
Instruction Manual
Page 2
... reproductions of labels on a circuit different from that interference will not occur in a residential installation. special handling may generate or use radio frequency energy. JVC KENWOOD Corporation 2967-3, ISHIKAWA-MACHI, HACHIOJI-SHI, TOKYO, JAPAN THIS PRODUCT COMPLIES WITH DHHS ...sticos. This equipment may cause harmful interference unless the modifications are designed to provide reasonable protection against harmful interference in a particular installation. A reciclagem e a eliminação de lixo de maneira apropriada ajudarão a conservar os recursos naturais ao ...
... reproductions of labels on a circuit different from that interference will not occur in a residential installation. special handling may generate or use radio frequency energy. JVC KENWOOD Corporation 2967-3, ISHIKAWA-MACHI, HACHIOJI-SHI, TOKYO, JAPAN THIS PRODUCT COMPLIES WITH DHHS ...sticos. This equipment may cause harmful interference unless the modifications are designed to provide reasonable protection against harmful interference in a particular installation. A reciclagem e a eliminação de lixo de maneira apropriada ajudarão a conservar os recursos naturais ao ...
Instruction Manual
Page 6
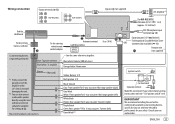
...important data has been backed up. How to read this manual • Operations are explained mainly using buttons on the faceplate of KW-R925BTS. • English indications are available on the dashboard. • The Lithium battery is especially important that takes your attention away ...11 BLUETOOTH® 14 AUX 20 AUDIO SETTINGS 20 DISPLAY SETTINGS 24 REFERENCES 26 Maintenance More information TROUBLESHOOTING 28 SPECIFICATIONS 30 INSTALLATION / CONNECTION 32 2 BEFORE USE IMPORTANT • To ensure proper use, please read through this manual before playing ...
...important data has been backed up. How to read this manual • Operations are explained mainly using buttons on the faceplate of KW-R925BTS. • English indications are available on the dashboard. • The Lithium battery is especially important that takes your attention away ...11 BLUETOOTH® 14 AUX 20 AUDIO SETTINGS 20 DISPLAY SETTINGS 24 REFERENCES 26 Maintenance More information TROUBLESHOOTING 28 SPECIFICATIONS 30 INSTALLATION / CONNECTION 32 2 BEFORE USE IMPORTANT • To ensure proper use, please read through this manual before playing ...
Instruction Manual
Page 11
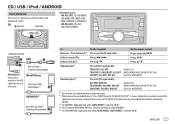
... 2.0 cable*1 (commercially available) KW-R925BTS: You can also install the latest version of the iPod/iPhone)*1 ANDROID*2 Micro USB 2.0 cable*1 (commercially available) To Reverse / Fast-forward*3 Select a track/file Select a folder*4 Repeat play*5 Random play*5 On the faceplate On the remote control Press and hold . Follow the instructions to install JVC MUSIC PLAY APP" is...
... 2.0 cable*1 (commercially available) KW-R925BTS: You can also install the latest version of the iPod/iPhone)*1 ANDROID*2 Micro USB 2.0 cable*1 (commercially available) To Reverse / Fast-forward*3 Select a track/file Select a folder*4 Repeat play*5 Random play*5 On the faceplate On the remote control Press and hold . Follow the instructions to install JVC MUSIC PLAY APP" is...

Instruction Manual
Page 12
...iPod, applicable only when [HEAD MODE] is selected. • For ANDROID, applicable only when [AUTO MODE] is other media player applications installed in the Android device. Select a file from this unit. AUTO MODE: Control Android device from this unit. Not applicable for a file ... A to Z, 0 to 9. • To return to 9/ OTHERS). - AUDIO MODE: Control Android device using the iPod itself via JVC MUSIC PLAY application installed in the following drive will be played back. • Selected internal or external memory of a smartphone (Mass Storage Class). • Selected...
...iPod, applicable only when [HEAD MODE] is selected. • For ANDROID, applicable only when [AUTO MODE] is other media player applications installed in the Android device. Select a file from this unit. AUTO MODE: Control Android device from this unit. Not applicable for a file ... A to Z, 0 to 9. • To return to 9/ OTHERS). - AUDIO MODE: Control Android device using the iPod itself via JVC MUSIC PLAY application installed in the following drive will be played back. • Selected internal or external memory of a smartphone (Mass Storage Class). • Selected...
Instruction Manual
Page 13
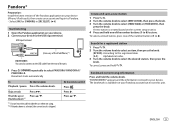
... press the knob. 3 Turn the volume knob to select PANDORA/ PANDORA-F/ PANDORA-R. USB input terminal and / or (Accessory of the iPod/iPhone)*1 KW-R925BTS: You can also connect to the USB cable from the rear of the unit. 3 Press repeatedly to select [FROM TRACK] or [FROM ARTIST],...then press the knob. The bookmark is created based on this unit. Press . Bookmark current song information Press and hold . Pandora® Preparation: Install the latest version of the Pandora application on your device (iPhone/ iPod touch), then create an account and log in [SRC SELECT]. ( 4) ...
... press the knob. 3 Turn the volume knob to select PANDORA/ PANDORA-F/ PANDORA-R. USB input terminal and / or (Accessory of the iPod/iPhone)*1 KW-R925BTS: You can also connect to the USB cable from the rear of the unit. 3 Press repeatedly to select [FROM TRACK] or [FROM ARTIST],...then press the knob. The bookmark is created based on this unit. Press . Bookmark current song information Press and hold . Pandora® Preparation: Install the latest version of the Pandora application on your device (iPhone/ iPod touch), then create an account and log in [SRC SELECT]. ( 4) ...
Instruction Manual
Page 14
iHeartRadio® Preparation: Install the latest version of the number buttons (2 to 6). 10 Press . On the remote control Press . Press I. Press T. To cancel, press and hold . • To store a ... to iHeartRadio. • Select [ON] for live station On the faceplate Press the volume knob. USB input terminal and / or (Accessory of the iPod/iPhone)* KW-R925BTS: You can search cities in [SRC SELECT]. ( 4) Start listening 1 Open the iHeartAuto application on your device to select the desired station, then press the knob...
iHeartRadio® Preparation: Install the latest version of the number buttons (2 to 6). 10 Press . On the remote control Press . Press I. Press T. To cancel, press and hold . • To store a ... to iHeartRadio. • Select [ON] for live station On the faceplate Press the volume knob. USB input terminal and / or (Accessory of the iPod/iPhone)* KW-R925BTS: You can search cities in [SRC SELECT]. ( 4) Start listening 1 Open the iHeartAuto application on your device to select the desired station, then press the knob...

Instruction Manual
Page 19
... is turned on the Android device ( 7) and [AUTO MODE] is selected ( 8). Press and hold or the Press and hold . Press . volume knob. BLUETOOTH - JVC MUSIC PLAY application is installed on . - [AUTO CNNT] is set to [ON]. ( 18) - Mobile phone Press the volume knob to the USB input terminal, pairing request (via Bluetooth...
... is turned on the Android device ( 7) and [AUTO MODE] is selected ( 8). Press and hold or the Press and hold . Press . volume knob. BLUETOOTH - JVC MUSIC PLAY application is installed on . - [AUTO CNNT] is set to [ON]. ( 18) - Mobile phone Press the volume knob to the USB input terminal, pairing request (via Bluetooth...
Instruction Manual
Page 32
...the connected Android device is unable to route the audio signal to unit. ( 27) ANDROID Cannot playback at [AUTO MODE]. • Make sure JVC MUSIC PLAY APP is intermittent or Turn off the developer options on the Android device and start playback. • If in supported formats. ( ... not • Check the connection between this does not solve the problem, the connected Android device does not support [AUTO MODE]. ( 27) Playback is installed on the Android device. ( 7) • Reconnect the Android device and select the appropriate control mode. ( 8) • If this does not solve ...
...the connected Android device is unable to route the audio signal to unit. ( 27) ANDROID Cannot playback at [AUTO MODE]. • Make sure JVC MUSIC PLAY APP is intermittent or Turn off the developer options on the Android device and start playback. • If in supported formats. ( ... not • Check the connection between this does not solve the problem, the connected Android device does not support [AUTO MODE]. ( 27) Playback is installed on the Android device. ( 7) • Reconnect the Android device and select the appropriate control mode. ( 8) • If this does not solve ...
Instruction Manual
Page 33
.... "NOT CONNCTD" Link to PRESS ENTER TO CONTINUE." Symptom Remedy "CHK ANTENNA" Check that the antenna and its limit. "CODE ERROR" Make sure you have installed the latest version of thumbs up /thumbs down is not deliverable. The selected channel is mounted outside the vehicle. Visit www.siriusxm.com for more...
.... "NOT CONNCTD" Link to PRESS ENTER TO CONTINUE." Symptom Remedy "CHK ANTENNA" Check that the antenna and its limit. "CODE ERROR" Make sure you have installed the latest version of thumbs up /thumbs down is not deliverable. The selected channel is mounted outside the vehicle. Visit www.siriusxm.com for more...

Instruction Manual
Page 35
... = 4 Ω) 22 W × 4 4 Ω - 8 Ω 4 000 mV/10 kΩ load ≤ 600 Ω General Operating Voltage (10.5 V - 16 V allowable) Maximum Current Consumption Operating Temperature Range Installation Size (W × H × D) Weight 14.4 V 10 A -10°C - +60°C 178 mm × 100 mm × 158 mm (7-1/16" × 3-15/16" × 6-1/4") 1.3 kg (3 lbs...
... = 4 Ω) 22 W × 4 4 Ω - 8 Ω 4 000 mV/10 kΩ load ≤ 600 Ω General Operating Voltage (10.5 V - 16 V allowable) Maximum Current Consumption Operating Temperature Range Installation Size (W × H × D) Weight 14.4 V 10 A -10°C - +60°C 178 mm × 100 mm × 158 mm (7-1/16" × 3-15/16" × 6-1/4") 1.3 kg (3 lbs...
Instruction Manual
Page 36
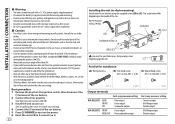
... blows, first make sure the wires are not touching car's chassis, then replace the old fuse with one that has the same rating. INSTALLATION / CONNECTION Warning • The unit can only be used with a 12 V DC power supply, negative ground. • Disconnect the battery.... ( 33) Car bracket Dashboard of the cars. Part list for installation (A) Wiring harness (B) Flat head screw (C) Round head screw M5 × 8 mm (M5 × 3/8") M5 × 8 mm (M5 × 3/8") Output terminals KW-R925BTS REAR FRONT SW KW-R920BTS FRONT REAR/SW For 2-way crossover setting : Rear output : Front...
... blows, first make sure the wires are not touching car's chassis, then replace the old fuse with one that has the same rating. INSTALLATION / CONNECTION Warning • The unit can only be used with a 12 V DC power supply, negative ground. • Disconnect the battery.... ( 33) Car bracket Dashboard of the cars. Part list for installation (A) Wiring harness (B) Flat head screw (C) Round head screw M5 × 8 mm (M5 × 3/8") M5 × 8 mm (M5 × 3/8") Output terminals KW-R925BTS REAR FRONT SW KW-R920BTS FRONT REAR/SW For 2-way crossover setting : Rear output : Front...
Instruction Manual
Page 37
... for your car audio dealer. Consult your safety. IMPORTANT We recommend installing the unit with a commercially available custom wiring harness specific for your car...setting, 22. Wiring connection Output terminals ( 32) Signal cord (not supplied) JVC Amplifier*1 Vehicle dashboard Factory wiring harness (vehicle) Custom wiring harness (separately purchased...crossover: Tweeter (right) Purple/black Green: Rear speaker*2/For 3-way crossover: Tweeter (left) Green/black *2 (For KW-R925BTS) USB cable (DC 5 V 1.5 A) (approx. 1.2 m/4 feet) MIC (Microphone input terminal) ( 14) Expansion...
... for your car audio dealer. Consult your safety. IMPORTANT We recommend installing the unit with a commercially available custom wiring harness specific for your car...setting, 22. Wiring connection Output terminals ( 32) Signal cord (not supplied) JVC Amplifier*1 Vehicle dashboard Factory wiring harness (vehicle) Custom wiring harness (separately purchased...crossover: Tweeter (right) Purple/black Green: Rear speaker*2/For 3-way crossover: Tweeter (left) Green/black *2 (For KW-R925BTS) USB cable (DC 5 V 1.5 A) (approx. 1.2 m/4 feet) MIC (Microphone input terminal) ( 14) Expansion...


