Instruction Manual
Page 16
...BLUETOOTH - Phonebook Access Profile (PBAP) - Advanced Audio Distribution Profile (A2DP) - Ensure that the passkey which appears on the display. Adjust the microphone angle 14 Pair a Bluetooth device When connecting a Bluetooth device to confirm pairing. Automatic pairing request is set to the USB input terminal, pairing ..."PAIRING" "PIN 0000" scrolls on the Bluetooth device. Press the volume knob to turn on the unit. 2 Search and select "JVC UNIT" on the display, enter the PIN code "0000" into the Bluetooth device. For some Bluetooth devices, you have confirmed the ...
...BLUETOOTH - Phonebook Access Profile (PBAP) - Advanced Audio Distribution Profile (A2DP) - Ensure that the passkey which appears on the display. Adjust the microphone angle 14 Pair a Bluetooth device When connecting a Bluetooth device to confirm pairing. Automatic pairing request is set to the USB input terminal, pairing ..."PAIRING" "PIN 0000" scrolls on the Bluetooth device. Press the volume knob to turn on the unit. 2 Search and select "JVC UNIT" on the display, enter the PIN code "0000" into the Bluetooth device. For some Bluetooth devices, you have confirmed the ...
Instruction Manual
Page 17
... turn off the unit or detach the faceplate, the Bluetooth connection is an incoming call . • This adjustment will not affect the volume of the microphone increases as the number increased. To Answer a call Reject a call End a call automatically if [AUTO ANSWER] is selected or activated. 4 Press to make a selection (see...
... turn off the unit or detach the faceplate, the Bluetooth connection is an incoming call . • This adjustment will not affect the volume of the microphone increases as the number increased. To Answer a call Reject a call End a call automatically if [AUTO ANSWER] is selected or activated. 4 Press to make a selection (see...
Instruction Manual
Page 28
... unit and Bluetooth device. • Delete pairing information from both the unit and the Bluetooth device, then perform pairing again. ( 14) • Adjust the microphone unit's position. ( 14) • Check the [ECHO CANCEL] setting. ( 15) • Reduce the distance between the unit and the Bluetooth audio player... and try the following: 1 Check TROUBLESHOOTING 2 Reset the unit ( 3) 3 Contact (USA only) Call: 1-800-252-5722 ( or ) visit: http://www.jvc.com Make sure the SiriusXM Vehicle Tuner is unavailable. If the message does not disappear, turn off , then turn on the unit and try to...
... unit and Bluetooth device. • Delete pairing information from both the unit and the Bluetooth device, then perform pairing again. ( 14) • Adjust the microphone unit's position. ( 14) • Check the [ECHO CANCEL] setting. ( 15) • Reduce the distance between the unit and the Bluetooth audio player... and try the following: 1 Check TROUBLESHOOTING 2 Reset the unit ( 3) 3 Contact (USA only) Call: 1-800-252-5722 ( or ) visit: http://www.jvc.com Make sure the SiriusXM Vehicle Tuner is unavailable. If the message does not disappear, turn off , then turn on the unit and try to...
Instruction Manual
Page 31
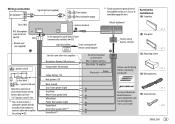
...Industries: www.scosche.com (E) Extraction key ENGLISH 29 Part list for installation (A) Faceplate Fuse (10 A) Antenna terminal Vehicle dashboard MIC (Microphone input terminal) ( 14) Remote wire (not supplied) Ignition switch Car fuse block Separate red wire Make this connection if your vehicle ...V ignition switch" wire. *2 You can also connect a subwoofer speaker directly using this lead without an external subwoofer amplifier. Wiring connection JVC Amplifier*1 Signal cord (not supplied) Front output Rear/subwoofer output *1 Firmly connect the ground wire of the amplifier to the car's...
...Industries: www.scosche.com (E) Extraction key ENGLISH 29 Part list for installation (A) Faceplate Fuse (10 A) Antenna terminal Vehicle dashboard MIC (Microphone input terminal) ( 14) Remote wire (not supplied) Ignition switch Car fuse block Separate red wire Make this connection if your vehicle ...V ignition switch" wire. *2 You can also connect a subwoofer speaker directly using this lead without an external subwoofer amplifier. Wiring connection JVC Amplifier*1 Signal cord (not supplied) Front output Rear/subwoofer output *1 Firmly connect the ground wire of the amplifier to the car's...
