Instruction Manual
Page 14
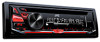
..., JAZZ, POP, R&B, TALK, USER, VOCAL BOOST, BASS BOOST, CLASSICAL, DANCE Use a 3-core plug head stereo mini plug for optimum audio output. Blue/white Black Brown Wiring harness of KS-BTA100. 14 Store your own sound settings 1 Press and hold . 2 Turn the volume knob to select an item ( 15), then press the...
..., JAZZ, POP, R&B, TALK, USER, VOCAL BOOST, BASS BOOST, CLASSICAL, DANCE Use a 3-core plug head stereo mini plug for optimum audio output. Blue/white Black Brown Wiring harness of KS-BTA100. 14 Store your own sound settings 1 Press and hold . 2 Turn the volume knob to select an item ( 15), then press the...
Instruction Manual
Page 17
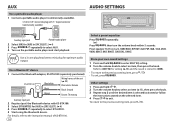
...; USER: The color you turn off . NIGHT: 15) SCROLL*2 ONCE: Scrolls the display information once. ; ENGLISH 17 DISPLAY SETTINGS KD-R775S KD-R670 / KD-R570 / KD-R470 / KD-R370 1 Press and hold . 2 Turn the volume knob to select an item (see the following table), then press the knob. 3 Repeat...for all primary colors for display and button illumination separately. OFF: Cancels. *1 The illumination control wire connection is turned off or on . OFF: Dimmer is required. ( 25) COLOR (for KD-R775S) PRESET Select color for [DISP ZONE], nothing appears on the selected item. 4 Press ...
...; USER: The color you turn off . NIGHT: 15) SCROLL*2 ONCE: Scrolls the display information once. ; ENGLISH 17 DISPLAY SETTINGS KD-R775S KD-R670 / KD-R570 / KD-R470 / KD-R370 1 Press and hold . 2 Turn the volume knob to select an item (see the following table), then press the knob. 3 Repeat...for all primary colors for display and button illumination separately. OFF: Cancels. *1 The illumination control wire connection is turned off or on . OFF: Dimmer is required. ( 25) COLOR (for KD-R775S) PRESET Select color for [DISP ZONE], nothing appears on the selected item. 4 Press ...

Instruction Manual
Page 20
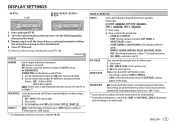
...NAME", or other information (eg. "IN DISC" appears. "CANNOT PLAY" flashes and/or connected device cannot be sure the terminals of the speaker wires are in which files were recorded (disc). REFERENCES Change the display information Each time you eject the disc. Disc cannot be heard. • ... Artist Song title Content information Category name Day/Clock (back to the optimum level. • Check the cords and connections. General "MISWIRING CHECK WIRING THEN PWR ON" appears. Send the unit to forcibly eject the disc. Source cannot be selected. Connect the antenna firmly. CD / USB /...
...NAME", or other information (eg. "IN DISC" appears. "CANNOT PLAY" flashes and/or connected device cannot be sure the terminals of the speaker wires are in which files were recorded (disc). REFERENCES Change the display information Each time you eject the disc. Disc cannot be heard. • ... Artist Song title Content information Category name Day/Clock (back to the optimum level. • Check the cords and connections. General "MISWIRING CHECK WIRING THEN PWR ON" appears. Send the unit to forcibly eject the disc. Source cannot be selected. Connect the antenna firmly. CD / USB /...
Instruction Manual
Page 24
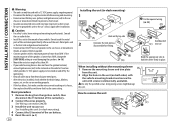
...firmly in -dash mounting). 4 Connect the terminal of the unit. on the car are working properly. • If the fuse blows, first make sure the wires are not touching car's chassis, then replace the old fuse with screws (commercially available). See Installing the unit (in place. If the maximum power of...(on the top side Orientate the trim plate as the heat sink and enclosure become hot. • Do not connect the wires of speakers to the car chassis or Ground wire (black), or connect them in -dash mounting) Hook on both sides) with the vehicle mounting bracket and secure the unit ...
...firmly in -dash mounting). 4 Connect the terminal of the unit. on the car are working properly. • If the fuse blows, first make sure the wires are not touching car's chassis, then replace the old fuse with screws (commercially available). See Installing the unit (in place. If the maximum power of...(on the top side Orientate the trim plate as the heat sink and enclosure become hot. • Do not connect the wires of speakers to the car chassis or Ground wire (black), or connect them in -dash mounting) Hook on both sides) with the vehicle mounting bracket and secure the unit ...

Instruction Manual
Page 25
... lead without an external subwoofer amplifier. KD-R775S KD-R670 KD-R570 / KD-R470 / KD-R370 Vehicle dashboard Output terminals Factory wiring harness (vehicle) To the steering wheel remote control adapter Antenna terminal Light blue/yellow STEERING WHEEL REMOTE Signal cord (not supplied) Fuse (10 A) JVC Amplifier*1 *1 Firmly connect the ground wire of the amplifier to the car's chassis...
... lead without an external subwoofer amplifier. KD-R775S KD-R670 KD-R570 / KD-R470 / KD-R370 Vehicle dashboard Output terminals Factory wiring harness (vehicle) To the steering wheel remote control adapter Antenna terminal Light blue/yellow STEERING WHEEL REMOTE Signal cord (not supplied) Fuse (10 A) JVC Amplifier*1 *1 Firmly connect the ground wire of the amplifier to the car's chassis...


