

User Manual
Page 2
...number located at our wesite http://go .jvc.com/HDTVSupport/. JVC, THE JVC LOGO, AND OTHER JVC TRADEMARKS ARE THE INTELLECTUAL PROPERTY OF JVC KENWOOD Corporation. Copyrights © 2011 AmTRAN Video Corporation. Changing the factory default picture setting or enabling other countries. IMAGES USED ARE ...FOR ILLUSTRATION PURPOSES ONLY. We recommend that you register your JVC LCD TV either at the back of the manual. Manufactured under license ...
...number located at our wesite http://go .jvc.com/HDTVSupport/. JVC, THE JVC LOGO, AND OTHER JVC TRADEMARKS ARE THE INTELLECTUAL PROPERTY OF JVC KENWOOD Corporation. Copyrights © 2011 AmTRAN Video Corporation. Changing the factory default picture setting or enabling other countries. IMAGES USED ARE ...FOR ILLUSTRATION PURPOSES ONLY. We recommend that you register your JVC LCD TV either at the back of the manual. Manufactured under license ...
User Manual
Page 5
... as practical. 26) The socket-outlet must be installed near the unit and easily accessible. Don't place TVs on or play with furniture and television sets. CHILD SAFETY: It Makes A Difference How and Where You Use TV Congratulations on dressers, bookcases, shelves, desks, speakers, chests or carts may fall over , or...
... as practical. 26) The socket-outlet must be installed near the unit and easily accessible. Don't place TVs on or play with furniture and television sets. CHILD SAFETY: It Makes A Difference How and Where You Use TV Congratulations on dressers, bookcases, shelves, desks, speakers, chests or carts may fall over , or...

User Manual
Page 8
...-CALL-FCC (1-888-225-5322) Fax: 1-866-418-0232; ENGLISH DTV Transition Advisory Important Safety Instructions As of analog television sets must connect a digital-to-analog converter box to the television set or subscribe to cable or satellite TV to digital broadcasting. As a result, owners of June 12, 2009, all U.S. television stations...
...-CALL-FCC (1-888-225-5322) Fax: 1-866-418-0232; ENGLISH DTV Transition Advisory Important Safety Instructions As of analog television sets must connect a digital-to-analog converter box to the television set or subscribe to cable or satellite TV to digital broadcasting. As a result, owners of June 12, 2009, all U.S. television stations...
User Manual
Page 9
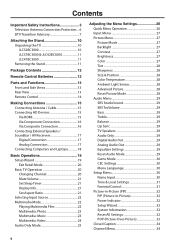
... Television Antenna Connection Protection.... 6 DTV Transition Advisory 7 Attaching the Stand 10 Unpacking the TV 10 JLC32BC3000 10 JLC37BC3000 & JLC42BC3000 11 JLC47BC3000 11 Removing the Stand 11 Package Contents 12 Remote Control Batteries 12 Parts and Functions 13 Front and Side Views 13 Rear View 13... 22 Playing Multimedia Files 22 Multimedia: Photo 23 Multimedia: Music 23 Multimedia: Video 24 Audio Only Mode 25 Adjusting the Menu Settings 26 Quick Menu Operation 26 Input Menu 27 Picture Menu 27 Picture Mode 27 Backlight 27 Contrast 27 Brightness 27 Color 27 Tint...
... Television Antenna Connection Protection.... 6 DTV Transition Advisory 7 Attaching the Stand 10 Unpacking the TV 10 JLC32BC3000 10 JLC37BC3000 & JLC42BC3000 11 JLC47BC3000 11 Removing the Stand 11 Package Contents 12 Remote Control Batteries 12 Parts and Functions 13 Front and Side Views 13 Rear View 13... 22 Playing Multimedia Files 22 Multimedia: Photo 23 Multimedia: Music 23 Multimedia: Video 24 Audio Only Mode 25 Adjusting the Menu Settings 26 Quick Menu Operation 26 Input Menu 27 Picture Menu 27 Picture Mode 27 Backlight 27 Contrast 27 Brightness 27 Color 27 Tint...
User Manual
Page 15
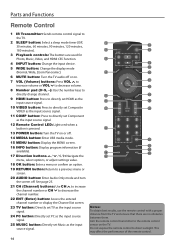
... the entered channel number or display the Channel list screen. 23 TV button: Directly set TV as the input source signal. 24 PC button: Directly set PC as the input source signal. 25 MUSIC button: Directly set Component as the input source signal. 1 12 2 13 SLEEP 3 MEDIA 14 MENU... Display the MENU screen. 16 INFO button: Display program information (if available). 17 Direction buttons / / / : Navigate the menu, select options, or adjust settings value. 18 OK button: Enter a menu or confirm an option. 19 RETURN button: Return to a previous menu or screen. 20 AUDIO button: Enter Audio...
... the entered channel number or display the Channel list screen. 23 TV button: Directly set TV as the input source signal. 24 PC button: Directly set PC as the input source signal. 25 MUSIC button: Directly set Component as the input source signal. 1 12 2 13 SLEEP 3 MEDIA 14 MENU... Display the MENU screen. 16 INFO button: Display program information (if available). 17 Direction buttons / / / : Navigate the menu, select options, or adjust settings value. 18 OK button: Enter a menu or confirm an option. 19 RETURN button: Return to a previous menu or screen. 20 AUDIO button: Enter Audio...
User Manual
Page 20
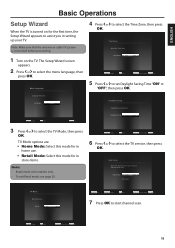
.... TV Mode options are: • Home Mode: Select this mode for in home use. • Retail Mode: Select this mode for in setting up your TV input and start channel scan. Change OK Select RETURN Previous Setup INFO Exit 6 Press or to start auto scan. Auto Scan Select...8226; To exit Retail mode, see page 20. Change OK Select RETURN Previous Setup INFO Exit 19 The Setup Wizard screen appears. 2 Press or to set Daylight Saving Time "ON" or "OFF", then press OK. Language Selection Language: English Daylight Saving Daylight Saving Selection. Note: Make sure that the antenna...
.... TV Mode options are: • Home Mode: Select this mode for in home use. • Retail Mode: Select this mode for in setting up your TV input and start channel scan. Change OK Select RETURN Previous Setup INFO Exit 6 Press or to start auto scan. Auto Scan Select...8226; To exit Retail mode, see page 20. Change OK Select RETURN Previous Setup INFO Exit 19 The Setup Wizard screen appears. 2 Press or to set Daylight Saving Time "ON" or "OFF", then press OK. Language Selection Language: English Daylight Saving Daylight Saving Selection. Note: Make sure that the antenna...
User Manual
Page 22
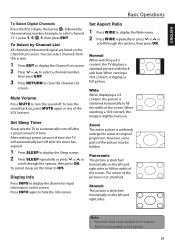
... then press _ , followed by Channel List All channels with black side bars. Mute Volume Press MUTE to scroll through the options, then press OK. Set Aspect Ratio 1 Press WIDE to display the Wide menu. 2 Press WIDE repeatedly or press or to turn the sound off after the timer has expired... is only available in 16:9 contents. 21 To Select by the remaining number. Set Sleep Timer Sleep sets the TV to scroll through the options, then press OK. After setting a preset amount of the screen. To cancel sleep, set the timer to hide the Info screen. Wide When displaying a 4:3 content, the...
... then press _ , followed by Channel List All channels with black side bars. Mute Volume Press MUTE to scroll through the options, then press OK. Set Aspect Ratio 1 Press WIDE to display the Wide menu. 2 Press WIDE repeatedly or press or to turn the sound off after the timer has expired... is only available in 16:9 contents. 21 To Select by the remaining number. Set Sleep Timer Sleep sets the TV to scroll through the options, then press OK. After setting a preset amount of the screen. To cancel sleep, set the timer to hide the Info screen. Wide When displaying a 4:3 content, the...

User Manual
Page 24
... Photo Photo PATH:/MMP/Photo/ File Name: P1130130 Resolution: 768x1024 Size: 113KB 1 2 Start Slideshow Sort: Newest First View: Thumbnails 3 Setting Browse Music 4 .. P1130130 P1130131 P1130132 P1130133 P1130134 P1130135 P1130136 Page 1 of 1 View: All 5 1 File directory: Displays the music files... Change view mode. The Nightingle 00:03:15 Sort: Track A-Z 4 Page 1 of 7 P1130137 5 1 Start Slideshow button: Play slide show settings. 5 Browse Music: Switch to select a file or function, then press OK. The Canary Prince 5. The Donkey 00:03:15 2 10....
... Photo Photo PATH:/MMP/Photo/ File Name: P1130130 Resolution: 768x1024 Size: 113KB 1 2 Start Slideshow Sort: Newest First View: Thumbnails 3 Setting Browse Music 4 .. P1130130 P1130131 P1130132 P1130133 P1130134 P1130135 P1130136 Page 1 of 1 View: All 5 1 File directory: Displays the music files... Change view mode. The Nightingle 00:03:15 Sort: Track A-Z 4 Page 1 of 7 P1130137 5 1 Start Slideshow button: Play slide show settings. 5 Browse Music: Switch to select a file or function, then press OK. The Canary Prince 5. The Donkey 00:03:15 2 10....
User Manual
Page 26
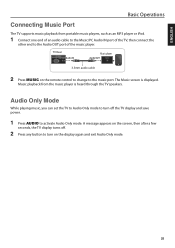
... to activate Audio Only mode. A message appears on the display again and exit Audio Only mode. 25 Audio Only Mode While playing music, you can set the TV to Audio Only mode to the music port. The Music screen is heard through the TV speakers.
... to activate Audio Only mode. A message appears on the display again and exit Audio Only mode. 25 Audio Only Mode While playing music, you can set the TV to Audio Only mode to the music port. The Music screen is heard through the TV speakers.
User Manual
Page 27
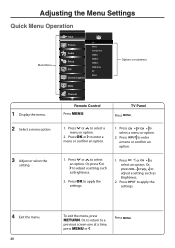
.... Press or to select an option. Press CH or CH to select an option. Press INPUT to adjust a setting, such as Brightness. 2. Press MENU. Adjusting the Menu Settings Quick Menu Operation Main Menu Input Picture Audio Setup PIP Closed Caption Wide Channel TV TV Video Component HDMI-1 HDMI-2...the menu. Or, press or to enter a menu or confirm an option. 3 Adjust or select the setting. 1. Press INPUT to adjust a setting, such as Brightness. 2. Or, press VOL _ or VOL + to apply the settings. 4 Exit the menu. 26 To exit the menu, press RETURN. Press CH or CH to select ...
.... Press or to select an option. Press CH or CH to select an option. Press INPUT to adjust a setting, such as Brightness. 2. Press MENU. Adjusting the Menu Settings Quick Menu Operation Main Menu Input Picture Audio Setup PIP Closed Caption Wide Channel TV TV Video Component HDMI-1 HDMI-2...the menu. Or, press or to enter a menu or confirm an option. 3 Adjust or select the setting. 1. Press INPUT to adjust a setting, such as Brightness. 2. Or, press VOL _ or VOL + to apply the settings. 4 Exit the menu. 26 To exit the menu, press RETURN. Press CH or CH to select ...
User Manual
Page 28
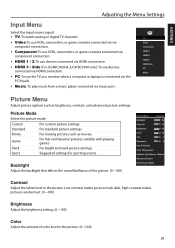
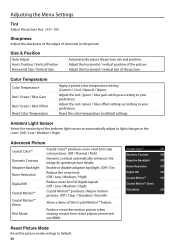
... • HDMI 3 / Side (For JLC4BC3000 & JLC47BC3000 only): To use devicePsIP connected via Picture composite connection. Input Picture Mode Select the picture mode. Suggested settings for sporting events. ENGLISH Adjusting the Menu Settings Input Menu Select the input source signal. Picture Picture...Audio Brightness 80 Movie Game Vivid Sport For moving pictures such as birghtness, contrast, and advanced picture settings. For standard picture settings. Color 60 Setup Tint 0 PIP Sharpness 8 Size & Position Color Temperature Closed Caption Ambient Light ...
... • HDMI 3 / Side (For JLC4BC3000 & JLC47BC3000 only): To use devicePsIP connected via Picture composite connection. Input Picture Mode Select the picture mode. Suggested settings for sporting events. ENGLISH Adjusting the Menu Settings Input Menu Select the input source signal. Picture Picture...Audio Brightness 80 Movie Game Vivid Sport For moving pictures such as birghtness, contrast, and advanced picture settings. For standard picture settings. Color 60 Setup Tint 0 PIP Sharpness 8 Size & Position Color Temperature Closed Caption Ambient Light ...
User Manual
Page 29
... Reduction Off Digital NR Off Crystal MotionTM Off Crystal MotionTM Demo Film Mode Off Reset Picture Mode Reset the picture mode setings to default settings. Adaptive Backlight Noise Reduction Digital NR Enable or disable adaptive backlight. (Off / On) Reduce the noise level. (Off / Low ... the color temperature to default. 28 Adjust the horizontal / vertical size of the picture. Adjust the red / green / blue offset settings according to light changes in the picture. Produce smoother motion picture when viewing movies from video players connected via HDMI. Size & Position ...
... Reduction Off Digital NR Off Crystal MotionTM Off Crystal MotionTM Demo Film Mode Off Reset Picture Mode Reset the picture mode setings to default settings. Adaptive Backlight Noise Reduction Digital NR Enable or disable adaptive backlight. (Off / On) Reduce the noise level. (Off / Low ... the color temperature to default. 28 Adjust the horizontal / vertical size of the picture. Adjust the red / green / blue offset settings according to light changes in the picture. Produce smoother motion picture when viewing movies from video players connected via HDMI. Size & Position ...
User Manual
Page 30
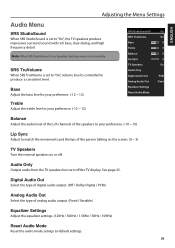
.... See page 25. SRS StudioSound HD On SRS TruVolume On Bass 0 Treble 0 Balance 0 Note: When SRS StudioSound is on, Equalizer Settings menu is not availablPe.IP Lip Sync 0 SRS TruVolume TV Speakers On Closed Caption Audio Only When SRS TruVolume is controlled to match the...of digital audio output. (Off / Dolby Digital / PCM) Analog Audio Out Select the type of analog audio output. (Fixed / Variable) Equalizer Settings Adjust the equalizer settings. (120Hz / 500Hz / 1.5KHz / 5KHz / 10KHz) Reset Audio Mode Reset the audio mode setings to "On", the TV speakers produce ...
.... See page 25. SRS StudioSound HD On SRS TruVolume On Bass 0 Treble 0 Balance 0 Note: When SRS StudioSound is on, Equalizer Settings menu is not availablPe.IP Lip Sync 0 SRS TruVolume TV Speakers On Closed Caption Audio Only When SRS TruVolume is controlled to match the...of digital audio output. (Off / Dolby Digital / PCM) Analog Audio Out Select the type of analog audio output. (Fixed / Variable) Equalizer Settings Adjust the equalizer settings. (120Hz / 500Hz / 1.5KHz / 5KHz / 10KHz) Reset Audio Mode Reset the audio mode setings to "On", the TV speakers produce ...
User Manual
Page 31
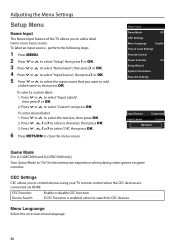
...Press or to control devices using your TV remote control when the CEC devices are connected via HDMI. Game Mode (For JLC42BC3000 and JLC47BC3000 only) Turn Game Mode to search for fast interactive experience when playing video games on game consoles. Menu Languange Select the on an... input source. Power Indicator On Setup Wizard System Information Reset All Settings To select a custom label: 1. Press , , or to close the menu screen. Input Source Component Input Labels Custom My Input 6 Press ...
...Press or to control devices using your TV remote control when the CEC devices are connected via HDMI. Game Mode (For JLC42BC3000 and JLC47BC3000 only) Turn Game Mode to search for fast interactive experience when playing video games on game consoles. Menu Languange Select the on an... input source. Power Indicator On Setup Wizard System Information Reset All Settings To select a custom label: 1. Press , , or to close the menu screen. Input Source Component Input Labels Custom My Input 6 Press ...

User Manual
Page 32
... Zone Select a location to enable rating. • "USA-TV": Set the rating by Channel Lock, TV Rating, or Movie Rating. Daylight Saving Enable or disable daylight saving time. Access Parental Control Menu The Parental Control ... channel. 4 Press to return to the previous screen or press RETURN to enter the submenu. Region Rating Block Unrated Shows Off Change Password Reset Parental Setting 31 Once locked channel is "0000". 5 Press or to select the submenu options, then press or OK to close the menu screen. Alt. OK Cancel...
... Zone Select a location to enable rating. • "USA-TV": Set the rating by Channel Lock, TV Rating, or Movie Rating. Daylight Saving Enable or disable daylight saving time. Access Parental Control Menu The Parental Control ... channel. 4 Press to return to the previous screen or press RETURN to enter the submenu. Region Rating Block Unrated Shows Off Change Password Reset Parental Setting 31 Once locked channel is "0000". 5 Press or to select the submenu options, then press or OK to close the menu screen. Alt. OK Cancel...
User Manual
Page 33
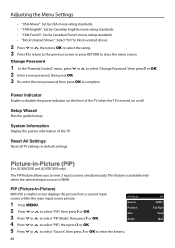
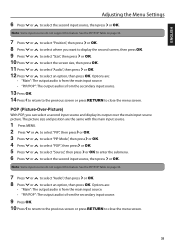
...simultaneousAlyu.dTihois feature is available only when the selected input source is turned on or off. Input Picture-in-Picture (PIP) (For JLC42BC3000 and JLC47BC3000 only) Picture The PIP feature allows you to close the menu screen. PIP PIP Mode 1 Press MENU. Source Position 2 Press or to ...select "PIP", then press or OK. System Information Display the system information of the TV when the TV is HDMI. Reset All Settings Reset all TV settings to enCtehratnhneebl menu. 32 PIP HDMI-1 Top Right Small Main PIP (Picture-In-Picture) Setup With PIP, a smaller screen displays the...
...simultaneousAlyu.dTihois feature is available only when the selected input source is turned on or off. Input Picture-in-Picture (PIP) (For JLC42BC3000 and JLC47BC3000 only) Picture The PIP feature allows you to close the menu screen. PIP PIP Mode 1 Press MENU. Source Position 2 Press or to ...select "PIP", then press or OK. System Information Display the system information of the TV when the TV is HDMI. Reset All Settings Reset all TV settings to enCtehratnhneebl menu. 32 PIP HDMI-1 Top Right Small Main PIP (Picture-In-Picture) Setup With PIP, a smaller screen displays the...
User Manual
Page 34
.... 7 Press or to select "Audio", then press or OK. 8 Press or to select the second input source, then press or OK. ENGLISH Adjusting the Menu Settings 6 Press or to select an option, then press OK. Options are : • "Main": The output audio is from the main input source. • "PIP/POP...
.... 7 Press or to select "Audio", then press or OK. 8 Press or to select the second input source, then press or OK. ENGLISH Adjusting the Menu Settings 6 Press or to select an option, then press OK. Options are : • "Main": The output audio is from the main input source. • "PIP/POP...

User Manual
Page 35
Picture Adjusting the Menu Settings Audio Closed Caption Setup Closed Caption decodes and displays closed caption data of television programs as text size and text color. PIP 1 Press MENU. Auto ...
Picture Adjusting the Menu Settings Audio Closed Caption Setup Closed Caption decodes and displays closed caption data of television programs as text size and text color. PIP 1 Press MENU. Auto ...

User Manual
Page 36
Added channels are listed on the menu screen. See page 21. 35 ENGLISH Adjusting the Menu Settings Partial Scan Channels You can partially scan for network signal within a specified range of channels. 1 Press MENU. 2 Press or to select "Partial Channel Scan", then ...
Added channels are listed on the menu screen. See page 21. 35 ENGLISH Adjusting the Menu Settings Partial Scan Channels You can partially scan for network signal within a specified range of channels. 1 Press MENU. 2 Press or to select "Partial Channel Scan", then ...
User Manual
Page 38
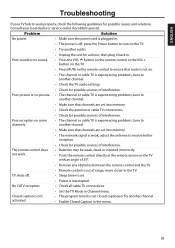
... solutions. Closed caption is not activated. • The program tuned is interrupted. Try another channel. • Check the TV audio settings. • Check for possible sources of interference. The remote control does not work properly, check the following guidelines for an hour, ... some channels. • The channel or cable TV is experiencing problems, tune to another channel. • Make sure that channels are set into memory. • Check the antenna or cable TV connections. • Check for possible sources of interference. No CATV reception. •...
... solutions. Closed caption is not activated. • The program tuned is interrupted. Try another channel. • Check the TV audio settings. • Check for possible sources of interference. The remote control does not work properly, check the following guidelines for an hour, ... some channels. • The channel or cable TV is experiencing problems, tune to another channel. • Make sure that channels are set into memory. • Check the antenna or cable TV connections. • Check for possible sources of interference. No CATV reception. •...


