Instructions
Page 5
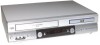
... GROUNDING ELECTRODE SYSTEM (NEC ART 250, PART H) CONDENSATION Moisture will be connected to file or cut the blade. And when this , let the DVD/VCR stand in . In such cases, change the location of cable entry as close to Article 820-40 of the NEC that the cable ground shall... from the AC outlet and plug it back in its new surroundings for about an hour before switching it on AC. To prevent this happens, DVD/VCR's performance will form in particular, specifies that provides guidelines for operation on , or make sure that the room temperature rises gradually. NOTES: •...
... GROUNDING ELECTRODE SYSTEM (NEC ART 250, PART H) CONDENSATION Moisture will be connected to file or cut the blade. And when this , let the DVD/VCR stand in . In such cases, change the location of cable entry as close to Article 820-40 of the NEC that the cable ground shall... from the AC outlet and plug it back in its new surroundings for about an hour before switching it on AC. To prevent this happens, DVD/VCR's performance will form in particular, specifies that provides guidelines for operation on , or make sure that the room temperature rises gradually. NOTES: •...
Instructions
Page 8
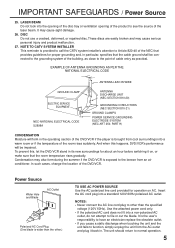
... OUT jack DVD COAXIAL DIGITAL AUDIO OUT jack DVD AUDIO (L/R) OUT jacks DVD S-VIDEO OUT jack 3/4 Channel Selector Switch DVD/VCR common AUDIO (L/R)/VIDEO OUT jacks DVD COMPONENT OUT jacks 8 R VCR CH VCR/DVD EJECT PLAY STOP OPEN/CLOSE REW FF REC DVD POWER button AUDIO (L/R)/ VIDEO IN jacks Remote sensor DVD indicator CHANNEL +/- AUDIO - Parts and functions Front VCR/DVD mode selector...
... OUT jack DVD COAXIAL DIGITAL AUDIO OUT jack DVD AUDIO (L/R) OUT jacks DVD S-VIDEO OUT jack 3/4 Channel Selector Switch DVD/VCR common AUDIO (L/R)/VIDEO OUT jacks DVD COMPONENT OUT jacks 8 R VCR CH VCR/DVD EJECT PLAY STOP OPEN/CLOSE REW FF REC DVD POWER button AUDIO (L/R)/ VIDEO IN jacks Remote sensor DVD indicator CHANNEL +/- AUDIO - Parts and functions Front VCR/DVD mode selector...
Instructions
Page 10
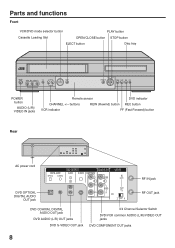
... Skip the unwanted short material of a remote controllable JVC TV by slide TV/ VCR/DVD switch to start recording at a preset time. 31,32 TV/VCR Switches between TV and VCR 18,29 TV POWER Turn the connected TV on the RCU of the other JVC RECEIVER/TV is not effective for the INDEX mark...48-52 CANCEL Delete Timer program 32 Cancel input data in playback mode 26 / Cursor buttons - SLOW A.MONITOR SET CANCEL SSEKAIRPCH VCR/DVD/TV JVC TV Remote Control This Remote can control a JVC TV only. • When you press the . So please note that the DVDkeys on or off 26,29,34,38 ...
... Skip the unwanted short material of a remote controllable JVC TV by slide TV/ VCR/DVD switch to start recording at a preset time. 31,32 TV/VCR Switches between TV and VCR 18,29 TV POWER Turn the connected TV on the RCU of the other JVC RECEIVER/TV is not effective for the INDEX mark...48-52 CANCEL Delete Timer program 32 Cancel input data in playback mode 26 / Cursor buttons - SLOW A.MONITOR SET CANCEL SSEKAIRPCH VCR/DVD/TV JVC TV Remote Control This Remote can control a JVC TV only. • When you press the . So please note that the DVDkeys on or off 26,29,34,38 ...

Instructions
Page 11
... intended to be operated with another JVC's VCR simultaneously arranging them side by side, the both recorders will appear on or off mode, press and hold PLAY for remote control If you can not be recharged; and SET +/- Otherwise, the DVD/VCR can change the remote control and DVD/VCR to follow the correct polarity when...
... intended to be operated with another JVC's VCR simultaneously arranging them side by side, the both recorders will appear on or off mode, press and hold PLAY for remote control If you can not be recharged; and SET +/- Otherwise, the DVD/VCR can change the remote control and DVD/VCR to follow the correct polarity when...
Instructions
Page 12
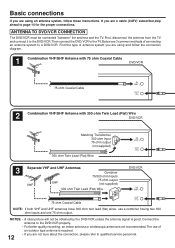
...you are not sure about the connection, please refer to the DVD/VCR properly. • For better quality recording, an indoor antenna or a telescopic antenna is good. ANTENNA TO DVD/VCR CONNECTION The DVD/VCR must be obtained by the DVD/VCR unless the antenna signal is not recommended.The use a combiner ...having two 300 ohm inputs and one 75 ohm output. Then connect the DVD/VCR to the DVD/VCR. Below are 3 common methods of connecting an antenna system to page 14 for the proper connections. NOTES: • A clear ...
...you are not sure about the connection, please refer to the DVD/VCR properly. • For better quality recording, an indoor antenna or a telescopic antenna is good. ANTENNA TO DVD/VCR CONNECTION The DVD/VCR must be obtained by the DVD/VCR unless the antenna signal is not recommended.The use a combiner ...having two 300 ohm inputs and one 75 ohm output. Then connect the DVD/VCR to the DVD/VCR. Below are 3 common methods of connecting an antenna system to page 14 for the proper connections. NOTES: • A clear ...
Instructions
Page 13
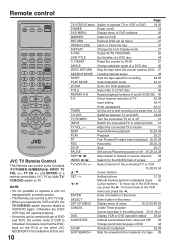
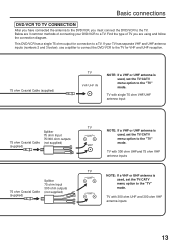
... option to a TV. Find the type of connecting your TV has separate VHF and UHF antenna inputs (numbers 2 and 3 below), use a splitter to connect the DVD/VCR to the TV for connection to the "TV" mode. VHF TV with 300 ohm UHFand 75 ohm VHF antenna inputs TV NOTE: If a VHF or... used , set the TV/CATV menu option to the "TV" mode. VHF TV with 300 ohm UHF and 300 ohm VHF antenna inputs 13 This DVD/VCR has a single 75 ohm output for VHF and UHF reception. 75 ohm Coaxial Cable (supplied) TV VHF/UHF IN NOTE: If a VHF or UHF antenna...
... option to a TV. Find the type of connecting your TV has separate VHF and UHF antenna inputs (numbers 2 and 3 below), use a splitter to connect the DVD/VCR to the TV for connection to the "TV" mode. VHF TV with 300 ohm UHFand 75 ohm VHF antenna inputs TV NOTE: If a VHF or... used , set the TV/CATV menu option to the "TV" mode. VHF TV with 300 ohm UHF and 300 ohm VHF antenna inputs 13 This DVD/VCR has a single 75 ohm output for VHF and UHF reception. 75 ohm Coaxial Cable (supplied) TV VHF/UHF IN NOTE: If a VHF or UHF antenna...
Instructions
Page 14
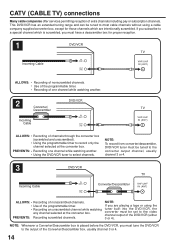
... Converter/Descrambler box, usually channel 3 or 4. 14 NOTE: Whenever a Converter/Descrambler box is scrambled, you must tune the DVD/VCR to a special channel which are playing a tape or using a cable company supplied converter box, except for those channels which is placed...ALLOWS: * Recording of nonscrambled channels. * Use of the programmable timer. * Recording of one channel while watching another . 2 Converter/ Descrambler Incoming Cable DVD/VCR IN (ANT.) OUT (TV) TV VHF/UHF IN (ANT) ALLOWS: * Recording of channels through the converter box (scrambled and unscrambled). * Using ...
... Converter/Descrambler box, usually channel 3 or 4. 14 NOTE: Whenever a Converter/Descrambler box is scrambled, you must tune the DVD/VCR to a special channel which are playing a tape or using a cable company supplied converter box, except for those channels which is placed...ALLOWS: * Recording of nonscrambled channels. * Use of the programmable timer. * Recording of one channel while watching another . 2 Converter/ Descrambler Incoming Cable DVD/VCR IN (ANT.) OUT (TV) TV VHF/UHF IN (ANT) ALLOWS: * Recording of channels through the converter box (scrambled and unscrambled). * Using ...

Instructions
Page 15
...* Recording of all channels through the converter box. * Recording a scrambled or unscrambled channel while watching another channel. * Using the DVD/VCR tuner to a cable system. PREVENTS: * Watching scrambled channels while recording another (scrambled or unscrambled) channel. * Using the programmable... premium channels through the converter box. Below are available from cable companies. Descrambler boxes are six common methods of connection. 4 Splitter DVD/VCR Incoming IN (ANT.) Cable Converter/Descrambler OUT (TV) A/B Switch A B TV VHF/UHF IN (ANT) ALLOWS: * Recording of...
...* Recording of all channels through the converter box. * Recording a scrambled or unscrambled channel while watching another channel. * Using the DVD/VCR tuner to a cable system. PREVENTS: * Watching scrambled channels while recording another (scrambled or unscrambled) channel. * Using the programmable... premium channels through the converter box. Below are available from cable companies. Descrambler boxes are six common methods of connection. 4 Splitter DVD/VCR Incoming IN (ANT.) Cable Converter/Descrambler OUT (TV) A/B Switch A B TV VHF/UHF IN (ANT) ALLOWS: * Recording of...

Instructions
Page 16
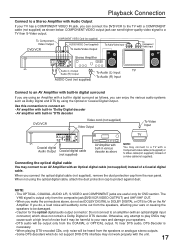
Check the Owner's Manual provided with each component for the location of each component. TV Audio (L) Output Video Output DVD/VCR DIGITAL AUDIO OPTICAL COAXIAL DVD OUTPUT AUDIO S-VIDEO COMPONENT L Y R PB/CB PR/CR VIDEO IN ( ANT.) L AUDIO OUT ( TV) R CH. 34 Audio (R) ...use to interconnect various video and audio components to a BS TUNER Satellite Antenna ANT. Connect to a TV with S-Video Output TV DVD/VCR S-Video Cord (not supplied) DIGITAL AUDIO OPTICAL COAXIAL DVD OUTPUT AUDIO S-VIDEO COMPONENT L Y R PB/CB PR/CR VIDEO IN ( ANT.) L AUDIO OUT ( TV) R CH...
Check the Owner's Manual provided with each component for the location of each component. TV Audio (L) Output Video Output DVD/VCR DIGITAL AUDIO OPTICAL COAXIAL DVD OUTPUT AUDIO S-VIDEO COMPONENT L Y R PB/CB PR/CR VIDEO IN ( ANT.) L AUDIO OUT ( TV) R CH. 34 Audio (R) ...use to interconnect various video and audio components to a BS TUNER Satellite Antenna ANT. Connect to a TV with S-Video Output TV DVD/VCR S-Video Cord (not supplied) DIGITAL AUDIO OPTICAL COAXIAL DVD OUTPUT AUDIO S-VIDEO COMPONENT L Y R PB/CB PR/CR VIDEO IN ( ANT.) L AUDIO OUT ( TV) R CH...
Instructions
Page 17
...When you connect the optical digital cable (not supplied), remove the dust protection cap from the COAXIAL or OPTICAL output. To Component Video Output DVD/VCR COMPONENT VIDEO Cord (not supplied) AUDIO/VIDEO Cord (supplied) To Audio/Video Output To Audio/Video Input To Component Video Input DIGITAL AUDIO ...speakers. • DTS audio will suddenly come out from the speakers, affecting your TV has a COMPONENT VIDEO IN jack, you can connect the DVD/VCR to the TV with a Component video cable(not supplied) or S-Video cable(not supplied) instead of a video cable(not supplied). If you do...
...When you connect the optical digital cable (not supplied), remove the dust protection cap from the COAXIAL or OPTICAL output. To Component Video Output DVD/VCR COMPONENT VIDEO Cord (not supplied) AUDIO/VIDEO Cord (supplied) To Audio/Video Output To Audio/Video Input To Component Video Input DIGITAL AUDIO ...speakers. • DTS audio will suddenly come out from the speakers, affecting your TV has a COMPONENT VIDEO IN jack, you can connect the DVD/VCR to the TV with a Component video cable(not supplied) or S-Video cable(not supplied) instead of a video cable(not supplied). If you do...
Instructions
Page 18
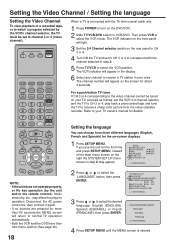
... then press ENTER. 4 Press SETUP MENU until the MENU screen is connected with the channel selected in step 3. 5 Press TV/VCR to select the VCR mode. TV VCR DVD POWER DVD MENU DISPLAY SP/EP PLAY MODE MARKER A.TRK SUB TITLE ZOOM RETURN OPEN/ CLOSE C.RESET ZERO RETURN ANGLE SEARCH MODE TITLE REPEAT... 4. 4 Turn ON the TV and set to receive a TV station in your area. Then press VCR to select the VCR position. Refer to normal TV operation automatically. • Both the VCR and the DVD have their own menu options (See page 36). 18 Setting the language You can choose from the video...
... then press ENTER. 4 Press SETUP MENU until the MENU screen is connected with the channel selected in step 3. 5 Press TV/VCR to select the VCR mode. TV VCR DVD POWER DVD MENU DISPLAY SP/EP PLAY MODE MARKER A.TRK SUB TITLE ZOOM RETURN OPEN/ CLOSE C.RESET ZERO RETURN ANGLE SEARCH MODE TITLE REPEAT... 4. 4 Turn ON the TV and set to receive a TV station in your area. Then press VCR to select the VCR position. Refer to normal TV operation automatically. • Both the VCR and the DVD have their own menu options (See page 36). 18 Setting the language You can choose from the video...

Instructions
Page 19
... up and when finished, the screen returns to normal. 〈+/-/ENTER/MENU〉 CH 002 19 In addition to normal VHF and UHF channels, this DVD/VCR with a channel memory feature which allows channels to skip up or down to the next channel set into memory, skipping over unwanted channels. CABLE TV... NOTE: You can not select "CH SET UP" if you set it to the video input mode. • Make sure TV/VCR/DVD switch has been slided to VCR/DVD. Tuner Setting This DVD/VCR is equipped with an antenna, set the TV/CATV menu option to the TV mode. Before selecting channels, they must be...
... up and when finished, the screen returns to normal. 〈+/-/ENTER/MENU〉 CH 002 19 In addition to normal VHF and UHF channels, this DVD/VCR with a channel memory feature which allows channels to skip up or down to the next channel set into memory, skipping over unwanted channels. CABLE TV... NOTE: You can not select "CH SET UP" if you set it to the video input mode. • Make sure TV/VCR/DVD switch has been slided to VCR/DVD. Tuner Setting This DVD/VCR is equipped with an antenna, set the TV/CATV menu option to the TV mode. Before selecting channels, they must be...

Instructions
Page 21
... set. • With cable box connection, if the Auto Clock Setting is unsuccessful, please select the PBS channel carrying the XDS information, then turn the DVD/VCR on P.19) is cleared. 21 Press or to select the SYSTEM SET UP menu, then press ENTER. 2 Press or to select the "STANDARD TIME"...on , and if the clock is off . Preparation: • You must set the clock manually. (See page 23) Canadian Viewers: Please see steps 1~2 on the DVD/VCR after the connections of two stations in some case the clock may recognize the wrong station for the AUTO CLOCK set. After 30 minutes, turn...
... set. • With cable box connection, if the Auto Clock Setting is unsuccessful, please select the PBS channel carrying the XDS information, then turn the DVD/VCR on P.19) is cleared. 21 Press or to select the SYSTEM SET UP menu, then press ENTER. 2 Press or to select the "STANDARD TIME"...on , and if the clock is off . Preparation: • You must set the clock manually. (See page 23) Canadian Viewers: Please see steps 1~2 on the DVD/VCR after the connections of two stations in some case the clock may recognize the wrong station for the AUTO CLOCK set. After 30 minutes, turn...
Instructions
Page 34
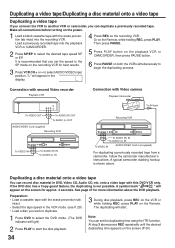
... 1 Load a blank cassette tape with this DVD/VCR only. It is shown above press REC repeatedly until the desired duplicating time appears on both the VCRs simultaneously to select the DVD mode. (The DVD indicator will appear in the VCR mode. (see P.28) • Load a... the camcorder manufacturer's instructions. Load a previously recorded tape into the recording VCR. "L" will light) 2 Press PLAY to start . 1 Press DVD to begin the duplicating process. Connection with second Video recorder Playback VCR Connection with the erase prevention tab intact. • Select the tape speed...
... 1 Load a blank cassette tape with this DVD/VCR only. It is shown above press REC repeatedly until the desired duplicating time appears on both the VCRs simultaneously to select the DVD mode. (The DVD indicator will appear in the VCR mode. (see P.28) • Load a... the camcorder manufacturer's instructions. Load a previously recorded tape into the recording VCR. "L" will light) 2 Press PLAY to start . 1 Press DVD to begin the duplicating process. Connection with second Video recorder Playback VCR Connection with the erase prevention tab intact. • Select the tape speed...

Instructions
Page 35
In case of this DVD/VCR. Chapter The titles can contain several items. These are recorded on a disc, the disc... 5 Removing Disc from center to prevent accidental erasure of disc. Cleaning Disc Wipe the disc with a Copy guard system. Some DVDs are : DVD, CD-R and CD-RW. Each section is called a "TITLE". Do not touch the surface of the disc. • ... strong disturbance may occur. Each section is called a "CHAPTER". This is divided into many sections. Do not play DVD-ROM, DVD-Audio, CDV, CD-G or Photo CD to edge. • Do not wipe the disc round. • Do ...
In case of this DVD/VCR. Chapter The titles can contain several items. These are recorded on a disc, the disc... 5 Removing Disc from center to prevent accidental erasure of disc. Cleaning Disc Wipe the disc with a Copy guard system. Some DVDs are : DVD, CD-R and CD-RW. Each section is called a "TITLE". Do not touch the surface of the disc. • ... strong disturbance may occur. Each section is called a "CHAPTER". This is divided into many sections. Do not play DVD-ROM, DVD-Audio, CDV, CD-G or Photo CD to edge. • Do not wipe the disc round. • Do ...
Instructions
Page 36
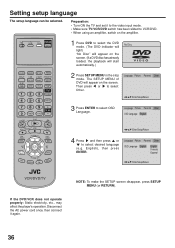
... once, then connect it to the video input mode. • Make sure TV/VCR/DVD switch has been slided to VCR/DVD. • When using an amplifier, switch on the screen. TV VCR DVD POWER DVD MENU DISPLAY SP/EP PLAY MODE MARKER A.TRK SUB TITLE ZOOM RETURN OPEN/ CLOSE ... Language Picture Parental Other OSD Language English English Francais Espanol /Enter/Setup/Return VCR/DVD/TV If the DVD/VCR does not operate properly: Static electricity, etc., may affect the player's operation. The SETUP MENU of DVD will start automatically.) No Disc 2 Press SETUP MENU in the stop mode. ...
... once, then connect it to the video input mode. • Make sure TV/VCR/DVD switch has been slided to VCR/DVD. • When using an amplifier, switch on the screen. TV VCR DVD POWER DVD MENU DISPLAY SP/EP PLAY MODE MARKER A.TRK SUB TITLE ZOOM RETURN OPEN/ CLOSE ... Language Picture Parental Other OSD Language English English Francais Espanol /Enter/Setup/Return VCR/DVD/TV If the DVD/VCR does not operate properly: Static electricity, etc., may affect the player's operation. The SETUP MENU of DVD will start automatically.) No Disc 2 Press SETUP MENU in the stop mode. ...

Instructions
Page 37
...heard from the scene point). • If you press STOP again(" " appears on the TV screen according to end playback. • The DVD/VCR memorizes the stopped point, depending on the screen for approx. 4 seconds. " " keep blinking in its proper position. 3 Press PLAY or OPEN...it to the video input mode. • Make sure TV/VCR/DVD switch has been slided to the disc contents the software producers designed, some playback features may be available. In this DVD/VCR plays DVDs according to VCR/DVD. TV VCR DVD POWER Playback procedure Preparation: • Turn ON the TV and...
...heard from the scene point). • If you press STOP again(" " appears on the TV screen according to end playback. • The DVD/VCR memorizes the stopped point, depending on the screen for approx. 4 seconds. " " keep blinking in its proper position. 3 Press PLAY or OPEN...it to the video input mode. • Make sure TV/VCR/DVD switch has been slided to the disc contents the software producers designed, some playback features may be available. In this DVD/VCR plays DVDs according to VCR/DVD. TV VCR DVD POWER Playback procedure Preparation: • Turn ON the TV and...

Instructions
Page 42
... through 9, and _ (under score). • Other letters than 200 files, it to the video input mode. • Make sure TV/VCR/DVD switch has been slided to VCR/ DVD. Use MP3 software that is standardized by ISO9660, its structure. • Music recorded by "Hierarchical File System" (HFS) cannot be played. .../0-9/Enter/Play Mode 5 Press STOP to display next track list. Press PLAY to select folder. The disc tray closes automatically and DVD/VCR turns off. Note: • During MP3-Playback, you need a Windows-PC with CD-ROM drive and a MP3encoding Software (not supplied).
... through 9, and _ (under score). • Other letters than 200 files, it to the video input mode. • Make sure TV/VCR/DVD switch has been slided to VCR/ DVD. Use MP3 software that is standardized by ISO9660, its structure. • Music recorded by "Hierarchical File System" (HFS) cannot be played. .../0-9/Enter/Play Mode 5 Press STOP to display next track list. Press PLAY to select folder. The disc tray closes automatically and DVD/VCR turns off. Note: • During MP3-Playback, you need a Windows-PC with CD-ROM drive and a MP3encoding Software (not supplied).

Instructions
Page 50
..., the setting is cleared. Then press or "Audio". /Enter/Setup/Return to select the OFF position. Setting surround sound This DVD/VCR equipped with a "SPATIALIZER 3-D STEREO" as the SURROUND option in the stop mode. MENU TIMER REC SET AUTO REPEAT ON OFF SAP ON OFF SURROUND ON ... press SETUP MENU. 2 Press or to select your unit even if you replace the disc or turn the power off. SLOW A.MONITOR SET CANCEL SSEKAIRPCH VCR/DVD/TV Note: • If the selected language is not recorded on the disc, the original language will be selected by your desired Audio Language, then...
..., the setting is cleared. Then press or "Audio". /Enter/Setup/Return to select the OFF position. Setting surround sound This DVD/VCR equipped with a "SPATIALIZER 3-D STEREO" as the SURROUND option in the stop mode. MENU TIMER REC SET AUTO REPEAT ON OFF SAP ON OFF SURROUND ON ... press SETUP MENU. 2 Press or to select your unit even if you replace the disc or turn the power off. SLOW A.MONITOR SET CANCEL SSEKAIRPCH VCR/DVD/TV Note: • If the selected language is not recorded on the disc, the original language will be selected by your desired Audio Language, then...
Instructions
Page 54
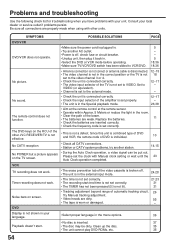
... is not lit). 21,23 31 31 Noise bars on the RCU of the beam. • The batteries are properly made when using with other JVC RECEIVER/TV is not effective. • This is not set correctly. Clean up the disc. 35 • The unit cannot play... is disconnected. 12~15 • The video channel is not in the menu options. 36 • No disc is set to - SYMPTOMS POSSIBLE SOLUTIONS PAGE DVD/VCR DVD/VCR does not operate. • Make sure the power cord is plugged in. • Try another station. 14,15 No POWER but a picture appears on the...
... is not lit). 21,23 31 31 Noise bars on the RCU of the beam. • The batteries are properly made when using with other JVC RECEIVER/TV is not effective. • This is not set correctly. Clean up the disc. 35 • The unit cannot play... is disconnected. 12~15 • The video channel is not in the menu options. 36 • No disc is set to - SYMPTOMS POSSIBLE SOLUTIONS PAGE DVD/VCR DVD/VCR does not operate. • Make sure the power cord is plugged in. • Try another station. 14,15 No POWER but a picture appears on the...


