Separate volume1
Page 1
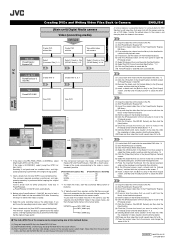
... user's guide of Japan, Limited LYT1411-001A 1004FOH-AL-VP Copy the video file folder (ex. Encoding is not performed on unedited video, and high-speed processing is [ECONOMY], select [Long Play NTSC (or PAL) DVD]. How To Create DVDs simply 1 Install CyberLink DVD Solution. PowerProducer 2 Gold NE starts automatically. 8 Load a blank DVD media into the recordable DVD drive. 4 Drag and drop the videos from the camera and connect it to save...
... user's guide of Japan, Limited LYT1411-001A 1004FOH-AL-VP Copy the video file folder (ex. Encoding is not performed on unedited video, and high-speed processing is [ECONOMY], select [Long Play NTSC (or PAL) DVD]. How To Create DVDs simply 1 Install CyberLink DVD Solution. PowerProducer 2 Gold NE starts automatically. 8 Load a blank DVD media into the recordable DVD drive. 4 Drag and drop the videos from the camera and connect it to save...
Separate volume1
Page 1
... recording mode as the edited video. After the completion of video creation, click the [Home] button. (10)If there are saved. If the video is performed while keeping the original image quality. The minimum required encoding is performed, and highspeed processing is [ECONOMY], select [Long Play NTSC (or PAL) DVD]. A (1) Copy the video files on the screen. *7 (9) Insert a check mark for [Burn to disc] in the [Final Output] screen...
... recording mode as the edited video. After the completion of video creation, click the [Home] button. (10)If there are saved. If the video is performed while keeping the original image quality. The minimum required encoding is performed, and highspeed processing is [ECONOMY], select [Long Play NTSC (or PAL) DVD]. A (1) Copy the video files on the screen. *7 (9) Insert a check mark for [Burn to disc] in the [Final Output] screen...

Separate volume2
Page 1
... display "MPG" on the PC Video files captured with the video file. Software Installation And USB Connection Guide Supplement - If one of 1GB or below are not supported. ● MultiMediaCards are not in the menu to turn on the index screen. Power supply 8 When a certain length of time passes without operation ● When using the AC adapter, the access lamp lights up, and the LCD turns off the SVRT function when editing the video files using this camera. when recording...
... display "MPG" on the PC Video files captured with the video file. Software Installation And USB Connection Guide Supplement - If one of 1GB or below are not supported. ● MultiMediaCards are not in the menu to turn on the index screen. Power supply 8 When a certain length of time passes without operation ● When using the AC adapter, the access lamp lights up, and the LCD turns off the SVRT function when editing the video files using this camera. when recording...

Separate volume1
Page 1
... image quality. *6 The correlation between the modes in PowerDirector Express NE and PowerProducer 2 Gold NE is presented below for playback. To play back the created video file in the camera, copy the video file into the recordable DVD drive. *3 (2) Start PowerProducer 2 Gold NE. (3) Click the [Produce Movie Disc] button. (4) Select the [DVD] button in the [Select Your Disc] screen to select the [Video quality], and then click the [➔] button. *6 (5) Click the [Video files] button...
... image quality. *6 The correlation between the modes in PowerDirector Express NE and PowerProducer 2 Gold NE is presented below for playback. To play back the created video file in the camera, copy the video file into the recordable DVD drive. *3 (2) Start PowerProducer 2 Gold NE. (3) Click the [Produce Movie Disc] button. (4) Select the [DVD] button in the [Select Your Disc] screen to select the [Video quality], and then click the [➔] button. *6 (5) Click the [Video files] button...
Instructions
Page 2
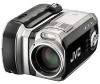
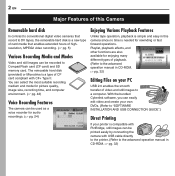
... mode for picture quality, image size, recording time, and computer environment. (੬ pg. 42) Voice Recording Features The camera can be used as a voice recorder for audio recordings. (੬ pg. 24) Enjoying Various Playback Features Unlike tape operation, playback is simple and easy in CD-ROM. ੬ pg. 32) Editing Files on your printer is compatible with PictBridge, still images can easily edit video and create your own DVDs. (Refer to "SOFTWARE INSTALLATION AND USB CONNECTION GUIDE".) Direct...
... mode for picture quality, image size, recording time, and computer environment. (੬ pg. 42) Voice Recording Features The camera can be used as a voice recorder for audio recordings. (੬ pg. 24) Enjoying Various Playback Features Unlike tape operation, playback is simple and easy in CD-ROM. ੬ pg. 32) Editing Files on your printer is compatible with PictBridge, still images can easily edit video and create your own DVDs. (Refer to "SOFTWARE INSTALLATION AND USB CONNECTION GUIDE".) Direct...
Instructions
Page 4
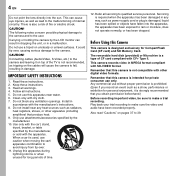
... water. 6. The removable hard disk (provided) or Microdrive is prohibited. (Even if you obtain permission beforehand.) Before recording important video, be sure to make sure the video and audio have fallen into the sun. Any commercial use a tripod on pages 37 to 39. There is intended for personal enjoyment, it is not compatible with CF+ Type II. Connecting cables (Audio/Video, S-Video, etc.) to the camera and leaving...
... water. 6. The removable hard disk (provided) or Microdrive is prohibited. (Even if you obtain permission beforehand.) Before recording important video, be sure to make sure the video and audio have fallen into the sun. Any commercial use a tripod on pages 37 to 39. There is intended for personal enjoyment, it is not compatible with CF+ Type II. Connecting cables (Audio/Video, S-Video, etc.) to the camera and leaving...

Instructions
Page 5
... discarding or giving away the removable hard disk. Be careful to completely delete data when discarding or giving away the removable hard disk, to erase all recorded data. in a cold location. However, this only modifies the file management information, and the data is released. To fix this problem, follow the messages displayed on the screen. (੬ pg. 36) ● To maintain high performance, perform check disks (error checks) using the same procedure as...
... discarding or giving away the removable hard disk. Be careful to completely delete data when discarding or giving away the removable hard disk, to erase all recorded data. in a cold location. However, this only modifies the file management information, and the data is released. To fix this problem, follow the messages displayed on the screen. (੬ pg. 36) ● To maintain high performance, perform check disks (error checks) using the same procedure as...

Instructions
Page 7
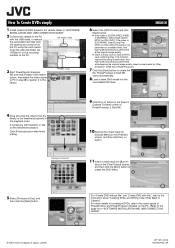
... Button (੬ pg. 19) B Mode Button [MODE] (੬ pg. 19) C Power Switch [OFF, , ] (੬ pg. 19) D Battery/CF Card Cover Open Switch [OPEN] (੬ pg. 14, 16) E Delete Button [ ] (੬ pg. 21, 23, 24) F Zoom Lever [T/W] (੬ pg. 20) Speaker Volume Control (੬ pg. 21) G Recording Start/Stop Button (੬ pg. 20) H Reverse Search Button [w (3)] (੬ pg. 21) Left Button [w] (੬ pg. 26) Flash Button [ ] (Used to the software installation and USB connection guide.) P Headphone connector [ ] (੬ pg. 13) Q S-Video/Audio/Video Output...
... Button (੬ pg. 19) B Mode Button [MODE] (੬ pg. 19) C Power Switch [OFF, , ] (੬ pg. 19) D Battery/CF Card Cover Open Switch [OPEN] (੬ pg. 14, 16) E Delete Button [ ] (੬ pg. 21, 23, 24) F Zoom Lever [T/W] (੬ pg. 20) Speaker Volume Control (੬ pg. 21) G Recording Start/Stop Button (੬ pg. 20) H Reverse Search Button [w (3)] (੬ pg. 21) Left Button [w] (੬ pg. 26) Flash Button [ ] (Used to the software installation and USB connection guide.) P Headphone connector [ ] (੬ pg. 13) Q S-Video/Audio/Video Output...
Instructions
Page 15
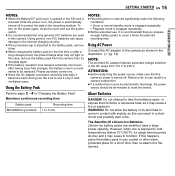
... battery packs to reset the device. GETTING STARTED EN 15 GETTING STARTED NOTES: ● When the Battery/CF card cover is opened or the SD card is removed while the power is on the power again, close the cover and use the power switch. ● It is recommended that the camera's power is turned off to protect the data in wellventilated areas. Using AC Power Connect the AC adapter to the camera...
... battery packs to reset the device. GETTING STARTED EN 15 GETTING STARTED NOTES: ● When the Battery/CF card cover is opened or the SD card is removed while the power is on the power again, close the cover and use the power switch. ● It is recommended that the camera's power is turned off to protect the data in wellventilated areas. Using AC Power Connect the AC adapter to the camera...
Instructions
Page 16
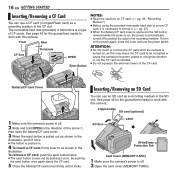
... eject button once again ejects the CF card. 5 Close the battery/CF card cover firmly until it once. To turn on CF card. (੬ pg. 38, "Recording Medium") ● Before using the provided removable hard disk or a new CF card, it is off . 2 Open the card cover (MEMORY CARD). See page 42 for the guaranteed media to work with this camera. Battery/CF Card Cover Inserting/Removing an SD Card You can use a CF card (CompactFlash card) as a recording...
... eject button once again ejects the CF card. 5 Close the battery/CF card cover firmly until it once. To turn on CF card. (੬ pg. 38, "Recording Medium") ● Before using the provided removable hard disk or a new CF card, it is off . 2 Open the card cover (MEMORY CARD). See page 42 for the guaranteed media to work with this camera. Battery/CF Card Cover Inserting/Removing an SD Card You can use a CF card (CompactFlash card) as a recording...

Instructions
Page 19
... the LCD monitor. 3 e( ) 2 MODE Lock Button Power/Charge Lamp Set the appropriate operation mode according to or while pressing down the lock button. Manual mode: Manual recording is selected, the indicator appears on . Auto mode: You can record using the power switch, MODE and e ( ) buttons. Playback Recording Power off the camera, set the power switch to your preference using no special effects or manual adjustments. To turn on the camera, set the power switch to OFF. 1 Power Switch 2 Recording/Playback Mode Press MODE to switch the auto/manual recording mode...
... the LCD monitor. 3 e( ) 2 MODE Lock Button Power/Charge Lamp Set the appropriate operation mode according to or while pressing down the lock button. Manual mode: Manual recording is selected, the indicator appears on . Auto mode: You can record using the power switch, MODE and e ( ) buttons. Playback Recording Power off the camera, set the power switch to your preference using no special effects or manual adjustments. To turn on the camera, set the power switch to OFF. 1 Power Switch 2 Recording/Playback Mode Press MODE to switch the auto/manual recording mode...

Instructions
Page 20
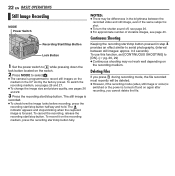
...] folder used for regular video. Instead, the files are not saved to the [SD_VIDEO] folder for saving files created on again, set the power switch to OFF, then to or . If the camera continues to heat up , the [REC] indicator flashes. 20 EN BASIC OPERATIONS Video Recording MODE Power Switch Zoom Lever Recording Start/Stop Button Lock Button 1 Set the power switch to while pressing down . (੬ pg. 36) ● When shooting continuously, shooting is automatically stopped when a file size of...
...] folder used for regular video. Instead, the files are not saved to the [SD_VIDEO] folder for saving files created on again, set the power switch to OFF, then to or . If the camera continues to heat up , the [REC] indicator flashes. 20 EN BASIC OPERATIONS Video Recording MODE Power Switch Zoom Lever Recording Start/Stop Button Lock Button 1 Set the power switch to while pressing down . (੬ pg. 36) ● When shooting continuously, shooting is automatically stopped when a file size of...
Instructions
Page 21
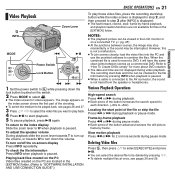
... play these video files, press the recording start playback. 5 To pause playback, press 49 again. To check the file information Press INFO when playback is not a malfunction. ● To join scenes cleanly, load the video files into the PC and use the provided software to combine the files. BASIC OPERATIONS EN 21 BASIC OPERATIONS Video Playback INFO Zoom Lever MODE 2 49 Power Switch Lock Button 36 5 1 Set the power switch to while pressing down the volume. The image appears on -screen display...
... play these video files, press the recording start playback. 5 To pause playback, press 49 again. To check the file information Press INFO when playback is not a malfunction. ● To join scenes cleanly, load the video files into the PC and use the provided software to combine the files. BASIC OPERATIONS EN 21 BASIC OPERATIONS Video Playback INFO Zoom Lever MODE 2 49 Power Switch Lock Button 36 5 1 Set the power switch to while pressing down the volume. The image appears on -screen display...
Instructions
Page 22
... stops blinking when the captured image is shot. ● To turn the shutter sound off and on the recording medium, press the recording start/stop button halfway and hold. NOTES: ● There may not work well depending on the medium in the brightness between the recorded video and still image, even if the same subject is focused. Deleting Files If you cannot delete the file. 22 EN BASIC OPERATIONS Still Image Recording MODE Power Switch Recording Start/Stop Button...
... stops blinking when the captured image is shot. ● To turn the shutter sound off and on the recording medium, press the recording start/stop button halfway and hold. NOTES: ● There may not work well depending on the medium in the brightness between the recorded video and still image, even if the same subject is focused. Deleting Files If you cannot delete the file. 22 EN BASIC OPERATIONS Still Image Recording MODE Power Switch Recording Start/Stop Button...
Instructions
Page 24
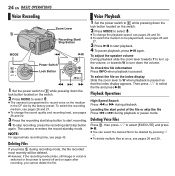
... BASIC OPERATIONS Voice Recording Voice Playback MODE Zoom Lever Recording Start/ Stop Button 2 49 Power Switch Lock Button 1 Set the power switch to while pressing down the lock button located on the switch. 2 Press MODE to select . ● To change the sound quality and recording level, see pages 26 and 30. 3 Press the recording start/stop button again. Locating the start playback. 4 To pause playback, press 49 again. The camera re-enters the record-standby mode. To adjust the speaker volume During playback...
... BASIC OPERATIONS Voice Recording Voice Playback MODE Zoom Lever Recording Start/ Stop Button 2 49 Power Switch Lock Button 1 Set the power switch to while pressing down the lock button located on the switch. 2 Press MODE to select . ● To change the sound quality and recording level, see pages 26 and 30. 3 Press the recording start/stop button again. Locating the start playback. 4 To pause playback, press 49 again. The camera re-enters the record-standby mode. To adjust the speaker volume During playback...

Instructions
Page 25
... turned off the displays.) NOTES: ● It is recommended to a TV or VCR Open the cover. Dubbing to a VCR 1 Perform step 1 to 6 above. 2 At the point you adjust the TV sound volume to the VCR's instruction manual.) 3 To stop dubbing, stop recording on the VCR, then stop playback on the VCR. (Refer to its VIDEO mode. BASIC OPERATIONS Connecting to use the AC Adapter as shown in the illustration. If using a VCR, go to step 4. 3 Connect the VCR output...
... turned off the displays.) NOTES: ● It is recommended to a TV or VCR Open the cover. Dubbing to a VCR 1 Perform step 1 to 6 above. 2 At the point you adjust the TV sound volume to the VCR's instruction manual.) 3 To stop dubbing, stop recording on the VCR, then stop playback on the VCR. (Refer to its VIDEO mode. BASIC OPERATIONS Connecting to use the AC Adapter as shown in the illustration. If using a VCR, go to step 4. 3 Connect the VCR output...

Instructions
Page 27
... image files between recording media in the CF or SD slot. ● You have to format the provided removable hard disk or newly-purchased CF cards and SD cards with this item is always displayed. This enables stable speeds and operation when accessing the recording medium. ON: Displays the counter during video mode. CLOCK ADJUST ੬ "Date/Time Settings" (੬ pg. 18) CLEAN UP [CF SLOT] / SD SLOT Writing speed of recording media tends to become slow...
... image files between recording media in the CF or SD slot. ● You have to format the provided removable hard disk or newly-purchased CF cards and SD cards with this item is always displayed. This enables stable speeds and operation when accessing the recording medium. ON: Displays the counter during video mode. CLOCK ADJUST ੬ "Date/Time Settings" (੬ pg. 18) CLEAN UP [CF SLOT] / SD SLOT Writing speed of recording media tends to become slow...

Instructions
Page 33
... hold MENU and MODE for video playback. HConnect the AC Adapter securely. (੬ pg. 14) ● The battery pack is set to the manual mode. There are periods of the hard disk is choppy. REFERENCES EN 33 Troubleshooting The camera is set to [10X] (optical zoom). HReplace with condensation. Digital zoom does not work. ● [ZOOM] is a microcomputer-controlled device. When the screen is under direct sunlight during shooting, the screen becomes red or black for a long time...
... hold MENU and MODE for video playback. HConnect the AC Adapter securely. (੬ pg. 14) ● The battery pack is set to the manual mode. There are periods of the hard disk is choppy. REFERENCES EN 33 Troubleshooting The camera is set to [10X] (optical zoom). HReplace with condensation. Digital zoom does not work. ● [ZOOM] is a microcomputer-controlled device. When the screen is under direct sunlight during shooting, the screen becomes red or black for a long time...
Instructions
Page 35
... set date/time is erased. (੬ pg. 18) LENS CAP Appears for file copy/move operation. NO IMAGE FILES STORED! NO VOICE FILES STORED! CHECK CARD'S WRITE PROTECTION SWITCH Appears when you attempt still image playback. Appears if there are no still image files when you attempt recording when the write protection tab on the screen. (Battery indicator) Displays the battery remaining power. THIS CARD IS NOT FOR CONTINUOUS SHOOTING Appears when the recording medium is exhausted, power turns...
... set date/time is erased. (੬ pg. 18) LENS CAP Appears for file copy/move operation. NO IMAGE FILES STORED! NO VOICE FILES STORED! CHECK CARD'S WRITE PROTECTION SWITCH Appears when you attempt still image playback. Appears if there are no still image files when you attempt recording when the write protection tab on the screen. (Battery indicator) Displays the battery remaining power. THIS CARD IS NOT FOR CONTINUOUS SHOOTING Appears when the recording medium is exhausted, power turns...
Instructions
Page 40
...°C to 50°C (-4°F to 122°F) Pickup 1/3.6" CCD Lens F 1.8 to 2.2, f = 4.5 mm to 45 mm, 10:1 power zoom lens Filter diameter ø30.5 mm LCD monitor 1.8" diagonally measured, LCD panel/TFT active matrix system Speaker Monaural Flash Within 2 m (recommended shooting distance) For video/audio Format SD-VIDEO Recording/Playback format Video: MPEG-2-PS Audio: Dolby Digital (2 ch) Signal format NTSC standard Recording mode (video) ULTRA FINE: 720 x 480 pixels, 8.5 Mbps (CBR) FINE: 720...
...°C to 50°C (-4°F to 122°F) Pickup 1/3.6" CCD Lens F 1.8 to 2.2, f = 4.5 mm to 45 mm, 10:1 power zoom lens Filter diameter ø30.5 mm LCD monitor 1.8" diagonally measured, LCD panel/TFT active matrix system Speaker Monaural Flash Within 2 m (recommended shooting distance) For video/audio Format SD-VIDEO Recording/Playback format Video: MPEG-2-PS Audio: Dolby Digital (2 ch) Signal format NTSC standard Recording mode (video) ULTRA FINE: 720 x 480 pixels, 8.5 Mbps (CBR) FINE: 720...


