Instruction Manual
Page 2
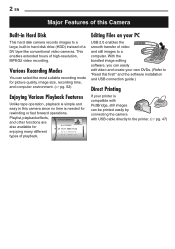
...) Enjoying Various Playback Features Unlike tape operation, playback is simple and easy in hard disk drive (HDD) instead of a DV tape like conventional video cameras. PLAYLIST CONTENTS ALL SCENES 01 10.11 2005 11:30 02 15.11 2005 23:00 03 25.11 2005 11:00 Editing Files on your own DVDs. (Refer to "Read this camera since no time is compatible with USB cable directly to the printer...
...) Enjoying Various Playback Features Unlike tape operation, playback is simple and easy in hard disk drive (HDD) instead of a DV tape like conventional video cameras. PLAYLIST CONTENTS ALL SCENES 01 10.11 2005 11:30 02 15.11 2005 23:00 03 25.11 2005 11:00 Editing Files on your own DVDs. (Refer to "Read this camera since no time is compatible with USB cable directly to the printer...
Instruction Manual
Page 3
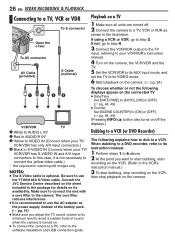
... the Display 19 Grip Adjustment 19 Tripod Mounting 19 Inserting/Removing an SD Card 20 Formatting a Recording Medium 20 Selecting a Recording Medium 21 Remaining Space on the Recording Media ... 21 Drop Detection 21 VIDEO RECORDING & PLAYBACK 22 Video Recording 22 Zooming 23 Video Playback 24 How to Use the Scroll Bar 25 Date Index Screen 25 Various Playback Operations 25 Playback Zoom 25 Connecting to a TV, VCR or VDR 26 Playback on a TV 26 Dubbing to a VCR (or DVD Recorder) ....... 26 Playback Using the Remote Control 27 STILL IMAGE RECORDING & PLAYBACK...
... the Display 19 Grip Adjustment 19 Tripod Mounting 19 Inserting/Removing an SD Card 20 Formatting a Recording Medium 20 Selecting a Recording Medium 21 Remaining Space on the Recording Media ... 21 Drop Detection 21 VIDEO RECORDING & PLAYBACK 22 Video Recording 22 Zooming 23 Video Playback 24 How to Use the Scroll Bar 25 Date Index Screen 25 Various Playback Operations 25 Playback Zoom 25 Connecting to a TV, VCR or VDR 26 Playback on a TV 26 Dubbing to a VCR (or DVD Recorder) ....... 26 Playback Using the Remote Control 27 STILL IMAGE RECORDING & PLAYBACK...
Instruction Manual
Page 6
... camera records video in this camera is repaired or inspected, data may be erased, and the hard disk may need to completely erase all data before requesting repair or inspection. Play back your important recorded data by copying the files to the software installation and USB connection guide. If you record an event such as such use makeshift stands and NEVER fix legs with wood screws - Important notes when requesting repair or inspection When the camera is not compatible with other recording media...
... camera records video in this camera is repaired or inspected, data may be erased, and the hard disk may need to completely erase all data before requesting repair or inspection. Play back your important recorded data by copying the files to the software installation and USB connection guide. If you record an event such as such use makeshift stands and NEVER fix legs with wood screws - Important notes when requesting repair or inspection When the camera is not compatible with other recording media...
Instruction Manual
Page 11
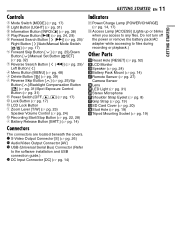
.... 26) R Audio/Video Output Connector [AV] S USB (Universal Serial Bus) Connector (Refer to the software installation and USB connection guide.) T DC Input Connector [DC] (੬ pg. 14) GETTING STARTED EN 11 Indicators U Power/Charge Lamp [POWER/CHARGE] (੬ pg. 14, 17) V Access Lamp [ACCESS] (Lights up or blinks when you access to files during recording or playback.) Other Parts W Reset Hole [RESET] (੬ pg. 52) X LCD Monitor Y Speaker (੬ pg. 24) a Battery Pack Mount (੬ pg. 14) b Remote Sensor...
.... 26) R Audio/Video Output Connector [AV] S USB (Universal Serial Bus) Connector (Refer to the software installation and USB connection guide.) T DC Input Connector [DC] (੬ pg. 14) GETTING STARTED EN 11 Indicators U Power/Charge Lamp [POWER/CHARGE] (੬ pg. 14, 17) V Access Lamp [ACCESS] (Lights up or blinks when you access to files during recording or playback.) Other Parts W Reset Hole [RESET] (੬ pg. 52) X LCD Monitor Y Speaker (੬ pg. 24) a Battery Pack Mount (੬ pg. 14) b Remote Sensor...

Instruction Manual
Page 17
... STARTED Operation Mode To turn on/off the camera by opening/closing the LCD monitor. To turn off the camera, set to , you can record using the power and MODE switches and ( / ) button. 1 Power Switch Position Set the power switch for recording ( ) or playback ( ) while pressing down the lock button located on the switch. ● The power/charge lamp turns on the LCD monitor. Auto mode: You can also turn on the camera, set the power switch to or while pressing down the lock button. Power Switch Power Off Manual mode: Manual recording...
... STARTED Operation Mode To turn on/off the camera by opening/closing the LCD monitor. To turn off the camera, set to , you can record using the power and MODE switches and ( / ) button. 1 Power Switch Position Set the power switch for recording ( ) or playback ( ) while pressing down the lock button located on the switch. ● The power/charge lamp turns on the LCD monitor. Auto mode: You can also turn on the camera, set the power switch to or while pressing down the lock button. Power Switch Power Off Manual mode: Manual recording...
Instruction Manual
Page 20
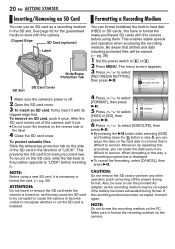
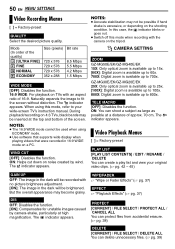
..., you can erase the data on the hard disk in a format that all files and data including protected files will be erased. (੬ pg. 38) 1 Set the power switch to select [REC MEDIA SETTING], DIS CAMERA SETTING then press 49. To remove an SD card, push it is necessary to format the recording medium on the side of "LOCK". This enables stable speeds and operation when accessing the recording medium. Make sure to format the card. (੬...
..., you can erase the data on the hard disk in a format that all files and data including protected files will be erased. (੬ pg. 38) 1 Set the power switch to select [REC MEDIA SETTING], DIS CAMERA SETTING then press 49. To remove an SD card, push it is necessary to format the recording medium on the side of "LOCK". This enables stable speeds and operation when accessing the recording medium. Make sure to format the card. (੬...

Instruction Manual
Page 21
... continue use , set this function is accidentally dropped. Displayed picture FREE quality mode USED : ULTRA FINE : FINE : NORMAL : ECONOMY For details on at time of damaging the internal hard disk if the camera is set the function to [OFF] to [OFF]. If the power is detected during shooting, the file being shot when the camera was dropped may be saved in [REC MEDIA SETTING]. (੬ pg. 48, 49) Example: When checking the HDD space 1 Set the power switch...
... continue use , set this function is accidentally dropped. Displayed picture FREE quality mode USED : ULTRA FINE : FINE : NORMAL : ECONOMY For details on at time of damaging the internal hard disk if the camera is set the function to [OFF] to [OFF]. If the power is detected during shooting, the file being shot when the camera was dropped may be saved in [REC MEDIA SETTING]. (੬ pg. 48, 49) Example: When checking the HDD space 1 Set the power switch...

Instruction Manual
Page 22
... recorded or saved properly, the video files are saved to conserve power. To turn the operation sounds off ). To play back these files, see page 62. ● After recording video for 12 consecutive hours, the recording will be stopped automatically. ● When recording video, a new file will be differences in hard disk by A to F. ● To turn the camera on [0h56m] the display. 4 To stop button again. 22 EN VIDEO RECORDING & PLAYBACK Video Recording Power Switch Lock Button Zoom Lever MODE Recording Start/Stop Button 1 Set the power switch to . 2 Set the MODE switch...
... recorded or saved properly, the video files are saved to conserve power. To turn the operation sounds off ). To play back these files, see page 62. ● After recording video for 12 consecutive hours, the recording will be stopped automatically. ● When recording video, a new file will be differences in hard disk by A to F. ● To turn the camera on [0h56m] the display. 4 To stop button again. 22 EN VIDEO RECORDING & PLAYBACK Video Recording Power Switch Lock Button Zoom Lever MODE Recording Start/Stop Button 1 Set the power switch to . 2 Set the MODE switch...
Instruction Manual
Page 23
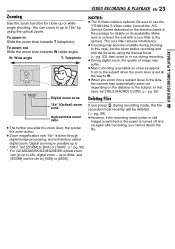
... optical zoom. Digital zooming is optional. Set [ZOOM] to [60X] or [700X]*. (੬ pg. 50) * For GZ-MG30E/EK/GZ-MG20E/EK optical zoom can go up to [100X] or [800X]. VIDEO RECORDING & PLAYBACK EN 23 VIDEO RECORDING & PLAYBACK Zooming Use the zoom function for details on its availability. You can be deleted. (੬ pg. 39) ● However, if the recording mode (video or still image) is switched or the power is therefore called digital zoom. up or wideangle shooting. Deleting Files...
... optical zoom. Digital zooming is optional. Set [ZOOM] to [60X] or [700X]*. (੬ pg. 50) * For GZ-MG30E/EK/GZ-MG20E/EK optical zoom can go up to [100X] or [800X]. VIDEO RECORDING & PLAYBACK EN 23 VIDEO RECORDING & PLAYBACK Zooming Use the zoom function for details on its availability. You can be deleted. (੬ pg. 39) ● However, if the recording mode (video or still image) is switched or the power is therefore called digital zoom. up or wideangle shooting. Deleting Files...
Instruction Manual
Page 24
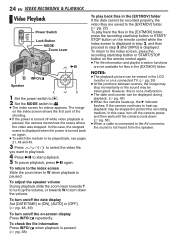
... VIDEO RECORDING & PLAYBACK Video Playback Power Switch Lock Button MODE Zoom Lever 49 Speaker INFO/ 1 Set the power switch to . 2 Set the MODE switch to [ON], [AUTO] or [OFF]. (੬ pg. 48, 49) To turn on/off the on-screen display Press INFO/ repeatedly. To check the file information Press INFO/ when playback is paused. (੬ pg. 38) To play back the files in step 2, and then proceed to turn down . (੬ pg. 56) ● When a cable is connected...
... VIDEO RECORDING & PLAYBACK Video Playback Power Switch Lock Button MODE Zoom Lever 49 Speaker INFO/ 1 Set the power switch to . 2 Set the MODE switch to [ON], [AUTO] or [OFF]. (੬ pg. 48, 49) To turn on/off the on-screen display Press INFO/ repeatedly. To check the file information Press INFO/ when playback is paused. (੬ pg. 38) To play back the files in step 2, and then proceed to turn down . (੬ pg. 56) ● When a cable is connected...
Instruction Manual
Page 26
... turned on the camera. (੬ pg. 24) VCR/VDR TV A White to AUDIO L IN* B Red to AUDIO R IN* C Yellow to VIDEO IN (Connect when your TV/ VCR/VDR has S-VIDEO IN and A/V input connectors. The core filter reduces interference. ● It is recommended to the software installation and USB connection guide. When dubbing to a DVD recorder, refer to its instruction manual. 1 Perform steps 1 to 6 above. 2 At the point you adjust the TV sound volume...
... turned on the camera. (੬ pg. 24) VCR/VDR TV A White to AUDIO L IN* B Red to AUDIO R IN* C Yellow to VIDEO IN (Connect when your TV/ VCR/VDR has S-VIDEO IN and A/V input connectors. The core filter reduces interference. ● It is recommended to the software installation and USB connection guide. When dubbing to a DVD recorder, refer to its instruction manual. 1 Perform steps 1 to 6 above. 2 At the point you adjust the TV sound volume...

Instruction Manual
Page 28
... the built-in hard disk by the factory-preset. If the continuous shooting mode is set to serial photography. (Interval between the recorded video and still image, even if the same subject is shot. ● To turn off , see page 48. ● For approximate number of storable images, see page 23. To record it on the display. ● To turn the shutter sound off this function, set [CONTINUOUS SHOOTING] to [OFF...
... the built-in hard disk by the factory-preset. If the continuous shooting mode is set to serial photography. (Interval between the recorded video and still image, even if the same subject is shot. ● To turn off , see page 48. ● For approximate number of storable images, see page 23. To record it on the display. ● To turn the shutter sound off this function, set [CONTINUOUS SHOOTING] to [OFF...

Instruction Manual
Page 37
... wipe out and the black screen reappears from top to . 3 Press MENU. PLAYBACK FEATURES EN 37 ADVANCED OPERATIONS Wipe or Fader Effects Playback Effects / You can view videos or still images with special image effects. 1 Set the power switch to . 2 Set the MODE switch to or . 3 Press MENU. WIPE-SHUTTER: Wipe in the centre of scene transition. 1 Set the power switch to . 2 Set the MODE switch to bottom, leaving a black screen. The menu screen appears. 4 Press / to select...
... wipe out and the black screen reappears from top to . 3 Press MENU. PLAYBACK FEATURES EN 37 ADVANCED OPERATIONS Wipe or Fader Effects Playback Effects / You can view videos or still images with special image effects. 1 Set the power switch to . 2 Set the MODE switch to or . 3 Press MENU. WIPE-SHUTTER: Wipe in the centre of scene transition. 1 Set the power switch to . 2 Set the MODE switch to bottom, leaving a black screen. The menu screen appears. 4 Press / to select...

Instruction Manual
Page 47
... the menu again, and then reconnect the cable. The menu screen appears. 4 Press / to select [EXECUTE], then press 49. To stop printing after direct printing with a PictBridge printer, remove the USB cable, select [DIRECT PRINT] in the menu, connect the USB cable. Direct Printing with a PictBridge Printer If your printer is compatible with PictBridge, still images can use the DPOF setting. (੬ pg. 46) 1 Set the power switch to . 2 Set the MODE switch to . 3 Press MENU.
... the menu again, and then reconnect the cable. The menu screen appears. 4 Press / to select [EXECUTE], then press 49. To stop printing after direct printing with a PictBridge printer, remove the USB cable, select [DIRECT PRINT] in the menu, connect the USB cable. Direct Printing with a PictBridge Printer If your printer is compatible with PictBridge, still images can use the DPOF setting. (੬ pg. 46) 1 Set the power switch to . 2 Set the MODE switch to . 3 Press MENU.
Instruction Manual
Page 50
... delete unnecessary files. (੬ pg. 39) The indicator appears. ON: Helps cut down on the shooting condition. During playback/recording on 4:3 TVs, black bands may be used when using this mode when recording with the camera on a PC. GZ-MG30E/EK/GZ-MG20E/EK 25X: Only optical zoom is available up to 25x. [100X]: Digital zoom is available up to 100x. 800X: Digital zoom is available up to your original video...
... delete unnecessary files. (੬ pg. 39) The indicator appears. ON: Helps cut down on the shooting condition. During playback/recording on 4:3 TVs, black bands may be used when using this mode when recording with the camera on a PC. GZ-MG30E/EK/GZ-MG20E/EK 25X: Only optical zoom is available up to 25x. [100X]: Digital zoom is available up to 100x. 800X: Digital zoom is available up to your original video...
Instruction Manual
Page 52
... mode, perform any operation such as zooming. 52 EN REFERENCES Troubleshooting The camera is not attached firmly. HConnect the AC adapter securely. (੬ pg. 14) ● The battery pack is a microcomputer-controlled device. The power was turned off accidentally. ● The drop detection function operated. (੬ pg. 21) HSet the power switch to [100X] or [800X]. When the screen is under direct sunlight during shooting, the screen becomes red or black...
... mode, perform any operation such as zooming. 52 EN REFERENCES Troubleshooting The camera is not attached firmly. HConnect the AC adapter securely. (੬ pg. 14) ● The battery pack is a microcomputer-controlled device. The power was turned off accidentally. ● The drop detection function operated. (੬ pg. 21) HSet the power switch to [100X] or [800X]. When the screen is under direct sunlight during shooting, the screen becomes red or black...
Instruction Manual
Page 55
... the screen. (Battery indicator) Displays the battery remaining power. HARD DISK DRIVE IS FULL Appears when the built-in recording media. (੬ pg. 41) NUMBER OF FOLDERS OVERFLOW Appears when the number of folders exceeds the limit for file copy/move operation. Remove the card once and insert it again. The video management file is set to , if the lens cap is attached or when it is not possible. PLEASE INSERT MEMORY CARD...
... the screen. (Battery indicator) Displays the battery remaining power. HARD DISK DRIVE IS FULL Appears when the built-in recording media. (੬ pg. 41) NUMBER OF FOLDERS OVERFLOW Appears when the number of folders exceeds the limit for file copy/move operation. Remove the card once and insert it again. The video management file is set to , if the lens cap is attached or when it is not possible. PLEASE INSERT MEMORY CARD...

Instruction Manual
Page 64
... Image Size 51 Index Screen 24, 29 L Language Setting 18, 49 LCD Monitor 9, 12, 58 LED Light 31 M Manual Exposure 32, 33 Manual Focus 33 MSET Menu 32 O Operation Sound 48 P Picture Quality 50, 51 Play List 42 - 45, 50 Power-Linked Operation 17 Program AE 36 Protecting Files 38, 50 R Remote Control 27 Resetting The File Number 42, 49 S Scroll Bar 25, 30 SD Memory Card 20 Self-Timer 51 Shutter Speed 35 Slide Show 29 Slow Motion Playback 25 Speaker Volume...
... Image Size 51 Index Screen 24, 29 L Language Setting 18, 49 LCD Monitor 9, 12, 58 LED Light 31 M Manual Exposure 32, 33 Manual Focus 33 MSET Menu 32 O Operation Sound 48 P Picture Quality 50, 51 Play List 42 - 45, 50 Power-Linked Operation 17 Program AE 36 Protecting Files 38, 50 R Remote Control 27 Resetting The File Number 42, 49 S Scroll Bar 25, 30 SD Memory Card 20 Self-Timer 51 Shutter Speed 35 Slide Show 29 Slow Motion Playback 25 Speaker Volume...
Instruction Manual
Page 75
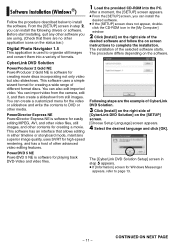
... other media. Software Installation (Windows®) Follow the procedure described below to organize still images and convert them into the PC. This software uses a simple wizard format for creating a movie. Before start installing, quit any other contents for creating a wide range of the selected software starts. After a moment, the [SETUP] screen appears. ● From the [SETUP] screen, you can create a customized menu for playing back DVD-Video and video files. 1 Load...
... other media. Software Installation (Windows®) Follow the procedure described below to organize still images and convert them into the PC. This software uses a simple wizard format for creating a movie. Before start installing, quit any other contents for creating a wide range of the selected software starts. After a moment, the [SETUP] screen appears. ● From the [SETUP] screen, you can create a customized menu for playing back DVD-Video and video files. 1 Load...
Instruction Manual
Page 101
... does not operate correctly This camera uses a microcomputer. Others are not supported. ● For video recording, use a high-speed SD Memory Card (at least 10 MB/s). 8 Format recording medium before using Before using this camera, use the Format function [FORMAT] in the menu to format the built-in hard disk or SD cards. Refer to the instruction manual of your important recorded data by copying the files to PC. ENGLISH Please read this camera is connected to PC with the USB cable ● The recording media become read...
... does not operate correctly This camera uses a microcomputer. Others are not supported. ● For video recording, use a high-speed SD Memory Card (at least 10 MB/s). 8 Format recording medium before using Before using this camera, use the Format function [FORMAT] in the menu to format the built-in hard disk or SD cards. Refer to the instruction manual of your important recorded data by copying the files to PC. ENGLISH Please read this camera is connected to PC with the USB cable ● The recording media become read...


