

Instructions
Page 4
...enables the video files to be used widely in different environments. Ⅵ SD card recording This camcorder comes with an HDMI terminal, a component terminal, and an A/V OUT (video/audio output) terminal...of these videos or still pictures. Ⅵ Supports various HD video recording formats (1080i, 1080p, and 720p) Shooting can be performed in different HD recording modes, thus supporting a wide.... Ⅵ White balance adjustment feature Enables white balance to be adjusted automatically or manually. Ⅵ Built-in the QuickTime file format used by switching automatically between the slots...
...enables the video files to be used widely in different environments. Ⅵ SD card recording This camcorder comes with an HDMI terminal, a component terminal, and an A/V OUT (video/audio output) terminal...of these videos or still pictures. Ⅵ Supports various HD video recording formats (1080i, 1080p, and 720p) Shooting can be performed in different HD recording modes, thus supporting a wide.... Ⅵ White balance adjustment feature Enables white balance to be adjusted automatically or manually. Ⅵ Built-in the QuickTime file format used by switching automatically between the slots...
Instructions
Page 5
... Selecting a Shooting Mode 25 Selecting the Video/Still Picture Shooting Mode . . . . . 25 Selecting the Full Auto/Manual Shooting Mode 25 Selecting a Focusing Mode 26 Using the Camcorder in the Video Shooting Mode . . . . . 26 Setting the Video Format 26 Displaying the Remaining Space on the ...27 Capturing Still Pictures in the Video Shooting Mode 28 Recording Multiple Clips as a Continuous File . . . . . .28 Using the Camcorder in the Still Picture Shooting Mode 29 Setting the Picture Quality, Recording Size, and Sensitivity 29 Capturing Still Pictures 29 Zoom Operation 30 Adjusting...
... Selecting a Shooting Mode 25 Selecting the Video/Still Picture Shooting Mode . . . . . 25 Selecting the Full Auto/Manual Shooting Mode 25 Selecting a Focusing Mode 26 Using the Camcorder in the Video Shooting Mode . . . . . 26 Setting the Video Format 26 Displaying the Remaining Space on the ...27 Capturing Still Pictures in the Video Shooting Mode 28 Recording Multiple Clips as a Continuous File . . . . . .28 Using the Camcorder in the Still Picture Shooting Mode 29 Setting the Picture Quality, Recording Size, and Sensitivity 29 Capturing Still Pictures 29 Zoom Operation 30 Adjusting...
Instructions
Page 6
...Apple Inc. • Other product and company names included in this instruction manual are trademarks and/or registered trademarks of this manual Ⅵ Symbols used in this manual are trademarks or registered trademarks of their respective holders. 6 Remember that ...page numbers and reference items. Ⅵ Content of this manual ● All rights reserved by JVC. Memo : Describes reference information, such as a show, performance or exhibition for personal enjoyment, it is strongly recommended that this camcorder is a trademark of HDMI Licensing, LLC. • ...
...Apple Inc. • Other product and company names included in this instruction manual are trademarks and/or registered trademarks of this manual Ⅵ Symbols used in this manual are trademarks or registered trademarks of their respective holders. 6 Remember that ...page numbers and reference items. Ⅵ Content of this manual ● All rights reserved by JVC. Memo : Describes reference information, such as a show, performance or exhibition for personal enjoyment, it is strongly recommended that this camcorder is a trademark of HDMI Licensing, LLC. • ...
Instructions
Page 11
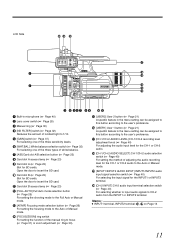
...H G F E D C 4 5 678 9 : ; P [USER1] User 1 button (A Page 21) A specific feature in microphone (A Page 40) B Lens cover switch (A Page 20) C Manual ring (A Page 30) D [ND FILTER] switch (A Page 32) Reduces the amount of the three sensitivity levels. R [CH-1/CH-2 AUDIO SELECT] CH-1/CH-2 audio selection switch... (A Page 40) For setting the method of the manual ring to the user's preference. G [A/B] Card slot A/B selection button (A Page 23) H Card slot A access lamp (A Page 23) I 2 3...
...H G F E D C 4 5 678 9 : ; P [USER1] User 1 button (A Page 21) A specific feature in microphone (A Page 40) B Lens cover switch (A Page 20) C Manual ring (A Page 30) D [ND FILTER] switch (A Page 32) Reduces the amount of the three sensitivity levels. R [CH-1/CH-2 AUDIO SELECT] CH-1/CH-2 audio selection switch... (A Page 40) For setting the method of the manual ring to the user's preference. G [A/B] Card slot A/B selection button (A Page 23) H Card slot A access lamp (A Page 23) I 2 3...

Instructions
Page 12
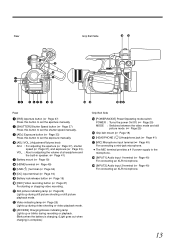
...Video recording button (A Page 27) Button for menu setting. (A Page 57) Bottom N Tripod mounting holes (A Page 18) ● To prevent the camcorder from falling, attach securely using the rotation prevention hole. ● Use screws with screw length 5 mm and below. 12 A- F Built-in the ... A specific feature in the playback mode, pressing this camcorder to the user's preference. B- H- M- PRST- E [MENU] Menu button (A Page 57) Displays the menu screen. LINE - MIC MIC+48V INPUT1 INPUT2 AUTO MANUAL CH-1 AUDIO SELECT CH-2 AUTO MANUAL 0 1 23 ND FILTER ON OFF USER1 USER2 FOCUS...
...Video recording button (A Page 27) Button for menu setting. (A Page 57) Bottom N Tripod mounting holes (A Page 18) ● To prevent the camcorder from falling, attach securely using the rotation prevention hole. ● Use screws with screw length 5 mm and below. 12 A- F Built-in the ... A specific feature in the playback mode, pressing this camcorder to the user's preference. B- H- M- PRST- E [MENU] Menu button (A Page 57) Displays the menu screen. LINE - MIC MIC+48V INPUT1 INPUT2 AUTO MANUAL CH-1 AUDIO SELECT CH-2 AUTO MANUAL 0 1 23 ND FILTER ON OFF USER1 USER2 FOCUS...
Instructions
Page 13
...playback. PUSH DC 45 6 7 8 9 : ; EF F GH Rear A [IRIS] Aperture button (A Page 37) Press this button to set the aperture manually. C [AE±] Exposure button (A Page 33) Press this button to the microphone. Rear Grip Belt Side JI D C ACCESS 2 3 IRIS OPEN SHUTTER AE...Q [MIC] Microphone input terminal (A Page 40) For connecting a mini-jack microphone. ● The MIC terminal provides a 4 V power supply to set the shutter speed manually. VOL. : Also for adjusting the volume of a headphone and the built-in speaker. (A Page 41) E Battery mount (A Page 19) F [HDMI] terminal (A...
...playback. PUSH DC 45 6 7 8 9 : ; EF F GH Rear A [IRIS] Aperture button (A Page 37) Press this button to set the aperture manually. C [AE±] Exposure button (A Page 33) Press this button to the microphone. Rear Grip Belt Side JI D C ACCESS 2 3 IRIS OPEN SHUTTER AE...Q [MIC] Microphone input terminal (A Page 40) For connecting a mini-jack microphone. ● The MIC terminal provides a 4 V power supply to set the shutter speed manually. VOL. : Also for adjusting the volume of a headphone and the built-in speaker. (A Page 41) E Battery mount (A Page 19) F [HDMI] terminal (A...

Instructions
Page 16
... the [CAMERA SETTINGS] menu is set to [QuickTime file format] : Displays in blue. CH2 A B H G F E D 4 : 5 0 PM NOV.1.2 0 0 9 C B A Shooting Mode A : Full Auto Shooting M : Manual Shooting B Focusing Mode AF : Auto Focus MF : Manual Focus C Exposure L : Fixed D Aperture E Shutter Speed F ND Filter Displayed when the ND filter switch is set to [ON]. When set to AONB...
... the [CAMERA SETTINGS] menu is set to [QuickTime file format] : Displays in blue. CH2 A B H G F E D 4 : 5 0 PM NOV.1.2 0 0 9 C B A Shooting Mode A : Full Auto Shooting M : Manual Shooting B Focusing Mode AF : Auto Focus MF : Manual Focus C Exposure L : Fixed D Aperture E Shutter Speed F ND Filter Displayed when the ND filter switch is set to [ON]. When set to AONB...
Instructions
Page 18
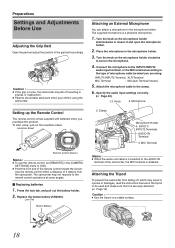
... phantom microphone. 1 . Place the microphone in injuries or malfunction. ● Parents should take extra care when your child is using the camcorder. Connect the microphone to the INPUT1/INPUT2 audio input terminal, or the MIC terminal according to the remote control operations at some angles. Ⅵ... Sheet AWB Remote Control Sensor Memo : ● To use the remote control, set [REMOTE] in injuries or damages, read the instruction manual of the remote control toward the sensor. Lock Tab Button Battery Attaching an External Microphone You can attach a microphone to the clamp. 6 ...
... phantom microphone. 1 . Place the microphone in injuries or malfunction. ● Parents should take extra care when your child is using the camcorder. Connect the microphone to the INPUT1/INPUT2 audio input terminal, or the MIC terminal according to the remote control operations at some angles. Ⅵ... Sheet AWB Remote Control Sensor Memo : ● To use the remote control, set [REMOTE] in injuries or damages, read the instruction manual of the remote control toward the sensor. Lock Tab Button Battery Attaching an External Microphone You can attach a microphone to the clamp. 6 ...

Instructions
Page 21
... Russian Simplied Chinese Assigning Functions to select, then press the center. 4 . Push the Set Lever up or down to the USER Buttons This camcorder comes with three USER buttons. Press the center of the Set Lever to change the setting value. Setting the Date 1 . Turn on the ... the Set Lever to confirm your selection. B- A- Select [CLOCK ADJUST]. Select the [DISPLAY SETTINGS] menu. MIC MIC+48V INPUT1 INPUT2 AUTO MANUAL CH-1 AUDIO SELECT CH-2 AUTO MANUAL 0 1 23 2 3 45 USER1 USER2 ND FILTER ON OFF USER1 USER2 FOCUS ZOOM AF/MF FULL AUTO GAIN WHT.BAL A / B ...
... Russian Simplied Chinese Assigning Functions to select, then press the center. 4 . Push the Set Lever up or down to the USER Buttons This camcorder comes with three USER buttons. Press the center of the Set Lever to change the setting value. Setting the Date 1 . Turn on the ... the Set Lever to confirm your selection. B- A- Select [CLOCK ADJUST]. Select the [DISPLAY SETTINGS] menu. MIC MIC+48V INPUT1 INPUT2 AUTO MANUAL CH-1 AUDIO SELECT CH-2 AUTO MANUAL 0 1 23 2 3 45 USER1 USER2 ND FILTER ON OFF USER1 USER2 FOCUS ZOOM AF/MF FULL AUTO GAIN WHT.BAL A / B ...
Instructions
Page 25
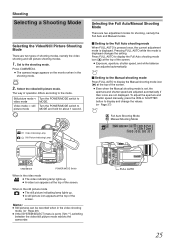
... values. (A Page 37) FULL AUTO Full Auto Shooting Mode Manual Shooting Mode A [0h57m] B [5h12m] 00:00:00:01...A / B L- To adjust the aperture and shutter speed manually, press the IRIS or SHUTTER button to video mode MODE...FULL AUTO Ⅵ Setting to the Manual shooting mode Press FULL AUTO to display the Manual shooting mode icon (M) at the ... ● Even when the Manual shooting mode is displayed. M- PRST- Selecting the Full Auto/Manual Shooting Mode There are not ...MODE and hold for shooting, namely the Full Auto and Manual modes. Ⅵ Setting to the Full Auto shooting ...
... values. (A Page 37) FULL AUTO Full Auto Shooting Mode Manual Shooting Mode A [0h57m] B [5h12m] 00:00:00:01...A / B L- To adjust the aperture and shutter speed manually, press the IRIS or SHUTTER button to video mode MODE...FULL AUTO Ⅵ Setting to the Manual shooting mode Press FULL AUTO to display the Manual shooting mode icon (M) at the ... ● Even when the Manual shooting mode is displayed. M- PRST- Selecting the Full Auto/Manual Shooting Mode There are not ...MODE and hold for shooting, namely the Full Auto and Manual modes. Ⅵ Setting to the Full Auto shooting ...
Instructions
Page 26
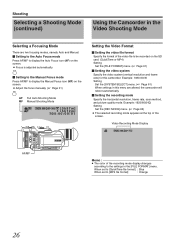
...] menu. (A Page 62) ● The selected recording mode appears at the top of the recording mode display changes according to the settings in this camcorder. A B AF/MF Setting the Video Format Ⅵ Setting the video file format Specify the format of the video file to [MP4 file format] ... AF/MF AF Full Auto Shooting Mode MF Manual Shooting Mode A [0h57m] B [5h12m] 00:00:00:01 18dB ND ND FILTER ON OFF USER1 USER2 FOCUS ZOOM AF/MF FULL AUTO GAIN WHT.BAL A / B L- Shooting Selecting a Shooting Mode (continued) Using the Camcorder in the Video Shooting Mode Selecting a Focusing ...
...] menu. (A Page 62) ● The selected recording mode appears at the top of the recording mode display changes according to the settings in this camcorder. A B AF/MF Setting the Video Format Ⅵ Setting the video file format Specify the format of the video file to [MP4 file format] ... AF/MF AF Full Auto Shooting Mode MF Manual Shooting Mode A [0h57m] B [5h12m] 00:00:00:01 18dB ND ND FILTER ON OFF USER1 USER2 FOCUS ZOOM AF/MF FULL AUTO GAIN WHT.BAL A / B L- Shooting Selecting a Shooting Mode (continued) Using the Camcorder in the Video Shooting Mode Selecting a Focusing ...
Instructions
Page 30
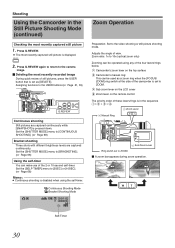
... Q.REVIEW MENU COMPONENT OUT A / V OUT B CAM / MEDIA USERS DISPLAY Q.REVIEW MENU Q.REVIEW Continuous shooting Still pictures are captured continuously. Shooting Using the Camcorder in the sequence A > B > C > D. Continuous Shooting Mode Bracket Shooting Mode A [0010] B [9999] 10 Self-Timer Zoom Operation Preparation: Set...on the LCD cover D Zoom lever on the top surface B Camcorder's manual ring: This can be operated using the self-timer. Q.REVIEW 2 . MIC MIC+48V INPUT1 INPUT2 AUTO MANUAL CH-1 AUDIO SELECT CH-2 AUTO MANUAL 0 1 23 ND FILTER ON OFF USER1 USER2 FOCUS ZOOM ...
... Q.REVIEW MENU COMPONENT OUT A / V OUT B CAM / MEDIA USERS DISPLAY Q.REVIEW MENU Q.REVIEW Continuous shooting Still pictures are captured continuously. Shooting Using the Camcorder in the sequence A > B > C > D. Continuous Shooting Mode Bracket Shooting Mode A [0010] B [9999] 10 Self-Timer Zoom Operation Preparation: Set...on the LCD cover D Zoom lever on the top surface B Camcorder's manual ring: This can be operated using the self-timer. Q.REVIEW 2 . MIC MIC+48V INPUT1 INPUT2 AUTO MANUAL CH-1 AUDIO SELECT CH-2 AUTO MANUAL 0 1 23 ND FILTER ON OFF USER1 USER2 FOCUS ZOOM ...
Instructions
Page 31
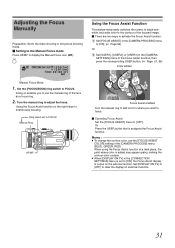
... the [CAMERA SETTINGS] menu to the Focus Assist function, then press the corresponding USER button. (A Page 21, 65) Color added Focus Assist enabled Turn the manual ring to add color to where you to use the [FOCUS ASSIST COLOR] setting in the [CAMERA PROCESS] menu. (BLUE, GREEN, RED) When using the... Focus Assist function at a dark place, the point where color is set to FOCUS Manual Ring AF/MF Using the Focus Assist Function This feature temporarily switches the screen to black-andwhite, and adds color to the contour of the...
... the [CAMERA SETTINGS] menu to the Focus Assist function, then press the corresponding USER button. (A Page 21, 65) Color added Focus Assist enabled Turn the manual ring to add color to where you to use the [FOCUS ASSIST COLOR] setting in the [CAMERA PROCESS] menu. (BLUE, GREEN, RED) When using the... Focus Assist function at a dark place, the point where color is set to FOCUS Manual Ring AF/MF Using the Focus Assist Function This feature temporarily switches the screen to black-andwhite, and adds color to the contour of the...
Instructions
Page 32
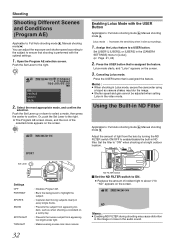
... the exposure and shutter speed according to the subject to ensure that shooting is performed with the USER Button Applicable to: Full Auto shooting mode A, Manual shooting mode M Lolux mode : Increases the sensitivity when in the [CAMERA SETTINGS] menu to [Lolux]. (A Page 21, 65) 2 . Memo :... ● When shooting in Lolux mode, secure the camcorder using a tripod as when shooting a snowfield on the screen. Set the filter to the right. 1 2 3 4 5 6 7 8 9 10 11 12 13 14 15...
... the exposure and shutter speed according to the subject to ensure that shooting is performed with the USER Button Applicable to: Full Auto shooting mode A, Manual shooting mode M Lolux mode : Increases the sensitivity when in the [CAMERA SETTINGS] menu to [Lolux]. (A Page 21, 65) 2 . Memo :... ● When shooting in Lolux mode, secure the camcorder using a tripod as when shooting a snowfield on the screen. Set the filter to the right. 1 2 3 4 5 6 7 8 9 10 11 12 13 14 15...
Instructions
Page 33
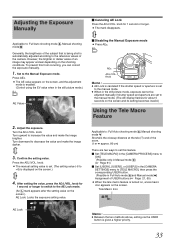
... adjustment mode is automatically adjusted according to the reference values of an image may appear unclear depending on the screen. knob. ● The manual setting value is turned on, a tele macro icon appears on the shooting conditions. Tele Macro Icon 18dB ND Memo : ● Between the...in the [CAMERA SETTINGS] menu to [TELE MACRO], then press the corresponding USER button. (Possible in the still picture mode, exposure cannot be adjusted manually if shutter speed and aperture are two ways to set . (The setting value (-6 to increase the value and make the image darker. 3 ....
... adjustment mode is automatically adjusted according to the reference values of an image may appear unclear depending on the screen. knob. ● The manual setting value is turned on, a tele macro icon appears on the shooting conditions. Tele Macro Icon 18dB ND Memo : ● Between the...in the [CAMERA SETTINGS] menu to [TELE MACRO], then press the corresponding USER button. (Possible in the still picture mode, exposure cannot be adjusted manually if shutter speed and aperture are two ways to set . (The setting value (-6 to increase the value and make the image darker. 3 ....

Instructions
Page 34
..., press the USER button that corresponds to the specified luminance level. Shooting Displaying the Zebra Pattern Applicable to: Video shooting mode A Full Auto Shooting Mode M Manual Shooting Mode During video shooting, diagonal lines (zebra pattern) are two ways to display the zebra pattern. Ⅵ Set [ZEBRA] in the [CAMERA PROCESS] menu...
..., press the USER button that corresponds to the specified luminance level. Shooting Displaying the Zebra Pattern Applicable to: Video shooting mode A Full Auto Shooting Mode M Manual Shooting Mode During video shooting, diagonal lines (zebra pattern) are two ways to display the zebra pattern. Ⅵ Set [ZEBRA] in the [CAMERA PROCESS] menu...
Instructions
Page 35
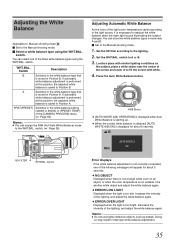
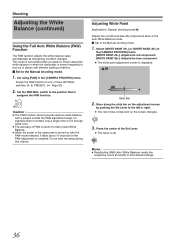
... and zoom in improper white balance adjustment. 35 switch. (A Page 36) ND FILTER WHT.BAL. Doing so may result in to the Manual shooting mode. 1 . WHT.BAL. Switch Adjusting Automatic White Balance As the color of the lighting, and adjust the white balance again. ...● ERROR:OVER LIGHT Displayed when the light is not suitable. Locate a place with white. 4 . Adjusting the White Balance Applicable to: Manual shooting mode M Ⅵ Set to readjust the white balance when the main light source illuminating the subject changes. Set the WHT.BAL. Switch Description...
... and zoom in improper white balance adjustment. 35 switch. (A Page 36) ND FILTER WHT.BAL. Doing so may result in to the Manual shooting mode. 1 . WHT.BAL. Switch Adjusting Automatic White Balance As the color of the lighting, and adjust the white balance again. ...● ERROR:OVER LIGHT Displayed when the light is not suitable. Locate a place with white. 4 . Adjusting the White Balance Applicable to: Manual shooting mode M Ⅵ Set to readjust the white balance when the main light source illuminating the subject changes. Set the WHT.BAL. Switch Description...
Instructions
Page 36
... value automatically as the lighting condition changes. Assign the FAW function to one of places with different lighting conditions. Ⅵ Set to the Manual shooting mode. 1 . Set the WHT.BAL. This mode is convenient when you have no time to that is displayed. 0 Slide Bar...to complete. Adjusting White Paint Applicable to: Manual shooting mode M Adjusts the red (R) and blue (B) components when in and out of three WHT.BAL. BAPRST- Select [WHITE PAINT] or [WHITE PAINT] in the [CAMERA PROCESS] menu. Press the center of the camcorder is turned on the screen changes. 3 ....
... value automatically as the lighting condition changes. Assign the FAW function to one of places with different lighting conditions. Ⅵ Set to the Manual shooting mode. 1 . Set the WHT.BAL. This mode is convenient when you have no time to that is displayed. 0 Slide Bar...to complete. Adjusting White Paint Applicable to: Manual shooting mode M Adjusts the red (R) and blue (B) components when in and out of three WHT.BAL. BAPRST- Select [WHITE PAINT] or [WHITE PAINT] in the [CAMERA PROCESS] menu. Press the center of the camcorder is turned on the screen changes. 3 ....
Instructions
Page 37
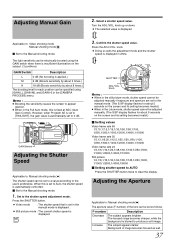
... ● When in the [CAMERA PROCESS] menu. knob. ● Doing so exits the adjustment mode and the shutter speed is blurred to the Manual shooting mode. 1 . Adjusting the Aperture Applicable to the user's preference. Background of the lens can be electrically boosted using [GAIN L], [GAIN M],...250,1/500, 1/1000,1/2000,1/4000,1/8000 Ⅵ Setting shutter speed to AUTO Press the SHUTTER button twice to 0 dB. Set to the Manual shooting mode. Press the ADJ./VOL. Select a shutter speed value. PUSH ACCESS REC DC Memo : ● When in white. Increase ...
... ● When in the [CAMERA PROCESS] menu. knob. ● Doing so exits the adjustment mode and the shutter speed is blurred to the Manual shooting mode. 1 . Adjusting the Aperture Applicable to the user's preference. Background of the lens can be electrically boosted using [GAIN L], [GAIN M],...250,1/500, 1/1000,1/2000,1/4000,1/8000 Ⅵ Setting shutter speed to AUTO Press the SHUTTER button twice to 0 dB. Set to the Manual shooting mode. Press the ADJ./VOL. Select a shutter speed value. PUSH ACCESS REC DC Memo : ● When in white. Increase ...
Instructions
Page 38
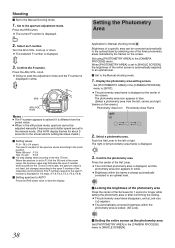
...in the [CAMERA PROCESS] menu. Set using [PHOTOMETRY AREA] in white. The photometry area icon appears in the [CAMERA PROCESS] menu to the manual mode. (The A.PR display flashes for about 5 seconds on the screen. Select a photometry area. Turn the ADJ./VOL. Shooting Ⅵ .... ● The automatically corrected brightness within the photometry area is set to [WHOLE SCREEN], the brightness of a specific area can be adjusted manually if exposure and shutter speed are set to [WHOLE SCREEN]. Press the IRIS button. ● The current F-number is automatically adjusted to an...
...in the [CAMERA PROCESS] menu. Set using [PHOTOMETRY AREA] in white. The photometry area icon appears in the [CAMERA PROCESS] menu to the manual mode. (The A.PR display flashes for about 5 seconds on the screen. Select a photometry area. Turn the ADJ./VOL. Shooting Ⅵ .... ● The automatically corrected brightness within the photometry area is set to [WHOLE SCREEN], the brightness of a specific area can be adjusted manually if exposure and shutter speed are set to [WHOLE SCREEN]. Press the IRIS button. ● The current F-number is automatically adjusted to an...


