
Instructions
Page 2
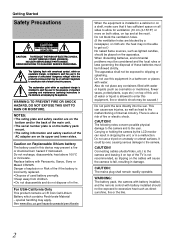
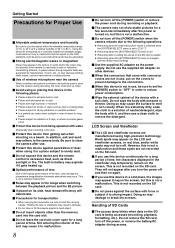
..., resulting in a bathroom or places with Panasonic, Sanyo, Sony or Maxell CR2025. Carrying or holding the camera by a newspaper, or cloth etc. Connecting cables (Audio/Video, etc.) to the camera and leaving it has sufficient space on all sides to allow for ventilation (10 cm (3-15/16") or more on both...
..., resulting in a bathroom or places with Panasonic, Sanyo, Sony or Maxell CR2025. Carrying or holding the camera by a newspaper, or cloth etc. Connecting cables (Audio/Video, etc.) to the camera and leaving it has sufficient space on all sides to allow for ventilation (10 cm (3-15/16") or more on both...

Instructions
Page 4
...to the camera image and playback image. Ⅵ Built-in or external microphone. Ⅵ Three video output terminals This camcorder comes with an HDMI terminal, a component terminal, and an A/V OUT (video/audio output) terminal, which support a wide variety of TV monitor types. Ⅵ Connection to PCs... settings files stored on an SD card, and also playback of these videos or still pictures. Ⅵ Supports various HD video recording formats (1080i, 1080p, and 720p) Shooting can also be loaded onto the camcorder according to the shooting scene to reproduce the most suitable settings. In ...
...to the camera image and playback image. Ⅵ Built-in or external microphone. Ⅵ Three video output terminals This camcorder comes with an HDMI terminal, a component terminal, and an A/V OUT (video/audio output) terminal, which support a wide variety of TV monitor types. Ⅵ Connection to PCs... settings files stored on an SD card, and also playback of these videos or still pictures. Ⅵ Supports various HD video recording formats (1080i, 1080p, and 720p) Shooting can also be loaded onto the camcorder according to the shooting scene to reproduce the most suitable settings. In ...
Instructions
Page 5
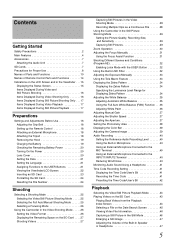
... Selecting a Shooting Mode 25 Selecting the Video/Still Picture Shooting Mode . . . . . 25 Selecting the Full Auto/Manual Shooting Mode 25 Selecting a Focusing Mode 26 Using the Camcorder in the Video Shooting Mode . . . . . 26 Setting the Video Format 26 Displaying the Remaining Space on ...the SD Card . . . . 27 Shooting Videos 27 Capturing Still Pictures in the Video Shooting Mode 28 Recording Multiple Clips as a Continuous ...
... Selecting a Shooting Mode 25 Selecting the Video/Still Picture Shooting Mode . . . . . 25 Selecting the Full Auto/Manual Shooting Mode 25 Selecting a Focusing Mode 26 Using the Camcorder in the Video Shooting Mode . . . . . 26 Setting the Video Format 26 Displaying the Remaining Space on ...the SD Card . . . . 27 Shooting Videos 27 Capturing Still Pictures in the Video Shooting Mode 28 Recording Multiple Clips as a Continuous ...
Instructions
Page 6
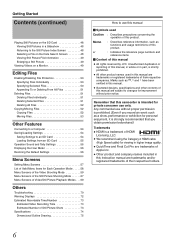
...Screen 48 Viewing Still Picture File Information 49 Enlarging a Still Picture 49 Viewing Videos on a Monitor 49 Editing Files Enabling/Disabling File Protection 50 Specifying Files ...Caution : Describes precautions concerning the operation of this manual ● All rights reserved by JVC. Memo : Describes reference information, such as functions and usage restrictions of this product. Marks...event such as ™, ா and have been omitted in this camcorder is strictly prohibited. ● All other contents of this instruction manual are trademarks or...
...Screen 48 Viewing Still Picture File Information 49 Enlarging a Still Picture 49 Viewing Videos on a Monitor 49 Editing Files Enabling/Disabling File Protection 50 Specifying Files ...Caution : Describes precautions concerning the operation of this manual ● All rights reserved by JVC. Memo : Describes reference information, such as functions and usage restrictions of this product. Marks...event such as ™, ா and have been omitted in this camcorder is strictly prohibited. ● All other contents of this instruction manual are trademarks or...
Instructions
Page 7
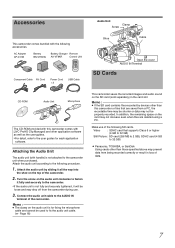
...Attaching the Audio Unit The audio unit (with [JVC ProHD Clip Manager] and other application software as well as the user guides. Attach the audio unit according to the camcorder unit when purchased. Connect the audio unit cable to the camcorder. In addition, the remaining space on the card... is not fully and securely tightened, it all the way into the shoe on the top of the camcorder. 2 . Video : SDHC card that are deleted using a PC. Accessories This camcorder comes bundled with this camcorder or files that supports Class 6 or higher (4 GB to 32 GB) Still Picture : SD card...
...Attaching the Audio Unit The audio unit (with [JVC ProHD Clip Manager] and other application software as well as the user guides. Attach the audio unit according to the camcorder unit when purchased. Connect the audio unit cable to the camcorder. In addition, the remaining space on the card... is not fully and securely tightened, it all the way into the shoe on the top of the camcorder. 2 . Video : SDHC card that are deleted using a PC. Accessories This camcorder comes bundled with this camcorder or files that supports Class 6 or higher (4 GB to 32 GB) Still Picture : SD card...
Instructions
Page 8
... is changed with connector covers are manufactured using high-precision technology. They will deteriorate. Ⅵ Precautions for transportation ● When carrying the camcorder, be sure to set the [POWER] switch to AOFFB in order to reduce power consumption. Ⅵ Wipe the external cabinet of the device...may explode if it gets heated up noise. Ⅵ Avoid using or placing this device in the following operations. ● Rebooting when the video/still picture mode is switched while the [SYSTEM SELECT] menu is not a camera malfunction. Ⅵ Noise may appear to lag on the ...
... is changed with connector covers are manufactured using high-precision technology. They will deteriorate. Ⅵ Precautions for transportation ● When carrying the camcorder, be sure to set the [POWER] switch to AOFFB in order to reduce power consumption. Ⅵ Wipe the external cabinet of the device...may explode if it gets heated up noise. Ⅵ Avoid using or placing this device in the following operations. ● Rebooting when the video/still picture mode is switched while the [SYSTEM SELECT] menu is not a camera malfunction. Ⅵ Noise may appear to lag on the ...

Instructions
Page 12
...playback mode, pressing this button displays the file information. (A Page 46) J [REC] Video recording button (A Page 27) Button for menu setting. (A Page 57) Bottom N Tripod mounting holes (A Page 18) ● To prevent the camcorder from falling, attach securely using the rotation prevention hole. ● Use screws with screw ...length 5 mm and below. 12 H- Press this camcorder to exit the menu screen. I [DISPLAY] Display button For switching the displays on the SD card (A Page 27) and the...
...playback mode, pressing this button displays the file information. (A Page 46) J [REC] Video recording button (A Page 27) Button for menu setting. (A Page 57) Bottom N Tripod mounting holes (A Page 18) ● To prevent the camcorder from falling, attach securely using the rotation prevention hole. ● Use screws with screw ...length 5 mm and below. 12 H- Press this camcorder to exit the menu screen. I [DISPLAY] Display button For switching the displays on the SD card (A Page 27) and the...
Instructions
Page 13
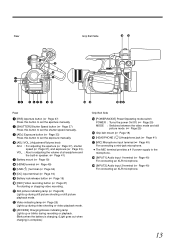
...is complete.) Grip Belt Side N [POWER/MODE] Power/Operating mode switch POWER : Turns the power On/Off. (A Page 20) MODE : Switches between the video mode and still picture mode. (A Page 25) O Grip belt mount (A Page 18) P [HEADPHONE ( )] Headphone jack (A Page 41) Q [MIC] ... (A Page 37), shutter speed (A Page 37), and exposure (A Page 33). K Still picture indicating lamp (A Page 25) Lights up during video shooting or video playback mode. L Video indicating lamp (A Page 25) Lights up during recording or playback. S [INPUT2] Audio input 2 terminal (A Page 40) For connecting an XLR...
...is complete.) Grip Belt Side N [POWER/MODE] Power/Operating mode switch POWER : Turns the power On/Off. (A Page 20) MODE : Switches between the video mode and still picture mode. (A Page 25) O Grip belt mount (A Page 18) P [HEADPHONE ( )] Headphone jack (A Page 41) Q [MIC] ... (A Page 37), shutter speed (A Page 37), and exposure (A Page 33). K Still picture indicating lamp (A Page 25) Lights up during video shooting or video playback mode. L Video indicating lamp (A Page 25) Lights up during recording or playback. S [INPUT2] Audio input 2 terminal (A Page 40) For connecting an XLR...
Instructions
Page 14
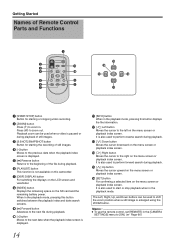
...Getting Started Names of still images. SET 6 : 7 9 8 F G C SET E D A [START/STOP] button Button for starting or stopping video recording. Press (W) to the beginning of still images. E [/] Reverse button Returns to zoom out. When in the playback mode, pressing this button displays the...the remaining space on the menu screen or playback index screen. M [ ] Down button Moves the cursor downward on this camcorder. F [PLAYLIST] button This function is also used when a video is displayed. I [0] Forward button Advances to [ON]. (A Page 66) 14 K [INFO] button When in the ...
...Getting Started Names of still images. SET 6 : 7 9 8 F G C SET E D A [START/STOP] button Button for starting or stopping video recording. Press (W) to the beginning of still images. E [/] Reverse button Returns to zoom out. When in the playback mode, pressing this button displays the...the remaining space on the menu screen or playback index screen. M [ ] Down button Moves the cursor downward on this camcorder. F [PLAYLIST] button This function is also used when a video is displayed. I [0] Forward button Advances to [ON]. (A Page 66) 14 K [INFO] button When in the ...
Instructions
Page 15
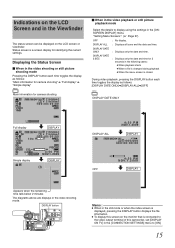
...in the still mode or when the index screen is displayed, pressing the DISPLAY button displays the file information. ● To display this camcorder, set [DISPLAY ON TV] in the [CONNECTION SETTINGS] menu to display using the settings in the Viewfinder The status screen can be ..."Simple display" DISPLAY Main information for camera shooting ±0 F5.6 1/4000 18dB A [1h56m] B [1h56m] 00:00:00:00 Ⅵ When in the video shooting mode. DISPLAY DATE ONLY : Displays only the date and time. Status screen is a screen display for 5 seconds in the following cases: ● When playback...
...in the still mode or when the index screen is displayed, pressing the DISPLAY button displays the file information. ● To display this camcorder, set [DISPLAY ON TV] in the [CONNECTION SETTINGS] menu to display using the settings in the Viewfinder The status screen can be ..."Simple display" DISPLAY Main information for camera shooting ±0 F5.6 1/4000 18dB A [1h56m] B [1h56m] 00:00:00:00 Ⅵ When in the video shooting mode. DISPLAY DATE ONLY : Displays only the date and time. Status screen is a screen display for 5 seconds in the following cases: ● When playback...

Instructions
Page 16
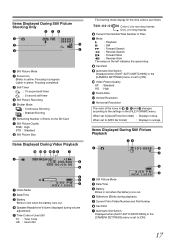
... by the card icon as follows: 0 0 : 0 0 : 0 0 : 0 0 Colon (:) for non-drop frames Dot (.) for drop frames H Remaining Time on the SD Card I Video Picture Quality SP : Standard HQ : High J Frame Rate K Vertical Resolution L Horizontal Resolution The color of the icons in I, J, K and L changes according to the settings in... the [CAMERA PROCESS] menu is set to [ON]. S Tele Macro Displayed when [TELE MACRO] in the Viewfinder (continued) Items Displayed During Video and Still Picture Shooting 2 J I Image Stabilizer [OFF] Displayed when [OIS] in red when the battery runs out.
... by the card icon as follows: 0 0 : 0 0 : 0 0 : 0 0 Colon (:) for non-drop frames Dot (.) for drop frames H Remaining Time on the SD Card I Video Picture Quality SP : Standard HQ : High J Frame Rate K Vertical Resolution L Horizontal Resolution The color of the icons in I, J, K and L changes according to the settings in... the [CAMERA PROCESS] menu is set to [ON]. S Tele Macro Displayed when [TELE MACRO] in the Viewfinder (continued) Items Displayed During Video and Still Picture Shooting 2 J I Image Stabilizer [OFF] Displayed when [OIS] in red when the battery runs out.
Instructions
Page 17
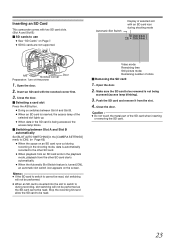
... SD Card G Still Picture Quality FINE : High STD : Standard H Still Picture Size Items Displayed During Video Playback D C B ;:9 8 2 +1 A 005/600 7 00:00:00:00 6 5 4 4:50 PM N OV. 1.2 0 0 9 3 A Video Mode B Date/Time C Battery Blinks in red when the battery runs out. D Speaker/Headphone Volume (...mode display for the time code is set to [ON]. When set to [QuickTime file format] : Displays in the [FILE FORMAT] menu. J Video Picture Quality SP : Standard HQ : High K Frame Rate L Vertical Resolution M Horizontal Resolution The color of the icons in J, K, L and ...
... SD Card G Still Picture Quality FINE : High STD : Standard H Still Picture Size Items Displayed During Video Playback D C B ;:9 8 2 +1 A 005/600 7 00:00:00:00 6 5 4 4:50 PM N OV. 1.2 0 0 9 3 A Video Mode B Date/Time C Battery Blinks in red when the battery runs out. D Speaker/Headphone Volume (...mode display for the time code is set to [ON]. When set to [QuickTime file format] : Displays in the [FILE FORMAT] menu. J Video Picture Quality SP : Standard HQ : High K Frame Rate L Vertical Resolution M Horizontal Resolution The color of the icons in J, K, L and ...
Instructions
Page 20
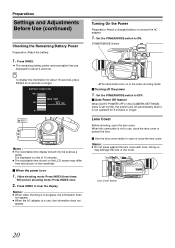
... A B Lens Cover Switch 20 Preparations Settings and Adjustments Before Use (continued) Checking the Remaining Battery Power Preparation: Attach the battery. 1 . Video shooting mode: Press INDEX three times. Turning On the Power Preparation: Attach a charged battery or connect the AC adapter. 1 . Set the POWER...PUSH IRIS SHUTTER AE ʶ REC DC Memo : ● The recordable time display should only be used as a guide. When this camcorder is on the viewfinder. Ⅵ When the power is not in use , the information does not appear. Doing so may differ from...
... A B Lens Cover Switch 20 Preparations Settings and Adjustments Before Use (continued) Checking the Remaining Battery Power Preparation: Attach the battery. 1 . Video shooting mode: Press INDEX three times. Turning On the Power Preparation: Attach a charged battery or connect the AC adapter. 1 . Set the POWER...PUSH IRIS SHUTTER AE ʶ REC DC Memo : ● The recordable time display should only be used as a guide. When this camcorder is on the viewfinder. Ⅵ When the power is not in use , the information does not appear. Doing so may differ from...
Instructions
Page 22
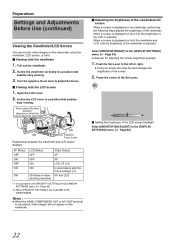
...2 . Turn the eyepiece focus lever to [ALWAYS-ON VIEWFINDER] Memo : ● When the HDMI, COMPONENT OUT or A/V OUT terminal is connected, video images will not appear on the viewfinder. Ⅵ Adjusting the brightness of the viewfinder/LCD screen When a screen is displayed on both . Ⅵ Viewing...the slide bar and changes the brightness of the screen. 2 . Open the LCD cover. 2 . When a screen is displayed on this camcorder using the viewfinder, LCD screen, or both the viewfinder and LCD, only the brightness of the viewfinder is adjusted. Preparations Settings and Adjustments Before...
...2 . Turn the eyepiece focus lever to [ALWAYS-ON VIEWFINDER] Memo : ● When the HDMI, COMPONENT OUT or A/V OUT terminal is connected, video images will not appear on the viewfinder. Ⅵ Adjusting the brightness of the viewfinder/LCD screen When a screen is displayed on both . Ⅵ Viewing...the slide bar and changes the brightness of the screen. 2 . Open the LCD cover. 2 . When a screen is displayed on this camcorder using the viewfinder, LCD screen, or both the viewfinder and LCD, only the brightness of the viewfinder is adjusted. Preparations Settings and Adjustments Before...
Instructions
Page 23
...supported. Open the door. 2 . Automatic Slot Switch Display of the selected slot lights up. ● When data in the playback mode, playback from the slot. 4 . Video mode: Remaining time Still picture mode: Remaining number of the SD card when inserting or removing the SD card. 23 Close the door. Make sure...be performed as the SD card cannot be performed. ● When an SD card is being accessed (access lamp blinking). 3 . Inserting an SD Card This camcorder comes with two SD card slots. (Slot A and Slot B) Ⅵ SD cards to use ● See ASD CardsB on the screen.
...supported. Open the door. 2 . Automatic Slot Switch Display of the selected slot lights up. ● When data in the playback mode, playback from the slot. 4 . Video mode: Remaining time Still picture mode: Remaining number of the SD card when inserting or removing the SD card. 23 Close the door. Make sure...be performed as the SD card cannot be performed. ● When an SD card is being accessed (access lamp blinking). 3 . Inserting an SD Card This camcorder comes with two SD card slots. (Slot A and Slot B) Ⅵ SD cards to use ● See ASD CardsB on the screen.
Instructions
Page 24
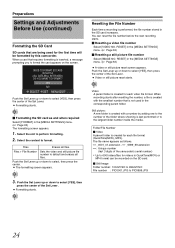
...to select [YES], then press the center of the Set Lever. ● Formatting starts. 24 Folder/File Number Ⅵ Video A parent folder is created for each video file format. Select the content to PIC0999.JPG 3 . The file name appears as and when required Select [FORMAT] in the...● Formatting starts. Ⅵ Formatting the SD card as follows. *** _0001_01.extension ~*** _9999_99.extension *** : Unique number (last 3 digits of the camcorder's serial number) T Up to 600 folders/files for the first time will be recorded on the screen. NEED TO FORMAT SD CARD IN SLOT A. (ALL...
...to select [YES], then press the center of the Set Lever. ● Formatting starts. 24 Folder/File Number Ⅵ Video A parent folder is created for each video file format. Select the content to PIC0999.JPG 3 . The file name appears as and when required Select [FORMAT] in the...● Formatting starts. Ⅵ Formatting the SD card as follows. *** _0001_01.extension ~*** _9999_99.extension *** : Unique number (last 3 digits of the camcorder's serial number) T Up to 600 folders/files for the first time will be recorded on the screen. NEED TO FORMAT SD CARD IN SLOT A. (ALL...
Instructions
Page 25
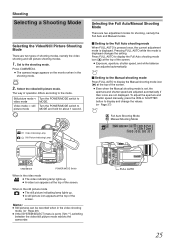
... automatically. B- M- A- Set to [720-**], switching between the video/still picture mode reboots the camcorder. Select the video/still picture mode. Memo : ● Still pictures can be recorded when in the video mode ● The video indicating lamp lights up . ● A still picture icon appears...USER1 USER2 FOCUS ZOOM AF/MF FULL AUTO GAIN WHT.BAL A / B L- The way of shooting modes, namely the video shooting and still picture shooting modes. 1 . Video Indicating Lamp Still Picture Indicating Lamp E OGRAM A INDEX T PR W REC CAM / MEDIA USERS DISPLAY Q.REVIEW MENU ...
... automatically. B- M- A- Set to [720-**], switching between the video/still picture mode reboots the camcorder. Select the video/still picture mode. Memo : ● Still pictures can be recorded when in the video mode ● The video indicating lamp lights up . ● A still picture icon appears...USER1 USER2 FOCUS ZOOM AF/MF FULL AUTO GAIN WHT.BAL A / B L- The way of shooting modes, namely the video shooting and still picture shooting modes. 1 . Video Indicating Lamp Still Picture Indicating Lamp E OGRAM A INDEX T PR W REC CAM / MEDIA USERS DISPLAY Q.REVIEW MENU ...
Instructions
Page 26
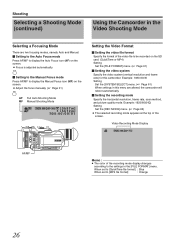
... OFF USER1 USER2 FOCUS ZOOM AF/MF FULL AUTO GAIN WHT.BAL A / B L- Shooting Selecting a Shooting Mode (continued) Using the Camcorder in the Video Shooting Mode Selecting a Focusing Mode There are altered, the camcorder will reboot automatically. Ⅵ Setting the recording mode Specify the horizontal resolution, frame rate, scan method, and picture quality mode...
... OFF USER1 USER2 FOCUS ZOOM AF/MF FULL AUTO GAIN WHT.BAL A / B L- Shooting Selecting a Shooting Mode (continued) Using the Camcorder in the Video Shooting Mode Selecting a Focusing Mode There are altered, the camcorder will reboot automatically. Ⅵ Setting the recording mode Specify the horizontal resolution, frame rate, scan method, and picture quality mode...
Instructions
Page 27
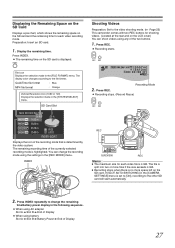
...REC [0h57m] B [5h12m] 00:00:00:01 Recording Mode 2 . PUSH REC DC Q.REVIEW REC Memo : ● The maximum size for each video recording mode. Press INDEX repeatedly to change the recording mode using battery Slot A B Slot B B Battery Power B End of Display ● When using...according to the other SD card will start automatically. 2 . INDEX Shooting Videos Preparation: Set to the video shooting mode. (A Page 25) This camcorder comes with two REC buttons for each video file is determined by the video system. The remaining recording time of the recording mode that is 4 GB...
...REC [0h57m] B [5h12m] 00:00:00:01 Recording Mode 2 . PUSH REC DC Q.REVIEW REC Memo : ● The maximum size for each video recording mode. Press INDEX repeatedly to change the recording mode using battery Slot A B Slot B B Battery Power B End of Display ● When using...according to the other SD card will start automatically. 2 . INDEX Shooting Videos Preparation: Set to the video shooting mode. (A Page 25) This camcorder comes with two REC buttons for each video file is determined by the video system. The remaining recording time of the recording mode that is 4 GB...
Instructions
Page 28
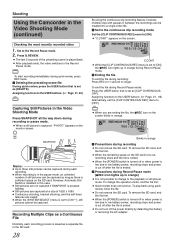
...pauses in the SD card. 28 By using quick review, close the file. ● Do not remove the SD card. Shooting Using the Camcorder in orange during Record Pause mode. Ⅵ Ending the file To end the file during each recording process is saved as there is ended. ...longer. Recording Multiple Clips as [CLIP CONTINUOUS OFF]. Assigning functions to the USER buttons: (A Page 21, 65) USER Capturing Still Pictures in the Video Shooting Mode Press SNAPSHOT all the way down during quick review, press REC twice. Ⅵ Deleting the preceding scene file During quick review, press ...
...pauses in the SD card. 28 By using quick review, close the file. ● Do not remove the SD card. Shooting Using the Camcorder in orange during Record Pause mode. Ⅵ Ending the file To end the file during each recording process is saved as there is ended. ...longer. Recording Multiple Clips as [CLIP CONTINUOUS OFF]. Assigning functions to the USER buttons: (A Page 21, 65) USER Capturing Still Pictures in the Video Shooting Mode Press SNAPSHOT all the way down during quick review, press REC twice. Ⅵ Deleting the preceding scene file During quick review, press ...


