
Printer Friendly Specs
Page 2
... Image Stabilizer, Pan/Tilt/Zoom functions can not be used. *3 Free app available for Android phones/tablets, iPhone, iPod touch, and iPad. *4 When recording, the streaming output is a certification mark of the Wi-Fi Alliance. School Events Web Conferences Distance Education JVC Live Streaming Cameras will enable "live broadcasting" of video streaming. JVC Live Streaming Cameras will keep your essential communication tool when teaching people in any literary, dramatic, musical, or artistic work embodied therein. Design and specifications...
... Image Stabilizer, Pan/Tilt/Zoom functions can not be used. *3 Free app available for Android phones/tablets, iPhone, iPod touch, and iPad. *4 When recording, the streaming output is a certification mark of the Wi-Fi Alliance. School Events Web Conferences Distance Education JVC Live Streaming Cameras will enable "live broadcasting" of video streaming. JVC Live Streaming Cameras will keep your essential communication tool when teaching people in any literary, dramatic, musical, or artistic work embodied therein. Design and specifications...
Basic User Guide
Page 2
...user. Connecting cables (Audio/Video, etc.) to this unit and leaving it has sufficient space on all sides to persons. Make a backup of important recorded data JVC will cause this equipment, fire or electric shock may not be able to get out.) No naked flame sources, such as lighted...unit. • The serial number plate is intended to alert the user to the Detailed User Guide at the rear). the heat may be responsible for any containers filled with water or liquids (such as lead to the unit. CAUTION! CAUTION: The mains plug shall remain readily operable...
...user. Connecting cables (Audio/Video, etc.) to this unit and leaving it has sufficient space on all sides to persons. Make a backup of important recorded data JVC will cause this equipment, fire or electric shock may not be able to get out.) No naked flame sources, such as lighted...unit. • The serial number plate is intended to alert the user to the Detailed User Guide at the rear). the heat may be responsible for any containers filled with water or liquids (such as lead to the unit. CAUTION! CAUTION: The mains plug shall remain readily operable...

Basic User Guide
Page 3
.... IMPORTANT SAFETY INSTRUCTIONS 1. Install in any ventilation openings. Dolby and the double-D symbol are trademarks of Dolby Laboratories. • Android™ is a trademark of Google Inc. • Windows® is subject to rain or moisture, does not operate normally, or has been dropped. Use only with Part 15 of connecting the unit's power cord to use the supplied AC adapter. • Do...
.... IMPORTANT SAFETY INSTRUCTIONS 1. Install in any ventilation openings. Dolby and the double-D symbol are trademarks of Dolby Laboratories. • Android™ is a trademark of Google Inc. • Windows® is subject to rain or moisture, does not operate normally, or has been dropped. Use only with Part 15 of connecting the unit's power cord to use the supplied AC adapter. • Do...

Basic User Guide
Page 5
... Model Number : GV-LS2 Trade Name : JVC Responsible party : JVC AMERICAS CORP. For more of the following two conditions: (1) This device may cause undesired operation. Changes or modifications not approved by a rechargeable battery that may not cause harmful interference, and (2) this battery. (USA and Canada only) Declaration of time. However, there is subject to the Detailed User Guide...
... Model Number : GV-LS2 Trade Name : JVC Responsible party : JVC AMERICAS CORP. For more of the following two conditions: (1) This device may cause undesired operation. Changes or modifications not approved by a rechargeable battery that may not cause harmful interference, and (2) this battery. (USA and Canada only) Declaration of time. However, there is subject to the Detailed User Guide...
Basic User Guide
Page 9
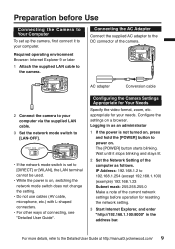
... video format, zoom, etc. The [POWER] button starts blinking. For more details, refer to the camera. Configuring the Camera Settings Appropriate for your needs. RESET DIRECT WLAN LAN(OFF) ETHERENT PLUG IN POWER MIC DC AV AC adapter Conversion cable 2 Connect the camera to the DC connector of connecting, see "Detailed User Guide". DIRECT WLAN LAN(OFF) RESET DIRECT WLAN LAN(OFF) ETHERENT PLUG IN POWER MIC DC AV • If the network mode switch is on a browser...
... video format, zoom, etc. The [POWER] button starts blinking. For more details, refer to the camera. Configuring the Camera Settings Appropriate for your needs. RESET DIRECT WLAN LAN(OFF) ETHERENT PLUG IN POWER MIC DC AV AC adapter Conversion cable 2 Connect the camera to the DC connector of connecting, see "Detailed User Guide". DIRECT WLAN LAN(OFF) RESET DIRECT WLAN LAN(OFF) ETHERENT PLUG IN POWER MIC DC AV • If the network mode switch is on a browser...
Basic User Guide
Page 10
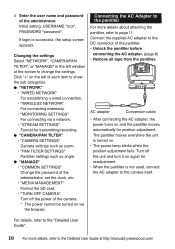
... to the DC connector of the administrator. Connect the supplied AC adapter to page 11. Click "+" on the left window of the camera. * The power cannot be turned on . • The power lamp blinks when the position adjustment fails. Turn off the power of the screen to show the sub categories. ● "NETWORK" • "WIRED NETWORK" For establishing a wired connection. • "WIRELESS NETWORK" For connecting wirelessly. • "MONITORING SETTINGS" For connecting via the browser. Changing the settings Select "NETWORK", "CAMERA/PAN TILTER", or...
... to the DC connector of the administrator. Connect the supplied AC adapter to page 11. Click "+" on the left window of the camera. * The power cannot be turned on . • The power lamp blinks when the position adjustment fails. Turn off the power of the screen to show the sub categories. ● "NETWORK" • "WIRED NETWORK" For establishing a wired connection. • "WIRELESS NETWORK" For connecting wirelessly. • "MONITORING SETTINGS" For connecting via the browser. Changing the settings Select "NETWORK", "CAMERA/PAN TILTER", or...
Basic User Guide
Page 12
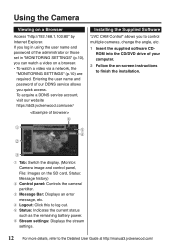
...quick access. To acquire a DDNS service account, visit our website https://dd3.jvckenwood.com/user/ 4 Installing the Supplied Software "JVC CAM Control" allows you can watch a video on a browser. • To watch a video via a network, the "MONITORING SETTINGS" (p.10) are required. Entering the user name and password of your computer. 2 Follow the on-screen instructions to finish the installation. 1 5 6 2 3 1 Tab: Switch the display. (Monitor: Camera image and control panel, File: Images on a Browser Access "http://192.168.1.100:80" by Internet Explorer. Using the Camera Viewing...
...quick access. To acquire a DDNS service account, visit our website https://dd3.jvckenwood.com/user/ 4 Installing the Supplied Software "JVC CAM Control" allows you can watch a video on a browser. • To watch a video via a network, the "MONITORING SETTINGS" (p.10) are required. Entering the user name and password of your computer. 2 Follow the on-screen instructions to finish the installation. 1 5 6 2 3 1 Tab: Switch the display. (Monitor: Camera image and control panel, File: Images on a Browser Access "http://192.168.1.100:80" by Internet Explorer. Using the Camera Viewing...
Basic User Guide
Page 13
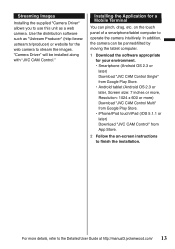
..., Resolution: 1024 x 600 or more details, refer to the Detailed User Guide at http://manual3.jvckenwood.com/ 13 In addition, the camera can pinch, drag, etc. on -screen instructions to finish the installation. Installing the Application for the web camera to stream the images. ustream.tv/producer) or website for a Mobile Terminal You can be installed along with "JVC CAM Control." Streaming Images Installing the supplied "Camera Driver" allows you to use this unit...
..., Resolution: 1024 x 600 or more details, refer to the Detailed User Guide at http://manual3.jvckenwood.com/ 13 In addition, the camera can pinch, drag, etc. on -screen instructions to finish the installation. Installing the Application for the web camera to stream the images. ustream.tv/producer) or website for a Mobile Terminal You can be installed along with "JVC CAM Control." Streaming Images Installing the supplied "Camera Driver" allows you to use this unit...

Basic User Guide
Page 14
... to change without notice due to product improvements. 14 For more details, refer to "MEDIUM" for the clock Secondary battery Stream output format Stream 1 Stream 2 Video Format 1 Audio JPEG (640x360) LPCM 16 kHz 16 bit 1 ch None System MPEG-2 TS - to 80 % Image element 1/2.3: 12.40 mil. pixels (BSI CMOS) Image range 5.40 mil. Specifications Camera Power supply Using the AC adapter: DC 12 V, Using a battery...
... to change without notice due to product improvements. 14 For more details, refer to "MEDIUM" for the clock Secondary battery Stream output format Stream 1 Stream 2 Video Format 1 Audio JPEG (640x360) LPCM 16 kHz 16 bit 1 ch None System MPEG-2 TS - to 80 % Image element 1/2.3: 12.40 mil. pixels (BSI CMOS) Image range 5.40 mil. Specifications Camera Power supply Using the AC adapter: DC 12 V, Using a battery...
Detailed User Guide
Page 2
... Camera Settings Appropriate for Your Needs 13 Configuring the initial settings 13 Changing the settings after changing the connection destination 14 Configuring the Camera Settings........15 Adjusting the clock 15 Setting the user name and password 16 Selecting the Format of Images to be Output/Saved 17 Allowing You to Connect from Outside (Monitoring Setting 18 Obtaining a DDNS account 18 Setting up the DDNS account 18 Adding a camera driver's user 19 Changing the Connection Destination 20 Establishing a wired connection to the access...
... Camera Settings Appropriate for Your Needs 13 Configuring the initial settings 13 Changing the settings after changing the connection destination 14 Configuring the Camera Settings........15 Adjusting the clock 15 Setting the user name and password 16 Selecting the Format of Images to be Output/Saved 17 Allowing You to Connect from Outside (Monitoring Setting 18 Obtaining a DDNS account 18 Setting up the DDNS account 18 Adding a camera driver's user 19 Changing the Connection Destination 20 Establishing a wired connection to the access...
Detailed User Guide
Page 3
... Connecting to the pantilter 31 Using the Unit Alone 32 Turning on/off the power 32 Starting/Stopping recording 32 Controlling from a Web Browser..........33 Logging in 33 Controlling the camera ("MONITOR" tab)....... 34 Configuring the camera settings 36 Managing files stored on the SD card ("FILE MANAGEMENT" tab 37 Checking the message history ("STATUS" tab)... 38 Using "JVC CAM Control 39 Installing "JVC CAM Control 39 Streaming images 39 Using the Mobile Terminal 40 Names of Apps...
... Connecting to the pantilter 31 Using the Unit Alone 32 Turning on/off the power 32 Starting/Stopping recording 32 Controlling from a Web Browser..........33 Logging in 33 Controlling the camera ("MONITOR" tab)....... 34 Configuring the camera settings 36 Managing files stored on the SD card ("FILE MANAGEMENT" tab 37 Checking the message history ("STATUS" tab)... 38 Using "JVC CAM Control 39 Installing "JVC CAM Control 39 Streaming images 39 Using the Mobile Terminal 40 Names of Apps...
Detailed User Guide
Page 5
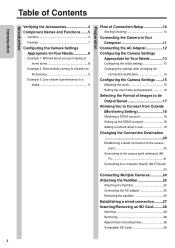
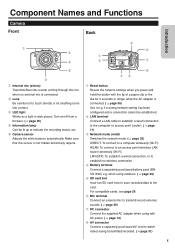
... connector Connect the supplied AC adapter when using outdoors. ( ➭ page 29) 5 SD card slot Insert an SD card here to save recorded data to touch directly or let anything come into contact. 3 LED light Works as a light in dark places. Component Names and Functions Camera Front Back Introduction PLUG IN POWER 1 3 4 5 2 1 Internal mic (stereo) Transmits/Records sounds coming through this button with AC power. ( ➭ page 12) 8 AV connector Connect a separately...
... connector Connect the supplied AC adapter when using outdoors. ( ➭ page 29) 5 SD card slot Insert an SD card here to save recorded data to touch directly or let anything come into contact. 3 LED light Works as a light in dark places. Component Names and Functions Camera Front Back Introduction PLUG IN POWER 1 3 4 5 2 1 Internal mic (stereo) Transmits/Records sounds coming through this button with AC power. ( ➭ page 12) 8 AV connector Connect a separately...
Detailed User Guide
Page 8
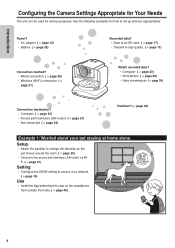
...; Access point (wireless LAN router) ( ➭ page 21) • Not connected ( ➭ page 32) Pantilter? ( ➭ page 25) Example 1: Worried about your pet staying at home alone. Introduction Configuring the Camera Settings Appropriate for Your Needs The unit can be used for how to set up and use appropriately: Power? • AC adapter ( ➭ page 12) • Battery ( ➭ page 29) Recorded data? • Save to view...
...; Access point (wireless LAN router) ( ➭ page 21) • Not connected ( ➭ page 32) Pantilter? ( ➭ page 25) Example 1: Worried about your pet staying at home alone. Introduction Configuring the Camera Settings Appropriate for Your Needs The unit can be used for how to set up and use appropriately: Power? • AC adapter ( ➭ page 12) • Battery ( ➭ page 29) Recorded data? • Save to view...
Detailed User Guide
Page 13
... 11) 2 Press and hold the power button to 192.168.1.254 (Example) 192.168.1.23 • SUBNET MASK 255.255.255.0 CAUTION To restore the settings of the administrator. Preparation Configuring the Camera Settings Appropriate for Your Needs Access the unit from Outside (Monitoring Setting)" (page 18), "Changing the Connection Destination" (page 20). • To confirm all the settings, refer to set the network, streaming, etc. Initial setting: USERNAME "root", PASSWORD "password".
... 11) 2 Press and hold the power button to 192.168.1.254 (Example) 192.168.1.23 • SUBNET MASK 255.255.255.0 CAUTION To restore the settings of the administrator. Preparation Configuring the Camera Settings Appropriate for Your Needs Access the unit from Outside (Monitoring Setting)" (page 18), "Changing the Connection Destination" (page 20). • To confirm all the settings, refer to set the network, streaming, etc. Initial setting: USERNAME "root", PASSWORD "password".

Detailed User Guide
Page 20
... and hold the power button to "AUTO", the camera's IP address is complete. 20 When the "WPS" button stops blinking and stays lit, the connection is assigned automatically by the access point. For values to the instruction manual, etc. Establishing a wired connection to the access point (wireless LAN router). of the access point. • If the IP address of the unit is unknown, confirm the displayed information of the PC...
... and hold the power button to "AUTO", the camera's IP address is complete. 20 When the "WPS" button stops blinking and stays lit, the connection is assigned automatically by the access point. For values to the instruction manual, etc. Establishing a wired connection to the access point (wireless LAN router). of the access point. • If the IP address of the unit is unknown, confirm the displayed information of the PC...
Detailed User Guide
Page 33
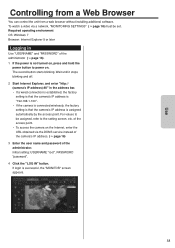
...", PASSWORD "password". 4 Click the "LOG IN" button. To watch a video via the DDNS service instead of the camera's IP address. ( ➭ page 18) 3 Enter the user name and password of the access point. • To access the camera on . of the administrator. Use Controlling from a Web Browser You can control the unit from a web browser without installing additional software. Required operating environment OS: Windows 7 Browser: Internet Explorer 9 or later Logging in the address bar. • If a wired connection is established, the factory setting...
...", PASSWORD "password". 4 Click the "LOG IN" button. To watch a video via the DDNS service instead of the camera's IP address. ( ➭ page 18) 3 Enter the user name and password of the access point. • To access the camera on . of the administrator. Use Controlling from a Web Browser You can control the unit from a web browser without installing additional software. Required operating environment OS: Windows 7 Browser: Internet Explorer 9 or later Logging in the address bar. • If a wired connection is established, the factory setting...
Detailed User Guide
Page 36
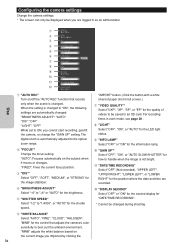
... ON, you cannot start recording, pan/tilt the camera, or change the "GAIN UP" setting. When the setting is automatically adjusted to "ON", the following settings are recorded. = "DISPLAY SECOND" Select "OFF" or "ON" for the second display for "DATE/TIME RECORDING". * Cannot be changed . For recording times in as an administrator. 1 2 3 4 5 6 7 8 9 0 = Use 1 "AUTO REC" Turn on the subject when it moves or changes. The digital zoom is changed to the optical zoom range. 2 "FOCUS"* Change the focus setting.
... ON, you cannot start recording, pan/tilt the camera, or change the "GAIN UP" setting. When the setting is automatically adjusted to "ON", the following settings are recorded. = "DISPLAY SECOND" Select "OFF" or "ON" for the second display for "DATE/TIME RECORDING". * Cannot be changed . For recording times in as an administrator. 1 2 3 4 5 6 7 8 9 0 = Use 1 "AUTO REC" Turn on the subject when it moves or changes. The digital zoom is changed to the optical zoom range. 2 "FOCUS"* Change the focus setting.
Detailed User Guide
Page 39
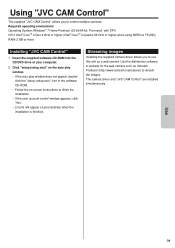
Use 39 The camera driver and "JVC CAM Control" are installed simultaneously. Streaming images Installing the supplied camera driver allows you to control multiple cameras. Use the distribution software or website for the web camera such as a web camera. Using "JVC CAM Control" The supplied "JVC CAM Control" allows you to use this unit as Ustream Producer (http://www.ustream.tv/producer) to stream the images. Required operating environment Operating System: Windows® 7 Home Premium (32-bit/64-bit, Pre-install, with SP1) CPU: Intel® CoreTM 2 Duo 2 GHz...
Use 39 The camera driver and "JVC CAM Control" are installed simultaneously. Streaming images Installing the supplied camera driver allows you to control multiple cameras. Use the distribution software or website for the web camera such as a web camera. Using "JVC CAM Control" The supplied "JVC CAM Control" allows you to use this unit as Ustream Producer (http://www.ustream.tv/producer) to stream the images. Required operating environment Operating System: Windows® 7 Home Premium (32-bit/64-bit, Pre-install, with SP1) CPU: Intel® CoreTM 2 Duo 2 GHz...
Detailed User Guide
Page 41
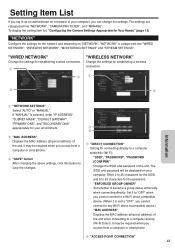
... a Wi-Fi direct compatible device. (When it is categorized into "NETWORK", "CAMERA/PAN TILTER", and "MANAGE". "NETWORK" is set to "OFF", you cannot connect to any Wi-Fi direct incompatible device.) "MAC ADDRESS" Displays the MAC address (physical address) of your computer. "SSID", "PASSWORD", "PASSWORD (CONFIRM)" Change the SSID and password of the unit. The settings are categorized into "WIRED NETWORK", "WIRELESS NETWORK", "MONITORING SETTINGS" and "STREAM SETTINGS". If "MANUAL" is selected, enter "IP ADDRESS", "SUBNET MASK", "DEFAULT GATEWAY", "PRIMARY...
... a Wi-Fi direct compatible device. (When it is categorized into "NETWORK", "CAMERA/PAN TILTER", and "MANAGE". "NETWORK" is set to "OFF", you cannot connect to any Wi-Fi direct incompatible device.) "MAC ADDRESS" Displays the MAC address (physical address) of your computer. "SSID", "PASSWORD", "PASSWORD (CONFIRM)" Change the SSID and password of the unit. The settings are categorized into "WIRED NETWORK", "WIRELESS NETWORK", "MONITORING SETTINGS" and "STREAM SETTINGS". If "MANUAL" is selected, enter "IP ADDRESS", "SUBNET MASK", "DEFAULT GATEWAY", "PRIMARY...
Detailed User Guide
Page 43
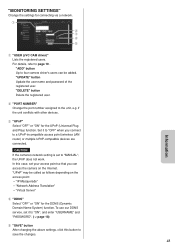
..." button Delete the registered user. 2 "PORT NUMBER" Change the port number assigned to page 19 . "Network Address Translation" - if the unit conflicts with other devices. 3 "UPnP" Select "OFF" or "ON" for connecting via a network. 1 2 3 4 5 1 "USER (JVC CAM driver)" Lists the registered users. CAUTION If the camera's network setting is set your access point so that you connect to a UPnP-incompatible access point (wireless LAN router) or multiple UPnP-compatible devices are connected. Set it to "ON", and enter "USERNAME" and "PASSWORD...
..." button Delete the registered user. 2 "PORT NUMBER" Change the port number assigned to page 19 . "Network Address Translation" - if the unit conflicts with other devices. 3 "UPnP" Select "OFF" or "ON" for connecting via a network. 1 2 3 4 5 1 "USER (JVC CAM driver)" Lists the registered users. CAUTION If the camera's network setting is set your access point so that you connect to a UPnP-incompatible access point (wireless LAN router) or multiple UPnP-compatible devices are connected. Set it to "ON", and enter "USERNAME" and "PASSWORD...


