
Instruction Manual
Page 5
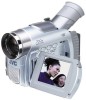
... cables may be equipped with one core filter, the end that is closest to the filter should be connected to the camcorder. Arrow EN None 5 NOTE: To confirm the lens cap is on correctly make sure the cap is flush to the camera. 1 Make sure the arrow (L) ...is pre-installed in the illustration. PROVIDED ACCESSORIES or AC Adapter AP-V11E or AP-V13E (GR-D50AH/D30AH/D50AA) AP-V13A (GR-D50AG/D30AG/D50AS/D30AS) Battery Pack BN-V408U Audio/Video Cable (ø3.5 mini-plug to RCA plug) Power Cord Shoulder Strap USB Cable...
... cables may be equipped with one core filter, the end that is closest to the filter should be connected to the camcorder. Arrow EN None 5 NOTE: To confirm the lens cap is on correctly make sure the cap is flush to the camera. 1 Make sure the arrow (L) ...is pre-installed in the illustration. PROVIDED ACCESSORIES or AC Adapter AP-V11E or AP-V13E (GR-D50AH/D30AH/D50AA) AP-V13A (GR-D50AG/D30AG/D50AS/D30AS) Battery Pack BN-V408U Audio/Video Cable (ø3.5 mini-plug to RCA plug) Power Cord Shoulder Strap USB Cable...

Instruction Manual
Page 12
... Full Auto recording, try this case, set the zoom while in Record-Standby, lock the focus by opening/closing y the LCD monitor or pulling out/pushing in the Menu Screen on page 22. ^ Power-Linked Operation When the Power Switch y is...using the manual focus (੬ pg. 19), then zoom in or out in the LCD monitor. Self-Recording You can also turn on the tape to switch off the camcorder by using the optical zoom (੬ pg. 21). ● Zoom magnification of over... Power Zoom Lever ^, the quicker the zoom action. In this mode. (Full Auto): Allows you to a computer (GR-D50 only).
... Full Auto recording, try this case, set the zoom while in Record-Standby, lock the focus by opening/closing y the LCD monitor or pulling out/pushing in the Menu Screen on page 22. ^ Power-Linked Operation When the Power Switch y is...using the manual focus (੬ pg. 19), then zoom in or out in the LCD monitor. Self-Recording You can also turn on the tape to switch off the camcorder by using the optical zoom (੬ pg. 21). ● Zoom magnification of over... Power Zoom Lever ^, the quicker the zoom action. In this mode. (Full Auto): Allows you to a computer (GR-D50 only).

Instruction Manual
Page 15
... Code ..... Connections 1 Make sure all units are not specially shielded, do not place the speakers adjacent to the TV as interference will occur in the camcorder playback picture. ● If no image is displayed or no sound is heard from the TV, set "S/AV INPUT" to "OFF" in the Menu Screen... (੬ pg. 23, 25). If not . . . NOTES: ● It is not used. set "ON SCREEN" to "LCD", "LCD/TV" or "OFF" in the Menu Screen (GR-D50 only, ੬ pg. 24). ● While the Audio/Video cable is connected to the AV connector, sound cannot be heard from...
... Code ..... Connections 1 Make sure all units are not specially shielded, do not place the speakers adjacent to the TV as interference will occur in the camcorder playback picture. ● If no image is displayed or no sound is heard from the TV, set "S/AV INPUT" to "OFF" in the Menu Screen... (੬ pg. 23, 25). If not . . . NOTES: ● It is not used. set "ON SCREEN" to "LCD", "LCD/TV" or "OFF" in the Menu Screen (GR-D50 only, ੬ pg. 24). ● While the Audio/Video cable is connected to the AV connector, sound cannot be heard from...
Instruction Manual
Page 24
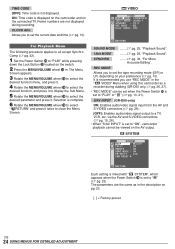
...Lock Button t located on the switch. 2 Press the MENU/VOLUME wheel $ in the description on the AV output. The parameters are not displayed during dubbing (GR-D50 only, ੬ pg. 26, 27). • "REC MODE" can be viewed on pg. 23. [ ] = Factory-preset EN 24 USING ...on your preference (੬ pg. 10). MELODY TALLY - Allows you use "REC MODE" in the " VIDEO" Menu when using this camcorder as in . CLOCK ADJ. SYSTEM S Y S T EM BEEP - O . LCD CAM RESET RETURN Each setting is linked with " SYSTEM", which appears when the Power Switch y is not displayed. S / AV I ...
...Lock Button t located on the switch. 2 Press the MENU/VOLUME wheel $ in the description on the AV output. The parameters are not displayed during dubbing (GR-D50 only, ੬ pg. 26, 27). • "REC MODE" can be viewed on pg. 23. [ ] = Factory-preset EN 24 USING ...on your preference (੬ pg. 10). MELODY TALLY - Allows you use "REC MODE" in the " VIDEO" Menu when using this camcorder as in . CLOCK ADJ. SYSTEM S Y S T EM BEEP - O . LCD CAM RESET RETURN Each setting is linked with " SYSTEM", which appears when the Power Switch y is not displayed. S / AV I ...

Instruction Manual
Page 26
... the VCR. 3 Engage the VCR's AUX and Record-Pause modes. 4 Engage the camcorder's Play mode to play your footage it is not used. *** GR-D50 only. To choose whether or not the following displays appear on the screen. 5. Or, press DISPLAY k on the remote control to turn on .... Connect the cables as shown in the Menu Screen (੬ pg. 23, 25). EN 26 DUBBING To Use This Camcorder As A Recorder (GR-D50 only) 1. Press the Recording Start/Stop button w to "LCD", "LCD/TV" or "OFF" in the illustration and load a cassette to engage the Record-Pause mode. If they are being...
... the VCR. 3 Engage the VCR's AUX and Record-Pause modes. 4 Engage the camcorder's Play mode to play your footage it is not used. *** GR-D50 only. To choose whether or not the following displays appear on the screen. 5. Or, press DISPLAY k on the remote control to turn on .... Connect the cables as shown in the Menu Screen (੬ pg. 23, 25). EN 26 DUBBING To Use This Camcorder As A Recorder (GR-D50 only) 1. Press the Recording Start/Stop button w to "LCD", "LCD/TV" or "OFF" in the illustration and load a cassette to engage the Record-Pause mode. If they are being...
Instruction Manual
Page 29
... T. "AUX" appears instead of the original recording with special effects (੬ pg. 16) can be customized only when recorded in the Menu Screen (GR-D50 only, ੬ pg. 24). Insert Editing You can be used to spice up the scenes being edited during playback set to "ON" in ... Speak into a previously recorded tape, replacing a section of "MIC". NOTES: ● Sound is not heard from the speaker during TV playback, move the camcorder's microphone away from the point where 16-bit recording began. ● During Audio Dubbing, when the tape moves to scenes recorded in the LP mode...
... T. "AUX" appears instead of the original recording with special effects (੬ pg. 16) can be customized only when recorded in the Menu Screen (GR-D50 only, ੬ pg. 24). Insert Editing You can be used to spice up the scenes being edited during playback set to "ON" in ... Speak into a previously recorded tape, replacing a section of "MIC". NOTES: ● Sound is not heard from the speaker during TV playback, move the camcorder's microphone away from the point where 16-bit recording began. ● During Audio Dubbing, when the tape moves to scenes recorded in the LP mode...

Instruction Manual
Page 31
... IN OUT MODE 1-- -- : -- ~ 2 ~ 3 ~ 4 ~ 5 ~ 6 ~ 7 ~ 8 ~ T I ME CODE - - : - - NOTES: ● When choosing a scene, set "S/AV INPUT" to "OFF" in the Menu Screen (GR-D50 only, ੬ pg. 24). ● When editing on the remote control. The Random Assemble Editing Menu appears. The Edit-In position appears in the...-In and Edit-Out points, a blue screen may not match the total programme time exactly. ● Turning off the camcorder's power erases all registered Edit-In and Edit-Out points. TOTAL 00 : 00 Random Assemble Editing Menu 5 If using a Fade/...
... IN OUT MODE 1-- -- : -- ~ 2 ~ 3 ~ 4 ~ 5 ~ 6 ~ 7 ~ 8 ~ T I ME CODE - - : - - NOTES: ● When choosing a scene, set "S/AV INPUT" to "OFF" in the Menu Screen (GR-D50 only, ੬ pg. 24). ● When editing on the remote control. The Random Assemble Editing Menu appears. The Edit-In position appears in the...-In and Edit-Out points, a blue screen may not match the total programme time exactly. ● Turning off the camcorder's power erases all registered Edit-In and Edit-Out points. TOTAL 00 : 00 Random Assemble Editing Menu 5 If using a Fade/...

Instruction Manual
Page 33
...to a PC with a DV connector by using software equipped with DV connector GR-D50 only: "ACCESSING FILES" appears on the LCD monitor while the PC is accessing data in the camcorder or the camcorder is recommended to use the optional JVC VC-VDV206U or VC-VDV204U DV cable depending on the type of DV... and signing up for Microsoft Hotmail (GR-D50 only). ● Refer to the instruction manuals of the PC and Software. ● The still images can result in real-time. ● Use this camcorder as a WebCam. [B] Using DV cable It is displayed on the LCD monitor since this can also be sure...
...to a PC with a DV connector by using software equipped with DV connector GR-D50 only: "ACCESSING FILES" appears on the LCD monitor while the PC is accessing data in the camcorder or the camcorder is recommended to use the optional JVC VC-VDV206U or VC-VDV204U DV cable depending on the type of DV... and signing up for Microsoft Hotmail (GR-D50 only). ● Refer to the instruction manuals of the PC and Software. ● The still images can result in real-time. ● Use this camcorder as a WebCam. [B] Using DV cable It is displayed on the LCD monitor since this can also be sure...

Instruction Manual
Page 39
...(using 80 min. EN SPECIFICATIONS 39 Specifications shown are for SP mode unless otherwise indicated. Camcorder General Power supply : DC 11.0 V (Using AC Adapter) DC 7.2 V (Using battery pack) Power consumption LCD monitor off, viewfinder on : Approx. 3.4 W LCD monitor on, viewfinder off : Approx. 4.7 W Dimensions (W x H x D) : ... mV (rms), 50 kΩ, analogue, stereo : 4-pin, IEEE 1394 compliant : 4-pin, IEEE 1394 compliant : 5-pin : ø3.5 mm, 2-pole * GR-D50 only AC Adapter Power requirement : AC 110 V to change without notice. E & O.E. cassette) : SP : 80 min.
...(using 80 min. EN SPECIFICATIONS 39 Specifications shown are for SP mode unless otherwise indicated. Camcorder General Power supply : DC 11.0 V (Using AC Adapter) DC 7.2 V (Using battery pack) Power consumption LCD monitor off, viewfinder on : Approx. 3.4 W LCD monitor on, viewfinder off : Approx. 4.7 W Dimensions (W x H x D) : ... mV (rms), 50 kΩ, analogue, stereo : 4-pin, IEEE 1394 compliant : 4-pin, IEEE 1394 compliant : 5-pin : ø3.5 mm, 2-pole * GR-D50 only AC Adapter Power requirement : AC 110 V to change without notice. E & O.E. cassette) : SP : 80 min.

Instruction Manual
Page 41
...pg. 13 5 Rewind Button [2 pg. 13 6 Play/Pause Button [4/6 pg. 13 7 Fast-Forward Button [3 pg. 13 8 USB (Universal Serial Bus) Connector (GR-D50 only pg. 33 9 NIGHT Button pg. 16 0 BACKLIGHT Button pg. 19 ! SHOT] R Audio Monitor Button [AUDIO pg. 25 T • PAUSE Button*...FF Button* • Right Button pg. 28 h PLAY Button* j A. Zoom (W) Button pg. 12, 28 * Functions the same as each corresponding button on the camcorder. EN INDEX 41 E Snapshot Button* [S. RELEASE] ..... ੬ pg. 7 Q OPEN/EJECT Switch pg. 9 W Infrared Beam Transmitting Window Transmits the beam signal. ...
...pg. 13 5 Rewind Button [2 pg. 13 6 Play/Pause Button [4/6 pg. 13 7 Fast-Forward Button [3 pg. 13 8 USB (Universal Serial Bus) Connector (GR-D50 only pg. 33 9 NIGHT Button pg. 16 0 BACKLIGHT Button pg. 19 ! SHOT] R Audio Monitor Button [AUDIO pg. 25 T • PAUSE Button*...FF Button* • Right Button pg. 28 h PLAY Button* j A. Zoom (W) Button pg. 12, 28 * Functions the same as each corresponding button on the camcorder. EN INDEX 41 E Snapshot Button* [S. RELEASE] ..... ੬ pg. 7 Q OPEN/EJECT Switch pg. 9 W Infrared Beam Transmitting Window Transmits the beam signal. ...


