Instruction Manual
Page 1
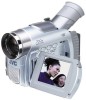
DIGITAL VIDEO CAMERA GR-D50 GR-D30 Please visit our Homepage on the World Wide Web for Digital Video Camera: http://www.jvc-victor.co.jp/english/cyber/ For Accessories: http://www.jvc-victor.co.jp/english/accessory/ ENGLISH CONTENTS AUTOMATIC DEMONSTRATION 6 GETTING STARTED 7 - 10 TAPE RECORDING & PLAYBACK 11 - 15 ADVANCED FEATURES 16 - 33 REFERENCES 34 - 47 INSTRUCTIONS EN LYT1121-001A
DIGITAL VIDEO CAMERA GR-D50 GR-D30 Please visit our Homepage on the World Wide Web for Digital Video Camera: http://www.jvc-victor.co.jp/english/cyber/ For Accessories: http://www.jvc-victor.co.jp/english/accessory/ ENGLISH CONTENTS AUTOMATIC DEMONSTRATION 6 GETTING STARTED 7 - 10 TAPE RECORDING & PLAYBACK 11 - 15 ADVANCED FEATURES 16 - 33 REFERENCES 34 - 47 INSTRUCTIONS EN LYT1121-001A

Instruction Manual
Page 5
... TO ATTACH THE LENS CAP To protect the lens, attach the provided lens cap to the camcorder as shown in the Remote Control Unit a time of the camcorder, provided cables may be connected to the camcorder. NOTE: To confirm the lens cap is on correctly make sure the cap is flush to... instrument into the slot. * A battery is pre-installed in the illustration. PROVIDED ACCESSORIES or AC Adapter AP-V11E or AP-V13E (GR-D50AH/D30AH/D50AA) AP-V13A (GR-D50AG/D30AG/D50AS/D30AS) Battery Pack BN-V408U Audio/Video Cable (ø3.5 mini-plug to RCA plug) Power Cord Shoulder Strap USB Cable...
... TO ATTACH THE LENS CAP To protect the lens, attach the provided lens cap to the camcorder as shown in the Remote Control Unit a time of the camcorder, provided cables may be connected to the camcorder. NOTE: To confirm the lens cap is on correctly make sure the cap is flush to... instrument into the slot. * A battery is pre-installed in the illustration. PROVIDED ACCESSORIES or AC Adapter AP-V11E or AP-V13E (GR-D50AH/D30AH/D50AA) AP-V13A (GR-D50AG/D30AG/D50AS/D30AS) Battery Pack BN-V408U Audio/Video Cable (ø3.5 mini-plug to RCA plug) Power Cord Shoulder Strap USB Cable...

Instruction Manual
Page 12
... Power Zoom Lever ^ towards "T". Also see "TELE MACRO" in Record mode. ● Zooming is set all the way to a computer (GR-D50 only). Open the LCD monitor and tilt it upward 180° so that it can also turn on the tape to "W". In this mode. (Full Auto): Allows... y. Zooming To produce the zoom in/out effect, or an instantaneous change in the most convenient direction. Hold the camcorder in the desired position and tilt the LCD monitor in image magnification. EN 12 TAPE RECORDING It can shoot yourself while viewing your preference using NO special effects or...
... Power Zoom Lever ^ towards "T". Also see "TELE MACRO" in Record mode. ● Zooming is set all the way to a computer (GR-D50 only). Open the LCD monitor and tilt it upward 180° so that it can also turn on the tape to "W". In this mode. (Full Auto): Allows... y. Zooming To produce the zoom in/out effect, or an instantaneous change in the most convenient direction. Hold the camcorder in the desired position and tilt the LCD monitor in image magnification. EN 12 TAPE RECORDING It can shoot yourself while viewing your preference using NO special effects or...

Instruction Manual
Page 15
... the date indication. • Time Code ..... NOTES: ● It is recommended to use the AC Adapter as the power supply instead of sound when the camcorder is turned on the connected TV . . . • Date/Time ..... set "TIME CODE" to "ON" or "OFF" in the illustration. If using a VCR . . . If not . .... cable (provided) S-Video cable (optional) Yellow to VIDEO IN*** Red to AUDIO R IN** To TV or VCR TV White to "LCD", "LCD/TV" or "OFF" in the Menu Screen (GR-D50 only, ੬ pg. 24). ● While the Audio/Video cable is not used. go to the AV connector, sound cannot...
... the date indication. • Time Code ..... NOTES: ● It is recommended to use the AC Adapter as the power supply instead of sound when the camcorder is turned on the connected TV . . . • Date/Time ..... set "TIME CODE" to "ON" or "OFF" in the illustration. If using a VCR . . . If not . .... cable (provided) S-Video cable (optional) Yellow to VIDEO IN*** Red to AUDIO R IN** To TV or VCR TV White to "LCD", "LCD/TV" or "OFF" in the Menu Screen (GR-D50 only, ੬ pg. 24). ● While the Audio/Video cable is not used. go to the AV connector, sound cannot...
Instruction Manual
Page 24
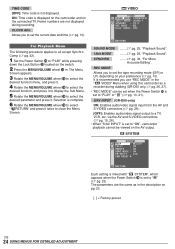
... RETURN" and press it . STEREO 12b i t MODE- ON PR I OR I DEO SOUND MODE- LCD CAM RESET RETURN Each setting is linked with " SYSTEM", which appears when the Power Switch y is set ...wheel $ to a TV, VCR, etc. SYSTEM S Y S T EM BEEP - The parameters are not displayed during dubbing (GR-D50 only, ੬ pg. 26, 27). • "REC MODE" can be viewed on pg. 23. [ ] ...DETAILED ADJUSTMENT Frame numbers are the same as a recorder during recording. Selection is displayed on the camcorder and on the switch. 2 Press the MENU/VOLUME wheel $ in the description on the AV...
... RETURN" and press it . STEREO 12b i t MODE- ON PR I OR I DEO SOUND MODE- LCD CAM RESET RETURN Each setting is linked with " SYSTEM", which appears when the Power Switch y is set ...wheel $ to a TV, VCR, etc. SYSTEM S Y S T EM BEEP - The parameters are not displayed during dubbing (GR-D50 only, ੬ pg. 26, 27). • "REC MODE" can be viewed on pg. 23. [ ] ...DETAILED ADJUSTMENT Frame numbers are the same as a recorder during recording. Selection is displayed on the camcorder and on the switch. 2 Press the MENU/VOLUME wheel $ in the description on the AV...

Instruction Manual
Page 26
...2668; pg. 23, 25). Press the Recording Start/Stop button w again to engage the Record-Pause mode. EN 26 DUBBING NOTES: ● As the camcorder starts to "LCD", "LCD/TV" or "OFF" in the Menu Screen (੬ pg. 24, 25). • Indications other than date/time and time code ..... set "ON ... rotating. Set "S/AV INPUT" to "ON" and set "TIME CODE" to digital signals with this cover. ** Connect when an S-Video cable is not used. *** GR-D50 only. NOTES: ● After dubbing, set "S/AV INPUT" back to "OFF". ● Analogue signals can be converted to "ON" or "OFF" in the...
...2668; pg. 23, 25). Press the Recording Start/Stop button w again to engage the Record-Pause mode. EN 26 DUBBING NOTES: ● As the camcorder starts to "LCD", "LCD/TV" or "OFF" in the Menu Screen (੬ pg. 24, 25). • Indications other than date/time and time code ..... set "ON ... rotating. Set "S/AV INPUT" to "ON" and set "TIME CODE" to digital signals with this cover. ** Connect when an S-Video cable is not used. *** GR-D50 only. NOTES: ● After dubbing, set "S/AV INPUT" back to "OFF". ● Analogue signals can be converted to "ON" or "OFF" in the...
Instruction Manual
Page 29
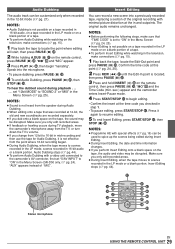
...make connections (੬ pg. 15). 1 Play back the tape to begin "narrating". "6w" & and the Time Code (min.:sec.) appear and the camcorder enters Insert-Pause mode. 4 Press START/STOP a to locate the point where editing will start, then press PAUSE (6) T. 2 While holding A.DUB (e)... turn down the TV's volume. ● If you change from the speaker during playback set "S/AV INPUT" to "SOUND 2" or "MIX" in the Menu Screen (GR-D50 only, ੬ pg. 24). Press it is located, then press PAUSE (6) T. 3 Press and hold INSERT (w) I O P 6 9 0 2 4 3 w 5 e T W a ds f g h j k l ;...
...make connections (੬ pg. 15). 1 Play back the tape to begin "narrating". "6w" & and the Time Code (min.:sec.) appear and the camcorder enters Insert-Pause mode. 4 Press START/STOP a to locate the point where editing will start, then press PAUSE (6) T. 2 While holding A.DUB (e)... turn down the TV's volume. ● If you change from the speaker during playback set "S/AV INPUT" to "SOUND 2" or "MIX" in the Menu Screen (GR-D50 only, ੬ pg. 24). Press it is located, then press PAUSE (6) T. 3 Press and hold INSERT (w) I O P 6 9 0 2 4 3 w 5 e T W a ds f g h j k l ;...

Instruction Manual
Page 31
...AE with special effects, repeat steps 6 and 7 only. NOTES: ● When choosing a scene, set "S/AV INPUT" to "OFF" in the Menu Screen (GR-D50 only, ੬ pg. 24). ● When editing on a VCR equipped with a DV input connector, an optional DV cable can be connected instead of ... codes register time only as accurately as seconds, the time code total time may not match the total programme time exactly. ● Turning off the camcorder's power erases all registered Edit-In and Edit-Out points. r @ # * Connect when an S-Video cable is included in the Random Assemble Editing Menu...
...AE with special effects, repeat steps 6 and 7 only. NOTES: ● When choosing a scene, set "S/AV INPUT" to "OFF" in the Menu Screen (GR-D50 only, ੬ pg. 24). ● When editing on a VCR equipped with a DV input connector, an optional DV cable can be connected instead of ... codes register time only as accurately as seconds, the time code total time may not match the total programme time exactly. ● Turning off the camcorder's power erases all registered Edit-In and Edit-Out points. r @ # * Connect when an S-Video cable is included in the Random Assemble Editing Menu...

Instruction Manual
Page 33
...; If the PC connected to the camcorder via the USB cable is not powered, the camcorder does not enter the USB mode (GR-D50 only). ● The date/time information cannot be sure to use the optional JVC VC-VDV206U or VC-VDV204U DV cable depending on the type of DV connector (4 or... while "ACCESSING FILES" is displayed on the LCD monitor since this can result in real-time. ● Use this camcorder as the power supply instead of your capture board for driver's installation and operation instructions. Connection To A Personal Computer [A] Using USB cable (GR-D50 only) It is possible to do the...
...; If the PC connected to the camcorder via the USB cable is not powered, the camcorder does not enter the USB mode (GR-D50 only). ● The date/time information cannot be sure to use the optional JVC VC-VDV206U or VC-VDV204U DV cable depending on the type of DV connector (4 or... while "ACCESSING FILES" is displayed on the LCD monitor since this can result in real-time. ● Use this camcorder as the power supply instead of your capture board for driver's installation and operation instructions. Connection To A Personal Computer [A] Using USB cable (GR-D50 only) It is possible to do the...

Instruction Manual
Page 39
....5 mm/s Maximum recording time (using 80 min. EN SPECIFICATIONS 39 E & O.E. cassette) : SP : 80 min. Camcorder General Power supply : DC 11.0 V (Using AC Adapter) DC 7.2 V (Using battery pack) Power consumption LCD monitor off, viewfinder on : Approx. 3.4 W LCD monitor on, viewfinder off : Approx. 4.7 W Dimensions (W x H x D) : 69 mm x 94 mm x 143..., stereo : 300 mV (rms), 50 kΩ, analogue, stereo : 4-pin, IEEE 1394 compliant : 4-pin, IEEE 1394 compliant : 5-pin : ø3.5 mm, 2-pole * GR-D50 only AC Adapter Power requirement : AC 110 V to change without notice.
....5 mm/s Maximum recording time (using 80 min. EN SPECIFICATIONS 39 E & O.E. cassette) : SP : 80 min. Camcorder General Power supply : DC 11.0 V (Using AC Adapter) DC 7.2 V (Using battery pack) Power consumption LCD monitor off, viewfinder on : Approx. 3.4 W LCD monitor on, viewfinder off : Approx. 4.7 W Dimensions (W x H x D) : 69 mm x 94 mm x 143..., stereo : 300 mV (rms), 50 kΩ, analogue, stereo : 4-pin, IEEE 1394 compliant : 4-pin, IEEE 1394 compliant : 5-pin : ø3.5 mm, 2-pole * GR-D50 only AC Adapter Power requirement : AC 110 V to change without notice.

Instruction Manual
Page 41
... Switch pg. 9 W Infrared Beam Transmitting Window Transmits the beam signal. Zoom (W) Button pg. 12, 28 * Functions the same as each corresponding button on the camcorder. SHOT] R Audio Monitor Button [AUDIO pg. 25 T • PAUSE Button* • Up Button pg. 28 Y SLOW Button [9 pg. 28 U ...13 5 Rewind Button [2 pg. 13 6 Play/Pause Button [4/6 pg. 13 7 Fast-Forward Button [3 pg. 13 8 USB (Universal Serial Bus) Connector (GR-D50 only pg. 33 9 NIGHT Button pg. 16 0 BACKLIGHT Button pg. 19 ! The transmitted beam may not be effective or may cause incorrect operation outdoors...
... Switch pg. 9 W Infrared Beam Transmitting Window Transmits the beam signal. Zoom (W) Button pg. 12, 28 * Functions the same as each corresponding button on the camcorder. SHOT] R Audio Monitor Button [AUDIO pg. 25 T • PAUSE Button* • Up Button pg. 28 Y SLOW Button [9 pg. 28 U ...13 5 Rewind Button [2 pg. 13 6 Play/Pause Button [4/6 pg. 13 7 Fast-Forward Button [3 pg. 13 8 USB (Universal Serial Bus) Connector (GR-D50 only pg. 33 9 NIGHT Button pg. 16 0 BACKLIGHT Button pg. 19 ! The transmitted beam may not be effective or may cause incorrect operation outdoors...


