Instruction Manual
Page 2
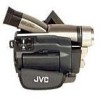
... OR SHOCK HAZARD, DO NOT EXPOSE THIS UNIT TO RAIN OR MOISTURE. It cannot be used for purchasing this product. This camcorder is intended to alert the user to the presence of important operating and maintenance (servicing) instructions in the following pages to the...with NTSC-type color television signals. 2 EN Dear Customer, Thank you . . . .... before use . .... Before use of this digital video camera. Using This Instruction Manual •All major sections and subsections are possible anywhere. refer to ensure safe use , please read thoroughly the Safety Precautions ...
... OR SHOCK HAZARD, DO NOT EXPOSE THIS UNIT TO RAIN OR MOISTURE. It cannot be used for purchasing this product. This camcorder is intended to alert the user to the presence of important operating and maintenance (servicing) instructions in the following pages to the...with NTSC-type color television signals. 2 EN Dear Customer, Thank you . . . .... before use . .... Before use of this digital video camera. Using This Instruction Manual •All major sections and subsections are possible anywhere. refer to ensure safe use , please read thoroughly the Safety Precautions ...
Instruction Manual
Page 5
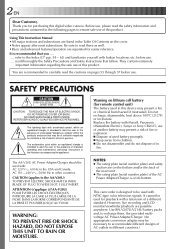
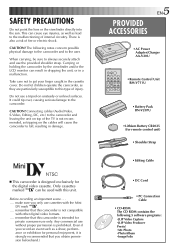
... BN-V207U • Lithium Battery CR2025 (for personal enjoyment, it is intended for the digital video cassette. Do not let children operate the camcorder, as a show, perform- Before recording an important scene . . . .... SAFETY PRECAUTIONS Do not point the lens or the viewfinder directly into... unsteady or unlevel surfaces. make sure you obtain permis- This can result in dropping the unit, or in damage. Ⅲ This camcorder is not compatible with other digital video formats. .... ance or exhibition for remote control unit) •Shoulder Strap •Editing Cable...
... BN-V207U • Lithium Battery CR2025 (for personal enjoyment, it is intended for the digital video cassette. Do not let children operate the camcorder, as a show, perform- Before recording an important scene . . . .... SAFETY PRECAUTIONS Do not point the lens or the viewfinder directly into... unsteady or unlevel surfaces. make sure you obtain permis- This can result in dropping the unit, or in damage. Ⅲ This camcorder is not compatible with other digital video formats. .... ance or exhibition for remote control unit) •Shoulder Strap •Editing Cable...
Instruction Manual
Page 6
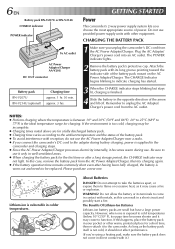
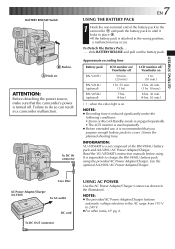
...(68°F to use the AC Power Adapter/Charger near a radio. ● If you unplug the camcorder's DC cord from the AC Power Adapter/Charger. approx. 3 hrs. GETTING STARTED Power This camcorder's 2-way power supply system lets you 're using a heating pad, make sure the battery pack does... a fire or explosion. The POWER indicator lights. 2 Remove the battery pack's protective cap. CHARGING THE BATTERY PACK 1 Make sure you connect the camcorder's DC cord to the adapter during use. Lithium-ion is exposed to cold temperatures (below 10° C/50° F), its usage time becomes ...
...(68°F to use the AC Power Adapter/Charger near a radio. ● If you unplug the camcorder's DC cord from the AC Power Adapter/Charger. approx. 3 hrs. GETTING STARTED Power This camcorder's 2-way power supply system lets you 're using a heating pad, make sure the battery pack does... a fire or explosion. The POWER indicator lights. 2 Remove the battery pack's protective cap. CHARGING THE BATTERY PACK 1 Make sure you connect the camcorder's DC cord to the adapter during use. Lithium-ion is exposed to cold temperatures (below 10° C/50° F), its usage time becomes ...
Instruction Manual
Page 7
..., make sure that you prepare enough battery packs to 240 V. ● For other notes, ੬ pg. 6. A Hook on . Failure to the camcorder and push the battery pack in until it is impossible to charge the BN-V856U battery pack using . To Detach The Battery Pack. . . .... INFORMATION:...1 hr. (30 min.) 2 hrs. 20 min. (1 hr. 10 min.) 8 hrs. 30 min. (4 hrs. 30 min.) ( ) : when the video light is attached in a camcorder malfunction. Read the VU-V856KIT's instruction manuals before using the provided AC Power Adapter/Charger. To DC IN connector USING THE BATTERY PACK 7 EN 1 Hook...
..., make sure that you prepare enough battery packs to 240 V. ● For other notes, ੬ pg. 6. A Hook on . Failure to the camcorder and push the battery pack in until it is impossible to charge the BN-V856U battery pack using . To Detach The Battery Pack. . . .... INFORMATION:...1 hr. (30 min.) 2 hrs. 20 min. (1 hr. 10 min.) 8 hrs. 30 min. (4 hrs. 30 min.) ( ) : when the video light is attached in a camcorder malfunction. Read the VU-V856KIT's instruction manuals before using the provided AC Power Adapter/Charger. To DC IN connector USING THE BATTERY PACK 7 EN 1 Hook...
Instruction Manual
Page 8
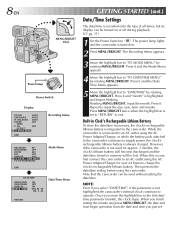
.../ WIPE P. Press it and the Date/ Time Menu appears. 5 Move the highlight bar to "DATE/TIME" by rotating MENU/BRIGHT. Note that the camcorder can be turned on . 2 Press MENU/BRIGHT. Rotating MENU/BRIGHT, input the month. Once you just set to "RETURN" to charge the clock's ...always charged. 8 EN MENU/BRIGHT Dial M Power lamp A OFF PLAY Power Switch Display FOCUS AUTO EXPOSURE AUTO W. The power lamp lights and the camcorder is not used for over 24 hours to exit. The Recording Menu appears. 3 Move the highlight bar to supply power, the clock's rechargeable lithium...
.../ WIPE P. Press it and the Date/ Time Menu appears. 5 Move the highlight bar to "DATE/TIME" by rotating MENU/BRIGHT. Note that the camcorder can be turned on . 2 Press MENU/BRIGHT. Rotating MENU/BRIGHT, input the month. Once you just set to "RETURN" to charge the clock's ...always charged. 8 EN MENU/BRIGHT Dial M Power lamp A OFF PLAY Power Switch Display FOCUS AUTO EXPOSURE AUTO W. The power lamp lights and the camcorder is not used for over 24 hours to exit. The Recording Menu appears. 3 Move the highlight bar to supply power, the clock's rechargeable lithium...
Instruction Manual
Page 9
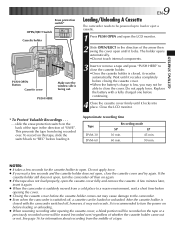
... you may not be able to close the cassette cover and try again. After the cassette holder is closed , it again. ● When the camcorder is switched off, a cassette can be loaded or unloaded. See page 16 for the cassette holder to open. Wait until it recedes completely before closing... over . NOTES: ● It takes a few seconds and the cassette holder does not open until it locks. PUSH HERE 9 EN Loading/Unloading A Cassette The camcorder needs to be powered up to load or eject a cassette. 1 Press PUSH OPEN and open the LCD monitor. 2 Slide OPEN/EJECT in the direction of...
... you may not be able to close the cassette cover and try again. After the cassette holder is closed , it again. ● When the camcorder is switched off, a cassette can be loaded or unloaded. See page 16 for the cassette holder to open. Wait until it recedes completely before closing... over . NOTES: ● It takes a few seconds and the cassette holder does not open until it locks. PUSH HERE 9 EN Loading/Unloading A Cassette The camcorder needs to be powered up to load or eject a cassette. 1 Press PUSH OPEN and open the LCD monitor. 2 Slide OPEN/EJECT in the direction of...
Instruction Manual
Page 10
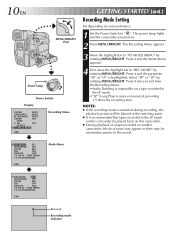
...mode. •"LP" (Long Play) is recommended that tapes recorded in the LP mode on this camcorder be played back on this camcorder. ● During playback of a tape recorded on another camcorder, blocks of noise may appear or there may be momentary pauses in the sound. 4 REC MODE SP... - - - -6- - - - - 10 EN MENU/BRIGHT Dial M Power lamp A OFF PLAY Power Switch Display FOCUS AUTO EXPOSURE AUTO W. The power lamp lights and the camcorder is highlighted. Press it and the parameter "SP" or "LP" is turned on your preference. 1 Set the Power Switch to "REC MODE" by rotating MENU...
...mode. •"LP" (Long Play) is recommended that tapes recorded in the LP mode on this camcorder be played back on this camcorder. ● During playback of a tape recorded on another camcorder, blocks of noise may appear or there may be momentary pauses in the sound. 4 REC MODE SP... - - - -6- - - - - 10 EN MENU/BRIGHT Dial M Power lamp A OFF PLAY Power Switch Display FOCUS AUTO EXPOSURE AUTO W. The power lamp lights and the camcorder is highlighted. Press it and the parameter "SP" or "LP" is turned on your preference. 1 Set the Power Switch to "REC MODE" by rotating MENU...
Instruction Manual
Page 11
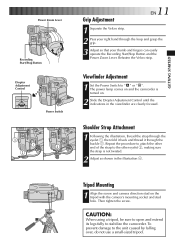
To prevent damage to stabilize the camcorder. The power lamp comes on and the camcorder is not twisted. 2 Adjust as shown in the viewfinder are clearly focused. Then tighten the screw. CAUTION: When using a tripod, be sure ... Power Switch 3 1 4 2 Grip Adjustment EN11 1 Separate the Velcro strip. 2 Pass your right hand through the buckle 2. Tripod Mounting 1 Align the screw and camera direction stud on . 2 Slide the Diopter Adjustment Control until the indications in the illustration 4. Shoulder Strap Attachment 1 Following the illustration, thread the strap through the...
To prevent damage to stabilize the camcorder. The power lamp comes on and the camcorder is not twisted. 2 Adjust as shown in the viewfinder are clearly focused. Then tighten the screw. CAUTION: When using a tripod, be sure ... Power Switch 3 1 4 2 Grip Adjustment EN11 1 Separate the Velcro strip. 2 Pass your right hand through the buckle 2. Tripod Mounting 1 Align the screw and camera direction stud on . 2 Slide the Diopter Adjustment Control until the indications in the illustration 4. Shoulder Strap Attachment 1 Following the illustration, thread the strap through the...
Instruction Manual
Page 12
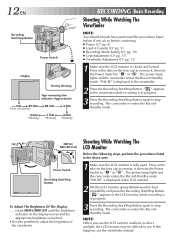
...Press in the above note. 1 Make sure the LCD monitor is in progress. 3 Press the Recording Start/Stop Button again to stop recording. The camcorder re-enters the RecordStandby mode. 180° 90° MENU/ BRIGHT Dial BRIGHT - - - - -6- - - - - Shooting While Watching The...2 min (Blinking) RECORDING Basic Recording Shooting While Watching The Viewfinder NOTE: You should already have performed the procedures listed below. The camcorder re-enters the RecordStandby mode. "PAUSE" is displayed in the tabs on the display moves and the appropriate brightness is reached. •...
...Press in the above note. 1 Make sure the LCD monitor is in progress. 3 Press the Recording Start/Stop Button again to stop recording. The camcorder re-enters the RecordStandby mode. 180° 90° MENU/ BRIGHT Dial BRIGHT - - - - -6- - - - - Shooting While Watching The...2 min (Blinking) RECORDING Basic Recording Shooting While Watching The Viewfinder NOTE: You should already have performed the procedures listed below. The camcorder re-enters the RecordStandby mode. "PAUSE" is displayed in the tabs on the display moves and the appropriate brightness is reached. •...
Instruction Manual
Page 13
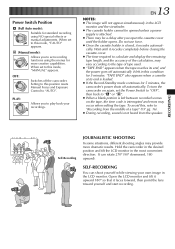
... LCD monitor and the viewfinder. ● The cassette holder cannot be opened unless a power supply is left in this condition for 5 minutes, the camcorder's power shuts off the camcorder. PLAY PLAY: OFF A M Allows you to set the Power Switch to "OFF", then back to the type of a tape" (੬ pg....When set to this position resets Manual Focus and Exposure Control to play back your own image in the most convenient direction. To turn the camcorder on the tape, the time code is closed, it faces forward, then point the lens toward yourself and start recording. To avoid this ...
... LCD monitor and the viewfinder. ● The cassette holder cannot be opened unless a power supply is left in this condition for 5 minutes, the camcorder's power shuts off the camcorder. PLAY PLAY: OFF A M Allows you to set the Power Switch to "OFF", then back to the type of a tape" (੬ pg....When set to this position resets Manual Focus and Exposure Control to play back your own image in the most convenient direction. To turn the camcorder on the tape, the time code is closed, it faces forward, then point the lens toward yourself and start recording. To avoid this ...
Instruction Manual
Page 15
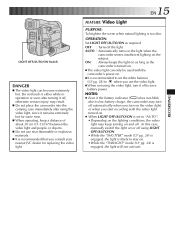
... brighten the scene when natural lighting is too dim. NOTES: ● Even if the battery indicator ( ) does not blink due to low battery charge, the camcorder may turn off automatically when you turn it off . LIGHT OFF/AUTO/ON Switch DANGER Ⅲ The video light can only be used with the... is set to "AUTO": •Depending on . Ⅲ It is recommended to set the white balance (੬ pg. 28) to when you consult your nearest JVC dealer for some time. Ⅲ When operating, keep turning on and off , otherwise serious injury may keep a distance of about 30 cm (11-13/16...
... brighten the scene when natural lighting is too dim. NOTES: ● Even if the battery indicator ( ) does not blink due to low battery charge, the camcorder may turn off automatically when you turn it off . LIGHT OFF/AUTO/ON Switch DANGER Ⅲ The video light can only be used with the... is set to "AUTO": •Depending on . Ⅲ It is recommended to set the white balance (੬ pg. 28) to when you consult your nearest JVC dealer for some time. Ⅲ When operating, keep turning on and off , otherwise serious injury may keep a distance of about 30 cm (11-13/16...
Instruction Manual
Page 16
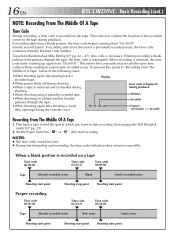
... code begins counting from "00:00:00". If during playback. Minutes Seconds Frames (30 frames = 1 second) Recording From The Middle Of A Tape 1. This means the camcorder may record the same time codes as those existing in the following cases; •When shooting again after shooting a scene then opening/closing the cassette...
... code begins counting from "00:00:00". If during playback. Minutes Seconds Frames (30 frames = 1 second) Recording From The Middle Of A Tape 1. This means the camcorder may record the same time codes as those existing in the following cases; •When shooting again after shooting a scene then opening/closing the cassette...
Instruction Manual
Page 17
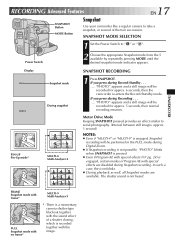
...as well, all Snapshot modes are disabled during Snapshot recording. RECORDING Advanced Features EN17 SNAPSHOT Button MODE Button Snapshot Use your camcorder like a regular camera to take a snapshot, or several of Program AE with special effects are available. SNAPSHOT MODE SELECTION 1 Set the Power ...them in the FULL mode during Record-Standby PHOTO" appears and a still image will be recorded for approx. 6 seconds, then the camcorder re-enters the Record-Standby mode. SNAPSHOT RECORDING 1 Press SNAPSHOT. If you press during Digital Zoom. ● If Snapshot recording ...
...as well, all Snapshot modes are disabled during Snapshot recording. RECORDING Advanced Features EN17 SNAPSHOT Button MODE Button Snapshot Use your camcorder like a regular camera to take a snapshot, or several of Program AE with special effects are available. SNAPSHOT MODE SELECTION 1 Set the Power ...them in the FULL mode during Record-Standby PHOTO" appears and a still image will be recorded for approx. 6 seconds, then the camcorder re-enters the Record-Standby mode. SNAPSHOT RECORDING 1 Press SNAPSHOT. If you press during Digital Zoom. ● If Snapshot recording ...
Instruction Manual
Page 18
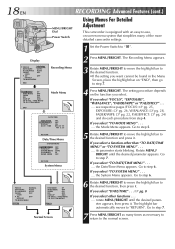
...the Mode Menu appears. Display 2 Press MENU/BRIGHT. BALANCE AUTO FADER OFF / WIPE P. Normal Screen 7 Press MENU/BRIGHT as many of the more detailed camcorder settings. 1 Set the Power Switch to step 6. Go to " ". eter appears, then press it. 18 EN RECORDING Advanced Features (cont.) MENU/BRIGHT Dial... Power Switch Using Menus For Detailed Adjustment This camcorder is equipped with an easy-to-use, on-screen menu system that simplifies many times as necessary to return to "RETURN".
...the Mode Menu appears. Display 2 Press MENU/BRIGHT. BALANCE AUTO FADER OFF / WIPE P. Normal Screen 7 Press MENU/BRIGHT as many of the more detailed camcorder settings. 1 Set the Power Switch to step 6. Go to " ". eter appears, then press it. 18 EN RECORDING Advanced Features (cont.) MENU/BRIGHT Dial... Power Switch Using Menus For Detailed Adjustment This camcorder is equipped with an easy-to-use, on-screen menu system that simplifies many times as necessary to return to "RETURN".
Instruction Manual
Page 19
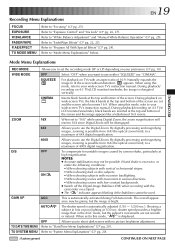
... various directions. • When shooting scenes with low-contrast backgrounds. ● Switch off the Digital Image Stabilizer (DIS) when recording with the camcorder on TVs with movement in low or poor lighting at the top and bottom of the screen are not smooth or natural. WIDE MODE OFF... Select "OFF" when you to "Mode Menu Explanations" below. appears. DIS OFF To compensate for unstable images caused by camera-shake, particularly at the top and bottom of the screen and the image appears like a letterboxed 16:9 movie. ON • When shooting ...
... various directions. • When shooting scenes with low-contrast backgrounds. ● Switch off the Digital Image Stabilizer (DIS) when recording with the camcorder on TVs with movement in low or poor lighting at the top and bottom of the screen are not smooth or natural. WIDE MODE OFF... Select "OFF" when you to "Mode Menu Explanations" below. appears. DIS OFF To compensate for unstable images caused by camera-shake, particularly at the top and bottom of the screen and the image appears like a letterboxed 16:9 movie. ON • When shooting ...
Instruction Manual
Page 20
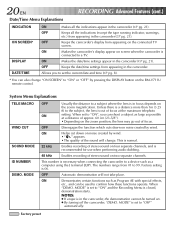
...MODE OFF ON Usually the distance to confirm how these functions operate. ON Helps cut down on the zoom magnification. OFF Keeps the camcorder's display from appearing in the camcorder (੬ pg. 21). Unless there is out of focus at a distance of the sound will not take place. When "DEMO.... indications (except the tape running indicator, warnings, etc.) from 01 to "ON" or "OFF" by pressing the DISPLAY button on screen when the camcorder is connected to "ON" and the Recording Menu is set to the subject, the lens is a distance more than 1m (3.25 ft) to "OFF...
...MODE OFF ON Usually the distance to confirm how these functions operate. ON Helps cut down on the zoom magnification. OFF Keeps the camcorder's display from appearing in the camcorder (੬ pg. 21). Unless there is out of focus at a distance of the sound will not take place. When "DEMO.... indications (except the tape running indicator, warnings, etc.) from 01 to "ON" or "OFF" by pressing the DISPLAY button on screen when the camcorder is connected to "ON" and the Recording Menu is set to the subject, the lens is a distance more than 1m (3.25 ft) to "OFF...
Instruction Manual
Page 21
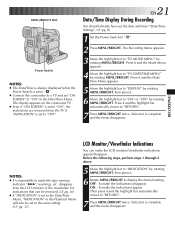
... MENU/BRIGHT. MENU/BRIGHT Dial Power Switch NOTES: ● The Date/Time is always displayed when the Power Switch is set to " ". ● Connect the camcorder to a TV and set "ON SCREEN" to "TO MODE MENU" by rotating MENU/BRIGHT. The display appears on the connected TV . ● Even if "ON...
... MENU/BRIGHT. MENU/BRIGHT Dial Power Switch NOTES: ● The Date/Time is always displayed when the Power Switch is set to " ". ● Connect the camcorder to a TV and set "ON SCREEN" to "TO MODE MENU" by rotating MENU/BRIGHT. The display appears on the connected TV . ● Even if "ON...
Instruction Manual
Page 22
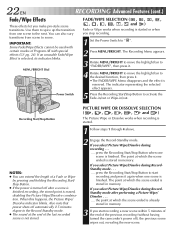
... Switch 5 Press the Recording Start/Stop Button to start recording a new scene within 5 minutes of the end of the previous recording (without having turned the camcorder's power off), the previous scene wipes out, revealing the new scene. Also note that power shuts off after performing a Picture Wipe/ Dissolve . . . .... press the Recording...
... Switch 5 Press the Recording Start/Stop Button to start recording a new scene within 5 minutes of the end of the previous recording (without having turned the camcorder's power off), the previous scene wipes out, revealing the new scene. Also note that power shuts off after performing a Picture Wipe/ Dissolve . . . .... press the Recording...
Instruction Manual
Page 23
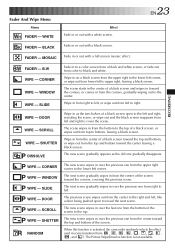
... as the two halves of a black screen toward the top and bottom, or wipe out from , and ). The Picture Wipe/Dissolve function is activated, the camcorder randomly selects the effect used in on a black screen from the upper right to the lower left corner, or wipe out from the corners, gradually...
... as the two halves of a black screen toward the top and bottom, or wipe out from , and ). The Picture Wipe/Dissolve function is activated, the camcorder randomly selects the effect used in on a black screen from the upper right to the lower left corner, or wipe out from the corners, gradually...
Instruction Manual
Page 24
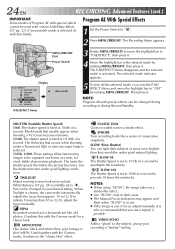
...) You can light dark subjects or areas even brighter than 10 m (32 ft), adjust the focus manually. SLOW 10X The Shutter Speed is chosen, the camcorder automatically adjusts the focus from approx. 10 m (32 ft) to infinity. NOTE: Program AE with special effects can be captured one frame at 1/60th of...
...) You can light dark subjects or areas even brighter than 10 m (32 ft), adjust the focus manually. SLOW 10X The Shutter Speed is chosen, the camcorder automatically adjusts the focus from approx. 10 m (32 ft) to infinity. NOTE: Program AE with special effects can be captured one frame at 1/60th of...


