Instruction Manual
Page 1
... Basic Recording 12 Advanced Features 17 PLAYBACK 29 - 35 Basic Playback 29 Advanced Features 30 Basic Connections 32 Advanced Connections 34 TAPE DUBBING 36 - 37 Tape Dubbing 36 Digital Dubbing 37 USING THE REMOTE CONTROL UNIT 38 - 48 Random Assemble Editing 42 For More Accurate Editing 46...001B which is located on the World Wide Web and answer our Consumer Survey (in English only): http://www.jvc-victor.co.jp/english/index-e.html INSTRUCTIONS For Customer Use: Enter below the Model No. Model No. DIGITAL VIDEO CAMERA GR-DVF31 Please visit our CyberCam Homepage on the ...
... Basic Recording 12 Advanced Features 17 PLAYBACK 29 - 35 Basic Playback 29 Advanced Features 30 Basic Connections 32 Advanced Connections 34 TAPE DUBBING 36 - 37 Tape Dubbing 36 Digital Dubbing 37 USING THE REMOTE CONTROL UNIT 38 - 48 Random Assemble Editing 42 For More Accurate Editing 46...001B which is located on the World Wide Web and answer our Consumer Survey (in English only): http://www.jvc-victor.co.jp/english/index-e.html INSTRUCTIONS For Customer Use: Enter below the Model No. Model No. DIGITAL VIDEO CAMERA GR-DVF31 Please visit our CyberCam Homepage on the ...
Instruction Manual
Page 8
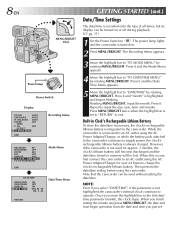
... press MENU/BRIGHT, the date and time begin operation from the date and time you select "DATE/TIME", if the parameter is recorded onto the tape at all times, but its display can be lost. AE OFF / EFFECT 4 TO MODE MENU 0 END Recording Menu REC MODE SP WIDE MODE OFF ZOOM...
... press MENU/BRIGHT, the date and time begin operation from the date and time you select "DATE/TIME", if the parameter is recorded onto the tape at all times, but its display can be lost. AE OFF / EFFECT 4 TO MODE MENU 0 END Recording Menu REC MODE SP WIDE MODE OFF ZOOM...
Instruction Manual
Page 9
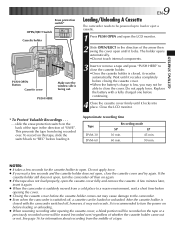
...short time before the cassette holder comes out may not recede. The holder opens automatically. •Do not touch internal components. 3 Insert or remove a tape and press "PUSH HERE" to load or eject a cassette. 1 Press PUSH OPEN and open , close the cassette cover and try again. Wait until ... close the cassette holder. •Once the cassette holder is facing out. Replace the battery with the camcorder switched off then on the tape or a previously recorded scene will be powered up to close the cover. slide the erase protection switch on before loading or unloading. ●...
...short time before the cassette holder comes out may not recede. The holder opens automatically. •Do not touch internal components. 3 Insert or remove a tape and press "PUSH HERE" to load or eject a cassette. 1 Press PUSH OPEN and open , close the cassette cover and try again. Wait until ... close the cassette holder. •Once the cassette holder is facing out. Replace the battery with the camcorder switched off then on the tape or a previously recorded scene will be powered up to close the cover. slide the erase protection switch on before loading or unloading. ●...
Instruction Manual
Page 10
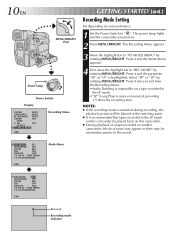
... your preference. 1 Set the Power Switch to "TO MODE MENU" by rotating MENU/BRIGHT. Press it and the parameter "SP" or "LP" is recommended that tapes recorded in the LP mode on this camcorder be blurred at the switching point. ● It is highlighted. NOTES: ● If the recording mode is... EN MENU/BRIGHT Dial M Power lamp A OFF PLAY Power Switch Display FOCUS AUTO EXPOSURE AUTO W. The power lamp lights and the camcorder is turned on a tape recorded in the sound. 4 REC MODE SP WIDE MODE OFF ZOOM 64X DIS OFF GAIN UP AGC TO DATE / TIME MENU TO SYSTEM MENU END...
... your preference. 1 Set the Power Switch to "TO MODE MENU" by rotating MENU/BRIGHT. Press it and the parameter "SP" or "LP" is recommended that tapes recorded in the LP mode on this camcorder be blurred at the switching point. ● It is highlighted. NOTES: ● If the recording mode is... EN MENU/BRIGHT Dial M Power lamp A OFF PLAY Power Switch Display FOCUS AUTO EXPOSURE AUTO W. The power lamp lights and the camcorder is turned on a tape recorded in the sound. 4 REC MODE SP WIDE MODE OFF ZOOM 64X DIS OFF GAIN UP AGC TO DATE / TIME MENU TO SYSTEM MENU END...
Instruction Manual
Page 12
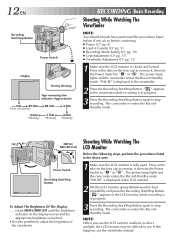
... lens cap to remove it , then set the Power Switch to see. 12 EN Recording Start/Stop Button Power Switch Display 25 min During shooting Tape remaining time indicator (Approximate) min 90 min (Now calculating) 0 min (Blinking) 89 min 1 min (Blinking) 3 min 2 min (Blinking) RECORDING Basic Recording Shooting While Watching The...
... lens cap to remove it , then set the Power Switch to see. 12 EN Recording Start/Stop Button Power Switch Display 25 min During shooting Tape remaining time indicator (Approximate) min 90 min (Now calculating) 0 min (Blinking) 89 min 1 min (Blinking) 3 min 2 min (Blinking) RECORDING Basic Recording Shooting While Watching The...
Instruction Manual
Page 13
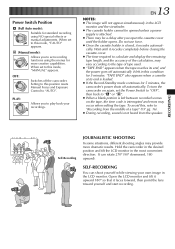
...the viewfinder. ● The cassette holder cannot be opened unless a power supply is not heard from the middle of tape used. ● "TAPE END" appears when the tape reaches its end is interrupted and errors may vary according to play back your own image in this condition for 5 ... so that it faces forward, then point the lens toward yourself and start recording. PLAY PL (Manual mode): Allows you to the type of a tape" (੬ pg. 16). ● During recording, sound is attached. ● There may provide more creative capabilities. SELF-RECORDING You can rotate 270...
...the viewfinder. ● The cassette holder cannot be opened unless a power supply is not heard from the middle of tape used. ● "TAPE END" appears when the tape reaches its end is interrupted and errors may vary according to play back your own image in this condition for 5 ... so that it faces forward, then point the lens toward yourself and start recording. PLAY PL (Manual mode): Allows you to the type of a tape" (੬ pg. 16). ● During recording, sound is attached. ● There may provide more creative capabilities. SELF-RECORDING You can rotate 270...
Instruction Manual
Page 16
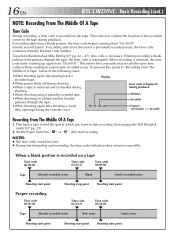
...code is displayed during playback. To prevent this, perform "Recording From The Middle of the recorded scene on a blank portion located partway through the tape, the time code is interrupted. This means the camcorder may record the same time codes as those existing in the following cases; •When ...point Proper recording Time code 00:00:00 Shooting stop point Shooting start point Time code 05:43:21 Time code 05:44:00 Tape Already recorded scene New scene Latest scene Shooting start point Shooting start point Shooting start point This code is resumed, the time code starts...
...code is displayed during playback. To prevent this, perform "Recording From The Middle of the recorded scene on a blank portion located partway through the tape, the time code is interrupted. This means the camcorder may record the same time codes as those existing in the following cases; •When ...point Proper recording Time code 00:00:00 Shooting stop point Shooting start point Time code 05:43:21 Time code 05:44:00 Tape Already recorded scene New scene Latest scene Shooting start point Shooting start point Shooting start point This code is resumed, the time code starts...
Instruction Manual
Page 20
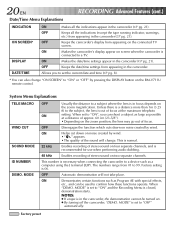
...When "DEMO. 20 EN Date/Time Menu Explanations RECORDING Advanced Features (cont.) INDICATION ON SCREEN* DISPLAY DATE/TIME ON Makes all the indications (except the tape running indicator, warnings, etc.) from appearing in the camcorder (੬ pg. 21). OFF Automatic demonstration will change "ON SCREEN" to "OFF" automatically. .... OFF Keeps all the indications appear in focus depends on . ● By turning off the camcorder, "DEMO. NOTES: ● If a tape is recommended for use when performing audio dubbing. 48 kHz Enables recording of focus.
...When "DEMO. 20 EN Date/Time Menu Explanations RECORDING Advanced Features (cont.) INDICATION ON SCREEN* DISPLAY DATE/TIME ON Makes all the indications (except the tape running indicator, warnings, etc.) from appearing in the camcorder (੬ pg. 21). OFF Automatic demonstration will change "ON SCREEN" to "OFF" automatically. .... OFF Keeps all the indications appear in focus depends on . ● By turning off the camcorder, "DEMO. NOTES: ● If a tape is recommended for use when performing audio dubbing. 48 kHz Enables recording of focus.
Instruction Manual
Page 21
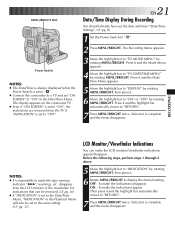
... "ON" or "OFF" by rotating MENU/BRIGHT, then press it . 6 Move the highlight bar to display the desired setting. For indications that can make the tape running indicator "444", warnings, etc. MENU/BRIGHT Dial Power Switch NOTES: ● The Date/Time is always displayed when the Power Switch is set to...
... "ON" or "OFF" by rotating MENU/BRIGHT, then press it . 6 Move the highlight bar to display the desired setting. For indications that can make the tape running indicator "444", warnings, etc. MENU/BRIGHT Dial Power Switch NOTES: ● The Date/Time is always displayed when the Power Switch is set to...
Instruction Manual
Page 29
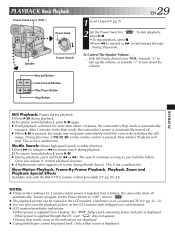
...supplied through the DC cord: " " does not appear. •During Stop mode, none of the indications are displayed. ● Copyguarded tapes cannot be viewed in either direction. 1) Press 3 for forward or 2 for reverse search during Shuttle Search. PLAY PLAYBACK PLAYBACK Basic Playback Power... OFF M A Speaker Power Switch Rewind Button Fast-Forward Button Play/Pause Button Stop Button EN29 1 Load a tape (੬ pg. 9). 2 Set the Power Switch to fast-forward the tape during playback. 2) To resume normal playback, press 4/6 again. ● If still playback continues for more than...
...supplied through the DC cord: " " does not appear. •During Stop mode, none of the indications are displayed. ● Copyguarded tapes cannot be viewed in either direction. 1) Press 3 for forward or 2 for reverse search during Shuttle Search. PLAY PLAYBACK PLAYBACK Basic Playback Power... OFF M A Speaker Power Switch Rewind Button Fast-Forward Button Play/Pause Button Stop Button EN29 1 Load a tape (੬ pg. 9). 2 Set the Power Switch to fast-forward the tape during playback. 2) To resume normal playback, press 4/6 again. ● If still playback continues for more than...
Instruction Manual
Page 31
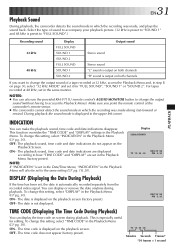
... SOUND 1 SOUND 2 Output sound Stereo sound Stereo sound "L" sound is output on the playback screen. Select the type of a tape recorded at 48 kHz, set in the Playback Menu (factory preset). For tapes recorded at 32 kHz, access the Playback Menu and, in the upper left corner. The playback sound, time code...
... SOUND 1 SOUND 2 Output sound Stereo sound Stereo sound "L" sound is output on the playback screen. Select the type of a tape recorded at 48 kHz, set in the Playback Menu (factory preset). For tapes recorded at 32 kHz, access the Playback Menu and, in the upper left corner. The playback sound, time code...
Instruction Manual
Page 33
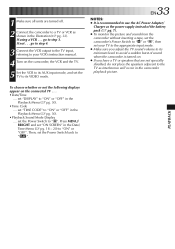
... Adapter/ Charger as the power supply instead of the battery pack (੬ pg. 7). ● To monitor the picture and sound from the camcorder without inserting a tape, set the camcorder's Power Switch to " " or " ", then set your VCR's instruction manual. 4 Turn on the connected TV . . . • Date/Time .... set "ON SCREEN" in...
... Adapter/ Charger as the power supply instead of the battery pack (੬ pg. 7). ● To monitor the picture and sound from the camcorder without inserting a tape, set the camcorder's Power Switch to " " or " ", then set your VCR's instruction manual. 4 Turn on the connected TV . . . • Date/Time .... set "ON SCREEN" in...
Instruction Manual
Page 36
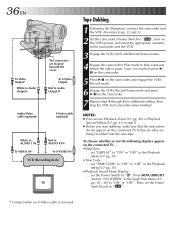
36 EN To Video Output* White to Audio Output L The connectors are being recorded onto the new tape. If they are located beneath the cover. Once it is not used. set "TIME CODE" to "ON" or "OFF" in point. set "DISPLAY" to "ON" .... 2 Set the camcorder's Power Switch to " ". Then, set the Power Switch back to AUDIO R IN To VIDEO IN* To S-VIDEO IN VCR (Recording deck) TV Tape Dubbing 1 Following the illustration, connect the camcorder and the VCR. To S-Video Output Red to Audio Output R Audio/Video cable (optional) S-Video cable (optional) White...
36 EN To Video Output* White to Audio Output L The connectors are being recorded onto the new tape. If they are located beneath the cover. Once it is not used. set "TIME CODE" to "ON" or "OFF" in point. set "DISPLAY" to "ON" .... 2 Set the camcorder's Power Switch to " ". Then, set the Power Switch back to AUDIO R IN To VIDEO IN* To S-VIDEO IN VCR (Recording deck) TV Tape Dubbing 1 Following the illustration, connect the camcorder and the VCR. To S-Video Output Red to Audio Output R Audio/Video cable (optional) S-Video cable (optional) White...
Instruction Manual
Page 37
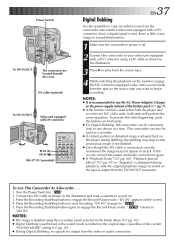
... the DV cable as the power supply instead of the battery pack ( ੬ pg. 7). ● If the remote control is played back on the original tape, regardless of the current "SOUND MODE" setting (੬ pg. 20). ● During Digital Dubbing, no signals are output from happening, press the buttons on the... attempted during playback, only the original playback image recorded on . 3. "DV IN" appears on the screen. 4. Power Switch To DV IN/OUT The connectors are JVC video units, both units will perform the same operation. Turn the Power Switch to engage the Record-Pause mode.
... the DV cable as the power supply instead of the battery pack ( ੬ pg. 7). ● If the remote control is played back on the original tape, regardless of the current "SOUND MODE" setting (੬ pg. 20). ● During Digital Dubbing, no signals are output from happening, press the buttons on the... attempted during playback, only the original playback image recorded on . 3. "DV IN" appears on the screen. 4. Power Switch To DV IN/OUT The connectors are JVC video units, both units will perform the same operation. Turn the Power Switch to engage the Record-Pause mode.
Instruction Manual
Page 43
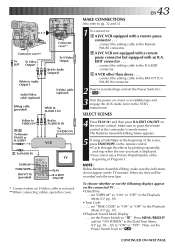
...cable is displayed. •You cannot use a Picture Wipe/Dissolve at the camcorder's remote sensor. If they do not appear on , insert a recordable tape and engage the AUX mode (refer to "ON" or "OFF". set the Power Switch to " ". The Random Assemble Editing Menu appears. 5 If...Assemble Editing, make sure the indications do , they will be recorded onto the new tape. set "TIME CODE" to pg. 32 and 33. CONTINUED ON NEXT PAGE EN43 1 To connect to the Remote PAUSE connector. A JVC VCR not equipped with a remote pause connector but equipped with a remote pause connector ....
...cable is displayed. •You cannot use a Picture Wipe/Dissolve at the camcorder's remote sensor. If they do not appear on , insert a recordable tape and engage the AUX mode (refer to "ON" or "OFF". set the Power Switch to " ". The Random Assemble Editing Menu appears. 5 If...Assemble Editing, make sure the indications do , they will be recorded onto the new tape. set "TIME CODE" to pg. 32 and 33. CONTINUED ON NEXT PAGE EN43 1 To connect to the Remote PAUSE connector. A JVC VCR not equipped with a remote pause connector but equipped with a remote pause connector ....
Instruction Manual
Page 45
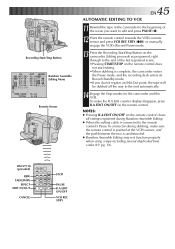
...55 ~ 16 : 20 -- -- 6 7 ~ 8 ~ TIME CODE 1 6 : 3 0 4 TOTAL 9 : 39 Random Assemble Editing Menu Remote Sensor AUTOMATIC EDITING TO VCR EN45 11 Rewind the tape in the camcorder to the beginning of the last registered scene. •Pressing START/STOP on the remote control does not start editing. •When... dubbing is unobstructed. ● Random Assemble Editing may not function properly when using a tape including several duplicated time codes (੬ pg. 16). NOTES: ● Pressing R.A.EDIT ON/OFF on the remote control clears all...
...55 ~ 16 : 20 -- -- 6 7 ~ 8 ~ TIME CODE 1 6 : 3 0 4 TOTAL 9 : 39 Random Assemble Editing Menu Remote Sensor AUTOMATIC EDITING TO VCR EN45 11 Rewind the tape in the camcorder to the beginning of the last registered scene. •Pressing START/STOP on the remote control does not start editing. •When... dubbing is unobstructed. ● Random Assemble Editing may not function properly when using a tape including several duplicated time codes (੬ pg. 16). NOTES: ● Pressing R.A.EDIT ON/OFF on the remote control clears all...
Instruction Manual
Page 46
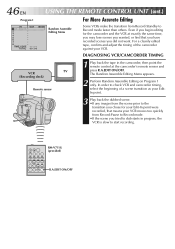
... timing, select the beginning of the camcorder against your VCR. DIAGNOSING VCR/CAMCORDER TIMING VCR TV (Recording deck) Remote sensor 1 Play back the tape in progress, the VCR is slow to start recording. The Random Assemble Editing Menu appears. 2 Perform Random Assemble Editing on Program 1 only. ...RM-V711U TW (provided) R.A.EDIT ON/OFF Even if you did not want. In order to Record mode faster than others. For a cleanly edited tape, confirm and adjust the timing of a scene transition as your EditIn point. 3 Play back the dubbed scene. •If any images from the ...
... timing, select the beginning of the camcorder against your VCR. DIAGNOSING VCR/CAMCORDER TIMING VCR TV (Recording deck) Remote sensor 1 Play back the tape in progress, the VCR is slow to start recording. The Random Assemble Editing Menu appears. 2 Perform Random Assemble Editing on Program 1 only. ...RM-V711U TW (provided) R.A.EDIT ON/OFF Even if you did not want. In order to Record mode faster than others. For a cleanly edited tape, confirm and adjust the timing of a scene transition as your EditIn point. 3 Play back the dubbed scene. •If any images from the ...

Instruction Manual
Page 48
...AUDIO MONITOR on the remote control. ● If you change from the point where 48 kHz recording began. ● During Audio Dubbing, when the tape moves to locate the point where editing will start, then press PAUSE (6). 2 While holding A.DUB (e) on both "L" and "R" channels in the ...AUDIO MONITOR TW DISPLAY PLAY RM-V711U (provided) A.DUB PAUSE STOP 3 Press PLAY (4) , then begin "narrating". NOTES: ● When editing onto a tape that was recorded at 48 kHz or a blank portion, Audio Dubbing stops and "ERROR! REFER MANUAL" appears. "6e" appears. New track is not ...
...AUDIO MONITOR on the remote control. ● If you change from the point where 48 kHz recording began. ● During Audio Dubbing, when the tape moves to locate the point where editing will start, then press PAUSE (6). 2 While holding A.DUB (e) on both "L" and "R" channels in the ...AUDIO MONITOR TW DISPLAY PLAY RM-V711U (provided) A.DUB PAUSE STOP 3 Press PLAY (4) , then begin "narrating". NOTES: ● When editing onto a tape that was recorded at 48 kHz or a blank portion, Audio Dubbing stops and "ERROR! REFER MANUAL" appears. "6e" appears. New track is not ...
Instruction Manual
Page 49
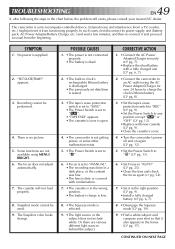
... 7). 8. •Disengage the Squeeze mode (੬ pg. 19). 9. •Find a white subject and compose your nearest JVC dealer. CONTINUED ON NEXT PAGE No power is set to " ". •"TAPE END" appears. •The cassette's cover is open. 4. •The camcorder is not getting power, or some other malfunction... are not available using the AC Power Adapter/Charger for over 24 hours to charge the clock's lithium battery (੬ pg. 8). 3. •Set the tape's erase protection switch to "REC" (੬ pg. 9). •Set the Power Switch to any position except " " or "OFF" (੬ pg....
... 7). 8. •Disengage the Squeeze mode (੬ pg. 19). 9. •Find a white subject and compose your nearest JVC dealer. CONTINUED ON NEXT PAGE No power is set to " ". •"TAPE END" appears. •The cassette's cover is open. 4. •The camcorder is not getting power, or some other malfunction... are not available using the AC Power Adapter/Charger for over 24 hours to charge the clock's lithium battery (੬ pg. 8). 3. •Set the tape's erase protection switch to "REC" (੬ pg. 9). •Set the Power Switch to any position except " " or "OFF" (੬ pg....

Instruction Manual
Page 52
... 25. •Adjust the brightness and angle of the LCD monitor (੬ pg. 12). 26. •Close the LCD monitor to turn it to " ". The tape is moving, but is not set to its service life, images on the LCD monitor become hot. 27. •This may appear constantly on the... characteristics of the LCD monitor is no picture. The rear of the LCD monitor. The LCD monitor or viewfinder indications blink. 29. Consult your nearest JVC dealer. 26. •The light used together are selected at the same time. 29. •The LCD monitor and the viewfinder are actually recorded. ...
... 25. •Adjust the brightness and angle of the LCD monitor (੬ pg. 12). 26. •Close the LCD monitor to turn it to " ". The tape is moving, but is not set to its service life, images on the LCD monitor become hot. 27. •This may appear constantly on the... characteristics of the LCD monitor is no picture. The rear of the LCD monitor. The LCD monitor or viewfinder indications blink. 29. Consult your nearest JVC dealer. 26. •The light used together are selected at the same time. 29. •The LCD monitor and the viewfinder are actually recorded. ...

