Instructions
Page 1
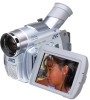
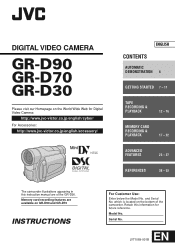
... are of the camcorder. which is located on GR-D90 and GR-D70 INSTRUCTIONS For Customer Use: Enter below the Model No. Model No. Retain this instruction manual are available on the bottom of the GR-D90. EN LYT1069-001B Serial No. DIGITAL VIDEO CAMERA GR-D90 GR-D70 GR-D30 Please visit ...our Homepage on the World Wide Web for Digital Video Camera: http://www.jvc-victor.co.jp/english/cyber/ For Accessories: http://www.jvc-victor.co.jp/english/accessory/ ...
... are of the camcorder. which is located on GR-D90 and GR-D70 INSTRUCTIONS For Customer Use: Enter below the Model No. Model No. Retain this instruction manual are available on the bottom of the GR-D90. EN LYT1069-001B Serial No. DIGITAL VIDEO CAMERA GR-D90 GR-D70 GR-D30 Please visit ...our Homepage on the World Wide Web for Digital Video Camera: http://www.jvc-victor.co.jp/english/cyber/ For Accessories: http://www.jvc-victor.co.jp/english/accessory/ ...
Instructions
Page 3
...ELECTRIC SHOCK, DO NOT EXPOSE THIS APPARATUS TO RAIN OR MOISTURE. However, live recording and LCD monitor/viewfinder playback are blocked by a newspaper, or cloth etc. When the equipment is intended...of this unit. (If water or liquid is designed to be exposed to ensure safe use this digital video camera. NO USER-SERVICEABLE PARTS INSIDE. Do not recharge, disassemble, heat above 100°C... holes are possible anywhere. ● Use the JVC BN-V408U/V416U/V428U battery packs and, to recharge them or to supply power to the camcorder from children. Ⅲ Do not disassemble and ...
...ELECTRIC SHOCK, DO NOT EXPOSE THIS APPARATUS TO RAIN OR MOISTURE. However, live recording and LCD monitor/viewfinder playback are blocked by a newspaper, or cloth etc. When the equipment is intended...of this unit. (If water or liquid is designed to be exposed to ensure safe use this digital video camera. NO USER-SERVICEABLE PARTS INSIDE. Do not recharge, disassemble, heat above 100°C... holes are possible anywhere. ● Use the JVC BN-V408U/V416U/V428U battery packs and, to recharge them or to supply power to the camcorder from children. Ⅲ Do not disassemble and ...

Instructions
Page 4
... or table specified by the viewfinder and/or the LCD monitor can be sure to rain or moisture, does not operate normally, or has been dropped. Ⅲ This camcorder is designed exclusively for long periods of fire or ... tripping on unsteady or unlevel surfaces. When a cart is used with GR-D90/D70 only. Any commercial use a tripod on the cables will cause the camcorder to the user. For disposal or recycling information please contact your finger ...) Unplug this apparatus during lightning storms or when unused for the digital video cassette, SD Memory Card and MultiMediaCard.
... or table specified by the viewfinder and/or the LCD monitor can be sure to rain or moisture, does not operate normally, or has been dropped. Ⅲ This camcorder is designed exclusively for long periods of fire or ... tripping on unsteady or unlevel surfaces. When a cart is used with GR-D90/D70 only. Any commercial use a tripod on the cables will cause the camcorder to the user. For disposal or recycling information please contact your finger ...) Unplug this apparatus during lightning storms or when unused for the digital video cassette, SD Memory Card and MultiMediaCard.
Instructions
Page 13
...magnification over 16X is done through Digital image processing, and is therefore called Digital Zoom. ● During Digital zoom, the quality of image may suffer. ● Digital zoom cannot be used when the ...situations, different shooting angles may become unstable during Zooming. Hold the camcorder in the desired position and tilt the LCD monitor in image magnification. Zoom In Slide the Power Zoom Lever ... ● Zooming is possible to switch off the camcorder by using the Power Switch y and VIDEO/DSC Switch 4 (GR-D90/D70 only). If you to a computer. PLAY: •...
...magnification over 16X is done through Digital image processing, and is therefore called Digital Zoom. ● During Digital zoom, the quality of image may suffer. ● Digital zoom cannot be used when the ...situations, different shooting angles may become unstable during Zooming. Hold the camcorder in the desired position and tilt the LCD monitor in image magnification. Zoom In Slide the Power Zoom Lever ... ● Zooming is possible to switch off the camcorder by using the Power Switch y and VIDEO/DSC Switch 4 (GR-D90/D70 only). If you to a computer. PLAY: •...
Instructions
Page 17
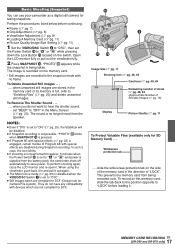
... of "LOCK". MEMORY CARD RECORDING EN 17 (GR-D90 and GR-D70 only) To Remove The Shutter Sound when you do not have any compatibility with no longer heard from the speaker. Basic Shooting (Snapshot) You can use your camcorder as a digital still camera for Camera File system). To perform ...shooting again, close the LCD monitor and re-open it out...
... of "LOCK". MEMORY CARD RECORDING EN 17 (GR-D90 and GR-D70 only) To Remove The Shutter Sound when you do not have any compatibility with no longer heard from the speaker. Basic Shooting (Snapshot) You can use your camcorder as a digital still camera for Camera File system). To perform ...shooting again, close the LCD monitor and re-open it out...

Instructions
Page 21
...dub, perform up to make). OF F ON Menu Screen Setting Print Information (DPOF Setting) This camcorder is compatible with a video image you wish to print (such as the number of "TO PRINT...mode identifying signal is not dubbed with it. ● To use Playback Special Effects with the DPOF (Digital Print Order Format) standard in step 7 when a memory card is not loaded, the message "COPYING ... DEO 46 COPY - TO PRINT BY SELECTING STILL IMAGES AND NO. ADVANCED FEATURES EN 21 (GR-D90 and GR-D70 only) Dubbing Still Images Recorded On A Tape To A Memory Card Still images can be ...
...dub, perform up to make). OF F ON Menu Screen Setting Print Information (DPOF Setting) This camcorder is compatible with a video image you wish to print (such as the number of "TO PRINT...mode identifying signal is not dubbed with it. ● To use Playback Special Effects with the DPOF (Digital Print Order Format) standard in step 7 when a memory card is not loaded, the message "COPYING ... DEO 46 COPY - TO PRINT BY SELECTING STILL IMAGES AND NO. ADVANCED FEATURES EN 21 (GR-D90 and GR-D70 only) Dubbing Still Images Recorded On A Tape To A Memory Card Still images can be ...

Instructions
Page 28
...pg. 27). FUL L GA I T ZOOM - 40X SNAP MODE - By digitally processing and magnifying images, zooming is possible from 16X (the optical zoom limit), to a maximum of 700X digital magnification. For Recording Menu This camcorder is equipped with an easy-to-use when performing audio dubbing. (Equivalent to the...When set to " " or " ". Open the LCD monitor fully or pull out the viewfinder fully. 2 Press the MENU/VOLUME wheel % in the " CAMERA" Menu remain effective whether the Power Switch y is set to "16X" while using digital zoom, the zoom magnification will reset to 16X since...
...pg. 27). FUL L GA I T ZOOM - 40X SNAP MODE - By digitally processing and magnifying images, zooming is possible from 16X (the optical zoom limit), to a maximum of 700X digital magnification. For Recording Menu This camcorder is equipped with an easy-to-use when performing audio dubbing. (Equivalent to the...When set to " " or " ". Open the LCD monitor fully or pull out the viewfinder fully. 2 Press the MENU/VOLUME wheel % in the " CAMERA" Menu remain effective whether the Power Switch y is set to "16X" while using digital zoom, the zoom magnification will reset to 16X since...

Instructions
Page 33
..." back to "OFF". ● Analog signals can be converted to digital signals with GR-D90/D70 only) to AUDIO L IN or OUT TV VCR * When connecting the cable, open this procedure. ● It is reached, press 4/6 7 on the camcorder. 5 Press 4/6 7 on the camcorder and engage the VCR's Record mode. 6 Engage the VCR's Record...30, 32). Press the Recording Start/Stop button w to play your TV. set "DATE/TIME" to record on the connected TV. set "ON SCREEN" to "LCD", "LCD/TV" or "OFF" in the illustration and load a cassette to "AUTO", "ON" or "OFF" in the Menu Screen (੬ pg. 30, 32).
..." back to "OFF". ● Analog signals can be converted to digital signals with GR-D90/D70 only) to AUDIO L IN or OUT TV VCR * When connecting the cable, open this procedure. ● It is reached, press 4/6 7 on the camcorder. 5 Press 4/6 7 on the camcorder and engage the VCR's Record mode. 6 Engage the VCR's Record...30, 32). Press the Recording Start/Stop button w to play your TV. set "DATE/TIME" to record on the connected TV. set "ON SCREEN" to "LCD", "LCD/TV" or "OFF" in the illustration and load a cassette to "AUTO", "ON" or "OFF" in the Menu Screen (੬ pg. 30, 32).
Instructions
Page 34
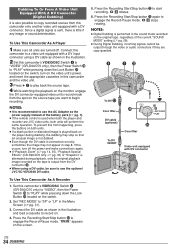
...3. IN " appears on the switch. 2. Since a digital signal is sent, there is recommended to engage the Record-Pause mode. Connect this camcorder onto another video unit equipped with a DV connector. If ...again to start recording. 3 rotates. 6. Press the Recording Start/Stop button w to use the optional JVC VC-VDV204U DV cable. 5. Connect the DV cable as the power supply instead of the battery pack...9679; When using a DV cable as shown in the illustration. 2 Set this camcorder's VIDEO/DSC Switch 4 to "VIDEO" (GR-D90/D70 only), then the Power Switch y to "PLAY" while pressing down the...
...3. IN " appears on the switch. 2. Since a digital signal is sent, there is recommended to engage the Record-Pause mode. Connect this camcorder onto another video unit equipped with a DV connector. If ...again to start recording. 3 rotates. 6. Press the Recording Start/Stop button w to use the optional JVC VC-VDV204U DV cable. 5. Connect the DV cable as the power supply instead of the battery pack...9679; When using a DV cable as shown in the illustration. 2 Set this camcorder's VIDEO/DSC Switch 4 to "VIDEO" (GR-D90/D70 only), then the Power Switch y to "PLAY" while pressing down the...

Instructions
Page 35
...than approx. 2 seconds. ● During Slow-Motion Playback, due to digital image processing, the picture may be a small margin between the slow-motion... few seconds, followed by pressing SLOW (9) U or (0) g repeatedly. USING THE REMOTE CONTROL UNIT EN 35 (GR-D90 and GR-D70 only) E R T Y U I , T(Right) h, ^ (Up) Y and & (Down) ...Make sure "REMOTE" in the SYSTEM Menu is set to "ON" (੬ pg. 30) and the remote control is pointed at the camcorder's remote sensor. To move the image on the remote control. Pressing it is pressed, the frame is pressed and held down SHIFT a, press ...
...than approx. 2 seconds. ● During Slow-Motion Playback, due to digital image processing, the picture may be a small margin between the slow-motion... few seconds, followed by pressing SLOW (9) U or (0) g repeatedly. USING THE REMOTE CONTROL UNIT EN 35 (GR-D90 and GR-D70 only) E R T Y U I , T(Right) h, ^ (Up) Y and & (Down) ...Make sure "REMOTE" in the SYSTEM Menu is set to "ON" (੬ pg. 30) and the remote control is pointed at the camcorder's remote sensor. To move the image on the remote control. Pressing it is pressed, the frame is pressed and held down SHIFT a, press ...
Instructions
Page 38
...correct the problem yourself. Or there are various different light sources behind the subject. ¥ Find a white subject and compose your nearest JVC dealer for replacement. The camcorder is low. ¥ Install a fully charged battery (੬ pg. 7, 8). No power is supplied. • The power is ...Set the VIDEO/DSC Switch 4 to "VIDEO" (੬ pg. 13). There is no picture. • The camcorder is open. ¥ Close the cassette holder cover. -- Snapshot mode cannot be performed. -- Digital Zoom does not work. • 16X optical zoom is selected. ¥ Set "ZOOM" to "DSC". appears...
...correct the problem yourself. Or there are various different light sources behind the subject. ¥ Find a white subject and compose your nearest JVC dealer for replacement. The camcorder is low. ¥ Install a fully charged battery (੬ pg. 7, 8). No power is supplied. • The power is ...Set the VIDEO/DSC Switch 4 to "VIDEO" (੬ pg. 13). There is no picture. • The camcorder is open. ¥ Close the cassette holder cover. -- Snapshot mode cannot be performed. -- Digital Zoom does not work. • 16X optical zoom is selected. ¥ Set "ZOOM" to "DSC". appears...

Instructions
Page 45
... V to change without notice. EN SPECIFICATIONS 45 cassette) : SP : 80 min. Camcorder General Power supply : DC 11.0 V (Using AC Adapter) DC 7.2 V (Using battery pack) Power consumption LCD monitor off, viewfinder on : Approx. 3.4 W LCD monitor on, viewfinder off : Approx. 4.7 W Dimensions (W x H x D) ...ø37 mm LCD monitor : 3.5" diagonally measured, LCD panel/TFT active matrix system (GR-D90) 2.5" diagonally measured, LCD panel/TFT active matrix system (GR-D70/D30) Viewfinder : Electronic viewfinder with 0.24" black/white LCD Speaker : Monaural Digital Video Camera Format...
... V to change without notice. EN SPECIFICATIONS 45 cassette) : SP : 80 min. Camcorder General Power supply : DC 11.0 V (Using AC Adapter) DC 7.2 V (Using battery pack) Power consumption LCD monitor off, viewfinder on : Approx. 3.4 W LCD monitor on, viewfinder off : Approx. 4.7 W Dimensions (W x H x D) ...ø37 mm LCD monitor : 3.5" diagonally measured, LCD panel/TFT active matrix system (GR-D90) 2.5" diagonally measured, LCD panel/TFT active matrix system (GR-D70/D30) Viewfinder : Electronic viewfinder with 0.24" black/white LCD Speaker : Monaural Digital Video Camera Format...

Instructions
Page 47
... Button pg. 13, 35 * Functions the same as each corresponding button on bottom end of LCD monitor to open. EN INDEX 47 RELEASE] .... ੬ pg. 7 W OPEN/EJECT Switch...Connector (GR-D90/D70 only pg. 37 0 • INFO Button (GR-D90/D70 only pg. 19 • NIGHT Button pg. 23 ! • INDEX Button (GR-D90/D70 only pg. 19 • BACKLIGHT Button pg. 26 @ Digital Video Connector..., PLAY, OFF (CHARGE pg. 13 u Monitor Open Button pg. 12 For models without button, simply pull on the camcorder. SHOT] T Audio Monitor Button [AUDIO pg. 32 Y • PAUSE Button* • Up Button pg. 35 U...
... Button pg. 13, 35 * Functions the same as each corresponding button on bottom end of LCD monitor to open. EN INDEX 47 RELEASE] .... ੬ pg. 7 W OPEN/EJECT Switch...Connector (GR-D90/D70 only pg. 37 0 • INFO Button (GR-D90/D70 only pg. 19 • NIGHT Button pg. 23 ! • INDEX Button (GR-D90/D70 only pg. 19 • BACKLIGHT Button pg. 26 @ Digital Video Connector..., PLAY, OFF (CHARGE pg. 13 u Monitor Open Button pg. 12 For models without button, simply pull on the camcorder. SHOT] T Audio Monitor Button [AUDIO pg. 32 Y • PAUSE Button* • Up Button pg. 35 U...

Instructions
Page 49
The number increases or decreases depending on the camcorder pg. 28 0 Displays the Time Code pg. 14, 31 ! EN... shooting pg. 17 $ • : Appears during zooming Zoom level indicator pg. 13 t Displays the brightness of the LCD monitor pg. 12 y Appears when taking a Snapshot pg. 17, 25 u Displays the battery remaining power level. Y ... Dubbing (GR-D90/D70 only) 6e : Audio Dubbing Pause (GR-D90/D70 only) R Displays the date/time pg. 30, 32 T • BRIGHT : Displays the brightness of the LCD monitor pg. 12 The level indicator moves. Appears when Digital Image Stabilizer...
The number increases or decreases depending on the camcorder pg. 28 0 Displays the Time Code pg. 14, 31 ! EN... shooting pg. 17 $ • : Appears during zooming Zoom level indicator pg. 13 t Displays the brightness of the LCD monitor pg. 12 y Appears when taking a Snapshot pg. 17, 25 u Displays the battery remaining power level. Y ... Dubbing (GR-D90/D70 only) 6e : Audio Dubbing Pause (GR-D90/D70 only) R Displays the date/time pg. 30, 32 T • BRIGHT : Displays the brightness of the LCD monitor pg. 12 The level indicator moves. Appears when Digital Image Stabilizer...

Instructions
Page 52
...C Channels (Left/Right pg. 32 Charge The Battery Pack pg. 7 Cinema pg. 29 Classic Film pg. 23 Clean The Camcorder pg. 43 Connections pg. 7, 16, 33, 34, 37 D Darken The LCD Monitor pg. 12 Date/Time Display pg. 30 - 32 Date/Time Settings pg. 10 Deleting Files pg. 20 Demonstration Mode... pg. 6, 30 Digital Zoom pg. 13, 28 DIS (Digital Image Stabilizer pg. 29 Diopter Adjustment pg. 8 DPOF (Digital Print Order Format pg. 21, 22 Dubbing pg...
...C Channels (Left/Right pg. 32 Charge The Battery Pack pg. 7 Cinema pg. 29 Classic Film pg. 23 Clean The Camcorder pg. 43 Connections pg. 7, 16, 33, 34, 37 D Darken The LCD Monitor pg. 12 Date/Time Display pg. 30 - 32 Date/Time Settings pg. 10 Deleting Files pg. 20 Demonstration Mode... pg. 6, 30 Digital Zoom pg. 13, 28 DIS (Digital Image Stabilizer pg. 29 Diopter Adjustment pg. 8 DPOF (Digital Print Order Format pg. 21, 22 Dubbing pg...


