
Software Guide
Page 4
... following provision. How to handle a CD-ROM ● Take care not to soil or scratch the mirror surface (opposite to You. In this manual. ● Use only the provided CD-ROM. Victor Company of Japan, Limited NOTE: If You acquired the Program in Germany, the provisions of Sections...(Limited Warranty) and 5 (Limited Liability) provided above will be in conflict with respect to the execution, interpretation and performance of this Agreement, JVC may claim against You for any damages caused by Your breach. If the CD-ROM gets dirty, gently wipe it away from direct sunlight. Should...
... following provision. How to handle a CD-ROM ● Take care not to soil or scratch the mirror surface (opposite to You. In this manual. ● Use only the provided CD-ROM. Victor Company of Japan, Limited NOTE: If You acquired the Program in Germany, the provisions of Sections...(Limited Warranty) and 5 (Limited Liability) provided above will be in conflict with respect to the execution, interpretation and performance of this Agreement, JVC may claim against You for any damages caused by Your breach. If the CD-ROM gets dirty, gently wipe it away from direct sunlight. Should...
Software Guide
Page 5
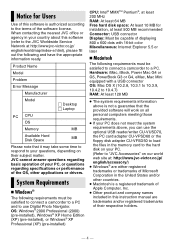
... must be satisfied to connect a camcorder to a PC and to a PC. When contacting the nearest JVC office or agency in your PC. (Refer to the terms of their subject matter. JVC cannot answer questions regarding basic operation of...Miscellaneous: Internet Explorer 5.5 or later Ⅲ Macintosh The following requirements must be satisfied to connect a camcorder to use the optional USB reader/writer CU-VUSD70, the PC card adapter CU-VPSD60 or the floppy... 10 MB for Users Use of this instruction manual are trademarks and/or registered trademarks of the software license.
... must be satisfied to connect a camcorder to a PC and to a PC. When contacting the nearest JVC office or agency in your PC. (Refer to the terms of their subject matter. JVC cannot answer questions regarding basic operation of...Miscellaneous: Internet Explorer 5.5 or later Ⅲ Macintosh The following requirements must be satisfied to connect a camcorder to use the optional USB reader/writer CU-VUSD70, the PC card adapter CU-VPSD60 or the floppy... 10 MB for Users Use of this instruction manual are trademarks and/or registered trademarks of the software license.
Software Guide
Page 12
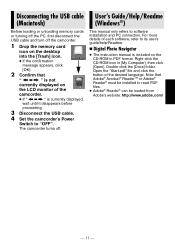
...to its user's guide/help/Readme. Ⅲ Digital Photo Navigator ● The instruction manual is currently displayed, wait until it disappears before proceeding. 3 Disconnect the USB cable. 4 Set the camcorder's Power Switch to software installation and PC connection. User's Guide/Help/Readme (Windows&#...174;) This manual only refers to "OFF". Right-click the CD-ROM icon in PDF format. Note...
...to its user's guide/help/Readme. Ⅲ Digital Photo Navigator ● The instruction manual is currently displayed, wait until it disappears before proceeding. 3 Disconnect the USB cable. 4 Set the camcorder's Power Switch to software installation and PC connection. User's Guide/Help/Readme (Windows&#...174;) This manual only refers to "OFF". Right-click the CD-ROM icon in PDF format. Note...
Instructions
Page 2
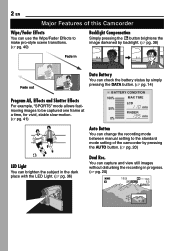
min 640F 13 PHOTO 2 EN Major Features of this Camcorder Wipe/Fader Effects You can use the Wipe/Fader Effects to make pro-style scene transitions. (੬ pg. 40) Backlight Compensation Simply pressing the button ...; pg. 14) BATTERY CONDITION 100% MAX TIME LCD 50% min FINDER 0% min Auto Button You can change the recording mode between manual setting to the standard mode setting of the camcorder by pressing the AUTO button. (੬ pg. 20) LED Light You can capture and view still images without disturbing the recording...
min 640F 13 PHOTO 2 EN Major Features of this Camcorder Wipe/Fader Effects You can use the Wipe/Fader Effects to make pro-style scene transitions. (੬ pg. 40) Backlight Compensation Simply pressing the button ...; pg. 14) BATTERY CONDITION 100% MAX TIME LCD 50% min FINDER 0% min Auto Button You can change the recording mode between manual setting to the standard mode setting of the camcorder by pressing the AUTO button. (੬ pg. 20) LED Light You can capture and view still images without disturbing the recording...
Instructions
Page 6
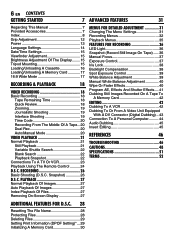
... Information (DPOF Setting)* ...29 Initializing A Memory Card 30 Snapshot 26 D.S.C. 6 EN CONTENTS GETTING STARTED 7 ADVANCED FEATURES 31 Regarding This Manual 7 Provided Accessories 7 Index 8 Grip Adjustment 12 Power 13 Language Settings 14 Date/Time Settings 15 Viewfinder Adjustment 15 Brightness Adjustment Of The...19 Journalistic Shooting 19 Interface Shooting 19 Time Code 20 Recording From The Middle Of A Tape...20 Dual Rec 20 Auto/Manual Mode 20 VIDEO PLAYBACK 21 Normal Playback 21 Still Playback 21 Variable Shuttle Search 22 Blank Search 22 Playback Snapshot 22 ...
... Information (DPOF Setting)* ...29 Initializing A Memory Card 30 Snapshot 26 D.S.C. 6 EN CONTENTS GETTING STARTED 7 ADVANCED FEATURES 31 Regarding This Manual 7 Provided Accessories 7 Index 8 Grip Adjustment 12 Power 13 Language Settings 14 Date/Time Settings 15 Viewfinder Adjustment 15 Brightness Adjustment Of The...19 Journalistic Shooting 19 Interface Shooting 19 Time Code 20 Recording From The Middle Of A Tape...20 Dual Rec 20 Auto/Manual Mode 20 VIDEO PLAYBACK 21 Normal Playback 21 Still Playback 21 Variable Shuttle Search 22 Blank Search 22 Playback Snapshot 22 ...

Instructions
Page 7
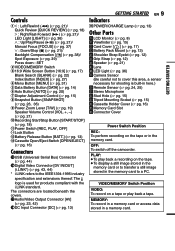
... shipment (with one core filter, the end that is pre-installed in the Remote Control Unit at time of the camcorder, provided cables may be connected to the camcorder. ● Make sure to select SET: SET Lithium Battery CR2025* (for connections. If a cable has only one or more...to the filter should be equipped with insulation sheet). Do not use the Remote Control Unit, remove the insulation sheet. Regarding This Manual Control Lever LCD Monitor GETTING STARTED EN 7 Provided Accessories OR AC Adapter AP-V14U or AP-V18U GETTING STARTED OR Control lever There are...
... shipment (with one core filter, the end that is pre-installed in the Remote Control Unit at time of the camcorder, provided cables may be connected to the camcorder. ● Make sure to select SET: SET Lithium Battery CR2025* (for connections. If a cable has only one or more...to the filter should be equipped with insulation sheet). Do not use the Remote Control Unit, remove the insulation sheet. Regarding This Manual Control Lever LCD Monitor GETTING STARTED EN 7 Provided Accessories OR AC Adapter AP-V14U or AP-V18U GETTING STARTED OR Control lever There are...
Instructions
Page 9
... Review [QUICK REVIEW] (੬ pg. 18) 2 : Right/Fast-Forward (¡) (੬ pg. 21)/ LED Light [LIGHT] (੬ pg. 36) 3 : Up/Play/Pause (6) (੬ pg. 21)/ Manual Focus [FOCUS] (੬ pg. 37) 4 : Down/Stop (7) (੬ pg. 21)/ Backlight Compensation [ ] (੬ pg. 38)/ Spot Exposure (੬ pg. 39) Press down : SET 2VIDEO/MEMORY.... 36) ìCamera Sensor (Be careful not to cover this area, a sensor necessary for products compliant with the i.LINK standard. OFF: To switch off the camcorder.
... Review [QUICK REVIEW] (੬ pg. 18) 2 : Right/Fast-Forward (¡) (੬ pg. 21)/ LED Light [LIGHT] (੬ pg. 36) 3 : Up/Play/Pause (6) (੬ pg. 21)/ Manual Focus [FOCUS] (੬ pg. 37) 4 : Down/Stop (7) (੬ pg. 21)/ Backlight Compensation [ ] (੬ pg. 38)/ Spot Exposure (੬ pg. 39) Press down : SET 2VIDEO/MEMORY.... 36) ìCamera Sensor (Be careful not to cover this area, a sensor necessary for products compliant with the i.LINK standard. OFF: To switch off the camcorder.

Instructions
Page 10
...Backlight Compensation Indicator (੬ pg. 38) ±: Exposure Adjustment Indicator (੬ pg. 37) : Iris Lock Indicator (੬ pg. 38) )Date/Time (੬ pg. 15) ~Manual Focus Adjustment Indicator (੬ pg. 37) "# $ 1 2M 3 4 5 6 7 8 10 x 640F 15 % PHOTO & 3( 11 : 13 AM DEC . 6 . 2007...memory card is displayed) "SOUND 12BIT/16BIT: Sound Mode Indicator (੬ pg. 33) (Appears for approx. 5 seconds after turning on the camcorder.) During Both Video And D.S.C. 10 EN GETTING STARTED LCD Monitor/Viewfinder Indications During Video Recording Only 12 3 4 16:9 LP -...
...Backlight Compensation Indicator (੬ pg. 38) ±: Exposure Adjustment Indicator (੬ pg. 37) : Iris Lock Indicator (੬ pg. 38) )Date/Time (੬ pg. 15) ~Manual Focus Adjustment Indicator (੬ pg. 37) "# $ 1 2M 3 4 5 6 7 8 10 x 640F 15 % PHOTO & 3( 11 : 13 AM DEC . 6 . 2007...memory card is displayed) "SOUND 12BIT/16BIT: Sound Mode Indicator (੬ pg. 33) (Appears for approx. 5 seconds after turning on the camcorder.) During Both Video And D.S.C. 10 EN GETTING STARTED LCD Monitor/Viewfinder Indications During Video Recording Only 12 3 4 16:9 LP -...

Instructions
Page 14
... The language on the display can be set to "OFF", it is recommended that the camcorder's power is in progress. ● If "COMMUNICATION ERROR" appears instead of LCD monitor in this manual supposes the use the viewfinder, close the LCD monitor and pull out the view...ATTENTION: Before detaching the power source, make sure that you tried to the normal screen. ● Data battery status cannot be a problem with your nearest JVC dealer. When the battery is set to "REC", the recording mode should be changed. 1 (੬ pg. 34) Select LANGUAGE ENGLISH 2 SET 1 ...
... The language on the display can be set to "OFF", it is recommended that the camcorder's power is in progress. ● If "COMMUNICATION ERROR" appears instead of LCD monitor in this manual supposes the use the viewfinder, close the LCD monitor and pull out the view...ATTENTION: Before detaching the power source, make sure that you tried to the normal screen. ● Data battery status cannot be a problem with your nearest JVC dealer. When the battery is set to "REC", the recording mode should be changed. 1 (੬ pg. 34) Select LANGUAGE ENGLISH 2 SET 1 ...

Instructions
Page 20
... tape during shooting. ● When shooting using no special effects or manual adjustments. When recording is resumed, the time code starts counting up again from "00:00:00" (minute:second:frame). This means the camcorder may record the same time codes as those existing in progress. When... manual mode is selected, the indicator " " appears on the tape. Display Minutes Seconds 12 : 34 : 24 Frames* (...
... tape during shooting. ● When shooting using no special effects or manual adjustments. When recording is resumed, the time code starts counting up again from "00:00:00" (minute:second:frame). This means the camcorder may record the same time codes as those existing in progress. When... manual mode is selected, the indicator " " appears on the tape. Display Minutes Seconds 12 : 34 : 24 Frames* (...

Instructions
Page 23
.... 35). If not, go to step 3. If using a VCR, go to step 4. 3 Connect the VCR output to the TV input, referring to your VCR's instruction manual. 4 Turn on the camcorder, the VCR and the TV. 5 Set the VCR to its AUX input mode, and set "16:9 OUTPUT" of sound when the...; Make sure you adjust the TV sound volume to use the AC Adapter as shown in the illustration. NOTES: ● It is turned on the camcorder. (੬ pg. 21) ● Please set the TV to its minimum level to avoid a sudden burst of Playback Menus so that the image may suit...
.... 35). If not, go to step 3. If using a VCR, go to step 4. 3 Connect the VCR output to the TV input, referring to your VCR's instruction manual. 4 Turn on the camcorder, the VCR and the TV. 5 Set the VCR to its AUX input mode, and set "16:9 OUTPUT" of sound when the...; Make sure you adjust the TV sound volume to use the AC Adapter as shown in the illustration. NOTES: ● It is turned on the camcorder. (੬ pg. 21) ● Please set the TV to its minimum level to avoid a sudden burst of Playback Menus so that the image may suit...
Instructions
Page 37
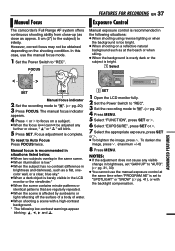
...to " ". (੬ pg. 20) 3 Press FOCUS. However, correct focus may not be adjusted any visible change in finity. Select ADVANCED FEATURES 1 2 SET Manual focus indicator M 2 Set the recording mode to " ". (੬ pg. 20) 4 Press MENU. 5 Select "FUNCTION", press SET or 2. 6 Select "EXPOSURE", ... adjustment does not cause any further or closer, " " or " " will blink. 5 Press SET. FEATURES FOR RECORDING EN 37 Manual Focus Exposure Control The camcorder's Full Range AF system offers continuous shooting ability from close-up (as close as a flat the beach or when skiing. &#...
...to " ". (੬ pg. 20) 3 Press FOCUS. However, correct focus may not be adjusted any visible change in finity. Select ADVANCED FEATURES 1 2 SET Manual focus indicator M 2 Set the recording mode to " ". (੬ pg. 20) 4 Press MENU. 5 Select "FUNCTION", press SET or 2. 6 Select "EXPOSURE", ... adjustment does not cause any further or closer, " " or " " will blink. 5 Press SET. FEATURES FOR RECORDING EN 37 Manual Focus Exposure Control The camcorder's Full Range AF system offers continuous shooting ability from close-up (as close as a flat the beach or when skiing. &#...
Instructions
Page 39
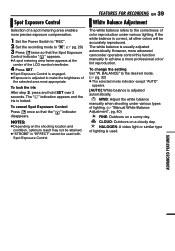
... usually adjusted automatically. If the white balance is correct, all other colors will be used . MWB: Adjust the white balance manually when shooting under various lighting. ADVANCED FEATURES To cancel Spot Exposure Control Press once so that the Spot Exposure Control indicator " ...a cloudy day. HALOGEN: A video light or similar type of the selected area most appropriate. However, more advanced camcorder operators control this function manually to the correctness of color reproduction under various types of a spot metering area enables more professional color/ tint reproduction....
... usually adjusted automatically. If the white balance is correct, all other colors will be used . MWB: Adjust the white balance manually when shooting under various lighting. ADVANCED FEATURES To cancel Spot Exposure Control Press once so that the Spot Exposure Control indicator " ...a cloudy day. HALOGEN: A video light or similar type of the selected area most appropriate. However, more advanced camcorder operators control this function manually to the correctness of color reproduction under various types of a spot metering area enables more professional color/ tint reproduction....
Instructions
Page 40
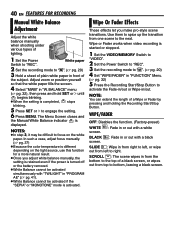
...them to spice up the transition from top to bottom, leaving a black screen. Wipe Or Fader Effects These effects let you adjust white balance manually, the setting is retained even if the power is different depending on the white paper. Wipe or Fader works when video recording is displayed.... The Menu Screen closes and the Manual White Balance indicator is started or stopped. 1 Set the VIDEO/MEMORY Switch to focus on the light source, use this function for a ...
...them to spice up the transition from top to bottom, leaving a black screen. Wipe Or Fader Effects These effects let you adjust white balance manually, the setting is retained even if the power is different depending on the white paper. Wipe or Fader works when video recording is displayed.... The Menu Screen closes and the Manual White Balance indicator is started or stopped. 1 Set the VIDEO/MEMORY Switch to focus on the light source, use this function for a ...
Instructions
Page 41
...Compensates for subjects that may otherwise appear too dark when shooting in extremely bright surroundings such as in the snow. When Twilight is chosen, the camcorder automatically adjusts the focus from approx. 10 m (32 ft) to the slow shutter speed. MIRROR* : Creates a mirror image on the ...ficult to "AUTO". FEATURES FOR RECORDING EN 41 NIGHT : Makes dark subjects or areas even brighter than 10 m, adjust the focus manually. To prevent this, use of a second. Black bands that occurs when shooting under good lighting conditions. SPORTS mode.) * Not available for...
...Compensates for subjects that may otherwise appear too dark when shooting in extremely bright surroundings such as in the snow. When Twilight is chosen, the camcorder automatically adjusts the focus from approx. 10 m (32 ft) to the slow shutter speed. MIRROR* : Creates a mirror image on the ...ficult to "AUTO". FEATURES FOR RECORDING EN 41 NIGHT : Makes dark subjects or areas even brighter than 10 m, adjust the focus manually. To prevent this, use of a second. Black bands that occurs when shooting under good lighting conditions. SPORTS mode.) * Not available for...
Instructions
Page 42
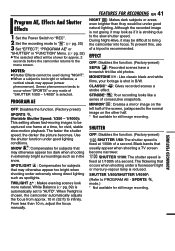
... EDITING Dubbing To A VCR To use the AC Adapter as a player 1 Following the illustration, ੬ pg. 23, "Connections To A TV Or VCR" , connect the camcorder and the VCR's input connectors. 2 Perform steps 1 - 6 (੬ pg. 23) 3 At the point you want to start dubbing, start recording on the VCR. (...Refer to the VCR's instruction manual.) 4 To stop dubbing, stop recording on the VCR, then stop playback on the camcorder. Or, press DISPLAY on the remote control to turn on/off the date indication. • Time code Set...
... EDITING Dubbing To A VCR To use the AC Adapter as a player 1 Following the illustration, ੬ pg. 23, "Connections To A TV Or VCR" , connect the camcorder and the VCR's input connectors. 2 Perform steps 1 - 6 (੬ pg. 23) 3 At the point you want to start dubbing, start recording on the VCR. (...Refer to the VCR's instruction manual.) 4 To stop dubbing, stop recording on the VCR, then stop playback on the camcorder. Or, press DISPLAY on the remote control to turn on/off the date indication. • Time code Set...

Instructions
Page 43
...; It is performed in step 4. NOTE: Digital Dubbing is recommended to use the optional JVC VC-VDV204U or VC-VDV206U DV cable. If this occurs, turn off the power and ...to start dubbing, start recording on the video unit. (Refer to the video unit's instruction manual.) 5 To stop dubbing, stop recording on the camcorder. (੬ pg. 21) 4 At the point you want to start dubbing. The ... the player during playback, only the original playback image recorded on the tape is output from the camcorder onto another video unit equipped with a DV output connector using a DV cable as a recorder. ...
...; It is performed in step 4. NOTE: Digital Dubbing is recommended to use the optional JVC VC-VDV204U or VC-VDV206U DV cable. If this occurs, turn off the power and ...to start dubbing, start recording on the video unit. (Refer to the video unit's instruction manual.) 5 To stop dubbing, stop recording on the camcorder. (੬ pg. 21) 4 At the point you want to start dubbing. The ... the player during playback, only the original playback image recorded on the tape is output from the camcorder onto another video unit equipped with a DV output connector using a DV cable as a recorder. ...
Instructions
Page 44
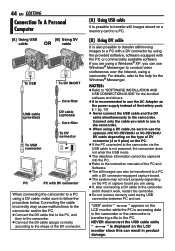
... only the cable you can use Windows® Messenger to conduct video conferences over the Internet, using a DV cable, be sure to use the optional JVC VC-VDV206U or VC-VDV204U DV cable depending on the type of DV connector (4 or 6 pins) on the PC. ● If the PC connected... the LCD monitor since this can also be captured into the PC. ● Refer to the instruction manuals of the DV connector. [A] Using USB cable It is recommended to use to the camcorder. ● When using a camcorder. NEVER disconnect the USB cable while " " is displayed on a memory card to a PC. [B] Using DV...
... only the cable you can use Windows® Messenger to conduct video conferences over the Internet, using a DV cable, be sure to use the optional JVC VC-VDV206U or VC-VDV204U DV cable depending on the type of DV connector (4 or 6 pins) on the PC. ● If the PC connected... the LCD monitor since this can also be captured into the PC. ● Refer to the instruction manuals of the DV connector. [A] Using USB cable It is recommended to use to the camcorder. ● When using a camcorder. NEVER disconnect the USB cable while " " is displayed on a memory card to a PC. [B] Using DV...

Instructions
Page 46
... are various different light sources behind the subject. ➜Find a white subject and compose your nearest JVC dealer. Picture does not appear on the LCD monitor appear dark or whitish. ● In places ... The focus does not adjust automatically. ● Focus is set to its service life, images on the camcorder does not light during shooting, the screen becomes red or black for video playback. (੬ pg. 23)...but there is no picture. ● Your TV has AV input terminals, but is not set to the Manual mode. ➜Set Focus to the Auto mode. (੬ pg. 37) ● The lens is...
... are various different light sources behind the subject. ➜Find a white subject and compose your nearest JVC dealer. Picture does not appear on the LCD monitor appear dark or whitish. ● In places ... The focus does not adjust automatically. ● Focus is set to its service life, images on the camcorder does not light during shooting, the screen becomes red or black for video playback. (੬ pg. 23)...but there is no picture. ● Your TV has AV input terminals, but is not set to the Manual mode. ➜Set Focus to the Auto mode. (੬ pg. 37) ● The lens is...
Instructions
Page 52
... 19 Iris Lock 38 J Journalistic Shooting ..... 19 L Language 14, 34 LCD Monitor and Viewfinder 8, 15 LED Light 36 Loading A Cassette ....... 16 Loading A Memory Card 17 M Manual Focus 37 Melody 34 Memory Card .......... 17, 49 Motor Drive Mode .......... 36 N Narration 35 Night Alive 41 O On Screen 34, 35 P Playback Sound 35 Playback... ...... 46, 47 V Video/Memory Switch ..... 9 W White Balance 39 Wind Cut 33 Wipe Or Fader Effects .. 40 Z Zooming 19, 25, 32 16:9 Output 34, 35 GR-D775U © 2006 Victor Company of Japan, Limited US Printed in Malaysia 1206ASR-NF-MP
... 19 Iris Lock 38 J Journalistic Shooting ..... 19 L Language 14, 34 LCD Monitor and Viewfinder 8, 15 LED Light 36 Loading A Cassette ....... 16 Loading A Memory Card 17 M Manual Focus 37 Melody 34 Memory Card .......... 17, 49 Motor Drive Mode .......... 36 N Narration 35 Night Alive 41 O On Screen 34, 35 P Playback Sound 35 Playback... ...... 46, 47 V Video/Memory Switch ..... 9 W White Balance 39 Wind Cut 33 Wipe Or Fader Effects .. 40 Z Zooming 19, 25, 32 16:9 Output 34, 35 GR-D775U © 2006 Victor Company of Japan, Limited US Printed in Malaysia 1206ASR-NF-MP


