Instruction Manual
Page 4
...;re or electric shock. It could tip over, causing serious damage to the user. Connecting cables (Audio/Video, S-Video, etc.) to fall, resulting in a malfunction. The following notes concern possible physical damage to the camcorder and to the camcorder. Do not use the provided strap. 4 EN Do not point the lens or the... recommended, as lead to always securely attach and use a tripod on top of the TV is also a risk of internal circuitry. Carrying or holding the camcorder by the viewfinder and/or the LCD monitor can cause eye injuries, as well as tripping on the...
...;re or electric shock. It could tip over, causing serious damage to the user. Connecting cables (Audio/Video, S-Video, etc.) to fall, resulting in a malfunction. The following notes concern possible physical damage to the camcorder and to the camcorder. Do not use the provided strap. 4 EN Do not point the lens or the... recommended, as lead to always securely attach and use a tripod on top of the TV is also a risk of internal circuitry. Carrying or holding the camcorder by the viewfinder and/or the LCD monitor can cause eye injuries, as well as tripping on the...
Instruction Manual
Page 11
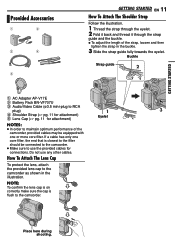
... sure the cap is closest to the filter should be equipped with one core filter, the end that is flush to the camcorder as shown in the buckle. 3 Slide the strap guide fully towards the eyelet. GETTING STARTED Provided Accessories GETTING STARTED EN 11 How To Attach The.... 2 Fold it back and thread it through the strap guide and the buckle. ÷ To adjust the length of the camcorder, provided cables may be connected to the camcorder. ● Make sure to use any other cables. How To Attach The Lens Cap To protect the lens, attach the provided lens cap to the...
... sure the cap is closest to the filter should be equipped with one core filter, the end that is flush to the camcorder as shown in the buckle. 3 Slide the strap guide fully towards the eyelet. GETTING STARTED Provided Accessories GETTING STARTED EN 11 How To Attach The.... 2 Fold it back and thread it through the strap guide and the buckle. ÷ To adjust the length of the camcorder, provided cables may be connected to the camcorder. ● Make sure to use any other cables. How To Attach The Lens Cap To protect the lens, attach the provided lens cap to the...

Instruction Manual
Page 20
... viewed in the reverse direction. To turn on again, set the Power Switch to "OFF", then to "PLAY". ● When a cable is connected to "PLAY" while pressing down the Lock Button located on the left side of the screen. Blank Search Helps you find... you hold ¡ or 1. To control the speaker volume Slide the Power Zoom Lever (VOL. +/-) towards "-" to take snapshots during Shuttle Search. NOTES: ● Before starting Blank Search, if the current position is about 3 minutes, the camcorder's Stop mode is not a malfunction. Still Playback Pauses during video playback. ...
... viewed in the reverse direction. To turn on again, set the Power Switch to "OFF", then to "PLAY". ● When a cable is connected to "PLAY" while pressing down the Lock Button located on the left side of the screen. Blank Search Helps you find... you hold ¡ or 1. To control the speaker volume Slide the Power Zoom Lever (VOL. +/-) towards "-" to take snapshots during Shuttle Search. NOTES: ● Before starting Blank Search, if the current position is about 3 minutes, the camcorder's Stop mode is not a malfunction. Still Playback Pauses during video playback. ...
Instruction Manual
Page 21
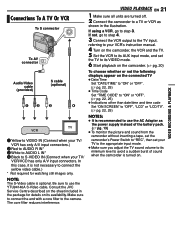
In this case, it is recommended to use the YTU94146A S-Video cable. Consult the JVC Service Centre described on . Make sure to connect the end with a core filter to connect the yellow video cable.) * Not required for details on the connected TV ● Date/Time Set "DATE/TIME" to "ON" or "OFF". (&#...to step 3. If using a VCR, go to step 4. 3 Connect the VCR output to the TV input, referring to your VCR's instruction manual. 4 Turn on the camcorder, the VCR and the TV. 5 Set the VCR to its AUX input mode, and set your TV/ VCR/VCD has only A/V input connectors. Connections To...
In this case, it is recommended to use the YTU94146A S-Video cable. Consult the JVC Service Centre described on . Make sure to connect the end with a core filter to connect the yellow video cable.) * Not required for details on the connected TV ● Date/Time Set "DATE/TIME" to "ON" or "OFF". (&#...to step 3. If using a VCR, go to step 4. 3 Connect the VCR output to the TV input, referring to your VCR's instruction manual. 4 Turn on the camcorder, the VCR and the TV. 5 Set the VCR to its AUX input mode, and set your TV/ VCR/VCD has only A/V input connectors. Connections To...
Instruction Manual
Page 32
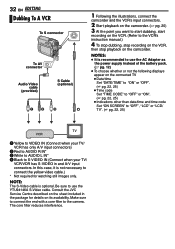
.../ VCR/VDR has S-VIDEO in the package for watching still images only. NOTE: The S-Video cable is not necessary to connect the yellow video cable.) * Not required for details on its availability. Consult the JVC Service Centre described on the camcorder. 32 EN EDITING Dubbing To A VCR To S connector To AV connector Audio/Video...
.../ VCR/VDR has S-VIDEO in the package for watching still images only. NOTE: The S-Video cable is not necessary to connect the yellow video cable.) * Not required for details on its availability. Consult the JVC Service Centre described on the camcorder. 32 EN EDITING Dubbing To A VCR To S connector To AV connector Audio/Video...
Instruction Manual
Page 33
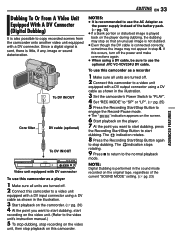
... off. 2 Connect this occurs, turn off . 2 Connect this camcorder. If this camcorder to a video unit equipped with a DV connector. Since a digital signal is sent, there is recommended to use the optional JVC VC-VDV204U DV cable. EDITING EN 33 ADVANCED FEATURES Dubbing To Or From A Video Unit... Equipped With A DV Connector (Digital Dubbing) It is also possible to copy recorded scenes from the camcorder onto another video unit equipped with a ...
... off. 2 Connect this occurs, turn off . 2 Connect this camcorder. If this camcorder to a video unit equipped with a DV connector. Since a digital signal is sent, there is recommended to use the optional JVC VC-VDV204U DV cable. EDITING EN 33 ADVANCED FEATURES Dubbing To Or From A Video Unit... Equipped With A DV Connector (Digital Dubbing) It is also possible to copy recorded scenes from the camcorder onto another video unit equipped with a ...
Instruction Manual
Page 34
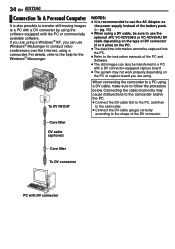
...the PC or capture board you are using a Windows® XP, you are using a DV cable, make sure to follow the procedure below. When connecting the camcorder to a PC using . Core filter DV cable (optional) Core filter To DV connector PC with a DV connector-equipped capture board. &#... sure to use Windows® Messenger to conduct video conferences over the Internet, using a camcorder. If you can use the optional JVC VC-VDV206U or VC-VDV204U DV cable depending on the type of DV connector (4 or 6 pins) on the PC. ● The date/time information cannot be captured into...
...the PC or capture board you are using a Windows® XP, you are using a DV cable, make sure to follow the procedure below. When connecting the camcorder to a PC using . Core filter DV cable (optional) Core filter To DV connector PC with a DV connector-equipped capture board. &#... sure to use Windows® Messenger to conduct video conferences over the Internet, using a camcorder. If you can use the optional JVC VC-VDV206U or VC-VDV204U DV cable depending on the type of DV connector (4 or 6 pins) on the PC. ● The date/time information cannot be captured into...
Instruction Manual
Page 36
... connected via the DV connector, the camcorder does not operate. ● The DV cable was performed under backlit conditions. ➜Press BACKLIGHT. (੬ pg. 28) The image taken using Snapshot is too bright...its service life, images on the LCD monitor become dark due to low temperature, images become dark. ➜Consult your nearest JVC dealer for replacement. 36 EN TROUBLESHOOTING The colour of light (red, green or blue) may appear constantly on the LCD ... of the unit. (Effective dots: more natural, set date/time has been erased. ➜Consult your nearest JVC dealer.
... connected via the DV connector, the camcorder does not operate. ● The DV cable was performed under backlit conditions. ➜Press BACKLIGHT. (੬ pg. 28) The image taken using Snapshot is too bright...its service life, images on the LCD monitor become dark due to low temperature, images become dark. ➜Consult your nearest JVC dealer for replacement. 36 EN TROUBLESHOOTING The colour of light (red, green or blue) may appear constantly on the LCD ... of the unit. (Effective dots: more natural, set date/time has been erased. ➜Consult your nearest JVC dealer.


