Instructions
Page 5
...Night-Scope 38 Snapshot (For Video Recording 38 Manual Focus 38 Exposure Control 39 Iris Lock 39 Backlight Compensation 40 Spot Exposure Control 40...Editing 46 REFERENCES 47 TROUBLESHOOTING 47 USER MAINTENANCE 51 CAUTIONS 52 SPECIFICATIONS 55 TERMS Back cover RECORDING 25 Basic Shooting (D.S.C. CONTENTS EN 5 GETTING STARTED 6 ADVANCED FEATURES 31 Index 6 Provided Accessories ...18 VIDEO RECORDING 18 Basic Recording 18 Tape Remaining Time 18 LCD Monitor And Viewfinder 18 Zooming 19 Journalistic Shooting 19 Time Code 19 Quick Review 20 Recording From The Middle Of A...
...Night-Scope 38 Snapshot (For Video Recording 38 Manual Focus 38 Exposure Control 39 Iris Lock 39 Backlight Compensation 40 Spot Exposure Control 40...Editing 46 REFERENCES 47 TROUBLESHOOTING 47 USER MAINTENANCE 51 CAUTIONS 52 SPECIFICATIONS 55 TERMS Back cover RECORDING 25 Basic Shooting (D.S.C. CONTENTS EN 5 GETTING STARTED 6 ADVANCED FEATURES 31 Index 6 Provided Accessories ...18 VIDEO RECORDING 18 Basic Recording 18 Tape Remaining Time 18 LCD Monitor And Viewfinder 18 Zooming 19 Journalistic Shooting 19 Time Code 19 Quick Review 20 Recording From The Middle Of A...
Instructions
Page 7
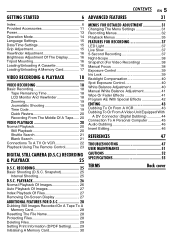
...; pg. 20) Index Button [INDEX] (੬ pg. 27) Backlight Compensation Button [BACK LIGHT] (੬ pg. 40) B Play/Pause Button [4/9] (੬ pg. 20) Manual Focus Button [FOCUS] (੬ pg. 38) C Rewind Button [3] (੬ pg. 20) Menu select Button [-] (੬ pg. 15) Quick Review Button [ ] (੬... [LIGHT] (੬ pg. 37) H Dioptre Adjustment Control (੬ pg. 16) I Snapshot Button [SNAPSHOT] (੬ pg. 25, 38) Live Slow Button [SLOW] (੬ pg. 31, 37) J Power Zoom Lever [T/W] (੬ pg. 19) Speaker Volume Control [VOL pg. 20) K Battery Release Button [PUSH BATT.] (੬ pg....
...; pg. 20) Index Button [INDEX] (੬ pg. 27) Backlight Compensation Button [BACK LIGHT] (੬ pg. 40) B Play/Pause Button [4/9] (੬ pg. 20) Manual Focus Button [FOCUS] (੬ pg. 38) C Rewind Button [3] (੬ pg. 20) Menu select Button [-] (੬ pg. 15) Quick Review Button [ ] (੬... [LIGHT] (੬ pg. 37) H Dioptre Adjustment Control (੬ pg. 16) I Snapshot Button [SNAPSHOT] (੬ pg. 25, 38) Live Slow Button [SLOW] (੬ pg. 31, 37) J Power Zoom Lever [T/W] (੬ pg. 19) Speaker Volume Control [VOL pg. 20) K Battery Release Button [PUSH BATT.] (੬ pg....
Instructions
Page 9
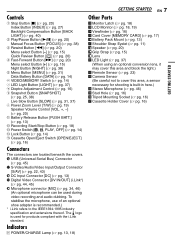
... optional microphone is connected during Audio Dubbing. ੬ pg. 46) During D.S.C. H Approximate Zoom Ratio (੬ pg. 19) I Zoom Indicator (੬ pg. 19) J O: (Appears when taking Snapshot.) (੬ pg. 25, 38) SLOW: (Appears when using Live Slow.) (੬ pg. 37) K Brightness ...Control Indicator (LCD monitor/ Viewfinder) (੬ pg. 16) L Battery Remaining Power Indicator (੬ pg. 49) M Date/Time (੬ pg. 15) N Manual...
... optional microphone is connected during Audio Dubbing. ੬ pg. 46) During D.S.C. H Approximate Zoom Ratio (੬ pg. 19) I Zoom Indicator (੬ pg. 19) J O: (Appears when taking Snapshot.) (੬ pg. 25, 38) SLOW: (Appears when using Live Slow.) (੬ pg. 37) K Brightness ...Control Indicator (LCD monitor/ Viewfinder) (੬ pg. 16) L Battery Remaining Power Indicator (੬ pg. 49) M Date/Time (੬ pg. 15) N Manual...
Instructions
Page 14
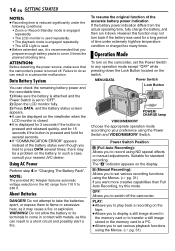
...you want more creative capabilities than Full Auto Recording, try this mode. M (Manual Recording): Allows you to set various recording functions using the Menus. (੬ .... NOTE: The provided AC Adapter features automatic voltage selection in a camcorder malfunction. Operation Mode To turn back if the battery was used for... you prepare enough battery packs to your nearest JVC dealer. 14 EN GETTING STARTED NOTES: ●...If "COMMUNICATION ERROR" appears instead of time under the following conditions: • Zoom or Record-Standby mode is engaged repeatedly. • The LCD monitor is ...
...you want more creative capabilities than Full Auto Recording, try this mode. M (Manual Recording): Allows you to set various recording functions using the Menus. (੬ .... NOTE: The provided AC Adapter features automatic voltage selection in a camcorder malfunction. Operation Mode To turn back if the battery was used for... you prepare enough battery packs to your nearest JVC dealer. 14 EN GETTING STARTED NOTES: ●...If "COMMUNICATION ERROR" appears instead of time under the following conditions: • Zoom or Record-Standby mode is engaged repeatedly. • The LCD monitor is ...
Instructions
Page 15
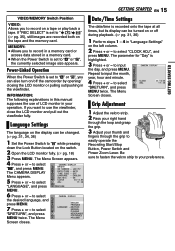
... memory card or access data stored in your operation. INFORMATION: The following explanations in this manual supposes the use the viewfinder, close the LCD monitor and pull out the viewfinder fully. If...Time Settings The date/time is set to "A" or "M", you can be turned on or off the camcorder by opening/ closing the LCD monitor or pulling out/pushing in "Language Settings" on the switch. 2... through the grip to easily operate the Recording Start/Stop Button, Power Switch and Power Zoom Lever. GETTING STARTED EN 15 GETTING STARTED VIDEO/MEMORY Switch Position VIDEO: Allows you to...
... memory card or access data stored in your operation. INFORMATION: The following explanations in this manual supposes the use the viewfinder, close the LCD monitor and pull out the viewfinder fully. If...Time Settings The date/time is set to "A" or "M", you can be turned on or off the camcorder by opening/ closing the LCD monitor or pulling out/pushing in "Language Settings" on the switch. 2... through the grip to easily operate the Recording Start/Stop Button, Power Switch and Power Zoom Lever. GETTING STARTED EN 15 GETTING STARTED VIDEO/MEMORY Switch Position VIDEO: Allows you to...
Instructions
Page 16
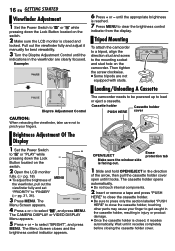
...the brightness of the arrow, then pull the cassette holder cover open until the indications in the viewfinder are not equipped with studs. The camcorder needs to be powered up to close the cassette holder; Cassette holder PUSH HERE Cassette holder cover Brightness Adjustment Of The Display 1 Set the...BRIGHT", and press MENU. Example: 6 Press + or - until it locks. to select "n", and press MENU. Pull out the viewfinder fully and adjust it manually for best viewability. 3 Turn the Dioptre Adjustment Control until it recedes completely before closing the cassette holder cover.
...the brightness of the arrow, then pull the cassette holder cover open until the indications in the viewfinder are not equipped with studs. The camcorder needs to be powered up to close the cassette holder; Cassette holder PUSH HERE Cassette holder cover Brightness Adjustment Of The Display 1 Set the...BRIGHT", and press MENU. Example: 6 Press + or - until it locks. to select "n", and press MENU. Pull out the viewfinder fully and adjust it manually for best viewability. 3 Turn the Dioptre Adjustment Control until it recedes completely before closing the cassette holder cover.
Instructions
Page 19
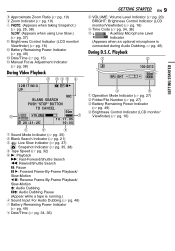
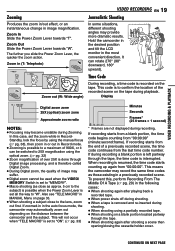
... Slide the Power Zoom Lever towards "W". Hold the camcorder in the desired position and tilt the LCD monitor in MANUAL Menu on page 33. ● When shooting a subject close as those existing in Record mode. ● Zooming is possible to "ON". (੬ pg. 33) Minutes Seconds Frames* (25 frames = 1 second) 12 : 34 : 24 * Frames are...
... Slide the Power Zoom Lever towards "W". Hold the camcorder in the desired position and tilt the LCD monitor in MANUAL Menu on page 33. ● When shooting a subject close as those existing in Record mode. ● Zooming is possible to "ON". (੬ pg. 33) Minutes Seconds Frames* (25 frames = 1 second) 12 : 34 : 24 * Frames are...
Instructions
Page 22
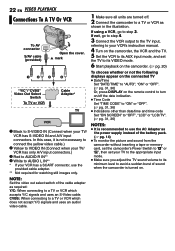
...required: Y/C: When connecting to a TV or VCR as the power supply instead of sound when the camcorder is not necessary to connect the yellow video cable.) B Yellow to VIDEO IN (Connect when your ... the TV sound volume to its minimum level to S-VIDEO IN (Connect when your VCR's instruction manual. 4 Turn on the camcorder, the VCR and the TV. 5 Set the VCR to its AUX input mode, and set... to AUDIO R IN** D White to step 3. In this case, it is turned on /off . 2 Connect the camcorder to a TV or VCR which does not accept Y/C signals and uses an audio/ video cable. 1 Make sure all units...
...required: Y/C: When connecting to a TV or VCR as the power supply instead of sound when the camcorder is not necessary to connect the yellow video cable.) B Yellow to VIDEO IN (Connect when your ... the TV sound volume to its minimum level to S-VIDEO IN (Connect when your VCR's instruction manual. 4 Turn on the camcorder, the VCR and the TV. 5 Set the VCR to its AUX input mode, and set... to AUDIO R IN** D White to step 3. In this case, it is turned on /off . 2 Connect the camcorder to a TV or VCR which does not accept Y/C signals and uses an audio/ video cable. 1 Make sure all units...
Instructions
Page 31
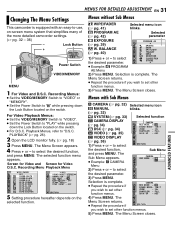
... I TE FADER-B LACK FADER-B .W W I PE-CORNER W I PE-W I NDOW WI PE-SL I DE W I PE-DOOR W I T ZOOM - 25x SNAP/SLOW - SCROLL WI PE-SHUTTER V I T ZOOM - 25x SNAP/SLOW - The Menu Screen closes. AGC n VIDEO DISPLAY (੬ pg. 36) 1) Press + or - ADVANCED FEATURES SOUND MODE -... ● Set the Power Switch to "D.S.C. MENUS FOR DETAILED ADJUSTMENT EN 31 Changing The Menu Settings This camcorder is equipped with Sub Menus m CAMERA (੬ pg. 32) Selected menu icon q MANUAL blinks. (੬ pg. 32) s SYSTEM (੬ pg. 33) Selected function n CAMERA DISPLAY (੬...
... I TE FADER-B LACK FADER-B .W W I PE-CORNER W I PE-W I NDOW WI PE-SL I DE W I PE-DOOR W I T ZOOM - 25x SNAP/SLOW - SCROLL WI PE-SHUTTER V I T ZOOM - 25x SNAP/SLOW - The Menu Screen closes. AGC n VIDEO DISPLAY (੬ pg. 36) 1) Press + or - ADVANCED FEATURES SOUND MODE -... ● Set the Power Switch to "D.S.C. MENUS FOR DETAILED ADJUSTMENT EN 31 Changing The Menu Settings This camcorder is equipped with Sub Menus m CAMERA (੬ pg. 32) Selected menu icon q MANUAL blinks. (੬ pg. 32) s SYSTEM (੬ pg. 33) Selected function n CAMERA DISPLAY (੬...
Instructions
Page 32
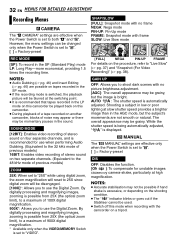
By digitally processing and magnifying images, zooming is possible from 25X (the optical zoom limit), to a maximum of 900X digital magnification. * Available only when the VIDEO/MEMORY Switch is set to both "A" and "M". Shooting a subject in the ...magnifying images, zooming is possible from 25X (the optical zoom limit), to a maximum of 100X digital magnification. 900X*: Allows you to shoot dark scenes with no frame NEGA: Nega mode PIN-UP: Pin-Up mode FRAME: Snapshot mode with the camcorder on a tripod. AUTO : The shutter speed is displayed. MANUAL The "q MANUAL" settings are...
By digitally processing and magnifying images, zooming is possible from 25X (the optical zoom limit), to a maximum of 900X digital magnification. * Available only when the VIDEO/MEMORY Switch is set to both "A" and "M". Shooting a subject in the ...magnifying images, zooming is possible from 25X (the optical zoom limit), to a maximum of 100X digital magnification. 900X*: Allows you to shoot dark scenes with no frame NEGA: Nega mode PIN-UP: Pin-Up mode FRAME: Snapshot mode with the camcorder on a tripod. AUTO : The shutter speed is displayed. MANUAL The "q MANUAL" settings are...
Instructions
Page 33
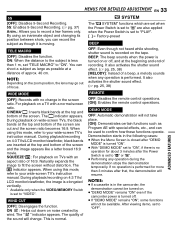
..., the demonstration will not be available. It also activates the shutter sound effect. (੬ pg. 25, 38) ADVANCED FEATURES WIDE MODE [OFF]: Records with a normal screen ratio. CINEMA* : Inserts ...this mode, refer to your wide-screen TV's instruction manual. The indicator appears. When using this mode, refer to your wide-screen TV's instruction manual. WIND CUT [OFF]: Disengages the function. The "... "DEMO MODE" remains "ON" even if the camcorder power is set "TELE MACRO" to "ON", if there is no operation is turned on the zoom position, the lens may go out of the screen....
..., the demonstration will not be available. It also activates the shutter sound effect. (੬ pg. 25, 38) ADVANCED FEATURES WIDE MODE [OFF]: Records with a normal screen ratio. CINEMA* : Inserts ...this mode, refer to your wide-screen TV's instruction manual. The indicator appears. When using this mode, refer to your wide-screen TV's instruction manual. WIND CUT [OFF]: Disengages the function. The "... "DEMO MODE" remains "ON" even if the camcorder power is set "TELE MACRO" to "ON", if there is no operation is turned on the zoom position, the lens may go out of the screen....
Instructions
Page 38
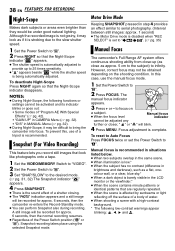
... recording. To reset to Auto Focus Press FOCUS twice or set to " / ". (੬ pg. 35) Manual Focus The camcorder's Full Range AF system offers continuous shooting ability from close-up to 25 times sensitivity. ● " " appears beside " " while the shutter speed is set the Power Switch to ... 42). • "GAIN UP" in CAMERA Menu (੬ pg. 32). • "DIS" in step 4 provides an effect similar to bring the camcorder into focus. However, correct focus may not be difficult to serial photography. (Interval between still images: approx. 1 second) ● The Motor Drive mode ...
... recording. To reset to Auto Focus Press FOCUS twice or set to " / ". (੬ pg. 35) Manual Focus The camcorder's Full Range AF system offers continuous shooting ability from close-up to 25 times sensitivity. ● " " appears beside " " while the shutter speed is set the Power Switch to ... 42). • "GAIN UP" in CAMERA Menu (੬ pg. 32). • "DIS" in step 4 provides an effect similar to bring the camcorder into focus. However, correct focus may not be difficult to serial photography. (Interval between still images: approx. 1 second) ● The Motor Drive mode ...

Instructions
Page 39
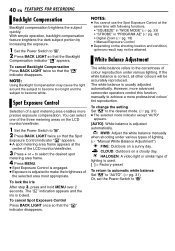
...or "SNOW" (੬ pg. 42), or with the backlight compensation. ● If the adjustment does not cause any visible change in brightness, set to "MANUAL". (੬ pg. 31) ● The exposure control indicator appears. 3 To brighten the image, press +. The exposure control indicator and the " " ...or when skiing. ● When shooting objects under a spotlight. ● When zooming. 1 Set the Power Switch to "M". 2 Set "p" to "MANUAL". (੬ pg. 31) ● The exposure control indicator appears. 3 Adjust zoom so that the subject fills the LCD monitor or the viewfinder, then press and...
...or "SNOW" (੬ pg. 42), or with the backlight compensation. ● If the adjustment does not cause any visible change in brightness, set to "MANUAL". (੬ pg. 31) ● The exposure control indicator appears. 3 To brighten the image, press +. The exposure control indicator and the " " ...or when skiing. ● When shooting objects under a spotlight. ● When zooming. 1 Set the Power Switch to "M". 2 Set "p" to "MANUAL". (੬ pg. 31) ● The exposure control indicator appears. 3 Adjust zoom so that the subject fills the LCD monitor or the viewfinder, then press and...
Instructions
Page 40
... Power Switch to achieve a more professional colour/ tint reproduction. Spot Exposure Control Selection of a spot metering area enables more advanced camcorder operators control this function manually to "M". 2 Press BACK LIGHT so that the Spot Exposure Control indicator " " appears. ● A spot metering area frame..." in "WIDE MODE" (੬ pg. 33) • "STROBE" in "PROGRAM AE" (੬ pg. 42) • Digital Zoom (੬ pg. 19) • Manual Exposure Control ● Depending on the LCD monitor/viewfinder. 1 Set the Power Switch to "A". NOTES: ● You cannot use the Spot...
... Power Switch to achieve a more professional colour/ tint reproduction. Spot Exposure Control Selection of a spot metering area enables more advanced camcorder operators control this function manually to "M". 2 Press BACK LIGHT so that the Spot Exposure Control indicator " " appears. ● A spot metering area frame..." in "WIDE MODE" (੬ pg. 33) • "STROBE" in "PROGRAM AE" (੬ pg. 42) • Digital Zoom (੬ pg. 19) • Manual Exposure Control ● Depending on the LCD monitor/viewfinder. 1 Set the Power Switch to "A". NOTES: ● You cannot use the Spot...
Instructions
Page 41
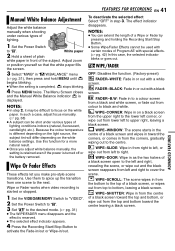
Adjust zoom or position yourself so that the white paper fills the screen. 3 Select "MWB" in "u ... out from lower left to black and white. Wipe Or Fader Effects These effects let you adjust white balance manually, the setting is retained even if the power is turned off or the battery removed. WIPE-WINDOW: The scene... paper. WIPE-DOOR: Wipe in from left to the centre. FEATURES FOR RECORDING EN 41 Manual White Balance Adjustment Adjust the white balance manually when shooting under various types of lighting conditions indoors (natural, fluorescent, candlelight, etc.). Use ...
Adjust zoom or position yourself so that the white paper fills the screen. 3 Select "MWB" in "u ... out from lower left to black and white. Wipe Or Fader Effects These effects let you adjust white balance manually, the setting is retained even if the power is turned off or the battery removed. WIPE-WINDOW: The scene... paper. WIPE-DOOR: Wipe in from left to the centre. FEATURES FOR RECORDING EN 41 Manual White Balance Adjustment Adjust the white balance manually when shooting under various types of lighting conditions indoors (natural, fluorescent, candlelight, etc.). Use ...

Instructions
Page 42
... certain Wipe/Fader effects. (੬ pg. 41) In this case, the selected indicator blinks or goes out. SHUTTER 1/120: The shutter speed is chosen, the camcorder automatically adjusts the focus from approx. 10 m to be captured one frame at 1/120th of the screen, juxtaposed to the normal image on the other... bright when shooting under a fluorescent light or mercury-vapour lamp is activated. ● The selected effect indicator appears. From less than 10 m, adjust the focus manually.
... certain Wipe/Fader effects. (੬ pg. 41) In this case, the selected indicator blinks or goes out. SHUTTER 1/120: The shutter speed is chosen, the camcorder automatically adjusts the focus from approx. 10 m to be captured one frame at 1/120th of the screen, juxtaposed to the normal image on the other... bright when shooting under a fluorescent light or mercury-vapour lamp is activated. ● The selected effect indicator appears. From less than 10 m, adjust the focus manually.
Instructions
Page 43
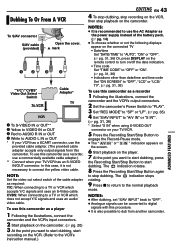
... use this case, it is also possible to stop playback on the camcorder. (੬ pg. 20) 3 At the point you want to start dubbing, start dubbing. The indication stops rotating. 9 Press 8 to return to the VCR's instruction manual.) EDITING EN 43 4 To stop dubbing, stop recording on the VCR...normal playback mode. NOTES: ● After dubbing, set "S/AV INPUT" back to "OFF". ● Analogue signals can be converted to digital signals with this camcorder. mark 12 3 4 "Y/C"/"CVBS" Video Out Select Switch To VCR Cable Adapter* TV VCR A To S-VIDEO IN or OUT** B Yellow to VIDEO IN ...
... use this case, it is also possible to stop playback on the camcorder. (੬ pg. 20) 3 At the point you want to start dubbing, start dubbing. The indication stops rotating. 9 Press 8 to return to the VCR's instruction manual.) EDITING EN 43 4 To stop dubbing, stop recording on the VCR...normal playback mode. NOTES: ● After dubbing, set "S/AV INPUT" back to "OFF". ● Analogue signals can be converted to digital signals with this camcorder. mark 12 3 4 "Y/C"/"CVBS" Video Out Select Switch To VCR Cable Adapter* TV VCR A To S-VIDEO IN or OUT** B Yellow to VIDEO IN ...
Instructions
Page 44
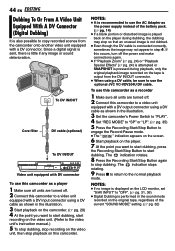
... use the optional JVC VC-VDV204U DV cable. NOTES: ● It is recommended to use this camcorder as a player 1 Make sure all units are turned off the power and make connections again. ● If "Playback Zoom" (੬ pg. 24) or "Playback Special Effects" (੬ pg. 24) is attempted or ... Button to start recording on the video unit. (Refer to the video unit's instruction manual.) 5 To stop dubbing, stop recording on the video unit, then stop dubbing. If this occurs, turn off . 2 Connect this camcorder to a video unit equipped with a DV output connector using a DV cable as the...
... use the optional JVC VC-VDV204U DV cable. NOTES: ● It is recommended to use this camcorder as a player 1 Make sure all units are turned off the power and make connections again. ● If "Playback Zoom" (੬ pg. 24) or "Playback Special Effects" (੬ pg. 24) is attempted or ... Button to start recording on the video unit. (Refer to the video unit's instruction manual.) 5 To stop dubbing, stop recording on the video unit, then stop dubbing. If this occurs, turn off . 2 Connect this camcorder to a video unit equipped with a DV output connector using a DV cable as the...
Instructions
Page 45
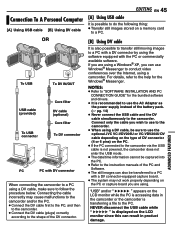
...(੬ pg. 14) ● Never connect the USB cable and the DV cable simultaneously to the camcorder. NEVER disconnect the USB cable while " " is displayed on the LCD monitor while the PC is ...software. Connect only the cable you wish to use to the camcorder. ● When using a DV cable, be sure to use the optional JVC VC-VDV206U or VC-VDV204U DV cable depending on the type of... the USB cable is not powered, the camcorder does not enter the USB mode. ● The date/time information cannot be captured into the PC. ● Refer to the instruction manuals of DV connector (4 or 6 pins)...
...(੬ pg. 14) ● Never connect the USB cable and the DV cable simultaneously to the camcorder. NEVER disconnect the USB cable while " " is displayed on the LCD monitor while the PC is ...software. Connect only the cable you wish to use to the camcorder. ● When using a DV cable, be sure to use the optional JVC VC-VDV206U or VC-VDV204U DV cable depending on the type of... the USB cable is not powered, the camcorder does not enter the USB mode. ● The date/time information cannot be captured into the PC. ● Refer to the instruction manuals of DV connector (4 or 6 pins)...
Instructions
Page 47
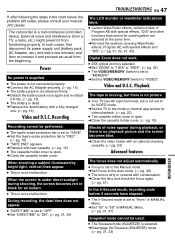
The camcorder is not attached firmly. External noise and interference (from a TV, a radio, etc.) might prevent it and proceed as usual from functioning properly. HSet "ZOOM" to "100X" or "900X". ...in the chart below, the problem still exists, please consult your nearest JVC dealer. If, after following the steps in MANUAL Menu. and then re-connect it from the beginning. HSet the ...special effects and "DIS". (੬ pg. 31, 32, 41, 42) Digital Zoom does not work. ● 25X optical zoom is not a malfunction. Recording Recording cannot be performed. ● The tape's erase...
The camcorder is not attached firmly. External noise and interference (from a TV, a radio, etc.) might prevent it and proceed as usual from functioning properly. HSet "ZOOM" to "100X" or "900X". ...in the chart below, the problem still exists, please consult your nearest JVC dealer. If, after following the steps in MANUAL Menu. and then re-connect it from the beginning. HSet the ...special effects and "DIS". (੬ pg. 31, 32, 41, 42) Digital Zoom does not work. ● 25X optical zoom is not a malfunction. Recording Recording cannot be performed. ● The tape's erase...


