
Instructions
Page 1
Before use of this digital video camera. DIGITAL VIDEO CAMERA GR-D270 Please visit our Homepage on the World Wide Web for Digital Video Camera: http://www.jvc.co.jp/english/cyber/ For Accessories: http://www.jvc.co.jp/english/accessory/ Dear Customer, Thank you for purchasing this product. ENGLISH GETTING STARTED 6 VIDEO RECORDING & PLAYBACK 18 DIGITAL STILL CAMERA (D.S.C.) RECORDING & PLAYBACK 25 ADVANCED FEATURES 31 REFERENCES 47 TERMS Back cover INSTRUCTIONS To deactivate the demonstration, set "DEMO MODE" to ensure...
Before use of this digital video camera. DIGITAL VIDEO CAMERA GR-D270 Please visit our Homepage on the World Wide Web for Digital Video Camera: http://www.jvc.co.jp/english/cyber/ For Accessories: http://www.jvc.co.jp/english/accessory/ Dear Customer, Thank you for purchasing this product. ENGLISH GETTING STARTED 6 VIDEO RECORDING & PLAYBACK 18 DIGITAL STILL CAMERA (D.S.C.) RECORDING & PLAYBACK 25 ADVANCED FEATURES 31 REFERENCES 47 TERMS Back cover INSTRUCTIONS To deactivate the demonstration, set "DEMO MODE" to ensure...
Instructions
Page 5
... The Display 16 Tripod Mounting 16 Loading/Unloading A Cassette 16 Loading/Unloading A Memory Card 17 VIDEO RECORDING & PLAYBACK 18 VIDEO RECORDING 18 Basic Recording 18 Tape Remaining Time 18 LCD Monitor And Viewfinder 18 Zooming 19 Journalistic Shooting 19 Time Code 19 Quick Review 20 Recording From The Middle Of A Tape...... 20 VIDEO PLAYBACK 20 Normal Playback 20 Still Playback 20 Shuttle Search 21 Blank Search 21 Connections To A TV Or VCR 22 Playback Using The Remote Control 23 DIGITAL STILL CAMERA (D.S.C.) RECORDING & PLAYBACK 25 D.S.C. Snapshot 25...
... The Display 16 Tripod Mounting 16 Loading/Unloading A Cassette 16 Loading/Unloading A Memory Card 17 VIDEO RECORDING & PLAYBACK 18 VIDEO RECORDING 18 Basic Recording 18 Tape Remaining Time 18 LCD Monitor And Viewfinder 18 Zooming 19 Journalistic Shooting 19 Time Code 19 Quick Review 20 Recording From The Middle Of A Tape...... 20 VIDEO PLAYBACK 20 Normal Playback 20 Still Playback 20 Shuttle Search 21 Blank Search 21 Connections To A TV Or VCR 22 Playback Using The Remote Control 23 DIGITAL STILL CAMERA (D.S.C.) RECORDING & PLAYBACK 25 D.S.C. Snapshot 25...
Instructions
Page 7
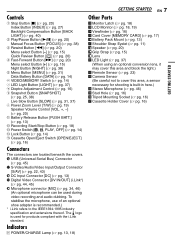
... optional microphone can be used for shooting is recommended.) * i.Link refers to the IEEE1394-1995 industry specification and extensions thereof. The logo is used during video recording and audio dubbing. Controls A Stop Button [8] (੬ pg. 20) Index Button [INDEX] (੬ pg. 27) Backlight Compensation Button [BACK LIGHT] (੬ pg. 40) B Play/Pause Button [4/9] (੬ pg. 20) Manual Focus Button [FOCUS] (੬ pg. 38) C Rewind Button [3] (੬ pg. 20) Menu select Button [-] (੬ pg. 15) Quick Review Button...
... optional microphone can be used for shooting is recommended.) * i.Link refers to the IEEE1394-1995 industry specification and extensions thereof. The logo is used during video recording and audio dubbing. Controls A Stop Button [8] (੬ pg. 20) Index Button [INDEX] (੬ pg. 27) Backlight Compensation Button [BACK LIGHT] (੬ pg. 40) B Play/Pause Button [4/9] (੬ pg. 20) Manual Focus Button [FOCUS] (੬ pg. 38) C Rewind Button [3] (੬ pg. 20) Menu select Button [-] (੬ pg. 15) Quick Review Button...
Instructions
Page 9
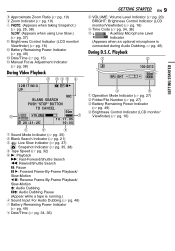
... Snapshot.) (੬ pg. 25, 38) SLOW: (Appears when using Live Slow.) (੬ pg. 37) K Brightness Control Indicator (LCD monitor/ Viewfinder) (੬ pg. 16) L Battery Remaining Power Indicator (੬ pg. 49) M Date/Time (੬ pg. 15) N Manual Focus Adjustment Indicator (੬ pg. 38) During Video Playback 1 2 345 6 12B I T/MI X L MIC BLANK SEARCH PUSH "STOP" BUTTON TO CANCEL q L R VOLUME 50m 7 10. 11. 05 20 : 21 : 25 10: 00 0 9 8 a Sound Mode Indicator (੬ pg. 35...
... Snapshot.) (੬ pg. 25, 38) SLOW: (Appears when using Live Slow.) (੬ pg. 37) K Brightness Control Indicator (LCD monitor/ Viewfinder) (੬ pg. 16) L Battery Remaining Power Indicator (੬ pg. 49) M Date/Time (੬ pg. 15) N Manual Focus Adjustment Indicator (੬ pg. 38) During Video Playback 1 2 345 6 12B I T/MI X L MIC BLANK SEARCH PUSH "STOP" BUTTON TO CANCEL q L R VOLUME 50m 7 10. 11. 05 20 : 21 : 25 10: 00 0 9 8 a Sound Mode Indicator (੬ pg. 35...
Instructions
Page 13
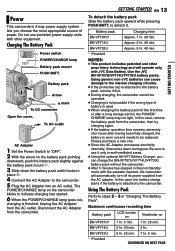
... POWER/ CHARGE lamp may not light. Be sure to use it only in Record-Standby mode with the cassette inserted, the camcorder will operate only with other proprietary technology and will automatically turn off its power supplied from the camcorder, then try charging again. ● If the battery operation time remains extremely short even after having been fully charged, the battery is worn out and needs to be operated. ● Charging...
... POWER/ CHARGE lamp may not light. Be sure to use it only in Record-Standby mode with the cassette inserted, the camcorder will operate only with other proprietary technology and will automatically turn off its power supplied from the camcorder, then try charging again. ● If the battery operation time remains extremely short even after having been fully charged, the battery is worn out and needs to be operated. ● Charging...
Instructions
Page 14
... the camcorder, set various playback functions using NO special effects or manual adjustments. However this mode. The "A" indicator appears on the tape. ● Allows you to display a still image stored in the memory card or to transfer a still image stored in a short circuit and possibly start a fire. To resume the original function of the battery status even though you tried to your nearest JVC dealer. MENU/DATA Power Switch Lock Button MA POWER/ CHARGE POWER/ CHARGE lamp VIDEO/MEMORY...
... the camcorder, set various playback functions using NO special effects or manual adjustments. However this mode. The "A" indicator appears on the tape. ● Allows you to display a still image stored in the memory card or to transfer a still image stored in a short circuit and possibly start a fire. To resume the original function of the battery status even though you tried to your nearest JVC dealer. MENU/DATA Power Switch Lock Button MA POWER/ CHARGE POWER/ CHARGE lamp VIDEO/MEMORY...
Instructions
Page 16
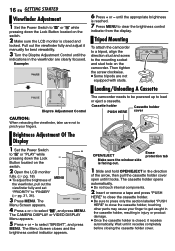
... Adjustment Of The Display 1 Set the Power Switch + to load or eject a cassette. OPEN/EJECT Make sure the window side is facing out. The camcorder needs to be powered up to "M" or "PLAY" while pressing down the Lock Button located on the switch. 2 Make sure the LCD monitor is closed , it manually for best viewability. 3 Turn the Dioptre Adjustment Control until it recedes completely before closing the cassette holder cover. The CAMERA DISPLAY or VIDEO DISPLAY Menu...
... Adjustment Of The Display 1 Set the Power Switch + to load or eject a cassette. OPEN/EJECT Make sure the window side is facing out. The camcorder needs to be powered up to "M" or "PLAY" while pressing down the Lock Button located on the switch. 2 Make sure the LCD monitor is closed , it manually for best viewability. 3 Turn the Dioptre Adjustment Control until it recedes completely before closing the cassette holder cover. The CAMERA DISPLAY or VIDEO DISPLAY Menu...
Instructions
Page 18
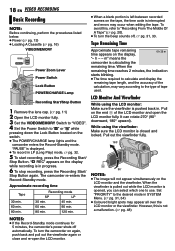
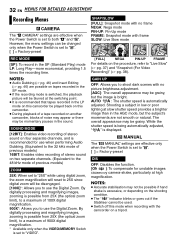
... simultaneously on the display. To turn the beep sounds off automatically. 18 EN VIDEO RECORDING Basic Recording NOTE: Before continuing, perform the procedures listed below: ● Power (੬ pg. 13) ● Loading A Cassette (੬ pg. 16) VIDEO/MEMORY Power Zoom Lever Power Switch Lock Button POWER/CHARGE Lamp Recording Start/Stop Button 1 Remove the lens cap. (੬ pg. 11) 2 Open the LCD monitor fully. 3 Set the VIDEO/MEMORY Switch to "VIDEO". 4 Set the Power Switch to the desired mode in SYSTEM Menu. (੬ pg...
... simultaneously on the display. To turn the beep sounds off automatically. 18 EN VIDEO RECORDING Basic Recording NOTE: Before continuing, perform the procedures listed below: ● Power (੬ pg. 13) ● Loading A Cassette (੬ pg. 16) VIDEO/MEMORY Power Zoom Lever Power Switch Lock Button POWER/CHARGE Lamp Recording Start/Stop Button 1 Remove the lens cap. (੬ pg. 11) 2 Open the LCD monitor fully. 3 Set the VIDEO/MEMORY Switch to "VIDEO". 4 Set the Power Switch to the desired mode in SYSTEM Menu. (੬ pg...
Instructions
Page 19
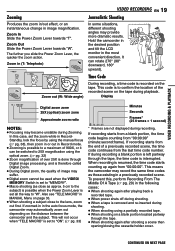
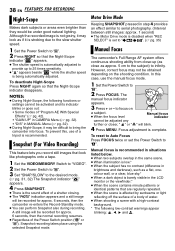
..., different shooting angles may provide more dramatic results. When recording is recorded on the tape during playback. Zoom in the auto focus mode, the camcorder may suffer. ● Digital zoom cannot be switched to 25X magnification using the optical zoom. (੬ pg. 32) ● Zoom magnification of over 25X is done through Digital image processing, and is therefore called Digital Zoom. ● During Digital zoom, the quality of a previously recorded scene, the time code continues from...
..., different shooting angles may provide more dramatic results. When recording is recorded on the tape during playback. Zoom in the auto focus mode, the camcorder may suffer. ● Digital zoom cannot be switched to 25X magnification using the optical zoom. (੬ pg. 32) ● Zoom magnification of over 25X is done through Digital image processing, and is therefore called Digital Zoom. ● During Digital zoom, the quality of a previously recorded scene, the time code continues from...
Instructions
Page 29
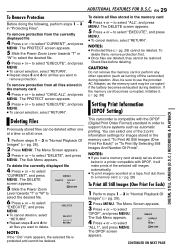
... a tape, first dub them , remove protection first. ● Once files are deleted, they cannot be deleted. The Sub Menu appears. DELETE CURRENT ALL 5 Slide the Power Zoom RETURN Lever towards "T" or "W" to a memory card. (੬ pg. 28) To Print All Still Images (One Print For Each) 1 Perform steps 1 - 3 in "Normal Playback Of Images" (੬ pg. 26). 2 Press MENU. to use the provided AC Adapter, as turning off the camcorder...
... a tape, first dub them , remove protection first. ● Once files are deleted, they cannot be deleted. The Sub Menu appears. DELETE CURRENT ALL 5 Slide the Power Zoom RETURN Lever towards "T" or "W" to a memory card. (੬ pg. 28) To Print All Still Images (One Print For Each) 1 Perform steps 1 - 3 in "Normal Playback Of Images" (੬ pg. 26). 2 Press MENU. to use the provided AC Adapter, as turning off the camcorder...
Instructions
Page 32
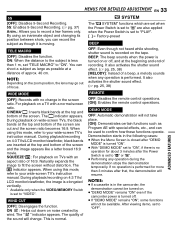
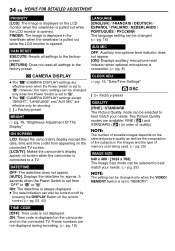
... slow shutter speed provides a brighter image than in the sound. GAIN UP OFF: Allows you to shoot dark scenes with no frame NEGA: Nega mode PIN-UP: Pin-Up mode FRAME: Snapshot mode with frame SLOW: Live Slow mode REC MODE [SP]: To record in low or poor lighting at the switching point. ● It is set to use the Digital Zoom. However, the menu settings can be used. ● Switch off this camcorder. ● During playback...
... slow shutter speed provides a brighter image than in the sound. GAIN UP OFF: Allows you to shoot dark scenes with no frame NEGA: Nega mode PIN-UP: Pin-Up mode FRAME: Snapshot mode with frame SLOW: Live Slow mode REC MODE [SP]: To record in low or poor lighting at the switching point. ● It is set to use the Digital Zoom. However, the menu settings can be used. ● Switch off this camcorder. ● During playback...
Instructions
Page 33
... power is set "TELE MACRO" to your wide-screen TV's instruction manual. During playback/recording on 4:3 TVs/LCD monitor/viewfinder, black bands are cut down on or off . ● If "DEMO MODE" remains "ON", some functions will resume. During playback/recording on 4:3 TVs/ LCD monitor/viewfinder, the image is elongated vertically. * Available only when the VIDEO/MEMORY Switch is turned on noise created by wind. The " " indicator appears. If no operation...
... power is set "TELE MACRO" to your wide-screen TV's instruction manual. During playback/recording on 4:3 TVs/LCD monitor/viewfinder, black bands are cut down on or off . ● If "DEMO MODE" remains "ON", some functions will resume. During playback/recording on 4:3 TVs/ LCD monitor/viewfinder, the image is elongated vertically. * Available only when the VIDEO/MEMORY Switch is turned on noise created by wind. The " " indicator appears. If no operation...
Instructions
Page 34
... "n" (CAMERA DISPLAY) settings except "BRIGHT", "LANGUAGE" and "AUX MIC" are not displayed during recording. (੬ pg. 19) ON: The date/time is always displayed. ● The date indication can be changed only when the Power Switch is set from appearing on the connected TV screen. [LCD/TV]: Makes the camcorder's display appear on the remote control. (੬ pg. 22, 43) CLOCK ADJ. ੬ pg. 15, "Date/Time Settings" [ ] = Factory-preset DSC QUALITY [FINE] / STANDARD The Picture Quality mode...
... "n" (CAMERA DISPLAY) settings except "BRIGHT", "LANGUAGE" and "AUX MIC" are not displayed during recording. (੬ pg. 19) ON: The date/time is always displayed. ● The date indication can be changed only when the Power Switch is set from appearing on the connected TV screen. [LCD/TV]: Makes the camcorder's display appear on the remote control. (੬ pg. 22, 43) CLOCK ADJ. ੬ pg. 15, "Date/Time Settings" [ ] = Factory-preset DSC QUALITY [FINE] / STANDARD The Picture Quality mode...
Instructions
Page 38
... the scene is barely visible in MANUAL Menu (੬ pg. 32). ● During Night-Scope, it is recommended. To prevent this case, use of a tripod is strobing due to the slow shutter speed. 1 Set the Power Switch to "M". 2 Press NIGHT so that look like photographs onto a tape. 1 Set the VIDEO/MEMORY Switch to "VIDEO". 2 Set the Power Switch to "M". 3 Set "SNAP/SLOW" to infinity. Motor Drive Mode Keeping SNAPSHOT pressed in brightness...
... the scene is barely visible in MANUAL Menu (੬ pg. 32). ● During Night-Scope, it is recommended. To prevent this case, use of a tripod is strobing due to the slow shutter speed. 1 Set the Power Switch to "M". 2 Press NIGHT so that look like photographs onto a tape. 1 Set the VIDEO/MEMORY Switch to "VIDEO". 2 Set the Power Switch to "M". 3 Set "SNAP/SLOW" to infinity. Motor Drive Mode Keeping SNAPSHOT pressed in brightness...
Instructions
Page 45
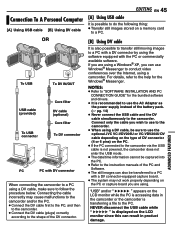
... or commercially available software. NEVER disconnect the USB cable while " " is displayed on the PC. ● If the PC connected to the camcorder via the USB cable is not powered, the camcorder does not enter the USB mode. ● The date/time information cannot be transferred to the instruction manuals of the DV connector. "USB" and/or " " appears on a memory card to a PC. [B] Using DV cable It is recommended to use Windows® Messenger...
... or commercially available software. NEVER disconnect the USB cable while " " is displayed on the PC. ● If the PC connected to the camcorder via the USB cable is not powered, the camcorder does not enter the USB mode. ● The date/time information cannot be transferred to the instruction manuals of the DV connector. "USB" and/or " " appears on a memory card to a PC. [B] Using DV cable It is recommended to use Windows® Messenger...
Instructions
Page 47
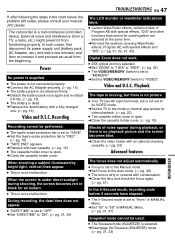
... the cassette holder cover. HSet Focus to "5S" in MANUAL Menu. (੬ pg. 31, 37) Snapshot mode cannot be performed. ● The tape's erase protection tab is not a malfunction. HReplace with special effects, "DIS" and other functions that cannot be used . ● The Squeeze mode (SQUEEZE) is selected. During recording, the date/ time does not appear. ● "DATE/TIME" is not connected properly. HSet the VIDEO/MEMORY Switch to "REC...
... the cassette holder cover. HSet Focus to "5S" in MANUAL Menu. (੬ pg. 31, 37) Snapshot mode cannot be performed. ● The tape's erase protection tab is not a malfunction. HReplace with special effects, "DIS" and other functions that cannot be used . ● The Squeeze mode (SQUEEZE) is selected. During recording, the date/ time does not appear. ● "DATE/TIME" is not connected properly. HSet the VIDEO/MEMORY Switch to "REC...

Instructions
Page 48
... the tape. HConsult your nearest JVC dealer for replacement. The POWER/CHARGE lamp on the LCD monitor become dark due to light when "GAIN UP" is set . HDetach the battery pack once again and re-attach it . However, black spots or bright spots of its service life, images on the camcorder does not light during charging. ● Charging is difficult in the memory card are not recorded on the LCD...
... the tape. HConsult your nearest JVC dealer for replacement. The POWER/CHARGE lamp on the LCD monitor become dark due to light when "GAIN UP" is set . HDetach the battery pack once again and re-attach it . However, black spots or bright spots of its service life, images on the camcorder does not light during charging. ● Charging is difficult in the memory card are not recorded on the LCD...

Instructions
Page 50
.... CHECK CARD'S WRITE PROTECTION SWITCH Appears when you attempt to shoot digital still images when the write protection tab on the SD Memory Card is set to "SAVE". (੬ pg. 46) MEMORY IS FULL Appears when the memory card's memory is full and shooting is set to record on a memory card or access data on a tape recorded in the HDV format cannot be played back with this camcorder. ? DUB ERROR! ● Appears if Insert Editing is corrupted. COPYING...
.... CHECK CARD'S WRITE PROTECTION SWITCH Appears when you attempt to shoot digital still images when the write protection tab on the SD Memory Card is set to "SAVE". (੬ pg. 46) MEMORY IS FULL Appears when the memory card's memory is full and shooting is set to record on a memory card or access data on a tape recorded in the HDV format cannot be played back with this camcorder. ? DUB ERROR! ● Appears if Insert Editing is corrupted. COPYING...
Instructions
Page 55
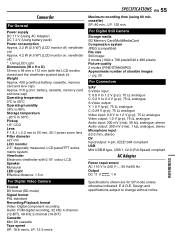
... LCD Speaker Monaural LED Light Effective distance: 1.5 m For Digital Video Camera Format DV format (SD mode) Signal format PAL standard Recording/Playback format Video: Digital component recording Audio: PCM digital recording, 32 kHz 4-channel (12-BIT), 48 kHz 2-channel (16-BIT) Cassette Mini DV cassette Tape speed SP: 18.8 mm/s, LP: 12.5 mm/s SPECIFICATIONS EN 55 Maximum recording time (using 80 min. For Digital Still Camera Storage media SD Memory Card/MultiMediaCard Compression system JPEG (compatible) File size Still image: 2 modes (1024 x 768 pixels/640 x 480 pixels) Picture...
... LCD Speaker Monaural LED Light Effective distance: 1.5 m For Digital Video Camera Format DV format (SD mode) Signal format PAL standard Recording/Playback format Video: Digital component recording Audio: PCM digital recording, 32 kHz 4-channel (12-BIT), 48 kHz 2-channel (16-BIT) Cassette Mini DV cassette Tape speed SP: 18.8 mm/s, LP: 12.5 mm/s SPECIFICATIONS EN 55 Maximum recording time (using 80 min. For Digital Still Camera Storage media SD Memory Card/MultiMediaCard Compression system JPEG (compatible) File size Still image: 2 modes (1024 x 768 pixels/640 x 480 pixels) Picture...
Instructions
Page 56
... 24 Power-Linked Operation 15 Program AE With Special Effects 42 Q Quick Review 20 R Recording Capacity Memory Card 25 Tape 18 Recording Media Selection 35 Remote Control 23 Resetting The File Name 28 S Slow-Motion Playback 24 Snapshot Mode 32 Sound Mode 32, 35 Speaker Volume 20 Specifications 55 Spot Exposure Control 40 T Tape Speed (REC MODE 32, 35 Telephoto Setting 33 Time Code 19, 34 Tripod Mounting 16 Troubleshooting 47 W Warning Indications 49 White Balance 40 Wide Mode 33 Wipe Or Fader Effects 41 Z Zooming...
... 24 Power-Linked Operation 15 Program AE With Special Effects 42 Q Quick Review 20 R Recording Capacity Memory Card 25 Tape 18 Recording Media Selection 35 Remote Control 23 Resetting The File Name 28 S Slow-Motion Playback 24 Snapshot Mode 32 Sound Mode 32, 35 Speaker Volume 20 Specifications 55 Spot Exposure Control 40 T Tape Speed (REC MODE 32, 35 Telephoto Setting 33 Time Code 19, 34 Tripod Mounting 16 Troubleshooting 47 W Warning Indications 49 White Balance 40 Wide Mode 33 Wipe Or Fader Effects 41 Z Zooming...


