Instructions
Page 11
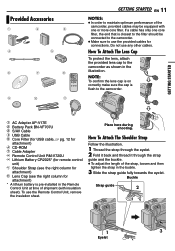
...the strap guide and the buckle. ● To adjust the length of the camcorder, provided cables may be connected to the camcorder. ● Make sure to the camcorder. Buckle Strap guide 2 2 1 3 Eyelet If a cable has only one core filter, the end that is pre-installed in the Remote... Slide the strap guide fully towards the eyelet. a AC Adapter AP-V17E b Battery Pack BN-VF707U c S/AV Cable d USB Cable e Core Filter (for USB cable, ੬ pg. 12 for attachment) f CD-ROM g Cable Adapter h Remote Control Unit RM-V720U i Lithium Battery CR2025* (for remote control unit) j Shoulder Strap (see...
...the strap guide and the buckle. ● To adjust the length of the camcorder, provided cables may be connected to the camcorder. ● Make sure to the camcorder. Buckle Strap guide 2 2 1 3 Eyelet If a cable has only one core filter, the end that is pre-installed in the Remote... Slide the strap guide fully towards the eyelet. a AC Adapter AP-V17E b Battery Pack BN-VF707U c S/AV Cable d USB Cable e Core Filter (for USB cable, ੬ pg. 12 for attachment) f CD-ROM g Cable Adapter h Remote Control Unit RM-V720U i Lithium Battery CR2025* (for remote control unit) j Shoulder Strap (see...
Instructions
Page 20
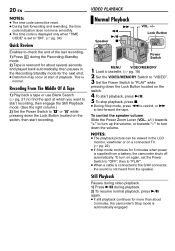
To control the speaker volume Slide the Power Zoom Lever (VOL. +/-) towards "+" to turn up the volume, or towards "-" to the S/AV connector, the sound is not heard from a battery, the camcorder shuts off automatically. NOTES: ● The playback picture can be reset. ● During ...fast-forwarding and rewinding, the time code indication does not move smoothly. ● The time code is displayed only when "TIME CODE" is set the Power Switch to "OFF", then to "PLAY". ● When a cable...
To control the speaker volume Slide the Power Zoom Lever (VOL. +/-) towards "+" to turn up the volume, or towards "-" to the S/AV connector, the sound is not heard from a battery, the camcorder shuts off automatically. NOTES: ● The playback picture can be reset. ● During ...fast-forwarding and rewinding, the time code indication does not move smoothly. ● The time code is displayed only when "TIME CODE" is set the Power Switch to "OFF", then to "PLAY". ● When a cable...
Instructions
Page 22
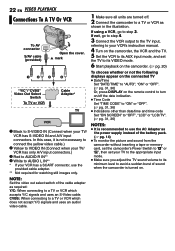
.... ● Make sure you adjust the TV sound volume to its minimum level to avoid a sudden burst of sound when the camcorder is not necessary to connect the yellow video cable.) B Yellow to VIDEO IN (Connect when your TV/ VCR has only A/V input connectors.) C Red to AUDIO R IN** D ...the cable adapter as required: Y/C: When connecting to a TV or VCR as shown in the illustration. In this case, it is turned on /off . 2 Connect the camcorder to a TV or VCR which accepts Y/C signals and uses an S-Video cable. 22 EN VIDEO PLAYBACK Connections To A TV Or VCR To AV connector S/AV cable (provided...
.... ● Make sure you adjust the TV sound volume to its minimum level to avoid a sudden burst of sound when the camcorder is not necessary to connect the yellow video cable.) B Yellow to VIDEO IN (Connect when your TV/ VCR has only A/V input connectors.) C Red to AUDIO R IN** D ...the cable adapter as required: Y/C: When connecting to a TV or VCR as shown in the illustration. In this case, it is turned on /off . 2 Connect the camcorder to a TV or VCR which accepts Y/C signals and uses an S-Video cable. 22 EN VIDEO PLAYBACK Connections To A TV Or VCR To AV connector S/AV cable (provided...
Instructions
Page 43
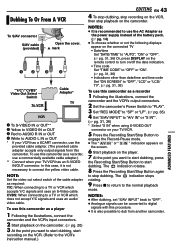
...To Or From A VCR To S/AV connector S/AV cable (provided) Open the cover. In this procedure. ● It is also possible to dub from this camcorder as a player 1 Following the illustrations, connect the camcorder and the VCR's input connectors. 2 Start playback on the camcorder. (੬ pg. 20) ... on the VCR, then stop dubbing. CVBS: When connecting to use the provided cable adapter. (The provided cable adapter accepts only output signals from another camcorder. NOTES: ● After dubbing, set "S/AV INPUT" back to "OFF". ● Analogue signals can be converted to digital ...
...To Or From A VCR To S/AV connector S/AV cable (provided) Open the cover. In this procedure. ● It is also possible to dub from this camcorder as a player 1 Following the illustrations, connect the camcorder and the VCR's input connectors. 2 Start playback on the camcorder. (੬ pg. 20) ... on the VCR, then stop dubbing. CVBS: When connecting to use the provided cable adapter. (The provided cable adapter accepts only output signals from another camcorder. NOTES: ● After dubbing, set "S/AV INPUT" back to "OFF". ● Analogue signals can be converted to digital ...
Instructions
Page 44
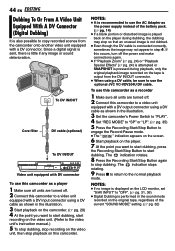
... the DV cable is connected correctly, sometimes the image may not appear in step 4. If this occurs, turn off the power and make connections again. ● If "Playback Zoom" (੬... deterioration. NOTES: ● If no image is displayed on the LCD monitor, set "S/AV INPUT" to "OFF". (੬ pg. 31, 36) ● Digital Dubbing is ...camcorder. 44 EN EDITING Dubbing To Or From A Video Unit Equipped With A DV Connector (Digital Dubbing) It is also possible to copy recorded scenes from the DV IN/OUT connector. ● When using a DV cable, be sure to use the optional JVC VC-VDV204U DV cable...
... the DV cable is connected correctly, sometimes the image may not appear in step 4. If this occurs, turn off the power and make connections again. ● If "Playback Zoom" (੬... deterioration. NOTES: ● If no image is displayed on the LCD monitor, set "S/AV INPUT" to "OFF". (੬ pg. 31, 36) ● Digital Dubbing is ...camcorder. 44 EN EDITING Dubbing To Or From A Video Unit Equipped With A DV Connector (Digital Dubbing) It is also possible to copy recorded scenes from the DV IN/OUT connector. ● When using a DV cable, be sure to use the optional JVC VC-VDV204U DV cable...


