Instructions
Page 10
... a while, the heads may experience mosaic-like noise during playback depending on pages 52 - 54. ● Microsoft® and Windows® are designed and optimized to store your trial recording to make sure the video and audio have been recorded properly. LP ...video than SP (Standard) mode, but JVC brand cassette tapes are either registered trademarks or trademarks of commercially available cassette tapes complying with a cleaning cassette (optional). Your camcorder is prohibited. (Even if you may be removed from the camcorder and stored in cassette cases. Any ...
... a while, the heads may experience mosaic-like noise during playback depending on pages 52 - 54. ● Microsoft® and Windows® are designed and optimized to store your trial recording to make sure the video and audio have been recorded properly. LP ...video than SP (Standard) mode, but JVC brand cassette tapes are either registered trademarks or trademarks of commercially available cassette tapes complying with a cleaning cassette (optional). Your camcorder is prohibited. (Even if you may be removed from the camcorder and stored in cassette cases. Any ...
Instructions
Page 16
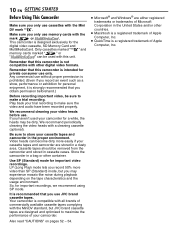
... a tripod, align the direction stud and screw to load or eject a cassette. The camcorder needs to be powered up to the mounting socket and stud hole on the camcorder. The cassette holder opens automatically. ● Do not touch internal components. 2 Insert or remove a tape and press "PUSH HERE...located on the switch. 2 Make sure the LCD monitor is closed and locked. to select "n", and press MENU. OPEN/EJECT Make sure the window side is reached. 7 Press MENU to clear the brightness control indicator from the display. touching other parts may cause your fingers. Loading/Unloading A...
... a tripod, align the direction stud and screw to load or eject a cassette. The camcorder needs to be powered up to the mounting socket and stud hole on the camcorder. The cassette holder opens automatically. ● Do not touch internal components. 2 Insert or remove a tape and press "PUSH HERE...located on the switch. 2 Make sure the LCD monitor is closed and locked. to select "n", and press MENU. OPEN/EJECT Make sure the window side is reached. 7 Press MENU to clear the brightness control indicator from the display. touching other parts may cause your fingers. Loading/Unloading A...

Instructions
Page 23
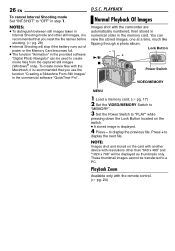
...the holder back in /out (੬ pg. 19, 24) (Also available with the Power Switch set to "PLAY") A Infrared beam transmitting window ● Transmits the beam signal. Remote sensor NOTE: The transmitted beam may cause incorrect operation when the remote sensor is set to "A" or... pg. 24) N EFFECT ON/OFF Button (੬ pg. 24) The following buttons are available when the camcorder's Power Switch is directly exposed to sunlight or powerful lighting. o Zoom (T/W) Buttons Zoom in until you hear a click. q S.SHOT Button Functions the same as the basic operations (Playback, Stop, ...
...the holder back in /out (੬ pg. 19, 24) (Also available with the Power Switch set to "PLAY") A Infrared beam transmitting window ● Transmits the beam signal. Remote sensor NOTE: The transmitted beam may cause incorrect operation when the remote sensor is set to "A" or... pg. 24) N EFFECT ON/OFF Button (੬ pg. 24) The following buttons are available when the camcorder's Power Switch is directly exposed to sunlight or powerful lighting. o Zoom (T/W) Buttons Zoom in until you hear a click. q S.SHOT Button Functions the same as the basic operations (Playback, Stop, ...
Instructions
Page 26
... the file names before shooting. (੬ pg. 28) ● Interval Shooting will be used to create movie files from the captured still images (Windows® only). Press + to "OFF" in the commercial software "QuickTime Pro". NOTE: Images shot and stored on the switch. ● A...Slideshow From Still Images" in step 1. PLAYBACK Normal Playback Of Images Images shot with the remote control. (੬ pg. 24) Playback Zoom Available only with the camcorder are automatically numbered, then stored in numerical order in Interval Shooting mode and other than "640 x 480" and "1024 x 768"...
... the file names before shooting. (੬ pg. 28) ● Interval Shooting will be used to create movie files from the captured still images (Windows® only). Press + to "OFF" in the commercial software "QuickTime Pro". NOTE: Images shot and stored on the switch. ● A...Slideshow From Still Images" in step 1. PLAYBACK Normal Playback Of Images Images shot with the remote control. (੬ pg. 24) Playback Zoom Available only with the camcorder are automatically numbered, then stored in numerical order in Interval Shooting mode and other than "640 x 480" and "1024 x 768"...
Instructions
Page 41
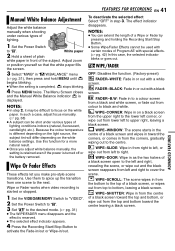
...menu (੬ pg. 31), then press and hold MENU until begins blinking. ● When the setting is completed, stops blinking. 4 Press MENU twice. Adjust zoom or position yourself so that the white paper fills the screen. 3 Select "MWB" in front of the subject. NOTES: ● In step 2, it may ...or wipe out from top to right. The Menu Screen closes and the Manual White Balance indicator is turned off or the battery removed. WIPE-WINDOW: The scene starts in the centre of a black screen and wipes in toward the centre leaving a black screen. To deactivate the selected ...
...menu (੬ pg. 31), then press and hold MENU until begins blinking. ● When the setting is completed, stops blinking. 4 Press MENU twice. Adjust zoom or position yourself so that the white paper fills the screen. 3 Select "MWB" in front of the subject. NOTES: ● In step 2, it may ...or wipe out from top to right. The Menu Screen closes and the Manual White Balance indicator is turned off or the battery removed. WIPE-WINDOW: The scene starts in the centre of a black screen and wipes in toward the centre leaving a black screen. To deactivate the selected ...
Instructions
Page 45
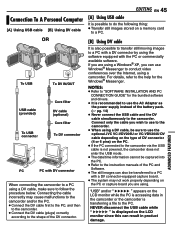
...connector Core filter DV cable (optional) Core filter To DV connector PC PC with DV connector When connecting the camcorder to a PC using a camcorder. Connect only the cable you wish to use Windows® Messenger to conduct video conferences over the Internet, using a DV cable, make sure to follow the procedure... you are using a Windows® XP, you are using a DV cable, be sure to the camcorder. "USB" and/or " " appears on the PC or capture board you can use to the help for the bundled software and drivers. ● It is recommended to use the optional JVC VC-VDV206U or VC-...
...connector Core filter DV cable (optional) Core filter To DV connector PC PC with DV connector When connecting the camcorder to a PC using a camcorder. Connect only the cable you wish to use Windows® Messenger to conduct video conferences over the Internet, using a DV cable, make sure to follow the procedure... you are using a Windows® XP, you are using a DV cable, be sure to the camcorder. "USB" and/or " " appears on the PC or capture board you can use to the help for the bundled software and drivers. ● It is recommended to use the optional JVC VC-VDV206U or VC-...


