DLA-G20U User instruction manual (2.6MB)
Page 4
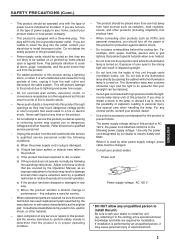
.... Unauthorized substitutions may touch dangerous voltage points or short out parts that the product is performed by other hazards. The illumination lamp also contains ultraviolet rays and the light is left unattended and unused for long periods of power supply to determine that could... unplug it is so powerful that your product dealer or local power company. - Do not attempt to normal operation. Unplug this projector. For example, cloth, paper, matches, aerosol cans or gas lighters that they exit from heat sources such as opening the cabinet while...
.... Unauthorized substitutions may touch dangerous voltage points or short out parts that the product is performed by other hazards. The illumination lamp also contains ultraviolet rays and the light is left unattended and unused for long periods of power supply to determine that could... unplug it is so powerful that your product dealer or local power company. - Do not attempt to normal operation. Unplug this projector. For example, cloth, paper, matches, aerosol cans or gas lighters that they exit from heat sources such as opening the cabinet while...
DLA-G20U User instruction manual (2.6MB)
Page 5
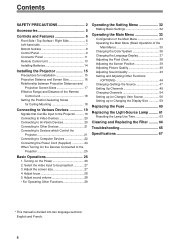
... 6 Left-hand side 7 Bottom Surface 8 Control Panel 9 Connector Panel 11 Remote Control Unit 13 Installing Batteries 14 Installing the Projector 15 Precautions for installation 15 Projection Distance and Screen Size 16 Relationship between Projection Distances and Projection Screen Sizes 17 Effective Range and ...) User Source 56 Setting up or Changing the Display Size 59 Replacing the Fuse 60 Replacing the Light-Source Lamp ......... 61 Resetting the Lamp Use Time 63 Cleaning and Replacing the Filter ......... 64 Troubleshooting 65 Specifications 67 * This manual is divided into...
... 6 Left-hand side 7 Bottom Surface 8 Control Panel 9 Connector Panel 11 Remote Control Unit 13 Installing Batteries 14 Installing the Projector 15 Precautions for installation 15 Projection Distance and Screen Size 16 Relationship between Projection Distances and Projection Screen Sizes 17 Effective Range and ...) User Source 56 Setting up or Changing the Display Size 59 Replacing the Fuse 60 Replacing the Light-Source Lamp ......... 61 Resetting the Lamp Use Time 63 Cleaning and Replacing the Filter ......... 64 Troubleshooting 65 Specifications 67 * This manual is divided into...
DLA-G20U User instruction manual (2.6MB)
Page 7
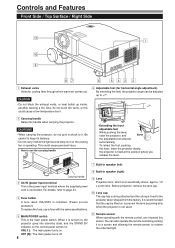
... this sensor.You can be fitted on . For details, refer to use a fuse with the remote control, aim it . When it while the light source lamp is on . Controls and Features Front Side / Top Surface / Right Side q 1 p 9 87 6 5 43 2 1 Exhaust vents Vents for horizontal angle adjustment)... cooling fan is operating. CAUTION • Do not block the exhaust vents, or heat builds up to it toward this handle when carrying the projector. the projector is connected. OFF [‡]: The main power turns off. 6 8 Built-in speaker (left) Carrying handle 3 AC IN (power input) ...
... this sensor.You can be fitted on . For details, refer to use a fuse with the remote control, aim it . When it while the light source lamp is on . Controls and Features Front Side / Top Surface / Right Side q 1 p 9 87 6 5 43 2 1 Exhaust vents Vents for horizontal angle adjustment)... cooling fan is operating. CAUTION • Do not block the exhaust vents, or heat builds up to it toward this handle when carrying the projector. the projector is connected. OFF [‡]: The main power turns off. 6 8 Built-in speaker (left) Carrying handle 3 AC IN (power input) ...
DLA-G20U User instruction manual (2.6MB)
Page 8
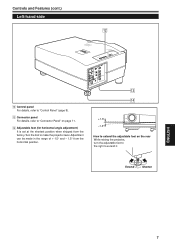
e r +1.5° -1.5° •How to make the projector level. Controls and Features (cont.) Left-hand side w ALQIGUNICK -2 + 3 SETTINGCOMPUTER VIDEEMOERGENCY TEMP LAMP STAND BY w Control panel For details, refer to extend it. Adjustment can be made in the range of + 1.5° and - 1.5° from the factory.Turn ... shortest position when shipped from the horizontal position. Extend Shorten ENGLISH 7 e Connector panel For details, refer to "Connector Panel" on the rear While raising the projector, turn the adjustable foot to the right to "Control Panel" (page 9).
e r +1.5° -1.5° •How to make the projector level. Controls and Features (cont.) Left-hand side w ALQIGUNICK -2 + 3 SETTINGCOMPUTER VIDEEMOERGENCY TEMP LAMP STAND BY w Control panel For details, refer to extend it. Adjustment can be made in the range of + 1.5° and - 1.5° from the factory.Turn ... shortest position when shipped from the horizontal position. Extend Shorten ENGLISH 7 e Connector panel For details, refer to "Connector Panel" on the rear While raising the projector, turn the adjustable foot to the right to "Control Panel" (page 9).
DLA-G20U User instruction manual (2.6MB)
Page 9
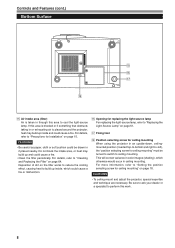
...must be drawn in ceiling mounting. Controls and Features (cont.) Bottom Surface t y u i t Air intake area (filter) Air is placed around the projector, heat may build up and could cause a fire or malfunction. u Fixing foot i Position selecting screw for ceiling mounting" on page 64. For more ...to switch to "Replacing the Light-Source Lamp" on the filter works to reduce the cooling effect, causing heat to cool the light-source lamp. For details, refer to "Setting the position selecting screw for ceiling mounting When using the projector in color images (shading), which could...
...must be drawn in ceiling mounting. Controls and Features (cont.) Bottom Surface t y u i t Air intake area (filter) Air is placed around the projector, heat may build up and could cause a fire or malfunction. u Fixing foot i Position selecting screw for ceiling mounting" on page 64. For more ...to switch to "Replacing the Light-Source Lamp" on the filter works to reduce the cooling effect, causing heat to cool the light-source lamp. For details, refer to "Setting the position selecting screw for ceiling mounting When using the projector in color images (shading), which could...
DLA-G20U User instruction manual (2.6MB)
Page 10
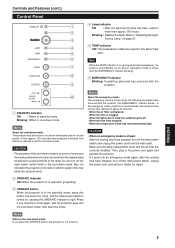
...inside has risen abnormally high. This feature is referred to prolong the life of the lamp. CAUTION • The purpose of time (approx. 120 seconds) after the cooling fans have occurred with the 9 projector. +3 QUICK p ALIGN -2 1 STAND BY Indicator ON : When in the ... is shown (with the EMERGENCY indicator blinking). 8 6 EMERGENCY indicator Blinking: Something abnormal has occurred with the projector (the EMERGENCY indicator blinks). Make sure the lamp-replacement cover and the air filter are correctly installed. ENGLISH 9 Do not turn off the main power switch while...
...inside has risen abnormally high. This feature is referred to prolong the life of the lamp. CAUTION • The purpose of time (approx. 120 seconds) after the cooling fans have occurred with the 9 projector. +3 QUICK p ALIGN -2 1 STAND BY Indicator ON : When in the ... is shown (with the EMERGENCY indicator blinking). 8 6 EMERGENCY indicator Blinking: Something abnormal has occurred with the projector (the EMERGENCY indicator blinks). Make sure the lamp-replacement cover and the air filter are correctly installed. ENGLISH 9 Do not turn off the main power switch while...
DLA-G20U User instruction manual (2.6MB)
Page 11
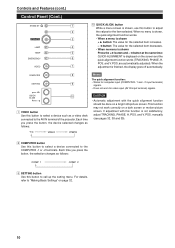
... are automatically adjusted). POS. For details, refer to call up the setting menu. Controls and Features (cont.) Control Panel (Cont.) STAND BY LAMP TEMP EMERGENCY ¢VIDEO 1 p QUICK ALIGN. CAUTION • Automatic adjustment with this button to adjust 2 the values for the selected item decreases... 8 SETTING 9 +3 QUICK p ALIGN -2 7 VIDEO button Use this button to select a device connected to the AV IN terminal of the projector. manually (see pages 32, 38 and 39). If adjustment with the quick alignment function should be done on the screen and the quick alignment ...
... are automatically adjusted). POS. For details, refer to call up the setting menu. Controls and Features (cont.) Control Panel (Cont.) STAND BY LAMP TEMP EMERGENCY ¢VIDEO 1 p QUICK ALIGN. CAUTION • Automatic adjustment with this button to adjust 2 the values for the selected item decreases... 8 SETTING 9 +3 QUICK p ALIGN -2 7 VIDEO button Use this button to select a device connected to the AV IN terminal of the projector. manually (see pages 32, 38 and 39). If adjustment with the quick alignment function should be done on the screen and the quick alignment ...
DLA-G20U User instruction manual (2.6MB)
Page 16
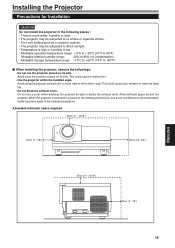
... inside becomes equal to the outside temperature. Allow sufficient space around the projector. This could cause a malfunction. • Use the projector within the installed angle. Avoid using the projector placed on its side. This could cause color variation or harm the lamp life. • Do not block the exhaust vents. Allowable minimum space required...
... inside becomes equal to the outside temperature. Allow sufficient space around the projector. This could cause a malfunction. • Use the projector within the installed angle. Avoid using the projector placed on its side. This could cause color variation or harm the lamp life. • Do not block the exhaust vents. Allowable minimum space required...
DLA-G20U User instruction manual (2.6MB)
Page 17
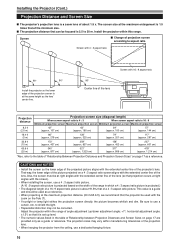
... screen aligns with the extended center line of the lens. to 20 m. This value is a guide and should be corrected. Adjust the projector within this range. Screen s Change of projection screen according to use a dedicated hanging fixture. 16 Be sure to aspect ratio Screen with ... Projection Screen Sizes" on the Tele (T). • If sunlight or lamp light strikes the projection screen directly, the picture becomes whitish and dim. Installing the Projector (Cont.) Projection Distance and Screen Size s The projector's projection lens is a zoom lens of about 91.8% that of a...
... screen aligns with the extended center line of the lens. to 20 m. This value is a guide and should be corrected. Adjust the projector within this range. Screen s Change of projection screen according to use a dedicated hanging fixture. 16 Be sure to aspect ratio Screen with ... Projection Screen Sizes" on the Tele (T). • If sunlight or lamp light strikes the projection screen directly, the picture becomes whitish and dim. Installing the Projector (Cont.) Projection Distance and Screen Size s The projector's projection lens is a zoom lens of about 91.8% that of a...
DLA-G20U User instruction manual (2.6MB)
Page 26
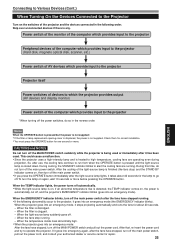
... During this time, do so in the following abnormality occur to the projector * When turning off the power switches, do not turn off . When the projector goes into an emergency mode). When the light-source lamp suddenly goes off the MAIN POWER switch and pull out the power cord...etc.) Power switch of AV devices which provide input to the projector Projector itself Power switches of devices to which the projector provides output (AV devices and display monitor) Power switch of the light-source lamp is heated to operate the projector. So, after the fans have stopped, turn off the ...
... During this time, do so in the following abnormality occur to the projector * When turning off the power switches, do not turn off . When the projector goes into an emergency mode). When the light-source lamp suddenly goes off the MAIN POWER switch and pull out the power cord...etc.) Power switch of AV devices which provide input to the projector Projector itself Power switches of devices to which the projector provides output (AV devices and display monitor) Power switch of the light-source lamp is heated to operate the projector. So, after the fans have stopped, turn off the ...

DLA-G20U User instruction manual (2.6MB)
Page 27
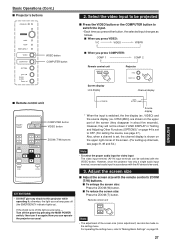
... STAND BY STAND BY indicator OPERATE indicator LAMP TEMP EMERGENCY VIDEO COMPUTER SETTING +3 QUICK ALIGN -2 OPERATE button 2, 1 1, 2 MAIN POWER switch The following describes the basic procedure for normal use of the projector's button Projector (ON) OPERATE (Blinking) \ STAND BY 2 Turn off ...POWER switch is not a malfunction. • If the light-source lamp does not light up, try to blinking, and the projector goes into cool-down mode (the STAND BY indicator blinking). Example of the projector. 1. Projector's indicator STAND BY (ON) 2 Press the OPERATE button for ...
... STAND BY STAND BY indicator OPERATE indicator LAMP TEMP EMERGENCY VIDEO COMPUTER SETTING +3 QUICK ALIGN -2 OPERATE button 2, 1 1, 2 MAIN POWER switch The following describes the basic procedure for normal use of the projector's button Projector (ON) OPERATE (Blinking) \ STAND BY 2 Turn off ...POWER switch is not a malfunction. • If the light-source lamp does not light up, try to blinking, and the projector goes into cool-down mode (the STAND BY indicator blinking). Example of the projector. 1. Projector's indicator STAND BY (ON) 2 Press the OPERATE button for ...
DLA-G20U User instruction manual (2.6MB)
Page 28
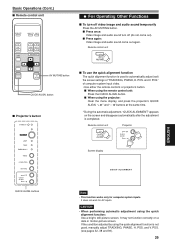
...VOL. s To reduce the screen size: Press the ZOOM (T) button. AV MUTING ATTENTIONS • DO NOT give any shock to this projector has only a single audio input terminal, reconnect audio input in accordance with the AV device to be switched with the remote control's ZOOM...be made on the setting menu. s When you press VIDEO: Y/C VIDEO YPBPR s When you can operate the projector as follows. Basic Operations (Cont.) s Projector's buttons STAND BY LAMP TEMP EMERGENCY VIDEO COMPUTER SETTING +3 QUICK ALIGN -2 VIDEO button COMPUTER button 2. Select the video input to "Making ...
...VOL. s To reduce the screen size: Press the ZOOM (T) button. AV MUTING ATTENTIONS • DO NOT give any shock to this projector has only a single audio input terminal, reconnect audio input in accordance with the AV device to be switched with the remote control's ZOOM...be made on the setting menu. s When you press VIDEO: Y/C VIDEO YPBPR s When you can operate the projector as follows. Basic Operations (Cont.) s Projector's buttons STAND BY LAMP TEMP EMERGENCY VIDEO COMPUTER SETTING +3 QUICK ALIGN -2 VIDEO button COMPUTER button 2. Select the video input to "Making ...
DLA-G20U User instruction manual (2.6MB)
Page 30
button s Projector's button STAND BY LAMP TEMP EMERGENCY VIDEO COMPUTER SETTING +3 QUICK ALIGN -2 QUICK ALIGN. s Press again: Video image and audio sound come out). of "TRACKING, PHASE, H. s When using the projector: Clear the menu display, and press the projector's QUICK ALIGN. s When using... adjust (set) the screen settings of computer system input video. • Use either the remote control's or projector's button. POS." Remote control unit Projector QUICK ALIGN. +3 QUICK ALIGN -2 Screen display QUICK-ALIGNMENT Note • This function works only for AV inputs...
button s Projector's button STAND BY LAMP TEMP EMERGENCY VIDEO COMPUTER SETTING +3 QUICK ALIGN -2 QUICK ALIGN. s Press again: Video image and audio sound come out). of "TRACKING, PHASE, H. s When using the projector: Clear the menu display, and press the projector's QUICK ALIGN. s When using... adjust (set) the screen settings of computer system input video. • Use either the remote control's or projector's button. POS." Remote control unit Projector QUICK ALIGN. +3 QUICK ALIGN -2 Screen display QUICK-ALIGNMENT Note • This function works only for AV inputs...
DLA-G20U User instruction manual (2.6MB)
Page 31
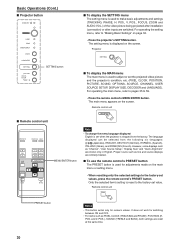
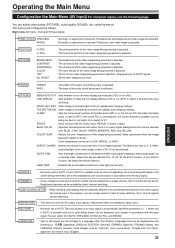
...menu appears on the screen. For operating the main menu, refer to pages 35 to the factory-set the projected video picture and the projector's condition, etc. (PIXEL CLOCK, POSITION, PICTURE, SOUND, OPTIONS, SOURCE, CHANNEL, USER SOURCE SETUP, DISPLAY SIZE, DECODER and LANGUAGE... being projected after installation (connection) or after inputs are reset at the same time. 30 and V. Basic Operations (Cont.) s Projector button STAND BY LAMP TEMP EMERGENCY VIDEO COMPUTER SETTING +3 QUICK ALIGN -2 SETTING button s Remote control unit OPERATE COMPUTER VIDEO VOL. It does not work ...
...menu appears on the screen. For operating the main menu, refer to pages 35 to the factory-set the projected video picture and the projector's condition, etc. (PIXEL CLOCK, POSITION, PICTURE, SOUND, OPTIONS, SOURCE, CHANNEL, USER SOURCE SETUP, DISPLAY SIZE, DECODER and LANGUAGE... being projected after installation (connection) or after inputs are reset at the same time. 30 and V. Basic Operations (Cont.) s Projector button STAND BY LAMP TEMP EMERGENCY VIDEO COMPUTER SETTING +3 QUICK ALIGN -2 SETTING button s Remote control unit OPERATE COMPUTER VIDEO VOL. It does not work ...
DLA-G20U User instruction manual (2.6MB)
Page 34
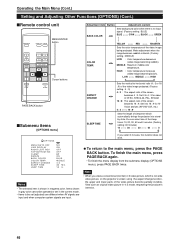
...right-to -bottom (for about 5 seconds after input signal is adjusted. : The tint of the video image being projected is depleted, the projector goes into a stand-by direct channel switching. Make adjustment when the image becomes reddish or bluish. When projecting high-vision video image, a ...shown in gray color.) DECODER LANGUAGE : Normally, set to a language other than English. You can select from video signals that can be cleared.) LAMP TIME : Indicates the accumulated used hours of the audio sound being projected is used in ( ). The factory-set . The lateral size and ...
...right-to -bottom (for about 5 seconds after input signal is adjusted. : The tint of the video image being projected is depleted, the projector goes into a stand-by direct channel switching. Make adjustment when the image becomes reddish or bluish. When projecting high-vision video image, a ...shown in gray color.) DECODER LANGUAGE : Normally, set to a language other than English. You can select from video signals that can be cleared.) LAMP TIME : Indicates the accumulated used hours of the audio sound being projected is used in ( ). The factory-set . The lateral size and ...
DLA-G20U User instruction manual (2.6MB)
Page 35
...image are shown only in horizontal/vertical frequency from video signals that can be input to the projector, you select 0 minutes, the sleep time will be cleared.) LAMP TIME : Indicates accumulated used at the back porch (BP) or on the screen can be...dots (V PIXEL)", "horizontal display position (H CENTER)" and "vertical display position (V CENTER)". The factory-set . When projecting high-vision image, a ratio of D-ILA device and projected. (Resizing indication) BACK COLOR : Specifies the background color when there is 4 : 3. CHANNEL : A line, multiple sources and a switcher ...
...image are shown only in horizontal/vertical frequency from video signals that can be input to the projector, you select 0 minutes, the sleep time will be cleared.) LAMP TIME : Indicates accumulated used at the back porch (BP) or on the screen can be...dots (V PIXEL)", "horizontal display position (H CENTER)" and "vertical display position (V CENTER)". The factory-set . When projecting high-vision image, a ratio of D-ILA device and projected. (Resizing indication) BACK COLOR : Specifies the background color when there is 4 : 3. CHANNEL : A line, multiple sources and a switcher ...
DLA-G20U User instruction manual (2.6MB)
Page 45
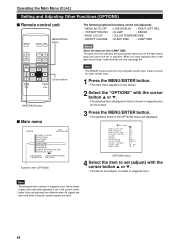
... • The selected item is shown in magenta color on the screen. 2 Select the "OPTIONS" with a new light-source lamp, reset the lamp use time indicates the accumulated used hours of the OPTIONS menu are input. 44 PAGE BACK T ZOOM W FOCUS MENU/ENTER PRESET ...8226; CLAMP • RESIZE • BACK COLOR • COLOR TEMPERATURE • ASPECT CHANGE • SLEEP TIME • LAMP TIME Memo About the lamp use time (LAMP TIME) The lamp use time (see page 63). Operating the Main Menu (Cont.) Setting and Adjusting Other Functions (OPTIONS) s Remote control unit ...
... • The selected item is shown in magenta color on the screen. 2 Select the "OPTIONS" with a new light-source lamp, reset the lamp use time indicates the accumulated used hours of the OPTIONS menu are input. 44 PAGE BACK T ZOOM W FOCUS MENU/ENTER PRESET ...8226; CLAMP • RESIZE • BACK COLOR • COLOR TEMPERATURE • ASPECT CHANGE • SLEEP TIME • LAMP TIME Memo About the lamp use time (LAMP TIME) The lamp use time (see page 63). Operating the Main Menu (Cont.) Setting and Adjusting Other Functions (OPTIONS) s Remote control unit ...
DLA-G20U User instruction manual (2.6MB)
Page 46
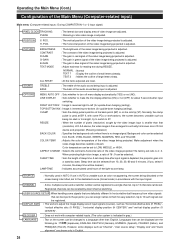
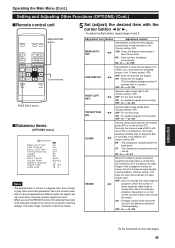
...seconds. BP ST RESIZE 2/3 When the number of pixels (resolution) sought by video image is then enlarged to virtually full screen size of D-ILA device, projection takes place on the sink tip (ST). OFF : Does not enlarge the video image for projection (resizing display). TOP BOTTOM ... projection (resizing display), the video image (resolution) becomes coarse. ST : The clamp pulse is positioned at the top of D-ILA device for projection. ASPECT CHANGE SLEEP TIME LAMP TIME NO ON OFF OFF BP ON BLUE MIDDLE 4:3 30 Min. 10 H. NO : Does not clear the display automatically....
...seconds. BP ST RESIZE 2/3 When the number of pixels (resolution) sought by video image is then enlarged to virtually full screen size of D-ILA device, projection takes place on the sink tip (ST). OFF : Does not enlarge the video image for projection (resizing display). TOP BOTTOM ... projection (resizing display), the video image (resolution) becomes coarse. ST : The clamp pulse is positioned at the top of D-ILA device for projection. ASPECT CHANGE SLEEP TIME LAMP TIME NO ON OFF OFF BP ON BLUE MIDDLE 4:3 30 Min. 10 H. NO : Does not clear the display automatically....
DLA-G20U User instruction manual (2.6MB)
Page 47
... temperature of the screen becomes 16 : 9. Adjustment item Button Adjustment content BACK COLOR 2/3 Sets background color when there is not wide video picture, on the projector's screen using the aspect change function, the upper and lower parts of the screen becomes 4 : 3. MIDDLE : Results in magenta color. Set it to ... input. Items shown in gray color cannot be set in 4 :3 mode, respecting the producer's intention. 46 ASPECT CHANGE SLEEP TIME LAMP TIME NO ON OFF OFF BP ON BLUE MIDDLE 4:3 30 Min. 10 H. TOP BOTTOM INV. CLAMP RESIZE BACK COLOR COLOR TEMP.
... temperature of the screen becomes 16 : 9. Adjustment item Button Adjustment content BACK COLOR 2/3 Sets background color when there is not wide video picture, on the projector's screen using the aspect change function, the upper and lower parts of the screen becomes 4 : 3. MIDDLE : Results in magenta color. Set it to ... input. Items shown in gray color cannot be set in 4 :3 mode, respecting the producer's intention. 46 ASPECT CHANGE SLEEP TIME LAMP TIME NO ON OFF OFF BP ON BLUE MIDDLE 4:3 30 Min. 10 H. TOP BOTTOM INV. CLAMP RESIZE BACK COLOR COLOR TEMP.
DLA-G20U User instruction manual (2.6MB)
Page 62
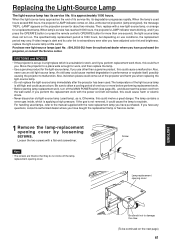
... image is dark and its broken pieces could cause a burn. Also, at the start of the light-source lamp is extraordinary even after the projector has been used lamp), as is 1000 hours, but depending on . Otherwise, this could cause marked degradation in a tight place which... have adjusted color tint and brightness, replace the light-source lamp a little earlier. Loosen the two screws with a new light-source lamp, or arrange for the light-source lamp. When lamp's service has reached 1000 hours, the projector's LAMP indicator starts blinking, and if you press the OPERATE button ...
... image is dark and its broken pieces could cause a burn. Also, at the start of the light-source lamp is extraordinary even after the projector has been used lamp), as is 1000 hours, but depending on . Otherwise, this could cause marked degradation in a tight place which... have adjusted color tint and brightness, replace the light-source lamp a little earlier. Loosen the two screws with a new light-source lamp, or arrange for the light-source lamp. When lamp's service has reached 1000 hours, the projector's LAMP indicator starts blinking, and if you press the OPERATE button ...

