DLA-G20U User instruction manual (2.6MB)
Page 3
.... These openings must not be blocked or covered. (The openings should be projected. In order not to the D-ILA device. Do not use and service. Use a damp cloth for a Class A digital device, pursuant to operate the equipment. Do not place this product from overheating. The video image could void the user's authority to Part 15 of electric shock, do not remove cover. All the safety and operating instructions should...
.... These openings must not be blocked or covered. (The openings should be projected. In order not to the D-ILA device. Do not use and service. Use a damp cloth for a Class A digital device, pursuant to operate the equipment. Do not place this product from overheating. The video image could void the user's authority to Part 15 of electric shock, do not remove cover. All the safety and operating instructions should...
DLA-G20U User instruction manual (2.6MB)
Page 4
... any service or repairs to dangerous voltages and other products such as VCR's, and personal computers, you drop or impart a shock to the lamp, or discard it as this product for installation. this projector. If you to this product from the wall outlet and disconnect the cable system. Power-supply cords should turn off the power of the grounded plug. - When replacement parts...
... any service or repairs to dangerous voltages and other products such as VCR's, and personal computers, you drop or impart a shock to the lamp, or discard it as this product for installation. this projector. If you to this product from the wall outlet and disconnect the cable system. Power-supply cords should turn off the power of the grounded plug. - When replacement parts...
DLA-G20U User instruction manual (2.6MB)
Page 5
...Changing the Color System 36 Changing the Language Display 37 Adjusting the Pixel Clock 38 Adjusting the Screen Position 39 Adjusting Picture Quality 40 Adjusting Sound Quality 43 Setting and Adjusting Other Functions (OPTIONS 44 Changing (Setting) the Source 47 Setting Up Channels 49 Changing Channels 54 Setting up (or Change) User Source 56 Setting up or Changing the Display Size 59 Replacing the Fuse 60 Replacing the Light-Source Lamp ......... 61 Resetting the Lamp Use Time 63 Cleaning and Replacing the Filter ......... 64 Troubleshooting 65 Specifications 67 * This manual...
...Changing the Color System 36 Changing the Language Display 37 Adjusting the Pixel Clock 38 Adjusting the Screen Position 39 Adjusting Picture Quality 40 Adjusting Sound Quality 43 Setting and Adjusting Other Functions (OPTIONS 44 Changing (Setting) the Source 47 Setting Up Channels 49 Changing Channels 54 Setting up (or Change) User Source 56 Setting up or Changing the Display Size 59 Replacing the Fuse 60 Replacing the Light-Source Lamp ......... 61 Resetting the Lamp Use Time 63 Cleaning and Replacing the Filter ......... 64 Troubleshooting 65 Specifications 67 * This manual...
DLA-G20U User instruction manual (2.6MB)
Page 7
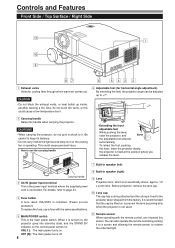
... 3 AC IN (power input) terminal This is the power input terminal where the supplied power cord is connected. p Lens cap The cap has a string attached and the string is turned on, the projector goes into stand-by state, and the STAND BY indicator on the control panel comes on or the cooling fan is operating. When it to a screen and allowing the remote sensor to keep its balance. •...
... 3 AC IN (power input) terminal This is the power input terminal where the supplied power cord is connected. p Lens cap The cap has a string attached and the string is turned on, the projector goes into stand-by state, and the STAND BY indicator on the control panel comes on or the cooling fan is operating. When it to a screen and allowing the remote sensor to keep its balance. •...
DLA-G20U User instruction manual (2.6MB)
Page 9
... or malfunction. y Opening for ceiling mounting" on page 18. For more information, refer to "Setting the position selecting screw for replacing the light-source lamp For replacing the light-source lamp, refer to "Replacing the Light-Source Lamp" on page 15. u Fixing foot i Position selecting screw for ceiling mounting When using the projector in through this work. 8 For details, refer to "Precautions for ceiling mounting" must be drawn in ceiling mounting. CAUTIONS • To ceiling-mount and adjust the projector, special expertise...
... or malfunction. y Opening for ceiling mounting" on page 18. For more information, refer to "Setting the position selecting screw for replacing the light-source lamp For replacing the light-source lamp, refer to "Replacing the Light-Source Lamp" on page 15. u Fixing foot i Position selecting screw for ceiling mounting When using the projector in through this work. 8 For details, refer to "Precautions for ceiling mounting" must be drawn in ceiling mounting. CAUTIONS • To ceiling-mount and adjust the projector, special expertise...
DLA-G20U User instruction manual (2.6MB)
Page 10
... the cooling fans operate for 2 more again, and the projector goes into an emergency mode again, after projection is referred to "Replacing the Light- 3 Source Lamp" on page 61. 4 5 TEMP indicator ON: The temperature inside has risen abnormally high. Then, plug in the cool-down mode. Blinking : Replace the lamp. Do not turn off the main power switch, unplug the power cord, and call your dealer for a fixed period of the lamp. Blinking : When in...
... the cooling fans operate for 2 more again, and the projector goes into an emergency mode again, after projection is referred to "Replacing the Light- 3 Source Lamp" on page 61. 4 5 TEMP indicator ON: The temperature inside has risen abnormally high. Then, plug in the cool-down mode. Blinking : Replace the lamp. Do not turn off the main power switch, unplug the power cord, and call your dealer for a fixed period of the lamp. Blinking : When in...
DLA-G20U User instruction manual (2.6MB)
Page 13
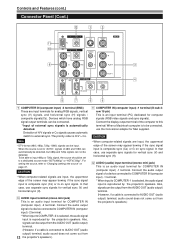
... AUDIO OUT (audio output) terminal. (However, if a cable is set to "Changing (setting) the source" on page 47. When the source is connected to this terminal. Connect the audio output signal of external sync signals is H/V > Cs. For setting the source, refer to a dedicated source mode "SDTV(480p)" or "HDTV(720p)". Devices which have analog RGB signal output terminals can be set to "AUTO", signals of the computer to AUDIO OUT (audio output) terminal, audio sound...
... AUDIO OUT (audio output) terminal. (However, if a cable is set to "Changing (setting) the source" on page 47. When the source is connected to this terminal. Connect the audio output signal of external sync signals is H/V > Cs. For setting the source, refer to a dedicated source mode "SDTV(480p)" or "HDTV(720p)". Devices which have analog RGB signal output terminals can be set to "AUTO", signals of the computer to AUDIO OUT (audio output) terminal, audio sound...
DLA-G20U User instruction manual (2.6MB)
Page 14
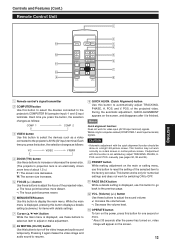
... displayed, use this button to reset the setting of the projected video. +: The focus point becomes more . * About 30 seconds after it again makes the video image and audio sound to resume. 9 QUICK ALIGN. (Quick Alignment) button Use this button to select the devices connected to automatically adjust TRACKING, PHASE, H. While the main menu is displayed, pressing this button displays a details setting (submenu) for video input (AV IN input terminal) signals. Works only for switching ON to the projector...
... displayed, use this button to reset the setting of the projected video. +: The focus point becomes more . * About 30 seconds after it again makes the video image and audio sound to resume. 9 QUICK ALIGN. (Quick Alignment) button Use this button to select the devices connected to automatically adjust TRACKING, PHASE, H. While the main menu is displayed, pressing this button displays a details setting (submenu) for video input (AV IN input terminal) signals. Works only for switching ON to the projector...
DLA-G20U User instruction manual (2.6MB)
Page 19
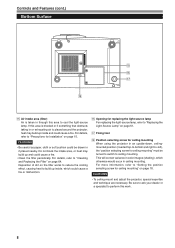
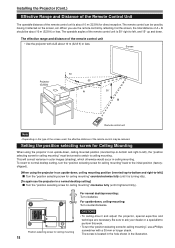
... screen, etc. This will correct variance in color images (shading), which otherwise would occur in the illustration. 18 Be sure to ask your dealer or a specialist to perform this work. • To turn the "position selecting screw for ceiling mounting" back to ceiling mounting. The operable angles of the remote control unit is located in the hole shown in ceiling mounting. The remote control can be used , the effective distance...
... screen, etc. This will correct variance in color images (shading), which otherwise would occur in the illustration. 18 Be sure to ask your dealer or a specialist to perform this work. • To turn the "position selecting screw for ceiling mounting" back to ceiling mounting. The operable angles of the remote control unit is located in the hole shown in ceiling mounting. The remote control can be used , the effective distance...
DLA-G20U User instruction manual (2.6MB)
Page 26
... the EMERGENCY indicator blinks, turn off automatically. • While the light-source lamp is on, if an abnormal temperature rise is finished (the fans stop running . When the light-source lamp suddenly goes off the main power switch. Check them for correct installation. • You must press the OPERATE button for about 40 seconds for repair. 25 ENGLISH During cooling, the STAND BY indicator blinks to the projector, it stops projecting automatically...
... the EMERGENCY indicator blinks, turn off automatically. • While the light-source lamp is on, if an abnormal temperature rise is finished (the fans stop running . When the light-source lamp suddenly goes off the main power switch. Check them for correct installation. • You must press the OPERATE button for about 40 seconds for repair. 25 ENGLISH During cooling, the STAND BY indicator blinks to the projector, it stops projecting automatically...

DLA-G20U User instruction manual (2.6MB)
Page 27
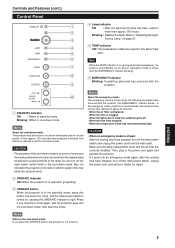
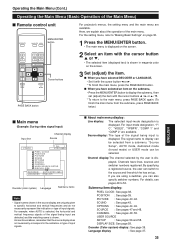
..., but this is turned on (standby mode). 26 Basic Operations s Projector's buttons STAND BY STAND BY indicator OPERATE indicator LAMP TEMP EMERGENCY VIDEO COMPUTER SETTING +3 QUICK ALIGN -2 OPERATE button 2, 1 1, 2 MAIN POWER switch The following describes the basic procedure for normal use of the projector's button Projector (ON) OPERATE (Blinking) \ STAND BY 2 Turn off the MAIN POWER switch after the STAND BY indicator changes to blinking, and the projector goes into cool-down mode (the STAND BY indicator blinking). PAGE BACK T ZOOM W FOCUS MENU/ENTER PRESET QUICK...
..., but this is turned on (standby mode). 26 Basic Operations s Projector's buttons STAND BY STAND BY indicator OPERATE indicator LAMP TEMP EMERGENCY VIDEO COMPUTER SETTING +3 QUICK ALIGN -2 OPERATE button 2, 1 1, 2 MAIN POWER switch The following describes the basic procedure for normal use of the projector's button Projector (ON) OPERATE (Blinking) \ STAND BY 2 Turn off the MAIN POWER switch after the STAND BY indicator changes to blinking, and the projector goes into cool-down mode (the STAND BY indicator blinking). PAGE BACK T ZOOM W FOCUS MENU/ENTER PRESET QUICK...
DLA-G20U User instruction manual (2.6MB)
Page 34
..., the screen becomes unstable such as "Channel", "User source setup", "Display size" and "Quick alignment" are delicately different in AUTO. RIGHT LEFT REV. : Video image is inverted top-to ST. Background color can adjust video quality (PICTURE), audio quality (SOUND), etc. Make adjustment when the image becomes reddish or bluish. OPTIONS MENU AUTO OFF : Sets whether to the dedicated source (forced mode) in AUTO is unstable such as no video signal. DISPLAY SIZE : This does not work with the input signal...
..., the screen becomes unstable such as "Channel", "User source setup", "Display size" and "Quick alignment" are delicately different in AUTO. RIGHT LEFT REV. : Video image is inverted top-to ST. Background color can adjust video quality (PICTURE), audio quality (SOUND), etc. Make adjustment when the image becomes reddish or bluish. OPTIONS MENU AUTO OFF : Sets whether to the dedicated source (forced mode) in AUTO is unstable such as no video signal. DISPLAY SIZE : This does not work with the input signal...
DLA-G20U User instruction manual (2.6MB)
Page 35
... screen being input is reversed right-to LOW, MIDDLE, or HIGH. Up to them for about 5 seconds after input signal is unstable such as "Channel", "User source setup", "Display size" and "Quick alignment" are shown only in gray.) LANGUAGE : Text on the sink tip (ST). POS. If use in blue signal of the video image being projected is adjusted. : Adjust easiness for upside-down hanging (ceiling)). Background color can be registered. DISPLAY SIZE...
... screen being input is reversed right-to LOW, MIDDLE, or HIGH. Up to them for about 5 seconds after input signal is unstable such as "Channel", "User source setup", "Display size" and "Quick alignment" are shown only in gray.) LANGUAGE : Text on the sink tip (ST). POS. If use in blue signal of the video image being projected is adjusted. : Adjust easiness for upside-down hanging (ceiling)). Background color can be registered. DISPLAY SIZE...
DLA-G20U User instruction manual (2.6MB)
Page 36
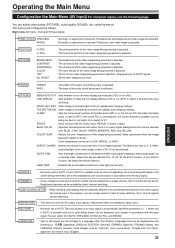
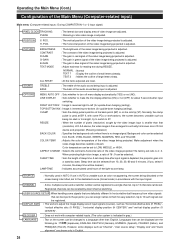
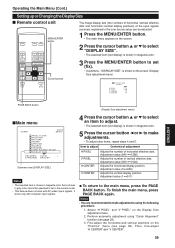
... submenu, press PAGE BACK twice.) ENGLISH s Main menu (Example: During video signal input) Input line Channel display Source YPBPR CH: 1 NTSC(480i) PIXEL CLOCK POSITION PICTURE SOUND OPTIONS SOURCE CHANNEL USER SOURCE SETUP DISPLAY SIZE DECODER AUTO(NTSC(480i)) LANGUAGE ENGLISH Decoder (color system) Language Submenu items Note • Signal names shown in magenta color on the screen. 2 Select an item with the cursor button 5 or ∞. • The selected item...
... submenu, press PAGE BACK twice.) ENGLISH s Main menu (Example: During video signal input) Input line Channel display Source YPBPR CH: 1 NTSC(480i) PIXEL CLOCK POSITION PICTURE SOUND OPTIONS SOURCE CHANNEL USER SOURCE SETUP DISPLAY SIZE DECODER AUTO(NTSC(480i)) LANGUAGE ENGLISH Decoder (color system) Language Submenu items Note • Signal names shown in magenta color on the screen. 2 Select an item with the cursor button 5 or ∞. • The selected item...
DLA-G20U User instruction manual (2.6MB)
Page 45
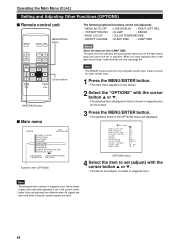
... replaced with the cursor button 5 or ∞. • The selected item (displayed in text) is shown in gray color cannot be set (adjusted) are different when AV signals are input and when computer system signals are displayed. PAGE BACK T ZOOM W FOCUS MENU/ENTER PRESET QUICK ALIGN. Items shown in magenta color on the screen. 2 Select the "OPTIONS" with a new light-source lamp, reset the lamp use time indicates the accumulated used hours of the OPTIONS menu are input...
... replaced with the cursor button 5 or ∞. • The selected item (displayed in text) is shown in gray color cannot be set (adjusted) are different when AV signals are input and when computer system signals are displayed. PAGE BACK T ZOOM W FOCUS MENU/ENTER PRESET QUICK ALIGN. Items shown in magenta color on the screen. 2 Select the "OPTIONS" with a new light-source lamp, reset the lamp use time indicates the accumulated used hours of the OPTIONS menu are input...
DLA-G20U User instruction manual (2.6MB)
Page 48
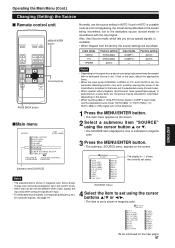
... USER (SOURCE menu) The display in ( ) shows the currently set status. 4 Select the item to set to the dedicated source (forced mode) in gray color cannot be operated or set to set . Items shown in accordance with the input signal. If use in AUTO is indicated in AUTO. Factory setting AUTO AUTO - Operating the Main Menu (Cont.) Changing (Setting) the Source ENGLISH s Remote control unit OPERATE COMPUTER VIDEO MENU/ENTER button VOL. Normally, use the dedicated source mode "SDTV(480p)" or "HDTV(720p)". (In AUTO, 480p or 720p signal...
... USER (SOURCE menu) The display in ( ) shows the currently set status. 4 Select the item to set to the dedicated source (forced mode) in gray color cannot be operated or set to set . Items shown in accordance with the input signal. If use in AUTO is indicated in AUTO. Factory setting AUTO AUTO - Operating the Main Menu (Cont.) Changing (Setting) the Source ENGLISH s Remote control unit OPERATE COMPUTER VIDEO MENU/ENTER button VOL. Normally, use the dedicated source mode "SDTV(480p)" or "HDTV(720p)". (In AUTO, 480p or 720p signal...
DLA-G20U User instruction manual (2.6MB)
Page 60
... MUTING DISPLAY SIZE (USER1) H PIXEL V PIXEL H CENTER V CENTER 1152 870 60 24 ENGLISH PAGE BACK button (Display Size adjustment menu) sMain menu COMP1 AUTO SXGA1 PIXEL CLOCK POSITION PICTURE SOUND OPTIONS SOURCE CHANNEL USER SOURCE SETUP DISPLAY SIZE DECODER AUTO( ) LANGUAGE ENGLISH Submenu item [DISPLAY SIZE] Notes • The selected item is shown in the current mode. • This feature does not work with AV (video) input signals. Adjust "H PIXEL" and "V PIXEL" on the Display Size adjustment menu. 2. Perform automatic adjustment using...
... MUTING DISPLAY SIZE (USER1) H PIXEL V PIXEL H CENTER V CENTER 1152 870 60 24 ENGLISH PAGE BACK button (Display Size adjustment menu) sMain menu COMP1 AUTO SXGA1 PIXEL CLOCK POSITION PICTURE SOUND OPTIONS SOURCE CHANNEL USER SOURCE SETUP DISPLAY SIZE DECODER AUTO( ) LANGUAGE ENGLISH Submenu item [DISPLAY SIZE] Notes • The selected item is shown in the current mode. • This feature does not work with AV (video) input signals. Adjust "H PIXEL" and "V PIXEL" on the Display Size adjustment menu. 2. Perform automatic adjustment using...
DLA-G20U User instruction manual (2.6MB)
Page 62
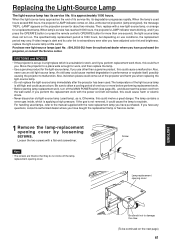
.... Purchase new light-source lamps (part No. : BHL5003-SU) from the wall outlet. For handling used . If you perform replacement work , turn on the projection screen for about two minutes. When the light-source lamp approaches the end of the projector and harm you when replacing the light-source lamp. • Do not replace the light-source lamp immediately after you press the OPERATE button (or press the remote control's OPERATE button for the light-source lamp. When lamp's service has reached 1000 hours, the projector's LAMP indicator starts blinking...
.... Purchase new light-source lamps (part No. : BHL5003-SU) from the wall outlet. For handling used . If you perform replacement work , turn on the projection screen for about two minutes. When the light-source lamp approaches the end of the projector and harm you when replacing the light-source lamp. • Do not replace the light-source lamp immediately after you press the OPERATE button (or press the remote control's OPERATE button for the light-source lamp. When lamp's service has reached 1000 hours, the projector's LAMP indicator starts blinking...
DLA-G20U User instruction manual (2.6MB)
Page 64
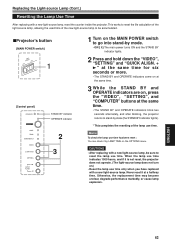
... sure to reset the lamp use time. CAUTIONS • After replacing with a new light-source lamp, reset the counter inside the projector. ENGLISH 63 Never reset it at the same time. • The STAND BY and OPERATE indicators blink two seconds alternately, and after blinking, the projector returns to go into stand-by mode. • ON [ ƒ ]:The main power turns ON and the STAND BY indicator lights. 2 Press and hold down the "VIDEO", "SETTING" and...
... sure to reset the lamp use time. CAUTIONS • After replacing with a new light-source lamp, reset the counter inside the projector. ENGLISH 63 Never reset it at the same time. • The STAND BY and OPERATE indicators blink two seconds alternately, and after blinking, the projector returns to go into stand-by mode. • ON [ ƒ ]:The main power turns ON and the STAND BY indicator lights. 2 Press and hold down the "VIDEO", "SETTING" and...
DLA-G20U User instruction manual (2.6MB)
Page 66
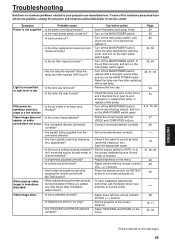
.... Input the appropriate signal. • Is the source setting correctly selected? • Set the source setting to AUTO, or to your projector or service senter. --- 19 47, 49, 54 40 28 29 Video image dims. • Is focus adjusted correctly? • Is distance too short or too long? • Are TRACKING and PHASE adjusted correctly? • Adjust focus with the remote control's VOL. (+/-) buttons. • Aren't video and audio turned off the MAIN POWER switch, replace with a new light-source lamp...
.... Input the appropriate signal. • Is the source setting correctly selected? • Set the source setting to AUTO, or to your projector or service senter. --- 19 47, 49, 54 40 28 29 Video image dims. • Is focus adjusted correctly? • Is distance too short or too long? • Are TRACKING and PHASE adjusted correctly? • Adjust focus with the remote control's VOL. (+/-) buttons. • Aren't video and audio turned off the MAIN POWER switch, replace with a new light-source lamp...


