
User Manual (English)
Page 3
... Panel Controls 9 2-2 Right-side Connectors 10 2-3 Back Connectors...11 3 YOUR REMOTE CONTROL AT A GLANCE 15 3-1 Remote Control Buttons 15 3-2 Using the Remote Control (Basic Operation 16 4 CONNECTING DEVICES 17 4-1 Connecting Your DVD Player 17 4-2 Connecting Your HDTV Set-top Box 18 4-3 Connecting Your VCR or Video Camera 19 4-4 Connecting Broadcast TV or Cable TV 21 4-5 Connecting a Computer 21 5 GETTING STARTED ...23 5-1 Plugging In Your LCD TV 23 5-2 Turning On the LCD TV 23 6 ADJUSTING SETTINGS 25 6-1 Basic Operations...25 6-2 Using the On-screen Display (OSD...
... Panel Controls 9 2-2 Right-side Connectors 10 2-3 Back Connectors...11 3 YOUR REMOTE CONTROL AT A GLANCE 15 3-1 Remote Control Buttons 15 3-2 Using the Remote Control (Basic Operation 16 4 CONNECTING DEVICES 17 4-1 Connecting Your DVD Player 17 4-2 Connecting Your HDTV Set-top Box 18 4-3 Connecting Your VCR or Video Camera 19 4-4 Connecting Broadcast TV or Cable TV 21 4-5 Connecting a Computer 21 5 GETTING STARTED ...23 5-1 Plugging In Your LCD TV 23 5-2 Turning On the LCD TV 23 6 ADJUSTING SETTINGS 25 6-1 Basic Operations...25 6-2 Using the On-screen Display (OSD...

User Manual (English)
Page 4
7 Setting the Channel ...31 7-1 Setting Channels Automatically (AUTO SEARCH 31 7-2 Setting Channels Manually (MANUAL SEARCH 31 7-3 Removing Unwanted Channels (MANUAL SEARCH 32 8 ADVANCED SETTINGS 33 8-1 Setting the Sleep Timer 33 8-2 Blocking Channels 33 8-3 Setting a Password 34 8-4 Displaying Closed Caption Subtitles 35 8-5 Displaying the Serial Number 36 8-6 Resetting to Factory Settings 36 9 PROGRAMMING THE REMOTE CONTROL 37 9-1 Programming to Control Other Devices 37 9-2 Component Program Codes 37 TROUBLESHOOTING AND SUPPORT 45
7 Setting the Channel ...31 7-1 Setting Channels Automatically (AUTO SEARCH 31 7-2 Setting Channels Manually (MANUAL SEARCH 31 7-3 Removing Unwanted Channels (MANUAL SEARCH 32 8 ADVANCED SETTINGS 33 8-1 Setting the Sleep Timer 33 8-2 Blocking Channels 33 8-3 Setting a Password 34 8-4 Displaying Closed Caption Subtitles 35 8-5 Displaying the Serial Number 36 8-6 Resetting to Factory Settings 36 9 PROGRAMMING THE REMOTE CONTROL 37 9-1 Programming to Control Other Devices 37 9-2 Component Program Codes 37 TROUBLESHOOTING AND SUPPORT 45
User Manual (English)
Page 5
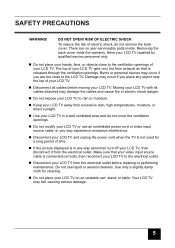
.... Do not use an unshielded power cord or video input source cable, or you are no user-serviceable parts inside. DO NOT OPEN! Disconnect your LCD TV from excessive dust, high temperatures, moisture, or direct sunlight. Disconnect your LCD TV and unplug the power cord when the TV is released through the ventilation openings. Your LCD TV may experience excessive interference. If the picture displayed is connected correctly...
.... Do not use an unshielded power cord or video input source cable, or you are no user-serviceable parts inside. DO NOT OPEN! Disconnect your LCD TV from excessive dust, high temperatures, moisture, or direct sunlight. Disconnect your LCD TV and unplug the power cord when the TV is released through the ventilation openings. Your LCD TV may experience excessive interference. If the picture displayed is connected correctly...

User Manual (English)
Page 8
... then plug the other end of the power cord into a correctly grounded electrical outlet or surge protector. 2. Remove the battery cover on the back of the remote control. 2. Make sure that you will be away for the first time, insert two AAA batteries (supplied). Connect the power cord to the power cord connector on your remote control. The Status LED on the front turns orange and your LCD...
... then plug the other end of the power cord into a correctly grounded electrical outlet or surge protector. 2. Remove the battery cover on the back of the remote control. 2. Make sure that you will be away for the first time, insert two AAA batteries (supplied). Connect the power cord to the power cord connector on your remote control. The Status LED on the front turns orange and your LCD...

User Manual (English)
Page 12
VGA in - Chapter 2 Your LCD TV At A Glance CONNECTOR DESCRIPTION Main power switch - Audio in - Audio out - Connects to a VGA video device, such as a computer or cable/Satellite box. Connect an external amplifier or speaker to this . Turns the main power ON and OFF. DVI in - Connect the power cable to a DVI video device, such as a computer or cable/Satellite box. Connects to this . 12 Connects to a computer's audio out jack. Power cord connector -
VGA in - Chapter 2 Your LCD TV At A Glance CONNECTOR DESCRIPTION Main power switch - Audio in - Audio out - Connects to a VGA video device, such as a computer or cable/Satellite box. Connect an external amplifier or speaker to this . Turns the main power ON and OFF. DVI in - Connect the power cable to a DVI video device, such as a computer or cable/Satellite box. Connects to this . 12 Connects to a computer's audio out jack. Power cord connector -
User Manual (English)
Page 15
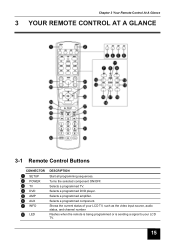
Turns the selected component ON/OFF. Shows the current status of your LCD TV, such as the video input source, audio status, and channel number Flashes when the remote is being programmed or is sending a signal to your LCD TV. 15 15 Selects a programmed amplifier. Selects a programmed TV. Selects a programmed DVD player. Chapter 3 Your Remote Control At A Glance 3 YOUR REMOTE CONTROL AT A GLANCE 3-1 Remote Control Buttons CONNECTOR SETUP POWER TV DVD AMP AUX INFO LED DESCRIPTION Start all programming sequences. Selects a programmed component.
Turns the selected component ON/OFF. Shows the current status of your LCD TV, such as the video input source, audio status, and channel number Flashes when the remote is being programmed or is sending a signal to your LCD TV. 15 15 Selects a programmed amplifier. Selects a programmed TV. Selects a programmed DVD player. Chapter 3 Your Remote Control At A Glance 3 YOUR REMOTE CONTROL AT A GLANCE 3-1 Remote Control Buttons CONNECTOR SETUP POWER TV DVD AMP AUX INFO LED DESCRIPTION Start all programming sequences. Selects a programmed component.
User Manual (English)
Page 16
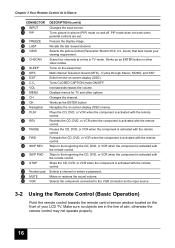
... remote control. Stops the CD, DVD, or VCR when the component is activated with the remote control. Mutes or restores the sound volume. Freezes the display image. Multi channel Television Sound (MTS) - Exits from the on the sleep timer. Displays menus for TV and other video modes. Cycles through Stereo, MONO, and SAP. Navigates the on and off. PIP mode does not work when parental controls are in other options. Recalls the last viewed channel. Selects the component connected...
... remote control. Stops the CD, DVD, or VCR when the component is activated with the remote control. Mutes or restores the sound volume. Freezes the display image. Multi channel Television Sound (MTS) - Exits from the on the sleep timer. Displays menus for TV and other video modes. Cycles through Stereo, MONO, and SAP. Navigates the on and off. PIP mode does not work when parental controls are in other options. Recalls the last viewed channel. Selects the component connected...

User Manual (English)
Page 17
... your DVD player to the green-colored Y jack on your LCD TV. 4-1 Connecting Your DVD Player 4-1-1 TO CONNECT USING COMPONENT VIDEO 1. Connect the green-colored Y jack on the back of your DVD player to the blue-colored PBCB jack on the back of your LCD TV. 5. Turn on the back of your LCD TV. 2. Before connecting any external components, make sure to unplug your LCD TV, then press the INPUT button repeatedly to connect the following devices: DVD players HDTV decoder set -top boxes VCRs...
... your DVD player to the green-colored Y jack on your LCD TV. 4-1 Connecting Your DVD Player 4-1-1 TO CONNECT USING COMPONENT VIDEO 1. Connect the green-colored Y jack on the back of your DVD player to the blue-colored PBCB jack on the back of your LCD TV. 5. Turn on the back of your LCD TV. 2. Before connecting any external components, make sure to unplug your LCD TV, then press the INPUT button repeatedly to connect the following devices: DVD players HDTV decoder set -top boxes VCRs...

User Manual (English)
Page 18
... Connect the red (R) and white (L) audio jacks on the back of your HDTV set -top box to the R and L audio-in jacks on your LCD TV. 2. Turn on the back of your LCD TV (see 1-4 Turning ON the Power), then press the INPUT button repeatedly to select AV1/S1 or AV2/S2. Chapter 4 Connecting Devices 4-1-2 TO CONNECT USING S-VIDEO 1. Connect the S-Video jack on the back of your LCD TV with the correct optional cable 2. Connect the red...
... Connect the red (R) and white (L) audio jacks on the back of your HDTV set -top box to the R and L audio-in jacks on your LCD TV. 2. Turn on the back of your LCD TV (see 1-4 Turning ON the Power), then press the INPUT button repeatedly to select AV1/S1 or AV2/S2. Chapter 4 Connecting Devices 4-1-2 TO CONNECT USING S-VIDEO 1. Connect the S-Video jack on the back of your LCD TV with the correct optional cable 2. Connect the red...

User Manual (English)
Page 21
... in jack. 3. Chapter 4 Connecting Devices 4-4 Connecting Broadcast TV or Cable TV 4-4-1 TO CONNECT USING COAXIAL AUDIO AND VIDEO 1. If an outdoor antenna or cable system is connected to select DVI-D. Turn on the back of this display is correctly grounded. NOTE: The DVI input of your LCD TV, make sure that the antenna or cable system is compatible with the correct optional cable. 2. UHF/VHF (CATV) S-Video (S1/S2) Composite Video/Audio in (AV1/AV2) Component HDTV Video/Audio...
... in jack. 3. Chapter 4 Connecting Devices 4-4 Connecting Broadcast TV or Cable TV 4-4-1 TO CONNECT USING COAXIAL AUDIO AND VIDEO 1. If an outdoor antenna or cable system is connected to select DVI-D. Turn on the back of this display is correctly grounded. NOTE: The DVI input of your LCD TV, make sure that the antenna or cable system is compatible with the correct optional cable. 2. UHF/VHF (CATV) S-Video (S1/S2) Composite Video/Audio in (AV1/AV2) Component HDTV Video/Audio...

User Manual (English)
Page 26
... current input source. 6-2-1 MAKING ADJUSTMENTS You can use these OSD menus and options to access the submenu. 5. Press the Navigation (UP/DOWN) buttons to make adjustments. 6. Press the Navigation (RIGHT/LEFT) buttons to select one of your LCD TV display or from your LCD TV. 26 With the power ON, press the TV button. 2. Press the MENU button to return to select channel TO SELECT CHANNELS FROM THE REMOTE Press...
... current input source. 6-2-1 MAKING ADJUSTMENTS You can use these OSD menus and options to access the submenu. 5. Press the Navigation (UP/DOWN) buttons to make adjustments. 6. Press the Navigation (RIGHT/LEFT) buttons to select one of your LCD TV display or from your LCD TV. 26 With the power ON, press the TV button. 2. Press the MENU button to return to select channel TO SELECT CHANNELS FROM THE REMOTE Press...

User Manual (English)
Page 27
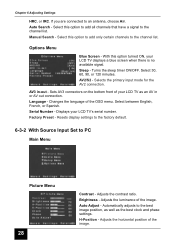
... - Setup Menu Closed Caption - Turns captioning ON/ OFF and selects the closed caption style. This option is turned ON. Sets the source for the tuner. Adjusts the contrast ratio. Tint - Balance - Activates parental controls. Color - Adjusts the treble value to enhance the low frequency sounds. Adjusts the level of flesh tones. TV System - If you are using cable or a satellite dish, select Cable, 27 27 Brightness - NOTE: PIP is disabled when this option is accessible only...
... - Setup Menu Closed Caption - Turns captioning ON/ OFF and selects the closed caption style. This option is turned ON. Sets the source for the tuner. Adjusts the contrast ratio. Tint - Balance - Activates parental controls. Color - Adjusts the treble value to enhance the low frequency sounds. Adjusts the level of flesh tones. TV System - If you are using cable or a satellite dish, select Cable, 27 27 Brightness - NOTE: PIP is disabled when this option is accessible only...
User Manual (English)
Page 28
... Menu Blue Screen - Resets display settings to the factory default. 6-3-2 With Source Input Set to an antenna, choose Air. Adjusts the luminance of the OSD menu. Automatically adjusts to the best image position, as well as an AV in -out - Auto Search - Changes the language of the image. Serial Number - Adjusts the contrast ratio. Chapter 6 Adjusting Settings HRC, or IRC. With this option to add all channels that have a signal to the channel list. Factory Preset - Manual Search - AV2/S2 - Select...
... Menu Blue Screen - Resets display settings to the factory default. 6-3-2 With Source Input Set to an antenna, choose Air. Adjusts the luminance of the OSD menu. Automatically adjusts to the best image position, as well as an AV in -out - Auto Search - Changes the language of the image. Serial Number - Adjusts the contrast ratio. Chapter 6 Adjusting Settings HRC, or IRC. With this option to add all channels that have a signal to the channel list. Factory Preset - Manual Search - AV2/S2 - Select...

User Manual (English)
Page 29
... factory default. 29 29 Options Menu Language - Select between the left and right speakers. Resets display settings to enhance the low frequency sounds. Adjusts the vertical position of the OSD menu. Clock - Audio Menu Treble - Chapter 6 Adjusting Settings V-Position - Used when patterns appear. Phase - Adjusts the treble value to match the video input source. Adjusts the level of sounds between English, French, or Spanish. Color Menu Standard - Warm - Select for a more reddish tone. Cold - Serial Number - Displays your LCD...
... factory default. 29 29 Options Menu Language - Select between the left and right speakers. Resets display settings to enhance the low frequency sounds. Adjusts the vertical position of the OSD menu. Clock - Audio Menu Treble - Chapter 6 Adjusting Settings V-Position - Used when patterns appear. Phase - Adjusts the treble value to match the video input source. Adjusts the level of sounds between English, French, or Spanish. Color Menu Standard - Warm - Select for a more reddish tone. Cold - Serial Number - Displays your LCD...

User Manual (English)
Page 30
... viewing. 6-5 Adjusting Picture Settings Follow these steps to adjust your LCD TV image. 1. TV/AV/SV/CS 30 Source Input - Press OK. When you want to adjust. 5. Press the Navigation (UP/DOWN) buttons to highlight LANGUAGE and then press OK. 5. Use the Navigation (UP/DOWN) buttons to select the Options submenu. 3. Use the Navigation (RIGHT/LEFT) buttons to call up the on-screen display (OSD) main menu. 2. Press MENU...
... viewing. 6-5 Adjusting Picture Settings Follow these steps to adjust your LCD TV image. 1. TV/AV/SV/CS 30 Source Input - Press OK. When you want to adjust. 5. Press the Navigation (UP/DOWN) buttons to highlight LANGUAGE and then press OK. 5. Use the Navigation (UP/DOWN) buttons to select the Options submenu. 3. Use the Navigation (RIGHT/LEFT) buttons to call up the on-screen display (OSD) main menu. 2. Press MENU...

User Manual (English)
Page 34
... four-digit number. You can change the password to select BLOCK or UNBLOCK. Press EXIT when you have not set a password, enter 0000. Press the MENU button on the remote control to the parental controls with a password. Press the MENU button on the remote control to open the OSD. 2. Press OK to open the submenu. 6. For more information about setting a password, see 8-3 Setting a Password. 7. Press the Navigation (UP/DOWN) buttons to select the Setup menu. 3. Press...
... four-digit number. You can change the password to select BLOCK or UNBLOCK. Press EXIT when you have not set a password, enter 0000. Press the MENU button on the remote control to the parental controls with a password. Press the MENU button on the remote control to open the OSD. 2. Press OK to open the submenu. 6. For more information about setting a password, see 8-3 Setting a Password. 7. Press the Navigation (UP/DOWN) buttons to select the Setup menu. 3. Press...

User Manual (English)
Page 35
...) buttons to select Closed Caption setting. 7. Use the Navigation (RIGHT/LEFT) buttons to select the Setup menu. 3. Press OK to enter a new four-digit password when prompted. 10. NOTE: Not all programs are broadcast with Closed Captioning, refer to select Closed Caption. 5. Use the number button pad to change the settings. 9. Press the Navigation (UP/DOWN) buttons to your password if prompted. For a listing of TV programs. TO TURN ON CLOSED CAPTIONING 1. Chapter8 Advanced Settings 5. Use the number pad to select the Change Password submenu. 8. Use the...
...) buttons to select Closed Caption setting. 7. Use the Navigation (RIGHT/LEFT) buttons to select the Setup menu. 3. Press OK to enter a new four-digit password when prompted. 10. NOTE: Not all programs are broadcast with Closed Captioning, refer to select Closed Caption. 5. Use the number button pad to change the settings. 9. Press the Navigation (UP/DOWN) buttons to your password if prompted. For a listing of TV programs. TO TURN ON CLOSED CAPTIONING 1. Chapter8 Advanced Settings 5. Use the number pad to select the Change Password submenu. 8. Use the...

User Manual (English)
Page 37
... can program the remote control to work with your LCD TV. Turn ON the device that works with the next code listed for the device and manufacturer. You may as seven other devices (VCR, DVD player, satellite, etc). 9-1 Programming to control. 2. If the code is a list of device codes to try all the codes listed until the LED lights and stays on . NOTE: Many devices have to be used when manually programming your device...
... can program the remote control to work with your LCD TV. Turn ON the device that works with the next code listed for the device and manufacturer. You may as seven other devices (VCR, DVD player, satellite, etc). 9-1 Programming to control. 2. If the code is a list of device codes to try all the codes listed until the LED lights and stays on . NOTE: Many devices have to be used when manually programming your device...

User Manual (English)
Page 45
... lights. If your LCD TV is connected to your computer in the OSD is set correctly. 45 45 Make sure that the main power switch and power button are not connected. Abnormal Colors Make sure that the selected video input source is connected to a working component. Make sure that the power cord is properly plugged into a grounded electrical outlet. TROUBLESHOOTING AND SUPPORT Before contacting customer service, use the following information to solve common problems...
... lights. If your LCD TV is connected to your computer in the OSD is set correctly. 45 45 Make sure that the main power switch and power button are not connected. Abnormal Colors Make sure that the selected video input source is connected to a working component. Make sure that the power cord is properly plugged into a grounded electrical outlet. TROUBLESHOOTING AND SUPPORT Before contacting customer service, use the following information to solve common problems...
User Manual (English)
Page 46
... your audio input source cables are inserted correctly. Make sure the remote control sensor window is HDCP encoded. Insignia Support If this type of precision technology. Stop and restart the source. Dim Screen Video display devices experience degradation of brightness over the life of your warranty. However, sometimes some pixels of the device. The signal on DVI-D is not under strong lighting. Pixel Problems Your LCD TV...
... your audio input source cables are inserted correctly. Make sure the remote control sensor window is HDCP encoded. Insignia Support If this type of precision technology. Stop and restart the source. Dim Screen Video display devices experience degradation of brightness over the life of your warranty. However, sometimes some pixels of the device. The signal on DVI-D is not under strong lighting. Pixel Problems Your LCD TV...


