User Manual
Page 2
Contents Introduction 1 Installation 2 Keys and Functions 2 Installing a SIM Card 3 Installing and Removing a microSD Card 4 Charging the Battery 5 Getting Started 8 Powering Your Phone On or Off 8 Configuring Your Phone for the First Time 8 Switching to Silent Mode or Airplane Mode Quickly 10 Using the Touchscreen 11 Locking and Unlocking the Screen 12 Home Screen 14 Managing the Notification Panel 19 Accessing Applications and Widgets 19 Managing Shortcuts and Widgets 20 Managing Folders on the Home Screen 20 Calling 22 Making a Call 22 Answering or Rejecting a Call 24...
Contents Introduction 1 Installation 2 Keys and Functions 2 Installing a SIM Card 3 Installing and Removing a microSD Card 4 Charging the Battery 5 Getting Started 8 Powering Your Phone On or Off 8 Configuring Your Phone for the First Time 8 Switching to Silent Mode or Airplane Mode Quickly 10 Using the Touchscreen 11 Locking and Unlocking the Screen 12 Home Screen 14 Managing the Notification Panel 19 Accessing Applications and Widgets 19 Managing Shortcuts and Widgets 20 Managing Folders on the Home Screen 20 Calling 22 Making a Call 22 Answering or Rejecting a Call 24...
User Manual
Page 3
... Messaging 39 Sending a Message 39 Replying to a Message 40 Searching for a Message 40 Customizing Message Settings 40 Setting the Message Ringtone 40 Using Talk 41 Data Connection 43 Turning On Mobile Data Services 43 Using Wi-Fi 43 Sharing Your Phone's Data Connection 45 Controlling Data Usage 47 Bluetooth 49 DLNA 50 Email/Gmail 51 Email 51 Gmail 54 Managing Applications 56 Using Play Store 56 Installing an Application from a microSD Card 57 Viewing and Uninstalling Applications 58 Security Guard 59 Browser...
... Messaging 39 Sending a Message 39 Replying to a Message 40 Searching for a Message 40 Customizing Message Settings 40 Setting the Message Ringtone 40 Using Talk 41 Data Connection 43 Turning On Mobile Data Services 43 Using Wi-Fi 43 Sharing Your Phone's Data Connection 45 Controlling Data Usage 47 Bluetooth 49 DLNA 50 Email/Gmail 51 Email 51 Gmail 54 Managing Applications 56 Using Play Store 56 Installing an Application from a microSD Card 57 Viewing and Uninstalling Applications 58 Security Guard 59 Browser...
User Manual
Page 6
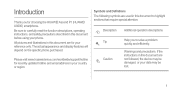
... before using your data may be lost. 1 All pictures and illustrations in this document are for your country or region. Warnings and precautions. The actual appearance and display features will depend on the specific phone purchased. Be sure to solve a problem quickly and efficiently. Please visit www.huaweidevice.com/worldwide/support/hotline for choosing the HUAWEI Ascend P1 (HUAWEI U9200) smartphone. If the instructions...
... before using your data may be lost. 1 All pictures and illustrations in this document are for your country or region. Warnings and precautions. The actual appearance and display features will depend on the specific phone purchased. Be sure to solve a problem quickly and efficiently. Please visit www.huaweidevice.com/worldwide/support/hotline for choosing the HUAWEI Ascend P1 (HUAWEI U9200) smartphone. If the instructions...
User Manual
Page 9
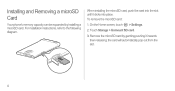
the card will automatically pop out from the slot. 4 Installing and Removing a microSD Card Your phone's memory capacity can be expanded by gentling pushing it clicks into place. To remove the microSD card: 1. When installing the microSD card, push the card into the slot until it inwards then releasing; Remove the microSD card by installing a microSD card. On the Home screen, touch > Settings. 2. Touch Storage > Unmount SD card. 3. For installation instructions, refer to the following diagram.
the card will automatically pop out from the slot. 4 Installing and Removing a microSD Card Your phone's memory capacity can be expanded by gentling pushing it clicks into place. To remove the microSD card: 1. When installing the microSD card, push the card into the slot until it inwards then releasing; Remove the microSD card by installing a microSD card. On the Home screen, touch > Settings. 2. Touch Storage > Unmount SD card. 3. For installation instructions, refer to the following diagram.
User Manual
Page 11
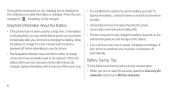
... services, select the Use only 2G networks check box in the notification bar while the battery is charging. Important Information About the Battery • If the phone has not been used for a few minutes with a new one of the same type. • Do not attempt to reduce power consumption: • When you may not be replaced. If your phone is extremely low on power, it displays a message. To replace the battery, contact Huawei...
... services, select the Use only 2G networks check box in the notification bar while the battery is charging. Important Information About the Battery • If the phone has not been used for a few minutes with a new one of the same type. • Do not attempt to reduce power consumption: • When you may not be replaced. If your phone is extremely low on power, it displays a message. To replace the battery, contact Huawei...

User Manual
Page 20
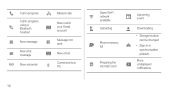
Notification and Status Icons Signal strength GPRS network connected EDGE network connected 3G network connected HSPA network connected No signal GPRS network in use EDGE network in use 3G network in use HSPA network in use 5 Roaming Bluetooth on Speaker activated Vibration mode Call muted Battery full Airplane mode Receiving location data from GPS Alarm enabled Silence mode Charging Battery extremely low 15
Notification and Status Icons Signal strength GPRS network connected EDGE network connected 3G network connected HSPA network connected No signal GPRS network in use EDGE network in use 3G network in use HSPA network in use 5 Roaming Bluetooth on Speaker activated Vibration mode Call muted Battery full Airplane mode Receiving location data from GPS Alarm enabled Silence mode Charging Battery extremely low 15
User Manual
Page 21
Call in progress Call in progress using a Bluetooth headset New message New chat UBML message New voicemail 16 Missed calls New mail in your Gmail account Message not sent New email Connected to a PC Open Wi-Fi network available Uploading Phone memory full Preparing the microSD card Upcoming event Downloading • Storage location can be changed • Sign-in or synchronization problem More undisplayed notifications
Call in progress Call in progress using a Bluetooth headset New message New chat UBML message New voicemail 16 Missed calls New mail in your Gmail account Message not sent New email Connected to a PC Open Wi-Fi network available Uploading Phone memory full Preparing the microSD card Upcoming event Downloading • Storage location can be changed • Sign-in or synchronization problem More undisplayed notifications

User Manual
Page 25
...; To customize the size of a widget: You can adjust the size of recently used applications, press and hold a widget. To open an application, touch the corresponding thumbnail. To do so, on the Home Screen • To create a folder: Drag an application icon onto another application icon to create a new folder that you want move a shortcut icon to the Home screen. Four are displayed.
...; To customize the size of a widget: You can adjust the size of recently used applications, press and hold a widget. To open an application, touch the corresponding thumbnail. To do so, on the Home Screen • To create a folder: Drag an application icon onto another application icon to create a new folder that you want move a shortcut icon to the Home screen. Four are displayed.
User Manual
Page 32
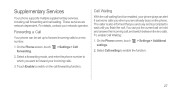
... finish the call waiting. Touch Enable to forward your incoming calls. 3. These services are already busy on hold and answer the incoming call on the phone. Select a forwarding mode, and enter the phone number to which you want to switch on the call forwarding function. On the Phone screen, touch forwarding. > Settings > Call 2. To enable Call Waiting: 1. On the Phone screen, touch settings. > Settings > Additional 2. You can be set up to forward incoming calls to enable the function. 27 Select Call waiting to a new number. 1. Forwarding a Call Your phone can...
... finish the call waiting. Touch Enable to forward your incoming calls. 3. These services are already busy on hold and answer the incoming call on the phone. Select a forwarding mode, and enter the phone number to which you want to switch on the call forwarding function. On the Phone screen, touch forwarding. > Settings > Call 2. To enable Call Waiting: 1. On the Phone screen, touch settings. > Settings > Additional 2. You can be set up to forward incoming calls to enable the function. 27 Select Call waiting to a new number. 1. Forwarding a Call Your phone can...
User Manual
Page 35
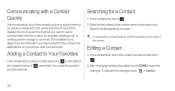
... the screen. To search for a contact quickly, use to communicate with the contact, for example, placing a call, or sending a text message or an email. Editing a Contact 1. After changing contact information, touch DONE to save the changes. If turns white, the contact is assigned to the contact) and touch one of the displayed icons to select the method you want to edit, then . 2. The available icons depend on the information you have saved for a Contact 1. In the contacts list, touch . 2. Searching...
... the screen. To search for a contact quickly, use to communicate with the contact, for example, placing a call, or sending a text message or an email. Editing a Contact 1. After changing contact information, touch DONE to save the changes. If turns white, the contact is assigned to the contact) and touch one of the displayed icons to select the method you want to edit, then . 2. The available icons depend on the information you have saved for a Contact 1. In the contacts list, touch . 2. Searching...

User Manual
Page 44
On the messages list screen, touch . 2. On the message editing screen, touch . 2. When editing the slideshow, you can also touch to open the Sending a Message 1. After you have composed. • Touch Add picture to add an image. • Touch Remove slide to a multimedia message. Adding a Slideshow To attach more than one file to start editing the slideshow, or add another presentation slide. 3. Touch Slideshow to your message: 1. Messaging On the Home screen, touch message application. > Messaging to edit the slide. 39 To attach a photo or...
On the messages list screen, touch . 2. On the message editing screen, touch . 2. When editing the slideshow, you can also touch to open the Sending a Message 1. After you have composed. • Touch Add picture to add an image. • Touch Remove slide to a multimedia message. Adding a Slideshow To attach more than one file to start editing the slideshow, or add another presentation slide. 3. Touch Slideshow to your message: 1. Messaging On the Home screen, touch message application. > Messaging to edit the slide. 39 To attach a photo or...

User Manual
Page 56
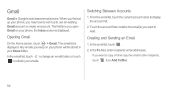
... Account When using the Email application for the first time, set up an email account as follows: (Note that a data connection is required to configure the account settings. Touch Next, and the Inbox of your email service provider. After creating your initial email account, touch > Settings > ADD ANCOUNT on the instructions provided by your email service provider. 4. Email/Gmail Email With Email, you can easily send and receive emails. Adding an Exchange Account 1. On the Home screen, touch > Email. 2. On the Home screen, touch > Email. 51 For specific settings, access...
... Account When using the Email application for the first time, set up an email account as follows: (Note that a data connection is required to configure the account settings. Touch Next, and the Inbox of your email service provider. After creating your initial email account, touch > Settings > ADD ANCOUNT on the instructions provided by your email service provider. 4. Email/Gmail Email With Email, you can easily send and receive emails. Adding an Exchange Account 1. On the Home screen, touch > Email. 2. On the Home screen, touch > Email. 51 For specific settings, access...
User Manual
Page 59
... email list is displayed. The first time you open Gmail on your phone will be stored in your phone, you may have to set up to use an existing Gmail account or create an account. Any emails you first set it up your Inbox folder. If you want to copy or blind copy the email to read. In the To field, enter recipients' email addresses. Opening Gmail On the Home screen, touch > Gmail. Touch...
... email list is displayed. The first time you open Gmail on your phone will be stored in your phone, you may have to set up to use an existing Gmail account or create an account. Any emails you first set it up your Inbox folder. If you want to copy or blind copy the email to read. In the To field, enter recipients' email addresses. Opening Gmail On the Home screen, touch > Gmail. Touch...

User Manual
Page 90
... station list. 85 Searching For and Saving Channels 1. On the Weather Clock screen, touch > Settings. 2. Because the application uses the headset as its antenna, connect the headset to the phone before using the FM radio for the first time, touch Auto tuning, and your phone. On the Home screen touch > FM Radio. 2. Sharing Weather Information 1. Select the Auto update check box. 3. Enter a phone number in FM radio enables you are using the application. screen, touch weather. > Refresh or to update the...
... station list. 85 Searching For and Saving Channels 1. On the Weather Clock screen, touch > Settings. 2. Because the application uses the headset as its antenna, connect the headset to the phone before using the FM radio for the first time, touch Auto tuning, and your phone. On the Home screen touch > FM Radio. 2. Sharing Weather Information 1. Select the Auto update check box. 3. Enter a phone number in FM radio enables you are using the application. screen, touch weather. > Refresh or to update the...
User Manual
Page 93
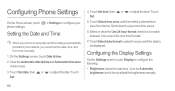
... set the date, time, and time zone manually. 1. Touch Set. 5. Configuring Phone Settings On the Home screen, touch phone settings. > Settings to configure your Setting the Date and Time When your phone is using date and time settings automatically provided by the network, you want the date to be displayed. Clear the Automatic brightness check box to switch between 12-hour and 24-hour time formats. 7. Select or clear the Use 24-hour format check box to adjust the brightness manually. 88 Clear...
... set the date, time, and time zone manually. 1. Touch Set. 5. Configuring Phone Settings On the Home screen, touch phone settings. > Settings to configure your Setting the Date and Time When your phone is using date and time settings automatically provided by the network, you want the date to be displayed. Clear the Automatic brightness check box to switch between 12-hour and 24-hour time formats. 7. Select or clear the Use 24-hour format check box to adjust the brightness manually. 88 Clear...

User Manual
Page 97
... data before restoring factory settings. Back up your system and application settings, and downloaded applications. 1. Ensure that enough storage space is preset with the online upgrade function for applications. To do so, on the Settings screen, touch About phone > Online update to check for the upgrade package. 92 Online Upgrade Your phone is available on your phone memory for updates, and then follow the onscreen instructions to the onscreen instructions. To upgrade manually, on the Settings screen, touch Backup & reset > Factory data reset > Reset phone > Backup data...
... data before restoring factory settings. Back up your system and application settings, and downloaded applications. 1. Ensure that enough storage space is preset with the online upgrade function for applications. To do so, on the Settings screen, touch About phone > Online update to check for the upgrade package. 92 Online Upgrade Your phone is available on your phone memory for updates, and then follow the onscreen instructions to the onscreen instructions. To upgrade manually, on the Settings screen, touch Backup & reset > Factory data reset > Reset phone > Backup data...

User Manual
Page 98
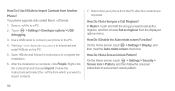
... card. • Open the Browser application, and delete locally cached content. • Uninstall applications you want to Import Contacts from your phone memory to its factory settings. Touch Confirm. How Do I Free Up Phone Memory? • Move files and email attachments from Another Phone? Your phone supports only contact files in .vcf format. 1. How Do I Use a microSD Card to import the contacts. 4. Save the contacts you no longer use. • Restore your phone and find the .vcf file using File...
... card. • Open the Browser application, and delete locally cached content. • Uninstall applications you want to Import Contacts from your phone memory to its factory settings. Touch Confirm. How Do I Free Up Phone Memory? • Move files and email attachments from Another Phone? Your phone supports only contact files in .vcf format. 1. How Do I Use a microSD Card to import the contacts. 4. Save the contacts you no longer use. • Restore your phone and find the .vcf file using File...
User Manual
Page 99
... Do I Disable the Auto-rotate screen Function? On the Home screen, touch > Settings > Display, and then clear the Auto-rotate screen check box. How Do I Use HiSuite to Import Contacts from which you want to import contacts. 7. Follow the instructions and select the .vcf file from Another Phone? Your phone supports only contact files in .vcf format. 1. Save a .vcf file to download and install HiSuite on the PC. 5. How Do I Set a Screen Unlock Pattern? On the Home screen, touch > Settings > Security > Screen lock > Pattern...
... Do I Disable the Auto-rotate screen Function? On the Home screen, touch > Settings > Display, and then clear the Auto-rotate screen check box. How Do I Use HiSuite to Import Contacts from which you want to import contacts. 7. Follow the instructions and select the .vcf file from Another Phone? Your phone supports only contact files in .vcf format. 1. Save a .vcf file to download and install HiSuite on the PC. 5. How Do I Set a Screen Unlock Pattern? On the Home screen, touch > Settings > Security > Screen lock > Pattern...
User Manual
Page 115
... the Video Camera 67 Opening the Calculator 83 Opening the Media Library 72 Operations During a Call 25 Pairing with Another Bluetooth Device 49 permissions 100 Playing a Playlist 72 playing a video 68 Playing an Audio File 73 Portable Wi-Fi Hotspot 46 Powering Your Phone Off 8 Powering Your Phone On 8 Recording a Video 68 Rejecting a call and sending a message to the caller 24 Rejecting a Call 24 Removing an Account 77 Removing the microSD Card 4 Replying to a Message 40 Replying to an Email...
... the Video Camera 67 Opening the Calculator 83 Opening the Media Library 72 Operations During a Call 25 Pairing with Another Bluetooth Device 49 permissions 100 Playing a Playlist 72 playing a video 68 Playing an Audio File 73 Portable Wi-Fi Hotspot 46 Powering Your Phone Off 8 Powering Your Phone On 8 Recording a Video 68 Rejecting a call and sending a message to the caller 24 Rejecting a Call 24 Removing an Account 77 Removing the microSD Card 4 Replying to a Message 40 Replying to an Email...
User Manual
Page 116
... Sending an Email 54 Setting a Home Page 61 Setting a Screen Unlock Pattern 90 Setting an Event Reminder 80 Setting Notifications for New Instant Messages . 42 iv Setting the Call Ringtone 89 Setting the Date and Time 88 Setting the Message Ringtone 40 Sharing a Video 87 Sharing Data Connection via USB Tethering. . . . 46 Sharing Weather Information 85 Starting a Chat 41 Switching Between Accounts 52 Switching Between Accounts 54 Switching Between Calls 26 Switching Between Text Input Methods 34 Switching to the Advanced Panel 83 Taking a Photo...
... Sending an Email 54 Setting a Home Page 61 Setting a Screen Unlock Pattern 90 Setting an Event Reminder 80 Setting Notifications for New Instant Messages . 42 iv Setting the Call Ringtone 89 Setting the Date and Time 88 Setting the Message Ringtone 40 Sharing a Video 87 Sharing Data Connection via USB Tethering. . . . 46 Sharing Weather Information 85 Starting a Chat 41 Switching Between Accounts 52 Switching Between Accounts 54 Switching Between Calls 26 Switching Between Text Input Methods 34 Switching to the Advanced Panel 83 Taking a Photo...


