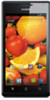
User Manual
Page 2
Contents Introduction 1 Installation 2 Keys and Functions 2 Installing a SIM Card 3 Installing and Removing a microSD Card 4 Charging the Battery 5 Getting Started 8 Powering Your Phone On or Off 8 Configuring Your Phone for the First Time 8 Switching to Silent Mode or Airplane Mode Quickly 10 Using the Touchscreen 11 Locking and Unlocking the Screen 12 Home Screen 14 Managing the Notification Panel 19 Accessing Applications and Widgets 19 Managing Shortcuts and Widgets 20 Managing Folders on the Home Screen 20 Calling 22 Making a Call 22 Answering or Rejecting a Call 24 ...
Contents Introduction 1 Installation 2 Keys and Functions 2 Installing a SIM Card 3 Installing and Removing a microSD Card 4 Charging the Battery 5 Getting Started 8 Powering Your Phone On or Off 8 Configuring Your Phone for the First Time 8 Switching to Silent Mode or Airplane Mode Quickly 10 Using the Touchscreen 11 Locking and Unlocking the Screen 12 Home Screen 14 Managing the Notification Panel 19 Accessing Applications and Widgets 19 Managing Shortcuts and Widgets 20 Managing Folders on the Home Screen 20 Calling 22 Making a Call 22 Answering or Rejecting a Call 24 ...
User Manual
Page 3
... Joining Contacts 32 Sending a Contact 32 Backing Up Your Contacts 33 Text Input 34 Using the Onscreen Keyboard 34 Switching Between Text Input Methods 34 Huawei Input Method 35 Using the Android Keyboard 36 Editing Text 37 Using the Landscape Keyboard 37 Selecting an Input Method 38 Messaging 39 Sending a Message...
... Joining Contacts 32 Sending a Contact 32 Backing Up Your Contacts 33 Text Input 34 Using the Onscreen Keyboard 34 Switching Between Text Input Methods 34 Huawei Input Method 35 Using the Android Keyboard 36 Editing Text 37 Using the Landscape Keyboard 37 Selecting an Input Method 38 Messaging 39 Sending a Message...
User Manual
Page 4
Managing Bookmarks 60 Setting the Home Page 61 Customizing Browser Settings 61 Maps 62 Enabling the Location Service 62 Opening Maps 62 Searching for Places of Interest 62 Getting Directions 62 Capturing Photos and Videos 64 Camera 64 Video Camera 67 Gallery 70 Viewing Photos or Videos 70 Editing a Picture 70 Rotating a Picture 71 Cropping a Picture 71 Music Player 72 Opening the Media Library 72 Adding an Audio File to a Playlist 72 Playing a Playlist 72 Playing an Audio File 73 Copying an Audio File 74 Accounts and Synchronization 77 Adding an Account 77 Removing an ...
Managing Bookmarks 60 Setting the Home Page 61 Customizing Browser Settings 61 Maps 62 Enabling the Location Service 62 Opening Maps 62 Searching for Places of Interest 62 Getting Directions 62 Capturing Photos and Videos 64 Camera 64 Video Camera 67 Gallery 70 Viewing Photos or Videos 70 Editing a Picture 70 Rotating a Picture 71 Cropping a Picture 71 Music Player 72 Opening the Media Library 72 Adding an Audio File to a Playlist 72 Playing a Playlist 72 Playing an Audio File 73 Copying an Audio File 74 Accounts and Synchronization 77 Adding an Account 77 Removing an ...
User Manual
Page 5
Configuring Phone Settings 88 Setting the Date and Time 88 Configuring the Display Settings 88 Adjusting the Volume 89 Setting the Call Ringtone 89 Security Settings 90 Restoring Factory Settings 92 Online Upgrade 92 FAQs 93 Appendix 96 Safety Precautions 96 Personal Information and Data Security 98 Legal Notice 99 Warnings and Precautions 102 iv
Configuring Phone Settings 88 Setting the Date and Time 88 Configuring the Display Settings 88 Adjusting the Volume 89 Setting the Call Ringtone 89 Security Settings 90 Restoring Factory Settings 92 Online Upgrade 92 FAQs 93 Appendix 96 Safety Precautions 96 Personal Information and Data Security 98 Legal Notice 99 Warnings and Precautions 102 iv
User Manual
Page 6
... this document are used in this document are not followed, the device may be lost. 1 Symbols and Definitions The following symbols are for choosing the HUAWEI Ascend P1 (HUAWEI U9200) smartphone.
... this document are used in this document are not followed, the device may be lost. 1 Symbols and Definitions The following symbols are for choosing the HUAWEI Ascend P1 (HUAWEI U9200) smartphone.
User Manual
Page 7
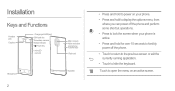
Touch to open the menu on your phone. • Press and hold to display the options menu, from where you can power off the phone and perform some shortcut operations. • Press to lock the screen when your phone is active. • Press and hold for over 10 seconds to forcibly power off the phone. • Touch to return to the previous screen or exit the currently running application. • Touch to power on an active screen. Installation Keys and Functions Headset jack Earpiece Charger jack/USB port SIM card slot Secondary camera Status indicator Power key microSD card slot Main...
Touch to open the menu on your phone. • Press and hold to display the options menu, from where you can power off the phone and perform some shortcut operations. • Press to lock the screen when your phone is active. • Press and hold for over 10 seconds to forcibly power off the phone. • Touch to return to the previous screen or exit the currently running application. • Touch to power on an active screen. Installation Keys and Functions Headset jack Earpiece Charger jack/USB port SIM card slot Secondary camera Status indicator Power key microSD card slot Main...
User Manual
Page 8
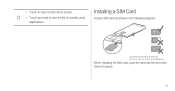
• Touch to return to the Home screen. • Touch and hold to view the list of recently used applications. Installing a SIM Card Install a SIM card as shown in the following diagram. Standard USIM card dimension: 25 mm x 15 mm x 0.76 mm (DxWxH) When installing the SIM card, push the card into the slot until it clicks into place. 3
• Touch to return to the Home screen. • Touch and hold to view the list of recently used applications. Installing a SIM Card Install a SIM card as shown in the following diagram. Standard USIM card dimension: 25 mm x 15 mm x 0.76 mm (DxWxH) When installing the SIM card, push the card into the slot until it clicks into place. 3
User Manual
Page 9
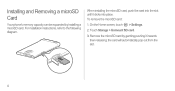
For installation instructions, refer to the following diagram. On the Home screen, touch > Settings. 2. Remove the microSD card by installing a microSD card. To remove the microSD card: 1. When installing the microSD card, push the card into the slot until it inwards then releasing; Touch Storage > Unmount SD card. 3. the card will automatically pop out from the slot. 4 Installing and Removing a microSD Card Your phone's memory capacity can be expanded by gentling pushing it clicks into place.
For installation instructions, refer to the following diagram. On the Home screen, touch > Settings. 2. Remove the microSD card by installing a microSD card. To remove the microSD card: 1. When installing the microSD card, push the card into the slot until it inwards then releasing; Touch Storage > Unmount SD card. 3. the card will automatically pop out from the slot. 4 Installing and Removing a microSD Card Your phone's memory capacity can be expanded by gentling pushing it clicks into place.
User Manual
Page 10
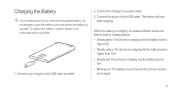
... the battery level is low. • Blinking red: The battery level is low and the phone needs to be charged. 5 To replace the battery, contact Huawei or an authorized service provider. 1. Charging the Battery Your mobile phone has an internal rechargeable battery.
... the battery level is low. • Blinking red: The battery level is low and the phone needs to be charged. 5 To replace the battery, contact Huawei or an authorized service provider. 1. Charging the Battery Your mobile phone has an internal rechargeable battery.
User Manual
Page 11
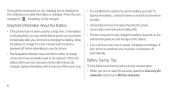
... phone is powered on your phone immediately after being fully charged, replace the battery with the phone powered off automatically. To replace the battery, contact Huawei or an authorized service provider. • Using data services increases the phone's power consumption and will power off before attempting to use the phone. •...
... phone is powered on your phone immediately after being fully charged, replace the battery with the phone powered off automatically. To replace the battery, contact Huawei or an authorized service provider. • Using data services increases the phone's power consumption and will power off before attempting to use the phone. •...
User Manual
Page 12
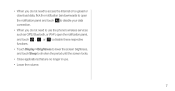
to disable your data • When you do not need to access the Internet or to upload or download data, flick the notification bar downwards to shorten the period until the screen locks. • Close applications that are no longer in use the phone's wireless services such as GPS, Bluetooth, or Wi-Fi, open the notification panel, and touch , , or to disable these respective functions. • Touch Display > Brightness to lower the screen brightness, and touch Sleep to open the notification panel and touch connection. • When you do not need to use . • Lower the ...
to disable your data • When you do not need to access the Internet or to upload or download data, flick the notification bar downwards to shorten the period until the screen locks. • Close applications that are no longer in use the phone's wireless services such as GPS, Bluetooth, or Wi-Fi, open the notification panel, and touch , , or to disable these respective functions. • Touch Display > Brightness to lower the screen brightness, and touch Sleep to open the notification panel and touch connection. • When you do not need to use . • Lower the ...

User Manual
Page 13
Do not enable Fast boot while traveling on . Press and hold to forcibly power off Enabling Fast Boot 1. Touch Power off. On the Home screen, touch > Settings. 2. If Fast boot is enabled, your phone off when prompted. for the First Time A configuration wizard is displayed the first time the phone is powered on an airplane. Touch Fast boot to configure your phone. If Fast boot is disabled, touch OK to power your phone enters deep sleep mode. Getting Started Powering Your Phone On or Off • When your phone is off, press and hold to power it to use the phone. • ...
Do not enable Fast boot while traveling on . Press and hold to forcibly power off Enabling Fast Boot 1. Touch Power off. On the Home screen, touch > Settings. 2. If Fast boot is enabled, your phone off when prompted. for the First Time A configuration wizard is displayed the first time the phone is powered on an airplane. Touch Fast boot to configure your phone. If Fast boot is disabled, touch OK to power your phone enters deep sleep mode. Getting Started Powering Your Phone On or Off • When your phone is off, press and hold to power it to use the phone. • ...

User Manual
Page 14
If you do not already have a Google account, you will be prompted to log in to your phone has an active data connection before account recovery in the event of Google applications, services, and features may vary according to your Google account, and then touch Next. Set the recovery information to ensure that your Google account, which is available. Ensure that a security question is already in use, you can create one as your Google account. If the user name is asked before logging in to your Gmail account (if you want to use them. On the Make it ...
If you do not already have a Google account, you will be prompted to log in to your phone has an active data connection before account recovery in the event of Google applications, services, and features may vary according to your Google account, and then touch Next. Set the recovery information to ensure that your Google account, which is available. Ensure that a security question is already in use, you can create one as your Google account. If the user name is asked before logging in to your Gmail account (if you want to use them. On the Make it ...
User Manual
Page 15
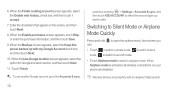
check box, and then touch I accept. 7. Switching to Silent Mode or Airplane Mode Quickly Press and hold to open the options menu, from where you want to airplane mode. Enter the characters that appear on your phone are disabled. When Airplane mode is activated, all wireless connections on the screen, and then touch Next. 8. When the Enable purchases screen appears, touch Skip, or enter the purchase information, and then touch Save. 9. When the Use Google location screen appears, select the option for Google's location service, and then touch Next. 11. Touch Finish. When the ...
check box, and then touch I accept. 7. Switching to Silent Mode or Airplane Mode Quickly Press and hold to open the options menu, from where you want to airplane mode. Enter the characters that appear on your phone are disabled. When Airplane mode is activated, all wireless connections on the screen, and then touch Next. 8. When the Enable purchases screen appears, touch Skip, or enter the purchase information, and then touch Save. 9. When the Use Google location screen appears, select the option for Google's location service, and then touch Next. 11. Touch Finish. When the ...
User Manual
Page 16
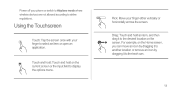
Flick: Move your finger to the desired location on the screen. Power off your phone or switch to Airplane mode where wireless devices are not allowed according to the trash can move an icon by dragging it to another location or remove an icon by dragging it to select an item or open an application. For example, on the current screen or the input field to display the options menu. Drag: Touch and hold on the Home screen, you can . 11 Using the Touchscreen Touch: Tap the screen once with your finger either vertically or horizontally across the screen. Touch and hold: Touch and...
Flick: Move your finger to the desired location on the screen. Power off your phone or switch to Airplane mode where wireless devices are not allowed according to the trash can move an icon by dragging it to another location or remove an icon by dragging it to select an item or open an application. For example, on the current screen or the input field to display the options menu. Drag: Touch and hold on the Home screen, you can . 11 Using the Touchscreen Touch: Tap the screen once with your finger either vertically or horizontally across the screen. Touch and hold: Touch and...

User Manual
Page 17
On the Home screen, touch > Settings > Security > Screen lock to Music+ controller. Locking and Unlocking the Screen Locking the Screen • To lock the screen when the phone is active, press . • If the phone is off, press to turn it reaches . Follow the onscreen instructions and drag until it on. 2. to the right 12 • When the screen is locked, flick to the left or right in the clock area to switch to select a method for a specified period of time, the phone automatically locks its screen. Unlocking the Screen 1. If the screen is idle for unlocking the screen....
On the Home screen, touch > Settings > Security > Screen lock to Music+ controller. Locking and Unlocking the Screen Locking the Screen • To lock the screen when the phone is active, press . • If the phone is off, press to turn it reaches . Follow the onscreen instructions and drag until it on. 2. to the right 12 • When the screen is locked, flick to the left or right in the clock area to switch to select a method for a specified period of time, the phone automatically locks its screen. Unlocking the Screen 1. If the screen is idle for unlocking the screen....

User Manual
Page 18
On the Home screen, touch > Settings > Security > Screen lock > Face Unlock. 2. If face identification fails, unlock the phone using the Face Unlock function, bring your face to unlock by recognizing your face. To enable and configure the settings of the screen. Choose an unlock method, and configure the unlock settings. Your phone will identify your face is at the center of the capture screen, and then wait for the phone to take a photo. 3. Face Unlock You can set your phone using the alternative method you have selected. 5. To unlock your phone to the center of the ...
On the Home screen, touch > Settings > Security > Screen lock > Face Unlock. 2. If face identification fails, unlock the phone using the Face Unlock function, bring your face to unlock by recognizing your face. To enable and configure the settings of the screen. Choose an unlock method, and configure the unlock settings. Your phone will identify your face is at the center of the capture screen, and then wait for the phone to take a photo. 3. Face Unlock You can set your phone using the alternative method you have selected. 5. To unlock your phone to the center of the ...

User Manual
Page 19
The screen layout varies depending on the theme. To move an application or widget, touch and hold its icon, and then drag the icon to open the corresponding applications. Flick the notification bar downwards to open the notification panel. 2 Display area: The main display area of your phone. 3 Menu key: Touch to open the application list. 4 Shortcuts: Touch to the target location. To remove an item, drag it to the trash can. The default theme is preloaded with multiple themes. Home Screen Your phone is used as an example in this section. 1 2 3 4 14 Notification bar: ...
The screen layout varies depending on the theme. To move an application or widget, touch and hold its icon, and then drag the icon to open the corresponding applications. Flick the notification bar downwards to open the notification panel. 2 Display area: The main display area of your phone. 3 Menu key: Touch to open the application list. 4 Shortcuts: Touch to the target location. To remove an item, drag it to the trash can. The default theme is preloaded with multiple themes. Home Screen Your phone is used as an example in this section. 1 2 3 4 14 Notification bar: ...

User Manual
Page 20
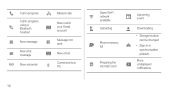
Notification and Status Icons Signal strength GPRS network connected EDGE network connected 3G network connected HSPA network connected No signal GPRS network in use EDGE network in use 3G network in use HSPA network in use 5 Roaming Bluetooth on Speaker activated Vibration mode Call muted Battery full Airplane mode Receiving location data from GPS Alarm enabled Silence mode Charging Battery extremely low 15
Notification and Status Icons Signal strength GPRS network connected EDGE network connected 3G network connected HSPA network connected No signal GPRS network in use EDGE network in use 3G network in use HSPA network in use 5 Roaming Bluetooth on Speaker activated Vibration mode Call muted Battery full Airplane mode Receiving location data from GPS Alarm enabled Silence mode Charging Battery extremely low 15
User Manual
Page 21
Call in progress Call in progress using a Bluetooth headset New message New chat UBML message New voicemail 16 Missed calls New mail in your Gmail account Message not sent New email Connected to a PC Open Wi-Fi network available Uploading Phone memory full Preparing the microSD card Upcoming event Downloading • Storage location can be changed • Sign-in or synchronization problem More undisplayed notifications
Call in progress Call in progress using a Bluetooth headset New message New chat UBML message New voicemail 16 Missed calls New mail in your Gmail account Message not sent New email Connected to a PC Open Wi-Fi network available Uploading Phone memory full Preparing the microSD card Upcoming event Downloading • Storage location can be changed • Sign-in or synchronization problem More undisplayed notifications
