Owners Guide
Page 2
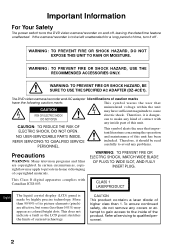
..., AND FULLY INSERT PLUG. Refer all servicing to cause RISK OF ELECTRIC SHOCK electric shock. Therefore, it off , leaving the date/time feature unaffected. The DVD video camera/recorder and AC adapter Identifications of current technology. CLASS 1 LASERPRODUCT English The liquid crystal display (LCD) panel is danger- WARNING: TO PREVENT FIRE OR SHOCK HAZARD, BE SURE TO USE THE SPECIFIED AC ADAPTER (DZ-ACE1). In...
..., AND FULLY INSERT PLUG. Refer all servicing to cause RISK OF ELECTRIC SHOCK electric shock. Therefore, it off , leaving the date/time feature unaffected. The DVD video camera/recorder and AC adapter Identifications of current technology. CLASS 1 LASERPRODUCT English The liquid crystal display (LCD) panel is danger- WARNING: TO PREVENT FIRE OR SHOCK HAZARD, BE SURE TO USE THE SPECIFIED AC ADAPTER (DZ-ACE1). In...
Owners Guide
Page 4
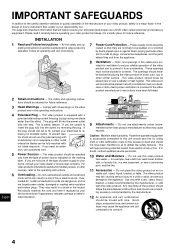
... the type of power source indicated on a bed, sofa, rug, or other outlet unless the blades can result in the cabinet are pro- This video product should bear the UL listing mark or CSA certification mark on an un- To prevent electric shock do not use instructions. 7 Power-Cord Protection - Overloading - Caution: Maintain electrical safety. Do not use of DVD video camera/recorder...
... the type of power source indicated on a bed, sofa, rug, or other outlet unless the blades can result in the cabinet are pro- This video product should bear the UL listing mark or CSA certification mark on an un- To prevent electric shock do not use instructions. 7 Power-Cord Protection - Overloading - Caution: Maintain electrical safety. Do not use of DVD video camera/recorder...
Owners Guide
Page 7
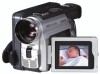
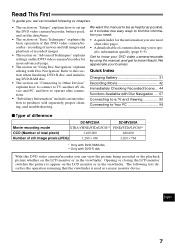
... appreciate your DVD video camera/recorder by using this section when finalizing DVD-R disc and initializing DVD-RAM disc. • The section on the LCD monitor or in the viewfinder. Quick Index Charging Battery 31 Recording Movie 42 Immediately Checking Recorded Scene ... 44 Functions Available with Disc Navigation .... 67 Connecting to a TV and Viewing 90 Connecting to Your PC 94 ■ Type of difference DZ-MV230A DZ-MV200A Movie recording mode XTRA*/FINE/STD/LPCM** FINE/STD/LPCM** CCD (Number of...
... appreciate your DVD video camera/recorder by using this section when finalizing DVD-R disc and initializing DVD-RAM disc. • The section on the LCD monitor or in the viewfinder. Quick Index Charging Battery 31 Recording Movie 42 Immediately Checking Recorded Scene ... 44 Functions Available with Disc Navigation .... 67 Connecting to a TV and Viewing 90 Connecting to Your PC 94 ■ Type of difference DZ-MV230A DZ-MV200A Movie recording mode XTRA*/FINE/STD/LPCM** FINE/STD/LPCM** CCD (Number of...
Owners Guide
Page 8
... camera/ recorder 30 Removing Battery 30 Charging Battery 31 Battery Remaining Level Indicator 33 Using DVD video camera/recorder with AC Adapter 34 English Setting Date and Time 35 Changing Display Format of Date and Time 36 Inserting and Ejecting Disc 37 Inserting Disc 37 Removing Disc 39 Basic Techniques Basic Handling of DVD video camera/ recorder 40 Turning DVD Video Camera/ Recorder On 40 Opening LCD Monitor 40 LCD Screen Brightness Adjustment .......... 41 Closing LCD Monitor 41 Viewing Subject through Viewfinder ......... 41 Recording Movie 42 Using External Microphone...
... camera/ recorder 30 Removing Battery 30 Charging Battery 31 Battery Remaining Level Indicator 33 Using DVD video camera/recorder with AC Adapter 34 English Setting Date and Time 35 Changing Display Format of Date and Time 36 Inserting and Ejecting Disc 37 Inserting Disc 37 Removing Disc 39 Basic Techniques Basic Handling of DVD video camera/ recorder 40 Turning DVD Video Camera/ Recorder On 40 Opening LCD Monitor 40 LCD Screen Brightness Adjustment .......... 41 Closing LCD Monitor 41 Viewing Subject through Viewfinder ......... 41 Recording Movie 42 Using External Microphone...
Owners Guide
Page 9
... Play 89 Connecting to Other Devices Viewing on TV Screen 90 Connecting to a TV 90 Viewing on TV Screen 91 Recording Image from Other AV Devices .... 92 Connecting to Other AV Device 92 Recording Image from Other Camcorder or AV Device 93 Cautions when connecting DVD video camera/recorder to PC 94 Capturing Data for PC 95 Using DZ-WINPC3(W) PC kit 95 Using Disc on PC 97 Subsidiary Information Cleaning 98 If dust adheres to viewfinder lens 98 Trouble Messages 99 Troubleshooting...
... Play 89 Connecting to Other Devices Viewing on TV Screen 90 Connecting to a TV 90 Viewing on TV Screen 91 Recording Image from Other AV Devices .... 92 Connecting to Other AV Device 92 Recording Image from Other Camcorder or AV Device 93 Cautions when connecting DVD video camera/recorder to PC 94 Capturing Data for PC 95 Using DZ-WINPC3(W) PC kit 95 Using Disc on PC 97 Subsidiary Information Cleaning 98 If dust adheres to viewfinder lens 98 Trouble Messages 99 Troubleshooting...
Owners Guide
Page 11
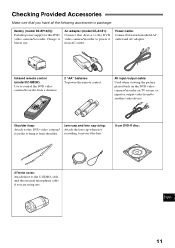
...the lens. 8 cm DVD-R disc: 2 Ferrite cores: Attach these to the S-VIDEO cable, and the external microphone cable if you have all the following accessories in package: Battery (model DZ-BP14(R)): Portable power supply for this device to the DVD video camera/recorder to another video device. Ac adapter (model DZ-ACE1): Connect this DVD video camera/recorder. Charge it from a distance. 2 "AA" batteries: To power the remote control. AV input/output cable Used when viewing the picture played back on the DVD video camera/recorder on TV screen, or input or output video from...
...the lens. 8 cm DVD-R disc: 2 Ferrite cores: Attach these to the S-VIDEO cable, and the external microphone cable if you have all the following accessories in package: Battery (model DZ-BP14(R)): Portable power supply for this device to the DVD video camera/recorder to another video device. Ac adapter (model DZ-ACE1): Connect this DVD video camera/recorder. Charge it from a distance. 2 "AA" batteries: To power the remote control. AV input/output cable Used when viewing the picture played back on the DVD video camera/recorder on TV screen, or input or output video from...
Owners Guide
Page 12
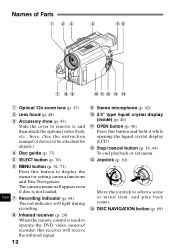
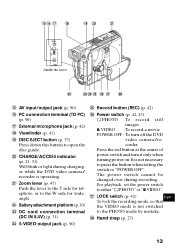
... the remote control is used to operate the DVD video camera/ recorder, this receiver will appear even if disc is not loaded. Names of device to be attached for setting camera functions and Disc Navigation. The camera menu will receive the infrared signal. 12 9 Stereo microphone (p. 42) ! 2.5" type liquid crystal display (inside) (p. 40) " OPEN button (p. 40) Press this button and hold it , and then attach the optional video flash, etc., here. (See the instruction manual of Parts...
... the remote control is used to operate the DVD video camera/ recorder, this receiver will appear even if disc is not loaded. Names of device to be attached for setting camera functions and Disc Navigation. The camera menu will receive the infrared signal. 12 9 Stereo microphone (p. 42) ! 2.5" type liquid crystal display (inside) (p. 40) " OPEN button (p. 40) Press this button and hold it , and then attach the optional video flash, etc., here. (See the instruction manual of Parts...
Owners Guide
Page 13
... the VIDEO mode is not necessary to press the button when setting the switch to open the disc guide. , CHARGE/ACCESS indicator (p. 21, 31) Will blink or light during recording. &( ) ~ +, - TO PC A / V (Inside the cover) . /:; < = > & AV input/output jack (p. 90) ( PC connection terminal (TO PC) (p. 96) ) External microphone jack (p. 42) ~ Viewfinder (p. 41) + DISC EJECT button (p. 37) Press down this button to "POWER OFF". Record button (REC) (p. 42) < Power switch (p. 42, 43) PHOTO : To record still images VIDEO : To record a movie POWER OFF : To turn off the DVD video camera...
... the VIDEO mode is not necessary to press the button when setting the switch to open the disc guide. , CHARGE/ACCESS indicator (p. 21, 31) Will blink or light during recording. &( ) ~ +, - TO PC A / V (Inside the cover) . /:; < = > & AV input/output jack (p. 90) ( PC connection terminal (TO PC) (p. 96) ) External microphone jack (p. 42) ~ Viewfinder (p. 41) + DISC EJECT button (p. 37) Press down this button to "POWER OFF". Record button (REC) (p. 42) < Power switch (p. 42, 43) PHOTO : To record still images VIDEO : To record a movie POWER OFF : To turn off the DVD video camera...
Owners Guide
Page 16
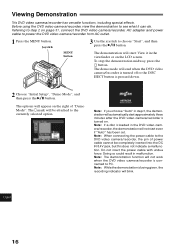
... then press the button. Note: While the demonstration is turned on the LCD screen. Joystick MENU button 3 Use the joystick to power the DVD video camera/recorder from AC outlet. 1 Press the MENU button. Note: When connecting the power cable to see what it in malfunction. Before using the DVD video camera/recorder, view the demonstration to the DVD video camera/recorder, the pin of "Demo Mode": The mark will automatically start : View it can do. To stop the demonstration midway...
... then press the button. Note: While the demonstration is turned on the LCD screen. Joystick MENU button 3 Use the joystick to power the DVD video camera/recorder from AC outlet. 1 Press the MENU button. Note: When connecting the power cable to see what it in malfunction. Before using the DVD video camera/recorder, view the demonstration to the DVD video camera/recorder, the pin of "Demo Mode": The mark will automatically start : View it can do. To stop the demonstration midway...
Owners Guide
Page 17
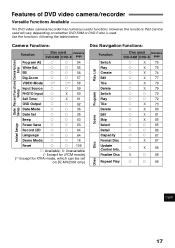
... Play \ \ 89 Others English 17 Use the functions, following the table below: Camera Functions: Disc Navigation Functions: Date Record Functions Camera Functions Function Disc used Reference DVD-RAM DVD-R page Program AE \ \ 54 Setup White Bal. \ \ 55 EIS \ \ 56 Dig.Zoom \ \ 57 VIDEO Mode \* \** 58 Input Source \ \ 59 Setup PHOTO Input \ X 60 Self Timer \ X 61 OSD Output \ \ 62 Setup Date Mode \ \ 36 Date Set \ \ 35 Beep \ \ 63 Initial Setup Power Save \ \ 63 Record LED \ \ 64 Language \ \ 64 Demo Mode \ \ 16 Reset...
... Play \ \ 89 Others English 17 Use the functions, following the table below: Camera Functions: Disc Navigation Functions: Date Record Functions Camera Functions Function Disc used Reference DVD-RAM DVD-R page Program AE \ \ 54 Setup White Bal. \ \ 55 EIS \ \ 56 Dig.Zoom \ \ 57 VIDEO Mode \* \** 58 Input Source \ \ 59 Setup PHOTO Input \ X 60 Self Timer \ X 61 OSD Output \ \ 62 Setup Date Mode \ \ 36 Date Set \ \ 35 Beep \ \ 63 Initial Setup Power Save \ \ 63 Record LED \ \ 64 Language \ \ 64 Demo Mode \ \ 16 Reset...
Owners Guide
Page 18
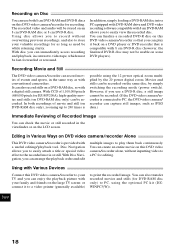
... DVD video camera/recorder is compatible with a useful editing/playback tool. In addition, simply loading a DVD-RAM disc into a PC equipped with DVD-RAM drive and DVD video recording software compatible with Various Devices Connect this DVD video camera/recorder alone, without overwriting previous recordings, and also to your family and friends on the same disc, by the 20 power digital zoom. Recording Movie and Still The DVD video camera/recorder can check the movie or still recorded in the same way as JPEG data.) Immediate Reviewing of movie...
... DVD video camera/recorder is compatible with a useful editing/playback tool. In addition, simply loading a DVD-RAM disc into a PC equipped with DVD-RAM drive and DVD video recording software compatible with Various Devices Connect this DVD video camera/recorder alone, without overwriting previous recordings, and also to your family and friends on the same disc, by the 20 power digital zoom. Recording Movie and Still The DVD video camera/recorder can check the movie or still recorded in the same way as JPEG data.) Immediate Reviewing of movie...
Owners Guide
Page 23
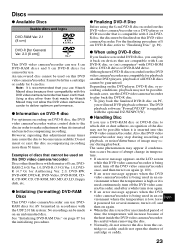
... DVD-R disc, the DVD video camera/recorder writes control data to the disc in tempera- The DVD playback software "PowerDVD XP" is inserted into this DVD video camera/recorder has been confirmed. An uncovered disc cannot be possible when it is low, leave English it powered for an extended period of time, the temperature will need DVD playback software. Note: It is recommended that made on this DVD video camera/recorder is being used in accordance with the optional DZ...
... DVD-R disc, the DVD video camera/recorder writes control data to the disc in tempera- The DVD playback software "PowerDVD XP" is inserted into this DVD video camera/recorder has been confirmed. An uncovered disc cannot be possible when it is low, leave English it powered for an extended period of time, the temperature will need DVD playback software. Note: It is recommended that made on this DVD video camera/recorder is being used in accordance with the optional DZ...

Owners Guide
Page 35
... the digit to choose "YES", and then press the button. The screen for verifying the set .) MENU button Joystick Power switch 1 Set the power switch to " VIDEO" or " PHOTO" to turn the DVD video camera/ recorder on the left end of screen for at least 24 hours with the DVD video camera/recorder turned off: The built-in memory. Choosing "NO" will appear. 7 If the displayed date and time are correct, use the joystick to be set , and the DVD video camera/recorder will...
... the digit to choose "YES", and then press the button. The screen for verifying the set .) MENU button Joystick Power switch 1 Set the power switch to " VIDEO" or " PHOTO" to turn the DVD video camera/ recorder on the left end of screen for at least 24 hours with the DVD video camera/recorder turned off: The built-in memory. Choosing "NO" will appear. 7 If the displayed date and time are correct, use the joystick to be set , and the DVD video camera/recorder will...
Owners Guide
Page 42
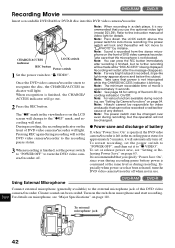
... is being displayed. Clearer sound can press the REC button immediately after the message disappears. Recording Movie Insert a recordable DVD-RAM or DVD-R disc into this DVD video camera/recorder. CHARGE/ACCESS LOCK switch indicator REC button Power switch 1 Set the power switch to the external microphone jack of any defect. Once the DVD video camera/recorder starts to turn off when not in a dark place, it is blinking. The " " mark in the recording pause status for video and audio that you use . During recording, the recording indicator on microphone and...
... is being displayed. Clearer sound can press the REC button immediately after the message disappears. Recording Movie Insert a recordable DVD-RAM or DVD-R disc into this DVD video camera/recorder. CHARGE/ACCESS LOCK switch indicator REC button Power switch 1 Set the power switch to the external microphone jack of any defect. Once the DVD video camera/recorder starts to turn off when not in a dark place, it is blinking. The " " mark in the recording pause status for video and audio that you use . During recording, the recording indicator on microphone and...
Owners Guide
Page 43
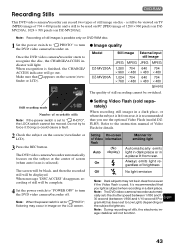
... Video information Flash (No Auto display) On Manner for details. 2 Check the subject on the LCD screen. cally sets the shutter speed 30 second (between 1/800 between 1/800 and 1/ and 1/10 second if Pro- age stabilizer will be viewed on TV (MPEG image of 704 × 480 pixels) and a still to turn the DVD video camera/recorder on the subject brightness. When message "DISC ACCESS" disappears, recording of still will light. Once the DVD video camera/recorder...
... Video information Flash (No Auto display) On Manner for details. 2 Check the subject on the LCD screen. cally sets the shutter speed 30 second (between 1/800 between 1/800 and 1/ and 1/10 second if Pro- age stabilizer will be viewed on TV (MPEG image of 704 × 480 pixels) and a still to turn the DVD video camera/recorder on the subject brightness. When message "DISC ACCESS" disappears, recording of still will light. Once the DVD video camera/recorder...
Owners Guide
Page 52
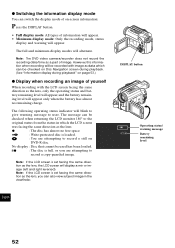
... minimum display modes will blink to give warning message to record a still on DVD-R disc. The following operating status indicator will alternate. Note: If the LCD screen is set facing the same direction as the lens, you are attempting to user. No display : Disc that cannot be used has been loaded. : The disc is set facing the same direction as a part of image. Note: The DVD video camera/recorder does not record the recording date/time as the lens, the LCD screen will...
... minimum display modes will blink to give warning message to record a still on DVD-R disc. The following operating status indicator will alternate. Note: If the LCD screen is set facing the same direction as the lens, you are attempting to user. No display : Disc that cannot be used has been loaded. : The disc is set facing the same direction as a part of image. Note: The DVD video camera/recorder does not record the recording date/time as the lens, the LCD screen will...
Owners Guide
Page 93
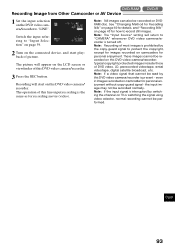
The operation of this DVD video camera/recorder. 3 Press the REC button. Note: The "Input Source" setting will return to "LINE". Note: Recording of picture. The picture will start playback of most images is prohibited by this DVD video camera/recorder is present - even in images recorded on camcorder for personal enjoyment. Switch the input referring to "Input Selection" on page 59. 2 Turn on the connected device, and start on this DVD video camera/recorder: Typical copyright protected images include those of this...
The operation of this DVD video camera/recorder. 3 Press the REC button. Note: The "Input Source" setting will return to "LINE". Note: Recording of picture. The picture will start playback of most images is prohibited by this DVD video camera/recorder is present - even in images recorded on camcorder for personal enjoyment. Switch the input referring to "Input Selection" on page 59. 2 Turn on the connected device, and start on this DVD video camera/recorder: Typical copyright protected images include those of this...

Owners Guide
Page 94
... recording mode, playback status, special effects, or title displayed on this DVD video camera/recorder, will not be transferred to PC. • The volume name of the DVD-RAM disc initialized on this DVD video camera/recorder will be performed on disc may not function in the following cases: • When a DVD-RAM disc or DVD-R disc is not finalized. ble or power cable while the CHARGE/ACCESS indicator is blinking, the data on this DVD video camera/recorder. English 94 Cautions when connecting DVD video camera/recorder...
... recording mode, playback status, special effects, or title displayed on this DVD video camera/recorder, will not be transferred to PC. • The volume name of the DVD-RAM disc initialized on this DVD video camera/recorder will be performed on disc may not function in the following cases: • When a DVD-RAM disc or DVD-R disc is not finalized. ble or power cable while the CHARGE/ACCESS indicator is blinking, the data on this DVD video camera/recorder. English 94 Cautions when connecting DVD video camera/recorder...
Owners Guide
Page 107
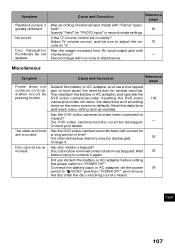
... DVD video camera/recorder could be sure to adjust the vol- 91 ume on the menu screen to " VIDEO" and then "POWER OFF", and remove the disc after the disc unlocking sound is greatly distorted. Connect the battery pack or AC adapter, set correctly? Adjust TV volume control, and be damaged. - Record image with no operation occurs by pressing button. Consult your dealer. Symptom Playback picture is heard. Cause and Correction Reference page Was recording of time? Resetting the DVD video...
... DVD video camera/recorder could be sure to adjust the vol- 91 ume on the menu screen to " VIDEO" and then "POWER OFF", and remove the disc after the disc unlocking sound is greatly distorted. Connect the battery pack or AC adapter, set correctly? Adjust TV volume control, and be damaged. - Record image with no operation occurs by pressing button. Consult your dealer. Symptom Playback picture is heard. Cause and Correction Reference page Was recording of time? Resetting the DVD video...
Owners Guide
Page 110
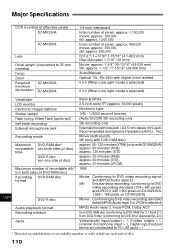
...) 0.3 lx (When Low Light mode is selected) English Viewfinder LCD monitor Electronic image stabilizer Shutter speed Flash [using Video Flash (optional)] Self-timer recording External microphone jack Recording mode Maximum recordable time DVD-RAM disc* (on both sides of disc) DVD-R disc (on one side of disc) Maximum number of recordable stills* (on both sides of DVD-RAM disc) Recording DVD-RAM disc format DVD-R disc Audio playback format Recording medium Jacks Black & White 2.5-inch color TFT (approx. 60,000 pixels) Electronic type 1/60 - 1/4000 second (movie) (Auto/On/Off) Still...
...) 0.3 lx (When Low Light mode is selected) English Viewfinder LCD monitor Electronic image stabilizer Shutter speed Flash [using Video Flash (optional)] Self-timer recording External microphone jack Recording mode Maximum recordable time DVD-RAM disc* (on both sides of disc) DVD-R disc (on one side of disc) Maximum number of recordable stills* (on both sides of DVD-RAM disc) Recording DVD-RAM disc format DVD-R disc Audio playback format Recording medium Jacks Black & White 2.5-inch color TFT (approx. 60,000 pixels) Electronic type 1/60 - 1/4000 second (movie) (Auto/On/Off) Still...


