Owners Guide
Page 4
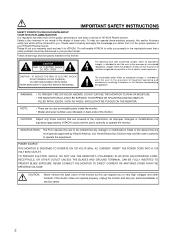
...; There are no user serviceable parts inside the monitor. • Model and serial numbers are indicated on this section illustrates safety tips which will enable HITACHI to notify you operate these units. INSERT THE POWER CORD INTO A 120 VOLT 60Hz OUTLET. If the monitor does not operate properly, unplug the monitor and call your product model. REFER SERVICING TO QUALIFIED SERVICE PERSONNEL. The exclamation point...
...; There are no user serviceable parts inside the monitor. • Model and serial numbers are indicated on this section illustrates safety tips which will enable HITACHI to notify you operate these units. INSERT THE POWER CORD INTO A 120 VOLT 60Hz OUTLET. If the monitor does not operate properly, unplug the monitor and call your product model. REFER SERVICING TO QUALIFIED SERVICE PERSONNEL. The exclamation point...
Owners Guide
Page 5
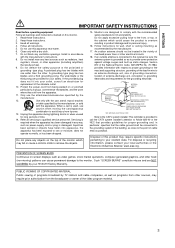
... CONDUCTORS POWER SERVICE GROUNDING ELECTRODE SYSTEM (NEC ART 250 PART H) NEC NATIONAL ELECTRICAL CODE Note to the CATV system installer: This reminder is connected to the receiver be connected to the grounding system of the building, as programs from other electrical circuits. 18. Disposal of cable entry as recommended by the manufacturer. 12. A polarized plug has two blades with the manufacturer's instructions...
... CONDUCTORS POWER SERVICE GROUNDING ELECTRODE SYSTEM (NEC ART 250 PART H) NEC NATIONAL ELECTRICAL CODE Note to the CATV system installer: This reminder is connected to the receiver be connected to the grounding system of the building, as programs from other electrical circuits. 18. Disposal of cable entry as recommended by the manufacturer. 12. A polarized plug has two blades with the manufacturer's instructions...
Owners Guide
Page 6
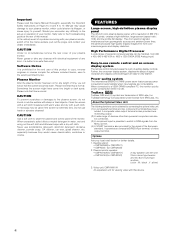
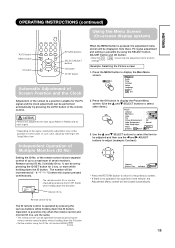
... power lines, the panel produces high-quality display images free from the Menu screen. (4) A SCART terminal is also provided for CMP420V2) 2. Desktop stand: • CMPAD05B(for CMP420V1) • CMPAD05 (for the signal of this device. Please note that this User's Manual thoroughly, especially the Important Safety Instructions on screen display system The remote control included eases the work of SRS Labs, Inc. Never guess or take any kind - Mis-use remote control...
... power lines, the panel produces high-quality display images free from the Menu screen. (4) A SCART terminal is also provided for CMP420V2) 2. Desktop stand: • CMPAD05B(for CMP420V1) • CMPAD05 (for the signal of this device. Please note that this User's Manual thoroughly, especially the Important Safety Instructions on screen display system The remote control included eases the work of SRS Labs, Inc. Never guess or take any kind - Mis-use remote control...
Owners Guide
Page 7
... 15 Power Cord Connection 15 OPERATING INSTRUCTIONS 16 Turning Power On and Off 16 Input Switching 17 Volume Adjustment 17 Audio Mute 17 Size Switching 18 Input Signal Screen Display 18 Automatic Adjustment of Screen Position and the Clock ..19 Independent Operation of Multiple Monitors 19 Using the Menu Screen 19 PICTURE MENU 20 AUDIO MENU 21 TIMER MENU 21 FUNCTION MENU 22 SETUP MENU 23 LANGUAGE MENU 24 OTHER FEATURES 24 Automatic Store 24 Signal Check 25 Power Save Mode 25 IMAGE RETENTION OF PLASMA DISPLAY ......26 NOTES 26 TROUBLESHOOTING...
... 15 Power Cord Connection 15 OPERATING INSTRUCTIONS 16 Turning Power On and Off 16 Input Switching 17 Volume Adjustment 17 Audio Mute 17 Size Switching 18 Input Signal Screen Display 18 Automatic Adjustment of Screen Position and the Clock ..19 Independent Operation of Multiple Monitors 19 Using the Menu Screen 19 PICTURE MENU 20 AUDIO MENU 21 TIMER MENU 21 FUNCTION MENU 22 SETUP MENU 23 LANGUAGE MENU 24 OTHER FEATURES 24 Automatic Store 24 Signal Check 25 Power Save Mode 25 IMAGE RETENTION OF PLASMA DISPLAY ......26 NOTES 26 TROUBLESHOOTING...
Owners Guide
Page 8
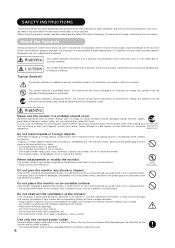
... sound, damaged casing, elements, cables, penetration of the monitor. Do not give the monitor any fixed cover. CAUTION This symbol indicates information that , if ignored, could possibly result in personal injury or physical damage due to incorrect handling. Never attempt to make repairs yourself because this product, please read these symbols are present. Use only the correct power...
... sound, damaged casing, elements, cables, penetration of the monitor. Do not give the monitor any fixed cover. CAUTION This symbol indicates information that , if ignored, could possibly result in personal injury or physical damage due to incorrect handling. Never attempt to make repairs yourself because this product, please read these symbols are present. Use only the correct power...
Owners Guide
Page 10
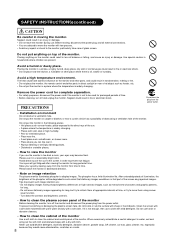
... and control panel of the screen as monochrome characters and graphic patterns, for prolonged periods of glass screen. SAFETY INSTRUCTIONS(continued) CAUTION Be careful in moving , disconnect the power plug and all external connections. • You are advised to move the monitor with two persons. • Avoid any impact or shock to the monitor; particularly take care of time. • Before cleaning, turn off...
... and control panel of the screen as monochrome characters and graphic patterns, for prolonged periods of glass screen. SAFETY INSTRUCTIONS(continued) CAUTION Be careful in moving , disconnect the power plug and all external connections. • You are advised to move the monitor with two persons. • Avoid any impact or shock to the monitor; particularly take care of time. • Before cleaning, turn off...
Owners Guide
Page 11
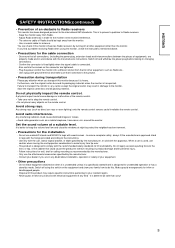
... the signal cable is to prevent a problem to your equipment. • Other precautions - Do not physically impact the remote control. Set the sound volume at night to the ground. • Precaution during transportation Please pay attention when you are tightened. - it is used, use makeshift stands and NEVER fix legs with the apparatus. Switch off all packing material. Plug the power cord of this monitor influences Radio receivers...
... the signal cable is to prevent a problem to your equipment. • Other precautions - Do not physically impact the remote control. Set the sound volume at night to the ground. • Precaution during transportation Please pay attention when you are tightened. - it is used, use makeshift stands and NEVER fix legs with the apparatus. Switch off all packing material. Plug the power cord of this monitor influences Radio receivers...
Owners Guide
Page 12
...: Plasma Display Monitor Model Number: CMP420V PW1A ( = 0 9,A Z or Blank) Home Electronics Division Located at: 900 Hitachi Way. This equipment generates, uses, and can radiate radio frequency energy and, if not installed and used with the requirements of 47CFR § §1 5.101 to 15.109. Connect the equipment into an outlet on a statistical basis as a Class B digital device. and / or CPU Boards and Power Supplies used in...
...: Plasma Display Monitor Model Number: CMP420V PW1A ( = 0 9,A Z or Blank) Home Electronics Division Located at: 900 Hitachi Way. This equipment generates, uses, and can radiate radio frequency energy and, if not installed and used with the requirements of 47CFR § §1 5.101 to 15.109. Connect the equipment into an outlet on a statistical basis as a Class B digital device. and / or CPU Boards and Power Supplies used in...
Owners Guide
Page 21
... Picture Enhancement : Off Color Temperature : Normal Color Temp.Adjust Reset Reset Select Return Exit 3. CAUTION Perform this button pressed continuously. Using the Menu Screen (On-screen display system) When the MENU button is possible only when the remote control and monitor ID nos. are the same. • The remote control can be adjusted and then use the and ADJUST buttons to - Press the OK button to display the Picture Menu screen. (Use the and SELECT buttons to display the Main Menu screen. can...
... Picture Enhancement : Off Color Temperature : Normal Color Temp.Adjust Reset Reset Select Return Exit 3. CAUTION Perform this button pressed continuously. Using the Menu Screen (On-screen display system) When the MENU button is possible only when the remote control and monitor ID nos. are the same. • The remote control can be adjusted and then use the and ADJUST buttons to - Press the OK button to display the Picture Menu screen. (Use the and SELECT buttons to display the Main Menu screen. can...
Owners Guide
Page 22
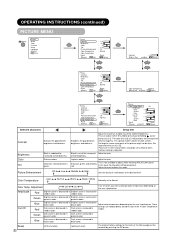
... in reddish color. These settings are independently stored in greenish color. Reset (off for most realistic skin color. Adjustment Off On Turn On when you wish to adjust when receiving PAL/SECAM signal. Dark scene is increased in reddish color. Dark scene is decreased in bluish color. greenish color. This can be clear. Enhances green and weakens red. Blue Dark scene is not available to change from white to...
... in reddish color. These settings are independently stored in greenish color. Reset (off for most realistic skin color. Adjustment Off On Turn On when you wish to adjust when receiving PAL/SECAM signal. Dark scene is increased in reddish color. Dark scene is decreased in bluish color. greenish color. This can be clear. Enhances green and weakens red. Blue Dark scene is not available to change from white to...
Owners Guide
Page 23
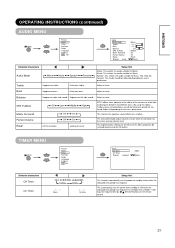
.... TIMER MENU MENU Picture Audio Timer Function Setup Language Select OK Set Timer Off Timer : 30Min. OK On Timer : --:-- Setup hint Movie: This selects the audio suitable for News, Talk show etc. Favorite: This mode should be heard. Adjust to standby status when the indicated time period has elapsed. Suppresses left-side sound. minutes Setup hint This function automatically sets the power to taste. Input the required time by pressing the OK button. Adjust to...
.... TIMER MENU MENU Picture Audio Timer Function Setup Language Select OK Set Timer Off Timer : 30Min. OK On Timer : --:-- Setup hint Movie: This selects the audio suitable for News, Talk show etc. Favorite: This mode should be heard. Adjust to standby status when the indicated time period has elapsed. Suppresses left-side sound. minutes Setup hint This function automatically sets the power to taste. Input the required time by pressing the OK button. Adjust to...
Owners Guide
Page 24
... the MENU or RETURN button on the remote control to return to Off when the monitor powered On. Off 15Min. 30Min. 120Min. 60Min. The order of setting time. Off On Setup hint This moves the picture around the screen in the Picture Menu. Optional (grayed out) Freeze Mode Optional (grayed out) Default Zoom Reset Panel Life Mode Display ID Number Inverse Standby White (off the function) (waiting to reduce the panel image retention. Set to use...
... the MENU or RETURN button on the remote control to return to Off when the monitor powered On. Off 15Min. 30Min. 120Min. 60Min. The order of setting time. Off On Setup hint This moves the picture around the screen in the Picture Menu. Optional (grayed out) Freeze Mode Optional (grayed out) Default Zoom Reset Panel Life Mode Display ID Number Inverse Standby White (off the function) (waiting to reduce the panel image retention. Set to use...
Owners Guide
Page 25
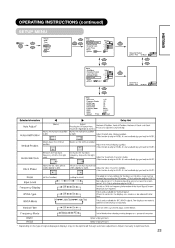
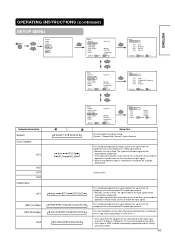
... INSTRUCTIONS (continued) SETUP MENU MENU Picture Audio Timer Function Setup Language Select OK Set Setup Auto Adjust Adjust OK Horizontal Position 0 Vertical Position + 31 Horizontal Clock - 20 Clock Phase 10 Reset Reset Select Return Exit OK Horizontal Position Next / Prev Adjust 0 Return Setup Auto Adjust Horizontal Position Vertical Position Horizontal Clock Clock Phase Reset Select Return Adjust 0 + 31 - 20 10 Reset Exit OK Clock Phase Next / Prev 10 Adjust Return Setup Input Level Frequency Display WVGA Type WXGA Mode Vertical...
... INSTRUCTIONS (continued) SETUP MENU MENU Picture Audio Timer Function Setup Language Select OK Set Setup Auto Adjust Adjust OK Horizontal Position 0 Vertical Position + 31 Horizontal Clock - 20 Clock Phase 10 Reset Reset Select Return Exit OK Horizontal Position Next / Prev Adjust 0 Return Setup Auto Adjust Horizontal Position Vertical Position Horizontal Clock Clock Phase Reset Select Return Adjust 0 + 31 - 20 10 Reset Exit OK Clock Phase Next / Prev 10 Adjust Return Setup Input Level Frequency Display WVGA Type WXGA Mode Vertical...
Owners Guide
Page 27
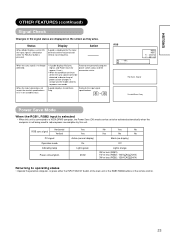
... and vertical sync frequency. Recheck the input signal specifications. Power Save Mode When the RGB1, RGB2 input is selected • When this unit. When the input signal does not match the monitor specifications or is not being used to reduce power consumption by this unit is connected to a VESA DPMS computer, the Power Save (Off) mode can be set to ON, the input signal is switched or when the RECALL button is no display) Off Lights orange...
... and vertical sync frequency. Recheck the input signal specifications. Power Save Mode When the RGB1, RGB2 input is selected • When this unit. When the input signal does not match the monitor specifications or is not being used to reduce power consumption by this unit is connected to a VESA DPMS computer, the Power Save (Off) mode can be set to ON, the input signal is switched or when the RECALL button is no display) Off Lights orange...
Owners Guide
Page 29
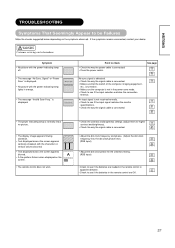
... input signal matches the monitor specifications. • Check the way the signal cable is connected. • The power indicating lamp is normally lit but no picture . • The display image appears flowing slantwise. • Text displayed across the screen appears vertically streaked, with the characters in vertical columns blurred. • Text displayed across the screen appears blurred. • A fine pattern flickers when displayed on the screen. • The remote control does not work...
... input signal matches the monitor specifications. • Check the way the signal cable is connected. • The power indicating lamp is normally lit but no picture . • The display image appears flowing slantwise. • Text displayed across the screen appears vertically streaked, with the characters in vertical columns blurred. • Text displayed across the screen appears blurred. • A fine pattern flickers when displayed on the screen. • The remote control does not work...
Owners Guide
Page 36
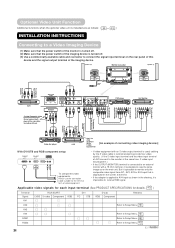
... the optional video unit is installed are as follows: ( ) INSTALLATION INSTRUCTIONS Connecting to a Video Imaging Device (1) Make sure that the power switch of the monitor is turned off. (2) Make sure that is displayed on the screen at the time. • If the adaptor is applied to AV4 input as on the rear panel of this device and the signal output terminal of the imaging device. Power cord DVD player Set-Top Box Video disc player Use if the video equipment...
... the optional video unit is installed are as follows: ( ) INSTALLATION INSTRUCTIONS Connecting to a Video Imaging Device (1) Make sure that the power switch of the monitor is turned off. (2) Make sure that is displayed on the screen at the time. • If the adaptor is applied to AV4 input as on the rear panel of this device and the signal output terminal of the imaging device. Power cord DVD player Set-Top Box Video disc player Use if the video equipment...
Owners Guide
Page 39
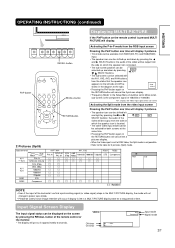
... if the input of the horizontal / vertical synchronizing signal (or video signal) stops in a MULTI PICTURE display state for 2 pictures (Split) mode. Min AV1 Composite Input mode Signal mode Activating the P-in-P mode from the RGB input screen RECALL button PinP button VOL RGB 1 RGB 2 MUTE VOL AV1 AV2 AV3 AV4 AUTO PinP SIZE RECALL RECALL button Pressing the PinP button one time will display 2 pictures. • The speaker icon can be shifted left in the MULTI PICTURE display, the mode will...
... if the input of the horizontal / vertical synchronizing signal (or video signal) stops in a MULTI PICTURE display state for 2 pictures (Split) mode. Min AV1 Composite Input mode Signal mode Activating the P-in-P mode from the RGB input screen RECALL button PinP button VOL RGB 1 RGB 2 MUTE VOL AV1 AV2 AV3 AV4 AUTO PinP SIZE RECALL RECALL button Pressing the PinP button one time will display 2 pictures. • The speaker icon can be shifted left in the MULTI PICTURE display, the mode will...

Owners Guide
Page 41
... background colors. Auto:Detects image brightness and automatically adjusts for sharper picture. Turn up to change from white to [+40] numbers will be fixed as possible. And it will be grayed out. On:Automatically detects the movie film material and faithfully reproduces the original film image. This is available only when receiving an NTSC composite/S.Video signal. Black Enhancement Adjusts the black level compensation. This monitors and adjusts the color...
... background colors. Auto:Detects image brightness and automatically adjusts for sharper picture. Turn up to change from white to [+40] numbers will be fixed as possible. And it will be grayed out. On:Automatically detects the movie film material and faithfully reproduces the original film image. This is available only when receiving an NTSC composite/S.Video signal. Black Enhancement Adjusts the black level compensation. This monitors and adjusts the color...
Owners Guide
Page 42
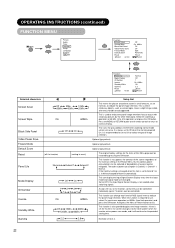
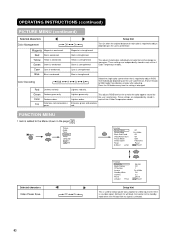
... Video Power Save Off On Function Panel Life Mode Display ID Number Inverse Standby White Gamma Reset Select Set Normal Off 1 On 60Min. Magenta is weakened. Green is strengthened. Cyan is strengthened. This adjusts R/G/B level or tint to the Menu shown in each of the 4 Color Temperature modes. These settings are independently stored in each of the 4 Color Temperature modes. Lightens colors. Lightens green only. Green Color Tint Darkens green only. Green is strengthened. MENU Picture Audio Timer Function Setup...
... Video Power Save Off On Function Panel Life Mode Display ID Number Inverse Standby White Gamma Reset Select Set Normal Off 1 On 60Min. Magenta is weakened. Green is strengthened. Cyan is strengthened. This adjusts R/G/B level or tint to the Menu shown in each of the 4 Color Temperature modes. These settings are independently stored in each of the 4 Color Temperature modes. Lightens colors. Lightens green only. Green Color Tint Darkens green only. Green is strengthened. MENU Picture Audio Timer Function Setup...
Owners Guide
Page 43
... connected to AV2 video input terminal. This step should be not available (grayed out). (Same to AV1) Auto HDTV SDTV/DVD RGB Composite/Component Auto HDTV SDTV/DVD S.Video Composite This should correspond to the signal mode of the input signal will have no effect. ENGLISH OPERATING INSTRUCTIONS (continued) SETUP MENU MENU Picture Audio Timer Function Setup Language Select OK Set Setup System System 2 OK Color System Video Input Audio Input Scart Output Monitor RGB1 DVI-STB RGB2 Component HDTV Select OK Set Return Setup Color...
... connected to AV2 video input terminal. This step should be not available (grayed out). (Same to AV1) Auto HDTV SDTV/DVD RGB Composite/Component Auto HDTV SDTV/DVD S.Video Composite This should correspond to the signal mode of the input signal will have no effect. ENGLISH OPERATING INSTRUCTIONS (continued) SETUP MENU MENU Picture Audio Timer Function Setup Language Select OK Set Setup System System 2 OK Color System Video Input Audio Input Scart Output Monitor RGB1 DVI-STB RGB2 Component HDTV Select OK Set Return Setup Color...


