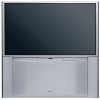

Owners Guide
Page 1
has determined that this product meets the ENERGY STAR® guidelines for 51F710, 57F710, 65F710, 51F710S, 57F710S, 65F710S IMPORTANT SAFETY INSTRUCTIONS 2-3 FIRST TIME USE ...4-19 THE REMOTE CONTROL 20-32 ON-SCREEN DISPLAY...33-64 CARE OF YOUR HITACHI TV AND REMOTE CONTROL 65 RECEPTION PROBLEMS...66 USEFUL INFORMATION ...67-70 57" / 65" DISASSEMBLY/ASSEMBLY INSTRUCTIONS 71-76 INDEX ...77 END USER LICENSE AGREEMENT FOR HITACHI DTV SOFTWARE 78-79 As an ENERGY STAR® Partner, Hitachi, Ltd. PROJECTION COLOR TV Operating Guide for energy efficiency.
has determined that this product meets the ENERGY STAR® guidelines for 51F710, 57F710, 65F710, 51F710S, 57F710S, 65F710S IMPORTANT SAFETY INSTRUCTIONS 2-3 FIRST TIME USE ...4-19 THE REMOTE CONTROL 20-32 ON-SCREEN DISPLAY...33-64 CARE OF YOUR HITACHI TV AND REMOTE CONTROL 65 RECEPTION PROBLEMS...66 USEFUL INFORMATION ...67-70 57" / 65" DISASSEMBLY/ASSEMBLY INSTRUCTIONS 71-76 INDEX ...77 END USER LICENSE AGREEMENT FOR HITACHI DTV SOFTWARE 78-79 As an ENERGY STAR® Partner, Hitachi, Ltd. PROJECTION COLOR TV Operating Guide for energy efficiency.

Owners Guide
Page 4
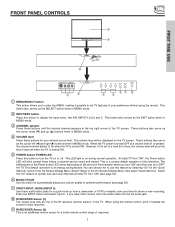
.... CAUTION: Danger of explosion if battery is capable of resulting in the battery compartment. 4. BOTTOM VIEW (Remote Control) 2. OPTIONAL TV TOP SHELF (NOT INCLUDED, ORDER SEPARATELY) Model No. Two "AA" size, 1.5V batteries (For Remote Control Unit). 3. Replace with Hitachi 51F710, 51F710S and 57F710, 57F710S. Part No. HL02071) or CLU4351UG2 (Part No. Match the batteries...
.... CAUTION: Danger of explosion if battery is capable of resulting in the battery compartment. 4. BOTTOM VIEW (Remote Control) 2. OPTIONAL TV TOP SHELF (NOT INCLUDED, ORDER SEPARATELY) Model No. Two "AA" size, 1.5V batteries (For Remote Control Unit). 3. Replace with Hitachi 51F710, 51F710S and 57F710, 57F710S. Part No. HL02071) or CLU4351UG2 (Part No. Match the batteries...
Owners Guide
Page 7
... TV features to instantly view your preference without using the remote control, point it possible to set when the TV is on the period of the TV screen....in MENU mode. ብ VOLUME level Press these audio/video jacks for a better remote control range of the Power button LED varies depending on during normal operation. Select "Setup" in the On-Screen... ቪ IR RECEIVER Sensor (2) This is an energy saving feature. This default operation is an additional remote sensor for a quick hook-up (̆) buttons when in MENU mode. This button also serves as the...
... TV features to instantly view your preference without using the remote control, point it possible to set when the TV is on the period of the TV screen....in MENU mode. ብ VOLUME level Press these audio/video jacks for a better remote control range of the Power button LED varies depending on during normal operation. Select "Setup" in the On-Screen... ቪ IR RECEIVER Sensor (2) This is an energy saving feature. This default operation is an additional remote sensor for a quick hook-up (̆) buttons when in MENU mode. This button also serves as the...

Owners Guide
Page 9
.... NOTES: 1. To ensure no copyright infringement, the MONITOR OUT output will be abnormal, when using the INPUTS button, CURSOR buttons and SELECT button of the remote control you have mono sound, insert the audio cable into the left audio jack.) NOTE: You may use composite video signal for composite video and component...
.... NOTES: 1. To ensure no copyright infringement, the MONITOR OUT output will be abnormal, when using the INPUTS button, CURSOR buttons and SELECT button of the remote control you have mono sound, insert the audio cable into the left audio jack.) NOTE: You may use composite video signal for composite video and component...

Owners Guide
Page 20
... for instructions on how to program the remote to control your set-top-box or satellite receiver, point the remote at the remote sensor of the cable box and press the CABLE (CBL) button. THE REMOTE CONTROL THE REMOTE CONTROL In addition to controlling all the functions on your HITACHI Projection TV, the new remote control is designed to operate different types...
... for instructions on how to program the remote to control your set-top-box or satellite receiver, point the remote at the remote sensor of the cable box and press the CABLE (CBL) button. THE REMOTE CONTROL THE REMOTE CONTROL In addition to controlling all the functions on your HITACHI Projection TV, the new remote control is designed to operate different types...

Owners Guide
Page 21
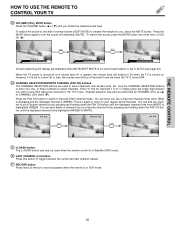
... 28). Select Day for instructions on how to set the remote control to TV mode.) ባ MODE buttons These buttons allow the remote to control your TV, VCR, DVD, Cable box/Satellite box depending on or off when the remote is in TV mode. (See page 20 for day time... viewing with room light. HOW TO USE THE REMOTE TO CONTROL YOUR TV ቢ ባ ቧ ብ ቦ ቨ ቩ ቫ ቭ ተ ቱ ቲ ታ ቤ THE REMOTE CONTROL ቢ POWER button Press this button to toggle between Day and Night picture mode...
... 28). Select Day for instructions on how to set the remote control to TV mode.) ባ MODE buttons These buttons allow the remote to control your TV, VCR, DVD, Cable box/Satellite box depending on or off when the remote is in TV mode. (See page 20 for day time... viewing with room light. HOW TO USE THE REMOTE TO CONTROL YOUR TV ቢ ባ ቧ ብ ቦ ቨ ቩ ቫ ቭ ተ ቱ ቲ ታ ቤ THE REMOTE CONTROL ቢ POWER button Press this button to toggle between Day and Night picture mode...

Owners Guide
Page 22
...15% of your total viewing time to Zoom-in once while in 16:9 aspect. (1) NTSC/480i/480P Input 4:3 INPUT 4:3 STANDARD 4:3 EXPANDED 4:3 ZOOM1 THE REMOTE CONTROL 16:9 ZOOM (2) 480i/480P Input 16:9 INPUT 4:3 STANDARD 16:9 STANDARD 4:3 EXPANDED 4:3 ZOOM2 4:3 ZOOM1 16:9 ZOOM (3) HDMI/720P/1080i Input 16:9 INPUT...picture format ASPECT ratio. Note: Use this button to preserve the original aspect ratio of the phosphors. HOW TO USE THE REMOTE TO CONTROL YOUR TV ቦ ASPECT button Press this mode for the other ANT input. However, all five video inputs have independent Aspect ...
...15% of your total viewing time to Zoom-in once while in 16:9 aspect. (1) NTSC/480i/480P Input 4:3 INPUT 4:3 STANDARD 4:3 EXPANDED 4:3 ZOOM1 THE REMOTE CONTROL 16:9 ZOOM (2) 480i/480P Input 16:9 INPUT 4:3 STANDARD 16:9 STANDARD 4:3 EXPANDED 4:3 ZOOM2 4:3 ZOOM1 16:9 ZOOM (3) HDMI/720P/1080i Input 16:9 INPUT...picture format ASPECT ratio. Note: Use this button to preserve the original aspect ratio of the phosphors. HOW TO USE THE REMOTE TO CONTROL YOUR TV ቦ ASPECT button Press this mode for the other ANT input. However, all five video inputs have independent Aspect ...

Owners Guide
Page 23
... will also cycle through the Inputs menu items. Then press the SELECT button to choose Input 1 for Video 1. Select to select. HOW TO USE THE REMOTE TO CONTROL YOUR TV ቧ INPUTS button When the remote control is in TV mode, press this button to choose Input 2 for Video 2. THE...
... will also cycle through the Inputs menu items. Then press the SELECT button to choose Input 1 for Video 1. Select to select. HOW TO USE THE REMOTE TO CONTROL YOUR TV ቧ INPUTS button When the remote control is in TV mode, press this button to choose Input 2 for Video 2. THE...

Owners Guide
Page 24
...720p Format INFO Day/Night Mode Closed Captioning Aspect Mode Day CC Off 4:3 Expanded View --:-- AM REC --:-- PM --:-- THE REMOTE CONTROL HOW TO USE THE REMOTE TO CONTROL YOUR TV ቨ PICTURE-IN-PICTURE button See separate section on pages 26-28 for numeric entries. Press this button to...CURSOR buttons toward desired direction and press the SELECT button to select. ቮ INFO button Press this button is only applicable when the remote control is set or adjusted by using the CURSOR buttons and the SELECT button, except for a description. ቩ MENU button The MENU ...
...720p Format INFO Day/Night Mode Closed Captioning Aspect Mode Day CC Off 4:3 Expanded View --:-- AM REC --:-- PM --:-- THE REMOTE CONTROL HOW TO USE THE REMOTE TO CONTROL YOUR TV ቨ PICTURE-IN-PICTURE button See separate section on pages 26-28 for numeric entries. Press this button to...CURSOR buttons toward desired direction and press the SELECT button to select. ቮ INFO button Press this button is only applicable when the remote control is set or adjusted by using the CURSOR buttons and the SELECT button, except for a description. ቩ MENU button The MENU ...
Owners Guide
Page 25
... select channels, lock access code, etc. To restore the sound, press the MUTE button one more time, or VOL Up (̆). THE REMOTE CONTROL HOW TO USE THE REMOTE TO CONTROL YOUR TV ቯ VOLUME (VOL), MUTE button Press the VOLUME button (̆ or ̄) until you wish to tune then wait a... to highlighted GREEN. Press the FAV CH button to switch to a level 30 or less, the volume level will know you are used when the remote control is in Satellite (SAT) mode. ቲ LAST CHANNEL (LC) button Press this button to toggle between the current and last channel viewed. ታ...
... select channels, lock access code, etc. To restore the sound, press the MUTE button one more time, or VOL Up (̆). THE REMOTE CONTROL HOW TO USE THE REMOTE TO CONTROL YOUR TV ቯ VOLUME (VOL), MUTE button Press the VOLUME button (̆ or ̄) until you wish to tune then wait a... to highlighted GREEN. Press the FAV CH button to switch to a level 30 or less, the volume level will know you are used when the remote control is in Satellite (SAT) mode. ቲ LAST CHANNEL (LC) button Press this button to toggle between the current and last channel viewed. ታ...
Owners Guide
Page 26
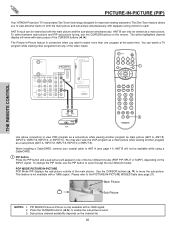
...B will not be viewed as a sub-picture (ANT A, INPUT:2, INPUT:3, INPUT:4 or INPUT:5). Sub-picture channel availability depends on the remote. RS232C 12 345 6 789 ቢ THE REMOTE CONTROL Audio Video OUTPUT VCR ባ Use above connection to move with a 1080i signal. 2. When installing a CableCARD, connect your coaxial cable ...the CURSOR buttons (̇, ̈) to cycle through the four different modes. Main Picture Sub Picture NOTES: 1. PICTURE-IN-PICTURE (PIP) Your HITACHI Projection TV incorporates Two Tuner technology designed for improved viewing enjoyment.
...B will not be viewed as a sub-picture (ANT A, INPUT:2, INPUT:3, INPUT:4 or INPUT:5). Sub-picture channel availability depends on the remote. RS232C 12 345 6 789 ቢ THE REMOTE CONTROL Audio Video OUTPUT VCR ባ Use above connection to move with a 1080i signal. 2. When installing a CableCARD, connect your coaxial cable ...the CURSOR buttons (̇, ̈) to cycle through the four different modes. Main Picture Sub Picture NOTES: 1. PICTURE-IN-PICTURE (PIP) Your HITACHI Projection TV incorporates Two Tuner technology designed for improved viewing enjoyment.

Owners Guide
Page 27
...-IN-PICTURE Surf Mode PIP automatically scans all active channels (those set in memory) and displays them as PIP sub-pictures or Thumbnail channels. THE REMOTE CONTROL PICTURE-IN-PICTURE (PIP) PIP MODE PICTURE-IN-PICTURE This feature is only available with a 1080i signal. Use the...
...-IN-PICTURE Surf Mode PIP automatically scans all active channels (those set in memory) and displays them as PIP sub-pictures or Thumbnail channels. THE REMOTE CONTROL PICTURE-IN-PICTURE (PIP) PIP MODE PICTURE-IN-PICTURE This feature is only available with a 1080i signal. Use the...

Owners Guide
Page 28
... PAUSE button to freeze three frames of the picture you are currently viewing (only the right sub-picture will freeze). Main Picture Sub Picture THE REMOTE CONTROL STROBE FREEZE Press the PAUSE button to freeze one that has many details, for freezing a picture frame with addresses. The last Freeze mode you selected...
... PAUSE button to freeze three frames of the picture you are currently viewing (only the right sub-picture will freeze). Main Picture Sub Picture THE REMOTE CONTROL STROBE FREEZE Press the PAUSE button to freeze one that has many details, for freezing a picture frame with addresses. The last Freeze mode you selected...

Owners Guide
Page 29
... you have programmed until the batteries are for pre-codes). 1. The remote control will now control your cable box. 2. THE REMOTE CONTROL USING THE REMOTE TO CONTROL CABLE BOX FUNCTIONS Operating the precoded function for your cable box. You must first program the remote to match the remote system of your cable box code has not been precoded into...
... you have programmed until the batteries are for pre-codes). 1. The remote control will now control your cable box. 2. THE REMOTE CONTROL USING THE REMOTE TO CONTROL CABLE BOX FUNCTIONS Operating the precoded function for your cable box. You must first program the remote to match the remote system of your cable box code has not been precoded into...

Owners Guide
Page 30
...-TOP-BOX/SATELLITE RECEIVER buttons These buttons transmit the chosen pre-coded set -topbox/satellite receiver. 30 SATELLITE BRAND CODES ECOSTAR 03 HITACHI 00 HUGHES 04 RCA 01 SONY 02 SET TOP BOX BRAND CODES PANASONIC 05 RCA 06 SAMSUNG 07 ZENITH 08 MY SATELLITE RECEIVER/...box/satellite receiver by setting it to set -top-box/satellite receiver. To switch to SET-TOP-BOX/SATEL- USING THE REMOTE TO CONTROL SET-TOP-BOX/SATELLITE RECEIVER FUNCTIONS THE REMOTE CONTROL Operating the precoded function for your set -top-box/satellite (STB) pre-coded mode, press and release the SAT button....
...-TOP-BOX/SATELLITE RECEIVER buttons These buttons transmit the chosen pre-coded set -topbox/satellite receiver. 30 SATELLITE BRAND CODES ECOSTAR 03 HITACHI 00 HUGHES 04 RCA 01 SONY 02 SET TOP BOX BRAND CODES PANASONIC 05 RCA 06 SAMSUNG 07 ZENITH 08 MY SATELLITE RECEIVER/...box/satellite receiver by setting it to set -top-box/satellite receiver. To switch to SET-TOP-BOX/SATEL- USING THE REMOTE TO CONTROL SET-TOP-BOX/SATELLITE RECEIVER FUNCTIONS THE REMOTE CONTROL Operating the precoded function for your set -top-box/satellite (STB) pre-coded mode, press and release the SAT button....

Owners Guide
Page 31
...10 GO VIDEO 09 HITACHI 00 KENWOOD 11 PANASONIC 02 PIONEER 03 DVD BRAND CODES RCA 04 SAMSUNG 06 SANYO 07 SONY 01 TOSHIBA 05 MY DVD PLAYER CODE IS: NOTE: Refer to 16:9 ባ widescreen. Hold down the DVD button on the remote and enter the two... transmit the chosen precoded DVD codes. ቤ EXCLUSIVE TV Buttons These buttons are removed from the remote control. The remote will now control your DVD player. When this occurs, the remote control is entered. The remote will turn off your DVD player. You will remember the codes you have programmed until the batteries...
...10 GO VIDEO 09 HITACHI 00 KENWOOD 11 PANASONIC 02 PIONEER 03 DVD BRAND CODES RCA 04 SAMSUNG 06 SANYO 07 SONY 01 TOSHIBA 05 MY DVD PLAYER CODE IS: NOTE: Refer to 16:9 ባ widescreen. Hold down the DVD button on the remote and enter the two... transmit the chosen precoded DVD codes. ቤ EXCLUSIVE TV Buttons These buttons are removed from the remote control. The remote will now control your DVD player. When this occurs, the remote control is entered. The remote will turn off your DVD player. You will remember the codes you have programmed until the batteries...

Owners Guide
Page 32
... shown below for ባ your VCR, as stated above. 4. VCR BRAND CODES EMERSON 20, 21, 22, 23 ,24 FISHER 34, 37, 38, 39 HITACHI 00, 01, 02, 03, 04, 05, 06 JVC 49, 50, 51 MAGNAVOX 12, 13 MITSUBISHI 27, 28, 29, 30 VCR BRAND CODES NEC 40...These buttons transmit the chosen precoded VCR codes. ቤ EXCLUSIVE TV Buttons These buttons are removed from the remote control. Aim the remote at the front of your VCR (refer below . The remote control will now control your VCR. Press the Record button twice to record. ባ ቢ VCR button This button allows ...
... shown below for ባ your VCR, as stated above. 4. VCR BRAND CODES EMERSON 20, 21, 22, 23 ,24 FISHER 34, 37, 38, 39 HITACHI 00, 01, 02, 03, 04, 05, 06 JVC 49, 50, 51 MAGNAVOX 12, 13 MITSUBISHI 27, 28, 29, 30 VCR BRAND CODES NEC 40...These buttons transmit the chosen precoded VCR codes. ቤ EXCLUSIVE TV Buttons These buttons are removed from the remote control. Aim the remote at the front of your VCR (refer below . The remote control will now control your VCR. Press the Record button twice to record. ባ ቢ VCR button This button allows ...

Owners Guide
Page 33
Press the CURSOR buttons to select. 3. ON-SCREEN DISPLAY 33 Press MENU on the remote control to display the different features on the remote control to use. Press EXIT on your HITACHI Projection TV. 2. Video Audio Aspect Chan. Press the SELECT button to navigate and highlight a different feature of the On-Screen Display menu. This part of the screen shows which selections are available. ON-SCREEN DISPLAY (OSD) 1. Manager Locks Timers Setup Move SEL Sel This part of the screen shows which Remote Control buttons to quickly exit from a menu.
Press the CURSOR buttons to select. 3. ON-SCREEN DISPLAY 33 Press MENU on the remote control to display the different features on the remote control to use. Press EXIT on your HITACHI Projection TV. 2. Video Audio Aspect Chan. Press the SELECT button to navigate and highlight a different feature of the On-Screen Display menu. This part of the screen shows which selections are available. ON-SCREEN DISPLAY (OSD) 1. Manager Locks Timers Setup Move SEL Sel This part of the screen shows which Remote Control buttons to quickly exit from a menu.

Owners Guide
Page 53
... was made after the On Timer has been activated, the Off Timer will automatically turn off when you can not use your television with the remote control. If no channel selection was turned on the screen will appear. Event 2 --:-- AM --:-- Event 2 --:-- AM --:-- AM --:-- Use the CURSOR button &#...;, ̄ or NUMBER buttons to set , you are away from home by the On Timer and no remote control button is pressed after 3 seconds, then the screen automatically goes to control your TV as a deterrent when away from home. 53 ON-SCREEN DISPLAY When the INFO button is not ...
... was made after the On Timer has been activated, the Off Timer will automatically turn off when you can not use your television with the remote control. If no channel selection was turned on the screen will appear. Event 2 --:-- AM --:-- Event 2 --:-- AM --:-- AM --:-- Use the CURSOR button &#...;, ̄ or NUMBER buttons to set , you are away from home by the On Timer and no remote control button is pressed after 3 seconds, then the screen automatically goes to control your TV as a deterrent when away from home. 53 ON-SCREEN DISPLAY When the INFO button is not ...
Owners Guide
Page 56
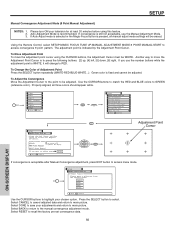
... repeatedly (WHITE-RED-BLUE-WHITE...). If you want to adjust now Start Move SEL Return Adjustment Point Cursor If convergence is to RED. Using the Remote Control, select SETUP-MAGIC FOCUS TUNE UP-MANUAL ADJUSTMENT MODE-9 POINT MANUAL-START to recall the factory pre-set convergence data. 56 ON-SCREEN DISPLAY SETUP...
... repeatedly (WHITE-RED-BLUE-WHITE...). If you want to adjust now Start Move SEL Return Adjustment Point Cursor If convergence is to RED. Using the Remote Control, select SETUP-MAGIC FOCUS TUNE UP-MANUAL ADJUSTMENT MODE-9 POINT MANUAL-START to recall the factory pre-set convergence data. 56 ON-SCREEN DISPLAY SETUP...


