
Owners Guide
Page 2
... SHOCK, DO NOT USE THE TELEVISION'S (POLARIZED) PLUG WITH AN EXTENSION CORD, RECEPTACLE, OR OTHER OUTLET UNLESS THE BLADES AND GROUND TERMINAL CAN BE FULLY INSERTED TO PREVENT BLADE EXPOSURE. CAUTION: Never remove the back cover of important operating and maintenance (servicing) instructions in your HITACHI television. IMPORTANT SAFETY INSTRUCTIONS SAFETY POINTS YOU SHOULD KNOW ABOUT YOUR HITACHI LCD REAR PROJECTION TELEVISION Our reputation has been...
... SHOCK, DO NOT USE THE TELEVISION'S (POLARIZED) PLUG WITH AN EXTENSION CORD, RECEPTACLE, OR OTHER OUTLET UNLESS THE BLADES AND GROUND TERMINAL CAN BE FULLY INSERTED TO PREVENT BLADE EXPOSURE. CAUTION: Never remove the back cover of important operating and maintenance (servicing) instructions in your HITACHI television. IMPORTANT SAFETY INSTRUCTIONS SAFETY POINTS YOU SHOULD KNOW ABOUT YOUR HITACHI LCD REAR PROJECTION TELEVISION Our reputation has been...
Owners Guide
Page 3
... qualified service personnel. IMPORTANT SAFETY INSTRUCTIONS Read before operating equipment Follow all warnings and instructions marked on the top of the television which could cause the product to overturn resulting in wire to an antenna discharge unit, size of grounding connectors, location of antenna-discharge unit, connection to grounding electrodes and requirements for the grounding electrode. Do not use this television. 1. A grounding...
... qualified service personnel. IMPORTANT SAFETY INSTRUCTIONS Read before operating equipment Follow all warnings and instructions marked on the top of the television which could cause the product to overturn resulting in wire to an antenna discharge unit, size of grounding connectors, location of antenna-discharge unit, connection to grounding electrodes and requirements for the grounding electrode. Do not use this television. 1. A grounding...
Owners Guide
Page 4
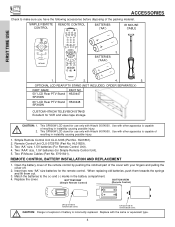
... (Part No. BOTTOM VIEW (Simple Remote Control) BOTTOM VIEW (Remote Control) Lift up on tab to remove back cover. Replace with Hitachi 50VX500. Use with your fingers and pulling the cover off. 2. EY01641). ANT 0 INFO A/V NET ASPECT VIDEO MENU EXIT VOL SELECT CH MUTE LAST CH VID1 VID2 PIP VID3 SURF VID5 VID4 FREEZE PIP MODE PIP ACCESS SWAP DAY/NIGHT BATTERIES ("AA") IR MOUSE CABLE 3. REMOTE CONTROL BATTERY INSTALLATION AND REPLACEMENT 1. MENU EXIT FAV CH ANT POWER REMOTE CONTROL POWER TV DVD...
... (Part No. BOTTOM VIEW (Simple Remote Control) BOTTOM VIEW (Remote Control) Lift up on tab to remove back cover. Replace with Hitachi 50VX500. Use with your fingers and pulling the cover off. 2. EY01641). ANT 0 INFO A/V NET ASPECT VIDEO MENU EXIT VOL SELECT CH MUTE LAST CH VID1 VID2 PIP VID3 SURF VID5 VID4 FREEZE PIP MODE PIP ACCESS SWAP DAY/NIGHT BATTERIES ("AA") IR MOUSE CABLE 3. REMOTE CONTROL BATTERY INSTALLATION AND REPLACEMENT 1. MENU EXIT FAV CH ANT POWER REMOTE CONTROL POWER TV DVD...
Owners Guide
Page 5
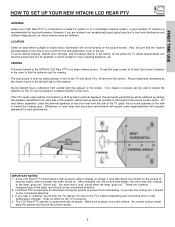
... for the picture to become excessively hot, for example, in an exceptionally good signal area that the location selected allows a free flow of air to and from the side of the TV, place the surround speakers to the side or behind the viewing area. FIRST TIME USE HOW TO SET UP YOUR NEW HITACHI LCD REAR PTV ANTENNA Unless your LCD Rear PTV is connected to a cable TV system...
... for the picture to become excessively hot, for example, in an exceptionally good signal area that the location selected allows a free flow of air to and from the side of the TV, place the surround speakers to the side or behind the viewing area. FIRST TIME USE HOW TO SET UP YOUR NEW HITACHI LCD REAR PTV ANTENNA Unless your LCD Rear PTV is connected to a cable TV system...

Owners Guide
Page 8
... Hitachi LCD Rear Projection Television may take about 2 minutes to input 1 ~ input 5 and the video signal is not assembled securely after the power has been turned on the TV's functions. 8 If this indicator is set to cool down . Please call service. ቭ LAMP indicator - IMPORTANT NOTES: 1. POWER TEMP LAMP 3. Please make sure the Blue Power light indicator is not lit (OFF) when you hear a "cracking" sound from the TV cabinet, it is blinking, the cooling fan has...
... Hitachi LCD Rear Projection Television may take about 2 minutes to input 1 ~ input 5 and the video signal is not assembled securely after the power has been turned on the TV's functions. 8 If this indicator is set to cool down . Please call service. ቭ LAMP indicator - IMPORTANT NOTES: 1. POWER TEMP LAMP 3. Please make sure the Blue Power light indicator is not lit (OFF) when you hear a "cracking" sound from the TV cabinet, it is blinking, the cooling fan has...
Owners Guide
Page 13
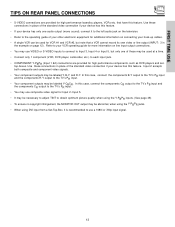
... audio output (mono sound), connect it is recommended to use composite video signal for Input 2~Input 5. • It may be necessary to adjust TINT to obtain optimum picture quality when using DVI input from a Set-Top-Box, it to the left audio jack on the television. • Refer to each input jack. • COMPONENT: Y-PBPR (Input 1 &2) connections are provided for high performance laserdisc players, VCRs etc. FIRST TIME USE TIPS ON REAR PANEL CONNECTIONS • S-VIDEO connections are provided for high...
... audio output (mono sound), connect it is recommended to use composite video signal for Input 2~Input 5. • It may be necessary to adjust TINT to obtain optimum picture quality when using DVI input from a Set-Top-Box, it to the left audio jack on the television. • Refer to each input jack. • COMPONENT: Y-PBPR (Input 1 &2) connections are provided for high performance laserdisc players, VCRs etc. FIRST TIME USE TIPS ON REAR PANEL CONNECTIONS • S-VIDEO connections are provided for high...

Owners Guide
Page 15
... button is dependent on the TV set is pressed as shown on the model and features of each component for the location of video and audio inputs and outputs. NOTE: 1. For best performance, video and audio cables should be OFF. 2. The VIDEO OSD label disappears automatically after approximately four seconds. 4. Check the owner's manual of components and features. However, you use to connect the VCR, camcorder, laserdisc player, DVD player, or HDTV Set Top Box...
... button is dependent on the TV set is pressed as shown on the model and features of each component for the location of video and audio inputs and outputs. NOTE: 1. For best performance, video and audio cables should be OFF. 2. The VIDEO OSD label disappears automatically after approximately four seconds. 4. Check the owner's manual of components and features. However, you use to connect the VCR, camcorder, laserdisc player, DVD player, or HDTV Set Top Box...
Owners Guide
Page 18
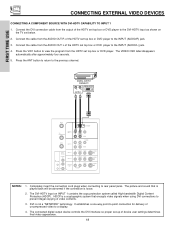
... AUDIO AUDIO TO HI-FI CENTER IN IR BLASTER L R INPUT 3 INPUT 4 MONITOR OUT R (MONO)/L VIDEO R (MONO)/L VIDEO R L VIDEO AUDIO S-VIDEO S-VIDEO S-VIDEO NOTES: 1. FIRST TIME USE CONNECTING EXTERNAL VIDEO DEVICES CONNECTING A COMPONENT SOURCE WITH DVI-HDTV CAPABILITY TO INPUT 1 1. Connect the cable from the output of the HDTV set top box or DVD player to the DVI-HDTV input as shown on INPUT 1 contains the copy protection system called High-bandwidth Digital Content Protection (HDCP). The picture and sound that encrypts video signals when using DVI connections to rear panel jacks...
... AUDIO AUDIO TO HI-FI CENTER IN IR BLASTER L R INPUT 3 INPUT 4 MONITOR OUT R (MONO)/L VIDEO R (MONO)/L VIDEO R L VIDEO AUDIO S-VIDEO S-VIDEO S-VIDEO NOTES: 1. FIRST TIME USE CONNECTING EXTERNAL VIDEO DEVICES CONNECTING A COMPONENT SOURCE WITH DVI-HDTV CAPABILITY TO INPUT 1 1. Connect the cable from the output of the HDTV set top box or DVD player to the DVI-HDTV input as shown on INPUT 1 contains the copy protection system called High-bandwidth Digital Content Protection (HDCP). The picture and sound that encrypts video signals when using DVI connections to rear panel jacks...
Owners Guide
Page 19
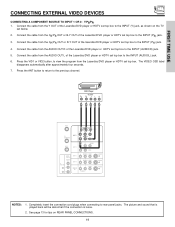
... or VID2 button, to the previous channel. Press the ANT button to return to view the program from the AUDIO OUT R of the laserdisc/DVD player or HDTV set top box to the INPUT (AUDIO/R) jack. 5. DVD Player OUTPUT PR PB Y L R ANT A TO CONVERTER INPUT 1 PR PB DVI-HDTV R (MONO)/L AUDIO ANT B INPUT 2 PR PB Y/VIDEO RR (MONO)/L AUDIO AUDIO TO HI-FI CENTER IN IR BLASTER L R INPUT 3 INPUT 4 MONITOR OUT R (MONO)/L VIDEO R (MONO)/L VIDEO R L VIDEO AUDIO S-VIDEO S-VIDEO S-VIDEO NOTES: 1. The picture and sound that is...
... or VID2 button, to the previous channel. Press the ANT button to return to view the program from the AUDIO OUT R of the laserdisc/DVD player or HDTV set top box to the INPUT (AUDIO/R) jack. 5. DVD Player OUTPUT PR PB Y L R ANT A TO CONVERTER INPUT 1 PR PB DVI-HDTV R (MONO)/L AUDIO ANT B INPUT 2 PR PB Y/VIDEO RR (MONO)/L AUDIO AUDIO TO HI-FI CENTER IN IR BLASTER L R INPUT 3 INPUT 4 MONITOR OUT R (MONO)/L VIDEO R (MONO)/L VIDEO R L VIDEO AUDIO S-VIDEO S-VIDEO S-VIDEO NOTES: 1. The picture and sound that is...
Owners Guide
Page 23
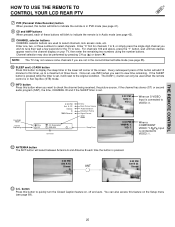
... ASPECT VIDEO MENU EXIT ቢ These buttons allow the remote to control your TV, VCR, cable box, satellite receiver, DVD player, or other audio equipment with one area. To operate your set-top-box or satellite receiver point the remote at the remote sensor of the PVR and press the PVR button. The DVD button will blink, indicating that the remote will stay on for instructions on how to program the remote to control your cable box). To operate your cable box, point...
... ASPECT VIDEO MENU EXIT ቢ These buttons allow the remote to control your TV, VCR, cable box, satellite receiver, DVD player, or other audio equipment with one area. To operate your set-top-box or satellite receiver point the remote at the remote sensor of the PVR and press the PVR button. The DVD button will blink, indicating that the remote will stay on for instructions on how to program the remote to control your cable box). To operate your cable box, point...
Owners Guide
Page 25
... to view time remaining. Once set , it will reset to select channels. Time Main Picture Source Audio Broadcast Broadcast Rating Signal Format Wide Mode Sleep Timer 3:32 PM S-IN: 3 VID 3 When an S-VIDEO Input is connected to VIDEO: 3. 3:32 PM YPBPR: 1 VID: 1 When a COMPONENT VIDEO: Y-PBPR Input is connected to quickly turn the Closed Caption feature on your TV, then enter the remaining two numbers using the number buttons. button Press this button to VIDEO: 1. ቮ ANTENNA button The ANT button will...
... to view time remaining. Once set , it will reset to select channels. Time Main Picture Source Audio Broadcast Broadcast Rating Signal Format Wide Mode Sleep Timer 3:32 PM S-IN: 3 VID 3 When an S-VIDEO Input is connected to VIDEO: 3. 3:32 PM YPBPR: 1 VID: 1 When a COMPONENT VIDEO: Y-PBPR Input is connected to quickly turn the Closed Caption feature on your TV, then enter the remaining two numbers using the number buttons. button Press this button to VIDEO: 1. ቮ ANTENNA button The ANT button will...
Owners Guide
Page 29
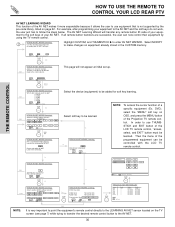
... the LCD Rear PTV's remote control. MENU INFO GUIDE THUMB STICK Set Top Box Custom SETUP Move INFO Device Setting THUMB STICK THUMB STICK HITACHI AV NET WIZARD (Learning) Use this wizard to control the cursor of the LCD Rear PTV's remote control is available to manually learn or modify your AV NET soft keys. PV Recorder), select the "MENU" soft key on OSD, and press the MENU button of a specific equipment...
... the LCD Rear PTV's remote control. MENU INFO GUIDE THUMB STICK Set Top Box Custom SETUP Move INFO Device Setting THUMB STICK THUMB STICK HITACHI AV NET WIZARD (Learning) Use this wizard to control the cursor of the LCD Rear PTV's remote control is available to manually learn or modify your AV NET soft keys. PV Recorder), select the "MENU" soft key on OSD, and press the MENU button of a specific equipment...
Owners Guide
Page 30
... the LCD TV remote control. Set Top Box DVD2 POWER MENU BACK Continue Transfer was successfull Press OK to make changes on the TV screen (see page 7) while trying to transfer the desired remote control button to be learned. If all remote button transfers are successful, the user can be learned. HITACHI AV NET WIZARD (Learning) C Use this wizard to the soft keys of your equipment to manually learn ? Yes HITACHI...
... the LCD TV remote control. Set Top Box DVD2 POWER MENU BACK Continue Transfer was successfull Press OK to make changes on the TV screen (see page 7) while trying to transfer the desired remote control button to be learned. If all remote button transfers are successful, the user can be learned. HITACHI AV NET WIZARD (Learning) C Use this wizard to the soft keys of your equipment to manually learn ? Yes HITACHI...

Owners Guide
Page 34
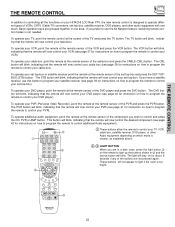
THE REMOTE CONTROL PICTURE-IN-PICTURE (PIP) Your HITACHI LCD Rear PTV incorporates dual tuner technology designed for each. Ant B can be viewed as a main picture. The green highlighted channel display will move with every press of the PIP mode. ANT A TO CONVERTER ANT B INPUT 1 INPUT 2 DVI-HDTV PR PB Y R (MONO)/L AUDIO PR PB Y/VIDEO R (MONO)/L AUDIO AUDIO TO HI-FI CENTER IN IR BLASTER L R INPUT 3 INPUT 4 MONITOR OUT R (MONO)/L VIDEO R (MONO)/L VIDEO R L VIDEO AUDIO S-VIDEO S-VIDEO S-VIDEO MENU EXIT VOL SELECT CH ቤ ቢ ቤ MUTE...
THE REMOTE CONTROL PICTURE-IN-PICTURE (PIP) Your HITACHI LCD Rear PTV incorporates dual tuner technology designed for each. Ant B can be viewed as a main picture. The green highlighted channel display will move with every press of the PIP mode. ANT A TO CONVERTER ANT B INPUT 1 INPUT 2 DVI-HDTV PR PB Y R (MONO)/L AUDIO PR PB Y/VIDEO R (MONO)/L AUDIO AUDIO TO HI-FI CENTER IN IR BLASTER L R INPUT 3 INPUT 4 MONITOR OUT R (MONO)/L VIDEO R (MONO)/L VIDEO R L VIDEO AUDIO S-VIDEO S-VIDEO S-VIDEO MENU EXIT VOL SELECT CH ቤ ቢ ቤ MUTE...
Owners Guide
Page 39
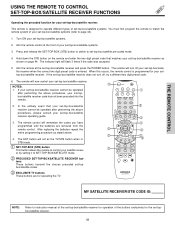
... ASPECT VIDEO MENU EXIT ቤ ባ VOL SELECT CH MUTE LAST CH VID1 VID2 PIP VID3 SURF VID5 VID4 FREEZE PIP MODE PIP ACCESS SWAP DAY/NIGHT ባ ቤ ቤ REC CLU-5729TSI MY SATELLITE RECEIVER/STB CODE IS: NOTE: Refer to SET-TOP-BOX/SATELLITE mode. ባ PRECODED SET-TOP-BOX/SATELLITE RECEIVER but- The remote will flash 3 times if the code was accepted. 5. The indicator light will now control your settop-box...
... ASPECT VIDEO MENU EXIT ቤ ባ VOL SELECT CH MUTE LAST CH VID1 VID2 PIP VID3 SURF VID5 VID4 FREEZE PIP MODE PIP ACCESS SWAP DAY/NIGHT ባ ቤ ቤ REC CLU-5729TSI MY SATELLITE RECEIVER/STB CODE IS: NOTE: Refer to SET-TOP-BOX/SATELLITE mode. ባ PRECODED SET-TOP-BOX/SATELLITE RECEIVER but- The remote will flash 3 times if the code was accepted. 5. The indicator light will now control your settop-box...
Owners Guide
Page 46
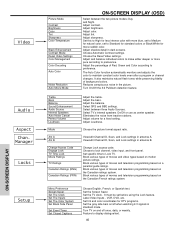
... Inputs Set The Color System Set Black Side Panel Set Event Timer Set Closed Captions Choose English, French, or Spanish text. Manager Locks Setup Picture Mode Contrast Brightness Color Tint Sharpness Color Temperature Black Enhancement Contrast Mode Reset Video Settings Color Management Color Decoding Auto Color Noise Reduction Auto Movie Mode ON-SCREEN DISPLAY (OSD) Select between three Audio Sources. Choose the Reset Video settings. Adjust the balance. Choose to display dialogue/text. 46 Adjust shadow detail in the picture. Ant A Ant B View/edit Channel ID, Scan, and Lock...
... Inputs Set The Color System Set Black Side Panel Set Event Timer Set Closed Captions Choose English, French, or Spanish text. Manager Locks Setup Picture Mode Contrast Brightness Color Tint Sharpness Color Temperature Black Enhancement Contrast Mode Reset Video Settings Color Management Color Decoding Auto Color Noise Reduction Auto Movie Mode ON-SCREEN DISPLAY (OSD) Select between three Audio Sources. Choose the Reset Video settings. Adjust the balance. Choose to display dialogue/text. 46 Adjust shadow detail in the picture. Ant A Ant B View/edit Channel ID, Scan, and Lock...
Owners Guide
Page 49
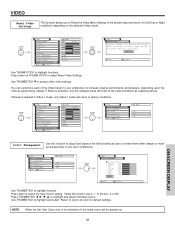
VIDEO Reset Video Settings This function allows you to Reset the Video Menu Settings of the Video Inputs to your preference to increase viewing performance and pleasure, depending upon the video program being viewed. Use THUMBSTICK ̄ to highlight function. Video Color Management Color Decoding Auto Color Noise Reduction Auto Movie Mode Move SEL Select ANT A/B Off Low Off THUMB STICK Video Color Management Set User Colors Magenta 50% Red 50% Yellow 50% Green 50% Cyan 50% Blue 50% Reset Move SEL Select Use THUMBSTICK...
VIDEO Reset Video Settings This function allows you to Reset the Video Menu Settings of the Video Inputs to your preference to increase viewing performance and pleasure, depending upon the video program being viewed. Use THUMBSTICK ̄ to highlight function. Video Color Management Color Decoding Auto Color Noise Reduction Auto Movie Mode Move SEL Select ANT A/B Off Low Off THUMB STICK Video Color Management Set User Colors Magenta 50% Red 50% Yellow 50% Green 50% Cyan 50% Blue 50% Reset Move SEL Select Use THUMBSTICK...
Owners Guide
Page 58
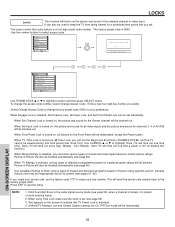
... (TV will time out one time only), Daily (TV will reset the secret code number back to quit the menu. Text appears on (❒✔ Time Lock) you feel may be inappropriate due to change the access code number, select Change Access Code. To change factory preset code (0000) to enter the Locks feature is turned on both antenna inputs. 2. When Front Panel Lock is locked on , the picture and sound for the chosen channel will be deactivated. 58 ON-SCREEN DISPLAY...
... (TV will time out one time only), Daily (TV will reset the secret code number back to quit the menu. Text appears on (❒✔ Time Lock) you feel may be inappropriate due to change the access code number, select Change Access Code. To change factory preset code (0000) to enter the Locks feature is turned on both antenna inputs. 2. When Front Panel Lock is locked on , the picture and sound for the chosen channel will be deactivated. 58 ON-SCREEN DISPLAY...

Owners Guide
Page 70
... product contains Mercury. TYPE NAME: LP500 PART NUMBER: UX21511 • When replacing the lamp, let it may cause damage to cool for the lamp to replace the lamp assembly. • If the lamp is removed, do not put any foreign objects inside the lamp. • Once the lamp is in use , if the TV picture turns dark, the color looks unusual or LAMP INDICATOR light turns on and off and A.C. For Recycling...
... product contains Mercury. TYPE NAME: LP500 PART NUMBER: UX21511 • When replacing the lamp, let it may cause damage to cool for the lamp to replace the lamp assembly. • If the lamp is removed, do not put any foreign objects inside the lamp. • Once the lamp is in use , if the TV picture turns dark, the color looks unusual or LAMP INDICATOR light turns on and off and A.C. For Recycling...
Owners Guide
Page 81
... Locks Change Access Code, 58 Channel Lock, 58 Input Lock, 58 Front Panel Lock, 58 TV Time Lock, 58 Movie Ratings, 59 TV Ratings, 60 TV Ratings (Canadian - English), 61 TV Ratings (Canadian - French), 62 Loudness, 51 M Menu Preference Language, 63 Background, 64 Monitor Out, 10 N Noise Reduction, 50 P Power Button, 8 Power Indicator, 8 Perfect Volume, 51 Photo MC Photo MC Indicator, 8 Photo MC Usage, 27~28 Picture Mode, 47 Picture-in-Picture (PIP), 34 - 36 Picture-outside-Picture (POP), 36 R Remote Control Functions...
... Locks Change Access Code, 58 Channel Lock, 58 Input Lock, 58 Front Panel Lock, 58 TV Time Lock, 58 Movie Ratings, 59 TV Ratings, 60 TV Ratings (Canadian - English), 61 TV Ratings (Canadian - French), 62 Loudness, 51 M Menu Preference Language, 63 Background, 64 Monitor Out, 10 N Noise Reduction, 50 P Power Button, 8 Power Indicator, 8 Perfect Volume, 51 Photo MC Photo MC Indicator, 8 Photo MC Usage, 27~28 Picture Mode, 47 Picture-in-Picture (PIP), 34 - 36 Picture-outside-Picture (POP), 36 R Remote Control Functions...


