Owners Guide
Page 20
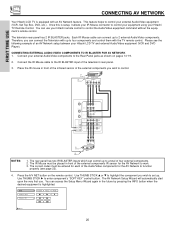
...button when the desired equipment is equipped with an AV Network feature. FIRST TIME USE CONNECTING AV NETWORK Your Hitachi LCD TV is highlighted. You can connect the Television with the TV remote control. Therefore, you can use . Connect the IR Mouse cable to the IR BLASTER input of the external...to function properly (see the following example of four external components. 2. The correct codes must be entered for each of the Audio/Video components for the AV Network to the Rear Panel jacks as shown on the remote control. Press the A/V NET button on pages 14~19. 2. The AV Network...
...button when the desired equipment is equipped with an AV Network feature. FIRST TIME USE CONNECTING AV NETWORK Your Hitachi LCD TV is highlighted. You can connect the Television with the TV remote control. Therefore, you can use . Connect the IR Mouse cable to the IR BLASTER input of the external...to function properly (see the following example of four external components. 2. The correct codes must be entered for each of the Audio/Video components for the AV Network to the Rear Panel jacks as shown on the remote control. Press the A/V NET button on pages 14~19. 2. The AV Network...
Owners Guide
Page 21
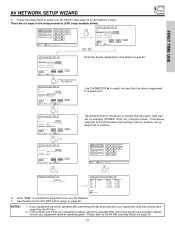
... Device DVD VCR CBL STB PVR AVR Custom Code 0672 Video INPUT 1 Not Setup Not Setup Not Setup Not Setup Not Setup Not Setup Audio Using TV Not Setup Not Setup Not Setup Not Setup Not Setup Not Setup EXIT SEL Select 6. See Remote Control A/V NET button usage on page 22....receiver operating guide. There are six steps in the setup procedure (DVD setup example below to . HITACHI AV NET SET UP DVD Device Code Video Input Audio Input 0 6 7 2 (Enter code "9999" to uninstall) Input 1 Using TV Transmission Test BACK POWER OK PLAY EXIT Move Set Input SEL Select THUMB STICK (x2) CH UP...
... Device DVD VCR CBL STB PVR AVR Custom Code 0672 Video INPUT 1 Not Setup Not Setup Not Setup Not Setup Not Setup Not Setup Audio Using TV Not Setup Not Setup Not Setup Not Setup Not Setup Not Setup EXIT SEL Select 6. See Remote Control A/V NET button usage on page 22....receiver operating guide. There are six steps in the setup procedure (DVD setup example below to . HITACHI AV NET SET UP DVD Device Code Video Input Audio Input 0 6 7 2 (Enter code "9999" to uninstall) Input 1 Using TV Transmission Test BACK POWER OK PLAY EXIT Move Set Input SEL Select THUMB STICK (x2) CH UP...
Owners Guide
Page 25
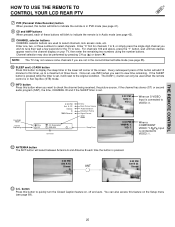
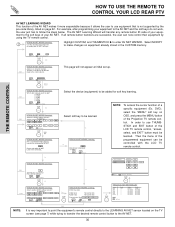
... "0" first for channels 1 to 9, or simply press the single digit channel you want to view time remaining. NOTE: The TV may also be used to select channels, lock access code, etc. Once set , it will reset to the original condition. Every subsequent press of the screen. Day/Night Mode Closed ... the sleep timer in the lower left corner of this button will add 15 minutes to this timer, up (̆) or down (̄). THE REMOTE CONTROL HOW TO USE THE REMOTE TO CONTROL YOUR LCD REAR PTV ቨ PVR (Personal Video Recorder) button When pressed, this button will blink to indicate the...
... "0" first for channels 1 to 9, or simply press the single digit channel you want to view time remaining. NOTE: The TV may also be used to select channels, lock access code, etc. Once set , it will reset to the original condition. Every subsequent press of the screen. Day/Night Mode Closed ... the sleep timer in the lower left corner of this button will add 15 minutes to this timer, up (̆) or down (̄). THE REMOTE CONTROL HOW TO USE THE REMOTE TO CONTROL YOUR LCD REAR PTV ቨ PVR (Personal Video Recorder) button When pressed, this button will blink to indicate the...
Owners Guide
Page 30
...HITACHI AV NET WIZARD (Learning) No Transfer not completed! Then the menu of the programmed equipment can now control their equipment by the pre-code library, listed on OSD, and press the MENU button of a specific equipment (Ex. HOW TO USE THE REMOTE TO CONTROL YOUR LCD REAR PTV THE REMOTE...enter AV NET WIZARD. This page will BACK replace the current device. NO Move YES SEL Select NOTE: To access the cursor function of the Projection TV remote control. For example, after programming your equipment to the AV NET and the soft keys do you want to add? (•) DVD2 ( ...
...HITACHI AV NET WIZARD (Learning) No Transfer not completed! Then the menu of the programmed equipment can now control their equipment by the pre-code library, listed on OSD, and press the MENU button of a specific equipment (Ex. HOW TO USE THE REMOTE TO CONTROL YOUR LCD REAR PTV THE REMOTE...enter AV NET WIZARD. This page will BACK replace the current device. NO Move YES SEL Select NOTE: To access the cursor function of the Projection TV remote control. For example, after programming your equipment to the AV NET and the soft keys do you want to add? (•) DVD2 ( ...
Owners Guide
Page 37
...to switch to page 44 for operating the TV. ባ ባ ቤ POWER TV DVD VCR CBL SOURCE WIZARD CD PVR STB AMP 1 2 3 ቢ 4 5 6 ባ 7 8 9 SLEEP C.C. The indicator light will remember the codes you must first program the remote to instruction manual of the VCR for ...performing the above procedures, please consult your VCR operating guide. 3. Turn ON your VCR's code has not been precoded into the remote. 2. Aim the remote at the front of the buttons exclusively for HITACHI VCRs. 5. NOTES: 1. In the unlikely event that matches your VCR, as your VCR...
...to switch to page 44 for operating the TV. ባ ባ ቤ POWER TV DVD VCR CBL SOURCE WIZARD CD PVR STB AMP 1 2 3 ቢ 4 5 6 ባ 7 8 9 SLEEP C.C. The indicator light will remember the codes you must first program the remote to instruction manual of the VCR for ...performing the above procedures, please consult your VCR operating guide. 3. Turn ON your VCR's code has not been precoded into the remote. 2. Aim the remote at the front of the buttons exclusively for HITACHI VCRs. 5. NOTES: 1. In the unlikely event that matches your VCR, as your VCR...

Owners Guide
Page 38
...buttons These buttons transmit the chosen precoded cable codes. ቤ EXCLUSIVE TV buttons These buttons are removed from the remote control. After replacing the batteries repeat the entire programming procedure as your cable box code has not been precoded into the remote. 2. Turn ON your cable box. In ... off , try a different two digit preset code. 6. If your cable box when the correct two digit preset code is programmed for operating the TV. Aim the remote control at the cable box and press the POWER button. The remote will turn off your cable box cannot be ...
...buttons These buttons transmit the chosen precoded cable codes. ቤ EXCLUSIVE TV buttons These buttons are removed from the remote control. After replacing the batteries repeat the entire programming procedure as your cable box code has not been precoded into the remote. 2. Turn ON your cable box. In ... off , try a different two digit preset code. 6. If your cable box when the correct two digit preset code is programmed for operating the TV. Aim the remote control at the cable box and press the POWER button. The remote will turn off your cable box cannot be ...
Owners Guide
Page 39
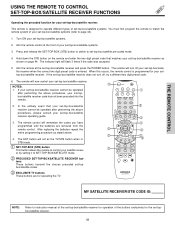
...set-top-box/satellite receiver. NOTES: 1. tons These buttons transmit the chosen precoded set-topbox/satellite codes. ቤ EXCLUSIVE TV buttons These buttons are removed from the remote control. The indicator light will now control your set-top-box/satellite systems. 2. The ANT ... ባ 7 8 9 SLEEP C.C. Hold down the STB button on the remote and enter the two digit preset code that your set-top-box/satellite receiver cannot be operated after performing the above . 4. The remote control will act as the TV/STB button when in STB mode. ቢ SET-TOP-BOX (STB) button...
...set-top-box/satellite receiver. NOTES: 1. tons These buttons transmit the chosen precoded set-topbox/satellite codes. ቤ EXCLUSIVE TV buttons These buttons are removed from the remote control. The indicator light will now control your set-top-box/satellite systems. 2. The ANT ... ባ 7 8 9 SLEEP C.C. Hold down the STB button on the remote and enter the two digit preset code that your set-top-box/satellite receiver cannot be operated after performing the above . 4. The remote control will act as the TV/STB button when in STB mode. ቢ SET-TOP-BOX (STB) button...

Owners Guide
Page 40
...FUNCTIONS Operating the precoded function for your DVD player. This remote is designed to DVD mode. ባ PRECODED DVD Buttons These buttons transmit the chosen precoded DVD codes. ቤ EXCLUSIVE TV Buttons These buttons are removed from the remote control. Turn ON your DVD player operating guide. 3.... Hold down the DVD button on the remote and enter the two digit preset code that your DVD player cannot be ...
...FUNCTIONS Operating the precoded function for your DVD player. This remote is designed to DVD mode. ባ PRECODED DVD Buttons These buttons transmit the chosen precoded DVD codes. ቤ EXCLUSIVE TV Buttons These buttons are removed from the remote control. Turn ON your DVD player operating guide. 3.... Hold down the DVD button on the remote and enter the two digit preset code that your DVD player cannot be ...
Owners Guide
Page 41
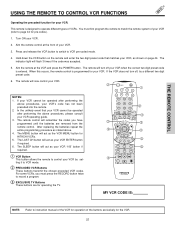
...button on page 44. The indicator light will remember the codes you have programmed until the batteries are for operating the TV. ባ POWER TV DVD VCR CBL SOURCE WIZARD CD PVR STB AMP 1 2 3 4 5 6 7 8 9 SLEEP C.C. The remote will now control your PVR. In the unlikely event that ... ቤ EXCLUSIVE TV Buttons These buttons are removed from the remote control. NOTE: The C.C. Aim the remote control at the PVR and press the POWER button. If the PVR does not turn off , try a different two digit preset code. 6. Turn ON your PVR. 3. The remote will turn off ...
...button on page 44. The indicator light will remember the codes you have programmed until the batteries are for operating the TV. ባ POWER TV DVD VCR CBL SOURCE WIZARD CD PVR STB AMP 1 2 3 4 5 6 7 8 9 SLEEP C.C. The remote will now control your PVR. In the unlikely event that ... ቤ EXCLUSIVE TV Buttons These buttons are removed from the remote control. NOTE: The C.C. Aim the remote control at the PVR and press the POWER button. If the PVR does not turn off , try a different two digit preset code. 6. Turn ON your PVR. 3. The remote will turn off ...

Owners Guide
Page 42
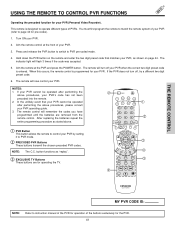
... These buttons transmit the chosen precoded Audio component codes. ቤ EXCLUSIVE TV Buttons These buttons are removed from the remote control. This remote is only precoded to Audio component pre-coded mode. 4. Aim the remote control at the Audio component and press the POWER button. THE REMOTE CONTROL USING YOUR REMOTE TO CONTROL ADDITIONAL AUDIO EQUIPMENT Operating the...
... These buttons transmit the chosen precoded Audio component codes. ቤ EXCLUSIVE TV Buttons These buttons are removed from the remote control. This remote is only precoded to Audio component pre-coded mode. 4. Aim the remote control at the Audio component and press the POWER button. THE REMOTE CONTROL USING YOUR REMOTE TO CONTROL ADDITIONAL AUDIO EQUIPMENT Operating the...
Owners Guide
Page 44
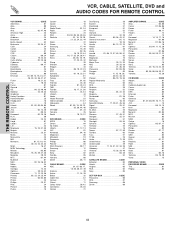
... VCR, CABLE, SATELLITE, DVD and AUDIO CODES FOR REMOTE CONTROL VCR BRAND CODE Adventura 01 Aiko 09 Aiwa 01 Akai 02, 47, 48 American High 23 Asha 44 ... 35, 36, 44, 46 XR-1000 01, 23 Yamaha 25 Zenith 10, 15, 22 DVD BRAND CODE APEX 15 Denon 04 Go Video 14 Hitachi 07, 12, 13 JVC 01 Kenwood 04, 16 Magnavox 05 Mitsubishi 10 Panasonic 04 Phillips 06 Pioneer 03...25, 51 Starquest 51 Starsight 53, 54 Sylvania 18 Teleview 25 Texscan 18 Tocom 07, 27, 50 Toshiba 03 Tusa 51 TV 86 29 Unika 11, 39 United Artists 36 United Cable 49 Universal 11, 24, 31, 32, 34, 39 Videoway 47...
... VCR, CABLE, SATELLITE, DVD and AUDIO CODES FOR REMOTE CONTROL VCR BRAND CODE Adventura 01 Aiko 09 Aiwa 01 Akai 02, 47, 48 American High 23 Asha 44 ... 35, 36, 44, 46 XR-1000 01, 23 Yamaha 25 Zenith 10, 15, 22 DVD BRAND CODE APEX 15 Denon 04 Go Video 14 Hitachi 07, 12, 13 JVC 01 Kenwood 04, 16 Magnavox 05 Mitsubishi 10 Panasonic 04 Phillips 06 Pioneer 03...25, 51 Starquest 51 Starsight 53, 54 Sylvania 18 Teleview 25 Texscan 18 Tocom 07, 27, 50 Toshiba 03 Tusa 51 TV 86 29 Unika 11, 39 United Artists 36 United Cable 49 Universal 11, 24, 31, 32, 34, 39 Videoway 47...
Owners Guide
Page 81
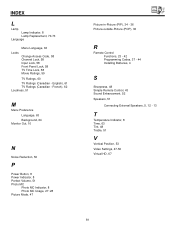
...Usage, 27~28 Picture Mode, 47 Picture-in-Picture (PIP), 34 - 36 Picture-outside-Picture (POP), 36 R Remote Control Functions, 23 - 42 Programming Codes, 37 - 44 Installing Batteries, 4 S Sharpness, 48 Simple Remote Control, 43 Sound Enhancement, 52 Speakers, 51 Connecting External Speakers, 5, 12 - 13 T Temperature Indicator, 8 Time...HD, 67 81 INDEX L Lamp Lamp Indicator, 8 Lamp Replacement, 70-73 Language Menu Language, 63 Locks Change Access Code, 58 Channel Lock, 58 Input Lock, 58 Front Panel Lock, 58 TV Time Lock, 58 Movie Ratings, 59 TV Ratings, 60 TV Ratings (Canadian - English), 61...
...Usage, 27~28 Picture Mode, 47 Picture-in-Picture (PIP), 34 - 36 Picture-outside-Picture (POP), 36 R Remote Control Functions, 23 - 42 Programming Codes, 37 - 44 Installing Batteries, 4 S Sharpness, 48 Simple Remote Control, 43 Sound Enhancement, 52 Speakers, 51 Connecting External Speakers, 5, 12 - 13 T Temperature Indicator, 8 Time...HD, 67 81 INDEX L Lamp Lamp Indicator, 8 Lamp Replacement, 70-73 Language Menu Language, 63 Locks Change Access Code, 58 Channel Lock, 58 Input Lock, 58 Front Panel Lock, 58 TV Time Lock, 58 Movie Ratings, 59 TV Ratings, 60 TV Ratings (Canadian - English), 61...


