

End User License Agreement
Page 1
... you subject to a separate license agreement between (a) you (either an individual or a single entity) and (b) Hewlett-Packard Company ("HP") that governs your HP product ("HP Product"), that it is used only for use the Software Product only on or made available by you via the internet and was... POLICY OF YOUR PLACE OF PURCHASE. 1. You do not have Software Product into Your Computer's AGREE TO ALL TERMS AND temporary memory (RAM) for use of using the Software INSTALLING, COPYING, Product. Other software may make archival or back-up purposes. The term "Software Product...
... you subject to a separate license agreement between (a) you (either an individual or a single entity) and (b) Hewlett-Packard Company ("HP") that governs your HP product ("HP Product"), that it is used only for use the Software Product only on or made available by you via the internet and was... POLICY OF YOUR PLACE OF PURCHASE. 1. You do not have Software Product into Your Computer's AGREE TO ALL TERMS AND temporary memory (RAM) for use of using the Software INSTALLING, COPYING, Product. Other software may make archival or back-up purposes. The term "Software Product...

Reference Guide
Page 8
... To safeguard your data 28 To extend the life of the display 28 To clean your notebook 28 Batteries and Power Management 29 Managing Power Consumption 30 How the notebook manages power automatically 30 Using Battery Power 32 To check battery status 32 To respond to a low-battery warning 33... a PC Card 48 Connecting External Devices 50 To connect an audio device 50 To use an external monitor 52 To connect an IEEE 1394 device (select models only 53 To connect an infrared device (select models only 54 To use a port replicator (select models only 55 Installing Additional RAM (Memory...
... To safeguard your data 28 To extend the life of the display 28 To clean your notebook 28 Batteries and Power Management 29 Managing Power Consumption 30 How the notebook manages power automatically 30 Using Battery Power 32 To check battery status 32 To respond to a low-battery warning 33... a PC Card 48 Connecting External Devices 50 To connect an audio device 50 To use an external monitor 52 To connect an IEEE 1394 device (select models only 53 To connect an infrared device (select models only 54 To use a port replicator (select models only 55 Installing Additional RAM (Memory...
Reference Guide
Page 16
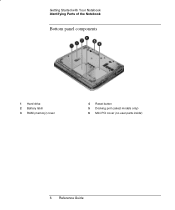
Getting Started with Your Notebook Identifying Parts of the Notebook Bottom panel components 1 Hard drive 2 Battery latch 3 RAM (memory) cover 4 Reset button 5 Docking port (select models only) 6 Mini PCI cover (no user parts inside) 6 Reference Guide
Getting Started with Your Notebook Identifying Parts of the Notebook Bottom panel components 1 Hard drive 2 Battery latch 3 RAM (memory) cover 4 Reset button 5 Docking port (select models only) 6 Mini PCI cover (no user parts inside) 6 Reference Guide
Reference Guide
Page 17
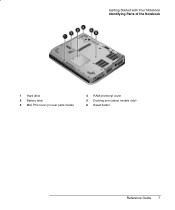
Getting Started with Your Notebook Identifying Parts of the Notebook 1 Hard drive 2 Battery latch 3 Mini PCI cover (no user parts inside) 4 RAM (memory) cover 5 Docking port (select models only) 6 Reset button Reference Guide 7
Getting Started with Your Notebook Identifying Parts of the Notebook 1 Hard drive 2 Battery latch 3 Mini PCI cover (no user parts inside) 4 RAM (memory) cover 5 Docking port (select models only) 6 Reset button Reference Guide 7

Reference Guide
Page 25
...Computer > Stand By. -or- See the "Batteries and Power Management" chapter in RAM. • Restarts quickly. • Restores network connections. • Saves maximum power. • Saves current session to turn on the notebook. However, at least 4 seconds to disk, then shuts down. • Restores ...ON-Power status light will blink. Press Fn+F12. -or- Powers off the notebook. • Saves significant power. • Turns off the notebook. Basic Operation Operating Your Notebook Operating Your Notebook You can also customize the way these power modes work. If the system has ...
...Computer > Stand By. -or- See the "Batteries and Power Management" chapter in RAM. • Restarts quickly. • Restores network connections. • Saves maximum power. • Saves current session to turn on the notebook. However, at least 4 seconds to disk, then shuts down. • Restores ...ON-Power status light will blink. Press Fn+F12. -or- Powers off the notebook. • Saves significant power. • Turns off the notebook. Basic Operation Operating Your Notebook Operating Your Notebook You can also customize the way these power modes work. If the system has ...

Reference Guide
Page 39
... power automatically Your notebook enters Hibernation and Standby automatically, and turns off the hard drive and display based on values set to suit your current session in RAM, and turns off the display and other input activity occurs for the specified interval The hard drive is not accessed for... a specified interval No pointing devices are running your notebook on battery power, you reduce power consumption and ...
... power automatically Your notebook enters Hibernation and Standby automatically, and turns off the hard drive and display based on values set to suit your current session in RAM, and turns off the display and other input activity occurs for the specified interval The hard drive is not accessed for... a specified interval No pointing devices are running your notebook on battery power, you reduce power consumption and ...
Reference Guide
Page 67
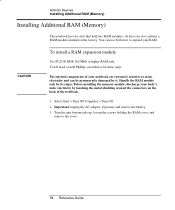
...body's static electricity by its edges. Turn the unit bottom-side up, loosen the screws holding the RAM cover, and remove the cover. 58 Reference Guide The internal components of the notebook. 1. Select Start > Turn Off Computer > Turn Off. 2. Important: unplug the AC adapter, ...if present, and remove the battery. 3. CAUTION To install a RAM expansion module Use PC2100 DDR-266 MHz or higher RAM only. You can be permanently damaged...
...body's static electricity by its edges. Turn the unit bottom-side up, loosen the screws holding the RAM cover, and remove the cover. 58 Reference Guide The internal components of the notebook. 1. Select Start > Turn Off Computer > Turn Off. 2. Important: unplug the AC adapter, ...if present, and remove the battery. 3. CAUTION To install a RAM expansion module Use PC2100 DDR-266 MHz or higher RAM only. You can be permanently damaged...
Reference Guide
Page 68
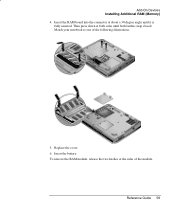
Match your notebook to one of the module. Replace the cover. 6. Then press down at the sides of the following illustrations. 5. Insert the battery. To remove the RAM module, release the two latches at both sides until it is fully inserted. Insert the RAM board into the connector at about a 30 degree angle until both latches snap closed. Add-On Devices Installing Additional RAM (Memory) 4. Reference Guide 59
Match your notebook to one of the module. Replace the cover. 6. Then press down at the sides of the following illustrations. 5. Insert the battery. To remove the RAM module, release the two latches at both sides until it is fully inserted. Insert the RAM board into the connector at about a 30 degree angle until both latches snap closed. Add-On Devices Installing Additional RAM (Memory) 4. Reference Guide 59
Reference Guide
Page 69
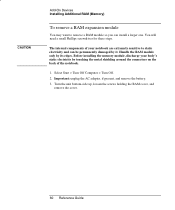
... module You may want to static electricity and can install a larger one. The internal components of the notebook. 1. Important: unplug the AC adapter, if present, and remove the battery. 3. Handle the RAM module only by touching the metal shielding around the connectors on the back of your body's static electricity by its...
... module You may want to static electricity and can install a larger one. The internal components of the notebook. 1. Important: unplug the AC adapter, if present, and remove the battery. 3. Handle the RAM module only by touching the metal shielding around the connectors on the back of your body's static electricity by its...

Reference Guide
Page 70
Release the two latches at the sides of the RAM board, so the free edge of the following illustrations. 5. Add-On Devices Installing Additional RAM (Memory) 4. Match your notebook to one of the board pops up. Replace the cover. 7. Insert the battery. Reference Guide 61 Pull the board out of the connector. 6.
Release the two latches at the sides of the RAM board, so the free edge of the following illustrations. 5. Add-On Devices Installing Additional RAM (Memory) 4. Match your notebook to one of the board pops up. Replace the cover. 7. Insert the battery. Reference Guide 61 Pull the board out of the connector. 6.
Reference Guide
Page 82
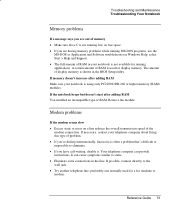
... Application and Software troubleshooter in Windows Help: select Start > Help and Support. • The full amount of RAM. It can provide instructions. Troubleshooting and Maintenance Troubleshooting Your Notebook Memory problems If a message says you are out of memory • Make sure drive C is not running... display memory is using only PC2100 DDR-266 or higher memory (RAM) modules. If memory doesn't increase after adding RAM You installed an incompatible type of RAM in the line. If necessary, contact your notebook is shown in the BIOS Setup utility. Modem problems If the ...
... Application and Software troubleshooter in Windows Help: select Start > Help and Support. • The full amount of RAM. It can provide instructions. Troubleshooting and Maintenance Troubleshooting Your Notebook Memory problems If a message says you are out of memory • Make sure drive C is not running... display memory is using only PC2100 DDR-266 or higher memory (RAM) modules. If memory doesn't increase after adding RAM You installed an incompatible type of RAM in the line. If necessary, contact your notebook is shown in the BIOS Setup utility. Modem problems If the ...

Reference Guide
Page 85
... Maintenance Troubleshooting Your Notebook PC Card problems If the notebook doesn't recognize a PC Card • Remove and reinsert the PC Card. • Restart the notebook: select Start > Turn Off Computer > Restart. • Try the card in Control Panel. If the notebook pauses or runs sluggishly • This may have at least 128 MB of memory (RAM). Background processing...
... Maintenance Troubleshooting Your Notebook PC Card problems If the notebook doesn't recognize a PC Card • Remove and reinsert the PC Card. • Restart the notebook: select Start > Turn Off Computer > Restart. • Try the card in Control Panel. If the notebook pauses or runs sluggishly • This may have at least 128 MB of memory (RAM). Background processing...

Reference Guide
Page 94
... Detected automatically Reference Guide 85 Sets the language for repair service. Shows the extended memory size. Troubleshooting and Maintenance Configuring Your Notebook Setting BIOS Revision System Time System Date Language Internal Hard Disk UMA Video Memory Memory Serial Number Service ID UUID MAC Address...identifier used for BIOS Setup. Sets the date using 24-hour format. Sets the video memory size allocated from total installed memory (RAM). Displays the serial number as 32 hex characters. Displays the value of the 16-byte UUID (Universally Unique ID) as shown ...
... Detected automatically Reference Guide 85 Sets the language for repair service. Shows the extended memory size. Troubleshooting and Maintenance Configuring Your Notebook Setting BIOS Revision System Time System Date Language Internal Hard Disk UMA Video Memory Memory Serial Number Service ID UUID MAC Address...identifier used for BIOS Setup. Sets the date using 24-hour format. Sets the video memory size allocated from total installed memory (RAM). Displays the serial number as 32 hex characters. Displays the value of the 16-byte UUID (Universally Unique ID) as shown ...
Reference Guide
Page 119
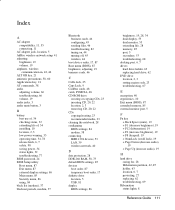
...-ROM drive creating or copying CDs, 23 inserting CD, 20, 22 location, 2, 3 removing CD, 20, 22 CDs copying/creating, 23 recommended media, 23 cleaning the notebook, 28 configuring BIOS settings, 84 modem, 38 connecting IEEE 1394 devices, 53 LAN, 39 wireless network, 40 D data protection, 28 DDR-266... RAM, 58, 73 default BIOS settings, 85 devices boot order, 87 temporary boot order, 17 diskette drive location, 5 USB, 81 display BIOS settings, 86 brightness, 19, ...
...-ROM drive creating or copying CDs, 23 inserting CD, 20, 22 location, 2, 3 removing CD, 20, 22 CDs copying/creating, 23 recommended media, 23 cleaning the notebook, 28 configuring BIOS settings, 84 modem, 38 connecting IEEE 1394 devices, 53 LAN, 39 wireless network, 40 D data protection, 28 DDR-266... RAM, 58, 73 default BIOS settings, 85 devices boot order, 87 temporary boot order, 17 diskette drive location, 5 USB, 81 display BIOS settings, 86 brightness, 19, ...

Reference Guide
Page 120
..., 53 mouse, troubleshooting, 71 mute button location, 3 N network connecting to, 39 LAN, See LAN wireless, See wireless network Norton AntiVirus, 25 notebook caring for, 27 changing BIOS settings, 84 cleaning, 28 opening/closing, 2, 3 protecting, 27, 70 resetting, 17 timeouts, 31 turning on, 13..., 2, 3 using, 20 overheating, 70 P parallel port location, 5 troubleshooting, 80 password, 24 PC card slot, location, 5 PC cards installing, 48 saving power, 34 stopping, 49 troubleshooting, 76 PC2100 DDR-266 RAM, 58, 73 PCMCIA cards, 48 phone cord, connecting, 12 plug requirements, 97 port locations, 5...
..., 53 mouse, troubleshooting, 71 mute button location, 3 N network connecting to, 39 LAN, See LAN wireless, See wireless network Norton AntiVirus, 25 notebook caring for, 27 changing BIOS settings, 84 cleaning, 28 opening/closing, 2, 3 protecting, 27, 70 resetting, 17 timeouts, 31 turning on, 13..., 2, 3 using, 20 overheating, 70 P parallel port location, 5 troubleshooting, 80 password, 24 PC card slot, location, 5 PC cards installing, 48 saving power, 34 stopping, 49 troubleshooting, 76 PC2100 DDR-266 RAM, 58, 73 PCMCIA cards, 48 phone cord, connecting, 12 plug requirements, 97 port locations, 5...
Maintenance and Service Guide
Page 20
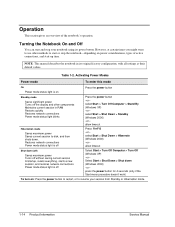
.... Power mode status light is off Select Start > Turn Off Computer > Turn Off (Windows XP) -or- NOTE: This manual describes the notebook in RAM Restarts quickly Restores network connections Power mode status light blinks Press the power button -or- select Start > Turn Off Computer > Stand By (Windows...Shut Down > Shut down (Windows 2000) -or- However, at their default values. select Start > Shut Down > Hibernate (Windows 2000) -or- Turning the Notebook On and Off You can start -up time. press the power button for 4 seconds (only if the Start menu procedure doesn't work) To turn on...
.... Power mode status light is off Select Start > Turn Off Computer > Turn Off (Windows XP) -or- NOTE: This manual describes the notebook in RAM Restarts quickly Restores network connections Power mode status light blinks Press the power button -or- select Start > Turn Off Computer > Stand By (Windows...Shut Down > Shut down (Windows 2000) -or- However, at their default values. select Start > Shut Down > Hibernate (Windows 2000) -or- Turning the Notebook On and Off You can start -up time. press the power button for 4 seconds (only if the Start menu procedure doesn't work) To turn on...
Maintenance and Service Guide
Page 26
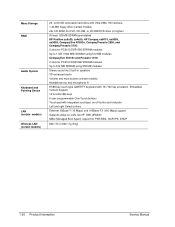
Mass Storage RAM Audio System Keyboard and Pointing Device LAN (certain models) Wireless LAN (certain models) 20- to 60-GB removable hard drive with Ultra-DMA 100 interface 1.... floppy drive (certain models) 24x CD-ROM, 8x DVD, CD-RW, or CD-RW/DVD drive (or higher) At least 128 MB SDRAM preinstalled HP Pavilion ze5x00, ze4x00, HP Compaq nx9010, nx9008, nx9005, Compaq Evo N1050v, Compaq Presario 2500, and Compaq Presario 2100: 2 slots for PC2100 DDR-266 SDRAM modules Up to...
Mass Storage RAM Audio System Keyboard and Pointing Device LAN (certain models) Wireless LAN (certain models) 20- to 60-GB removable hard drive with Ultra-DMA 100 interface 1.... floppy drive (certain models) 24x CD-ROM, 8x DVD, CD-RW, or CD-RW/DVD drive (or higher) At least 128 MB SDRAM preinstalled HP Pavilion ze5x00, ze4x00, HP Compaq nx9010, nx9008, nx9005, Compaq Evo N1050v, Compaq Presario 2500, and Compaq Presario 2100: 2 slots for PC2100 DDR-266 SDRAM modules Up to...
Maintenance and Service Guide
Page 30
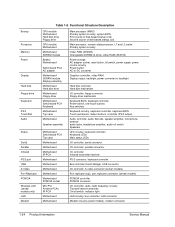
...source of disk-based startup cod. Main processor, numeric data processor, L1 and L2 cache Primary system circuitry Video RAM (XE4500) Changeable SDRAM (2 slots), video RAM (XE4100) Power storage AC adapter socket, reset button, lid switch, power supply, power control circuitry Power button ...AC-to-DC converter Graphics controller, video RAM Display output, backlight, power converter for backlight Hard disk controller Hard disk mechanism I/O controller, floppy connector Floppy drive mechanism Keyboard ...
...source of disk-based startup cod. Main processor, numeric data processor, L1 and L2 cache Primary system circuitry Video RAM (XE4500) Changeable SDRAM (2 slots), video RAM (XE4100) Power storage AC adapter socket, reset button, lid switch, power supply, power control circuitry Power button ...AC-to-DC converter Graphics controller, video RAM Display output, backlight, power converter for backlight Hard disk controller Hard disk mechanism I/O controller, floppy connector Floppy drive mechanism Keyboard ...
Maintenance and Service Guide
Page 115
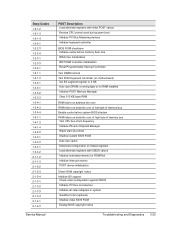
... (optional) Shadow video BIOS ROM Display BIOS copyright notice Troubleshooting and Diagnostics 3-23 or wrong type or no RAM installed Initialize POST Memory Manager Clear 512 KB base RAM RAM failure on address line xxxx RAM failure on data bits xxxx of low byte of memory bus Enable cache before memory Auto size 8254... values Restore CPU control word during warm boot Initialize PCI Bus Mastering devices Initialize keyboard controller BIOS ROM checksum Initialize cache before system BIOS shadow RAM failure on motherboard) Set ES segment register to 4 GB Auto size DRAM;
... (optional) Shadow video BIOS ROM Display BIOS copyright notice Troubleshooting and Diagnostics 3-23 or wrong type or no RAM installed Initialize POST Memory Manager Clear 512 KB base RAM RAM failure on address line xxxx RAM failure on data bits xxxx of low byte of memory bus Enable cache before memory Auto size 8254... values Restore CPU control word during warm boot Initialize PCI Bus Mastering devices Initialize keyboard controller BIOS ROM checksum Initialize cache before system BIOS shadow RAM failure on motherboard) Set ES segment register to 4 GB Auto size DRAM;
Maintenance and Service Guide
Page 116
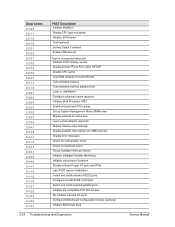
... devices Test for unexpected interrupts Initialize POST display service Display prompt "Press F2 to enter SETUP" Disable CPU cache Test RAM between 512 and 640 KB Test extended memory Test extended memory address lines Jump to UserPatch1 Configure advanced cache registers Initialize ... device initialization Detect and install external RS232 ports Configure non-MCD IDE controllers Detect and install external parallel ports Initialize PC-compatible PnP ISA devices Re-initialize onboard I/O ports Configure Motherboard Configurable Devices (optional) Initialize BIOS Data Area 3-24 Troubleshooting and...
... devices Test for unexpected interrupts Initialize POST display service Display prompt "Press F2 to enter SETUP" Disable CPU cache Test RAM between 512 and 640 KB Test extended memory Test extended memory address lines Jump to UserPatch1 Configure advanced cache registers Initialize ... device initialization Detect and install external RS232 ports Configure non-MCD IDE controllers Detect and install external parallel ports Initialize PC-compatible PnP ISA devices Re-initialize onboard I/O ports Configure Motherboard Configurable Devices (optional) Initialize BIOS Data Area 3-24 Troubleshooting and...


