
Reference Guide
Page 3
Reference Guide iii Check with a telephone connection near water (for example, near a bathtub, sink, swimming pool, or in a wet basement). • Avoid using your notebook computer with a telephone connection, always follow basic safety precautions to reduce the risk of fire, electrical shock, and injury to persons: • Do not use ...
Reference Guide iii Check with a telephone connection near water (for example, near a bathtub, sink, swimming pool, or in a wet basement). • Avoid using your notebook computer with a telephone connection, always follow basic safety precautions to reduce the risk of fire, electrical shock, and injury to persons: • Do not use ...

Reference Guide
Page 7
... 10 Step 2: Connect AC power 11 Step 3: Connect a phone line 12 Step 4: Turn on the notebook 13 Step 5: Set up Windows 13 Basic Operation ...15 Operating Your Notebook 16 Default power settings 16 To reset the notebook 17 To change the boot device 17 To use the TouchPad 18 To use the function... insert or remove a CD or DVD 22 To play DVD movies 23 To create or copy CDs 23 Securing Your Notebook 24 To set up password protection 24 To lock your notebook 24 To attach a security cable 25 To protect against viruses 25 To lock the hard drive 26 Reference Guide vii
... 10 Step 2: Connect AC power 11 Step 3: Connect a phone line 12 Step 4: Turn on the notebook 13 Step 5: Set up Windows 13 Basic Operation ...15 Operating Your Notebook 16 Default power settings 16 To reset the notebook 17 To change the boot device 17 To use the TouchPad 18 To use the function... insert or remove a CD or DVD 22 To play DVD movies 23 To create or copy CDs 23 Securing Your Notebook 24 To set up password protection 24 To lock your notebook 24 To attach a security cable 25 To protect against viruses 25 To lock the hard drive 26 Reference Guide vii

Reference Guide
Page 8
... To safeguard your data 28 To extend the life of the display 28 To clean your notebook 28 Batteries and Power Management 29 Managing Power Consumption 30 How the notebook manages power automatically 30 Using Battery Power 32 To check battery status 32 To respond to a low-battery warning 33 To recharge...and off 44 To prepare for Bluetooth connections 45 To send or receive files using Bluetooth 46 Add-On Devices ...47 Connecting PC Cards 48 To insert or remove a PC Card 48 Connecting External Devices 50 To connect an audio device 50 To use an external monitor 52 To connect an IEEE...
... To safeguard your data 28 To extend the life of the display 28 To clean your notebook 28 Batteries and Power Management 29 Managing Power Consumption 30 How the notebook manages power automatically 30 Using Battery Power 32 To check battery status 32 To respond to a low-battery warning 33 To recharge...and off 44 To prepare for Bluetooth connections 45 To send or receive files using Bluetooth 46 Add-On Devices ...47 Connecting PC Cards 48 To insert or remove a PC Card 48 Connecting External Devices 50 To connect an audio device 50 To use an external monitor 52 To connect an IEEE...
Reference Guide
Page 9
... 70 Infrared problems 70 Keyboard and pointing device problems 71 Local area network (LAN) problems 72 Memory problems 73 Modem problems 73 PC Card problems 76 Performance problems 76 Power and battery problems 77 Printing problems 79 Serial, parallel, and USB problems 80 Startup problems ...81 Wireless problems 82 Configuring Your Notebook 84 To run the BIOS Setup utility 84 To change video memory settings using BIOS Setup utility 87 Reinstalling and Updating Software 88...
... 70 Infrared problems 70 Keyboard and pointing device problems 71 Local area network (LAN) problems 72 Memory problems 73 Modem problems 73 PC Card problems 76 Performance problems 76 Power and battery problems 77 Printing problems 79 Serial, parallel, and USB problems 80 Startup problems ...81 Wireless problems 82 Configuring Your Notebook 84 To run the BIOS Setup utility 84 To change video memory settings using BIOS Setup utility 87 Reinstalling and Updating Software 88...

Reference Guide
Page 11
Getting Started with Your Notebook Reference Guide 1
Getting Started with Your Notebook Reference Guide 1
Reference Guide
Page 12
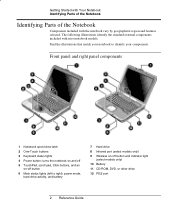
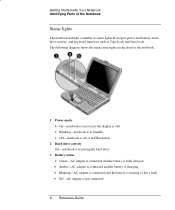
... and off 5 TouchPad, scroll pad, Click buttons, and an on-off button 6 Main status lights (left to identify your notebook to right): power mode, hard drive activity, and battery 7 Hard drive 8 Infrared port (select models only) 9 Wireless on-off button and indicator light (select models ...) 10 Battery 11 CD-ROM, DVD, or other drive 12 PS/2 port 2 Reference Guide The following illustrations identify the standard external components included with the notebook vary by geographical region and features selected. Find the illustrations that match your components. Getting Started with Your...
... and off 5 TouchPad, scroll pad, Click buttons, and an on-off button 6 Main status lights (left to identify your notebook to right): power mode, hard drive activity, and battery 7 Hard drive 8 Infrared port (select models only) 9 Wireless on-off button and indicator light (select models ...) 10 Battery 11 CD-ROM, DVD, or other drive 12 PS/2 port 2 Reference Guide The following illustrations identify the standard external components included with the notebook vary by geographical region and features selected. Find the illustrations that match your components. Getting Started with Your...
Reference Guide
Page 13
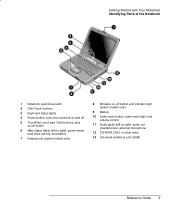
.../close latch 2 One-Touch buttons 3 Keyboard status lights 4 Power button: turns the notebook on and off 5 TouchPad, scroll pad, Click buttons, plus on-off button 6 Main status lights (left to right): power mode, hard drive activity, and battery 7 ...
.../close latch 2 One-Touch buttons 3 Keyboard status lights 4 Power button: turns the notebook on and off 5 TouchPad, scroll pad, Click buttons, plus on-off button 6 Main status lights (left to right): power mode, hard drive activity, and battery 7 ...
Reference Guide
Page 14
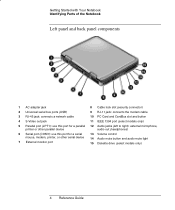
Getting Started with Your Notebook Identifying Parts of the Notebook Left panel and back panel components 1 AC adapter jack 8 Cable lock slot (security connector) 2 Universal serial bus ports (USB) 9 RJ-11 jack: connects the modem cable 3 RJ-45 jack: connects a network cable 10 PC Card and CardBus slot and button 4 S-Video out jack 11...
Getting Started with Your Notebook Identifying Parts of the Notebook Left panel and back panel components 1 AC adapter jack 8 Cable lock slot (security connector) 2 Universal serial bus ports (USB) 9 RJ-11 jack: connects the modem cable 3 RJ-45 jack: connects a network cable 10 PC Card and CardBus slot and button 4 S-Video out jack 11...
Reference Guide
Page 15
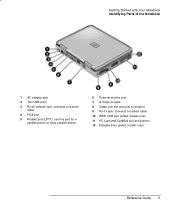
Getting Started with Your Notebook Identifying Parts of the Notebook 1 AC adapter jack 2 Two USB ports 3 RJ-45 network jack: connects a network cable 4 PS/2 port 5 Parallel port (LPT1): use this port for a parallel printer or other parallel device 6 External monitor port 7 S-Video out jack 8 Cable lock slot (security connector) 9 RJ-11 jack: connects a modem cable 10 IEEE 1394 port (select models only) 11 PC Card and CardBus slot and buttons 12 Diskette drive (select models only) Reference Guide 5
Getting Started with Your Notebook Identifying Parts of the Notebook 1 AC adapter jack 2 Two USB ports 3 RJ-45 network jack: connects a network cable 4 PS/2 port 5 Parallel port (LPT1): use this port for a parallel printer or other parallel device 6 External monitor port 7 S-Video out jack 8 Cable lock slot (security connector) 9 RJ-11 jack: connects a modem cable 10 IEEE 1394 port (select models only) 11 PC Card and CardBus slot and buttons 12 Diskette drive (select models only) Reference Guide 5
Reference Guide
Page 16
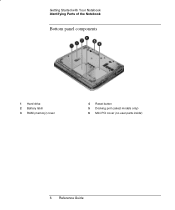
Getting Started with Your Notebook Identifying Parts of the Notebook Bottom panel components 1 Hard drive 2 Battery latch 3 RAM (memory) cover 4 Reset button 5 Docking port (select models only) 6 Mini PCI cover (no user parts inside) 6 Reference Guide
Getting Started with Your Notebook Identifying Parts of the Notebook Bottom panel components 1 Hard drive 2 Battery latch 3 RAM (memory) cover 4 Reset button 5 Docking port (select models only) 6 Mini PCI cover (no user parts inside) 6 Reference Guide
Reference Guide
Page 17
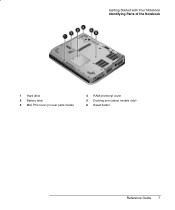
Getting Started with Your Notebook Identifying Parts of the Notebook 1 Hard drive 2 Battery latch 3 Mini PCI cover (no user parts inside) 4 RAM (memory) cover 5 Docking port (select models only) 6 Reset button Reference Guide 7
Getting Started with Your Notebook Identifying Parts of the Notebook 1 Hard drive 2 Battery latch 3 Mini PCI cover (no user parts inside) 4 RAM (memory) cover 5 Docking port (select models only) 6 Reset button Reference Guide 7
Reference Guide
Page 18
... such as Caps Lock and Num Lock. Getting Started with Your Notebook Identifying Parts of the Notebook Status lights The notebook includes a number of the notebook. 1 Power mode • On-notebook is on (even if the display is off) • Blinking-notebook is in Standby • Off-notebook is off or in Hibernation 2 Hard drive activity On...
... such as Caps Lock and Num Lock. Getting Started with Your Notebook Identifying Parts of the Notebook Status lights The notebook includes a number of the notebook. 1 Power mode • On-notebook is on (even if the display is off) • Blinking-notebook is in Standby • Off-notebook is off or in Hibernation 2 Hard drive activity On...
Reference Guide
Page 19
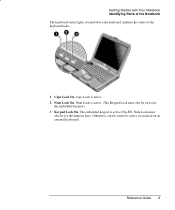
Num Lock must also be for the numeric keys. Reference Guide 9 Getting Started with Your Notebook Identifying Parts of the Notebook The keyboard status lights, located above the keyboard, indicate the states of the keyboard locks. 1 Caps Lock On. Otherwise, cursor control is active (Fn+F8). Num Lock is active. 2 Num Lock On. The embedded keypad is active (as marked on to use the embedded keypad.) 3 Keypad Lock On. Caps Lock is active. (The Keypad Lock must also be on an external keyboard).
Num Lock must also be for the numeric keys. Reference Guide 9 Getting Started with Your Notebook Identifying Parts of the Notebook The keyboard status lights, located above the keyboard, indicate the states of the keyboard locks. 1 Caps Lock On. Otherwise, cursor control is active (Fn+F8). Num Lock is active. 2 Num Lock On. The embedded keypad is active (as marked on to use the embedded keypad.) 3 Keypad Lock On. Caps Lock is active. (The Keypad Lock must also be on an external keyboard).
Reference Guide
Page 20
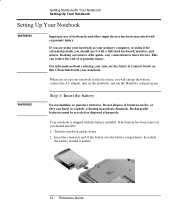
...the battery compartment, then slide the battery in fire, or they can reduce the risk of batteries in until it with your notebook for extended periods, you should use of properly. Docking accessories offer quick, easy connections to these devices. For information about reducing ...your primary computer, or using your notebook as your risk, see the Safety & Comfort Guide on the notebook, and run the Windows setup program. WARNING Step 1: Insert the battery Do not mutilate or puncture ...
...the battery compartment, then slide the battery in fire, or they can reduce the risk of batteries in until it with your notebook for extended periods, you should use of properly. Docking accessories offer quick, easy connections to these devices. For information about reducing ...your primary computer, or using your notebook as your risk, see the Safety & Comfort Guide on the notebook, and run the Windows setup program. WARNING Step 1: Insert the battery Do not mutilate or puncture ...
Reference Guide
Page 21
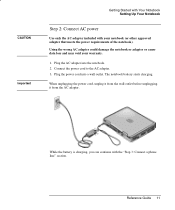
... the battery is charging, you can continue with your warranty. 1. CAUTION Important Getting Started with Your Notebook Setting Up Your Notebook Step 2: Connect AC power Use only the AC adapter included with the "Step 3: Connect a phone line" section. When unplugging the power cord, ...unplug it from the wall outlet before unplugging it from the AC adapter. The notebook battery starts charging. Connect the power cord to the AC adapter. 3. Plug the AC adapter into a wall outlet. Using the wrong AC adapter could ...
... the battery is charging, you can continue with your warranty. 1. CAUTION Important Getting Started with Your Notebook Setting Up Your Notebook Step 2: Connect AC power Use only the AC adapter included with the "Step 3: Connect a phone line" section. When unplugging the power cord, ...unplug it from the wall outlet before unplugging it from the AC adapter. The notebook battery starts charging. Connect the power cord to the AC adapter. 3. Plug the AC adapter into a wall outlet. Using the wrong AC adapter could ...

Reference Guide
Page 22
Getting Started with Your Notebook Setting Up Your Notebook Step 3: Connect a phone line 1. Make sure the telephone line is an analog line, sometimes called a data line. (Do not use a digital line.) 2. Connect the telephone cord (RJ-11) into the RJ-11 modem jack on the notebook. For details about using the modem, see "Using the Modem" later in this guide. 12 Reference Guide Plug the other end of the telephone cord into a telephone jack. 3.
Getting Started with Your Notebook Setting Up Your Notebook Step 3: Connect a phone line 1. Make sure the telephone line is an analog line, sometimes called a data line. (Do not use a digital line.) 2. Connect the telephone cord (RJ-11) into the RJ-11 modem jack on the notebook. For details about using the modem, see "Using the Modem" later in this guide. 12 Reference Guide Plug the other end of the telephone cord into a telephone jack. 3.
Reference Guide
Page 23
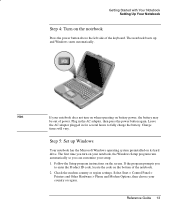
... up Windows Your notebook has the Microsoft Windows operating system preinstalled on its hard drive. Charge times will vary. The first time you turn on when operating on battery ... to enter the Product ID code, locate the code on the bottom of the keyboard. Check the modem country or region settings. Hint If your notebook does not turn on your notebook, the Windows Setup program runs automatically so you to fully charge the battery. Getting Started with Your...
... up Windows Your notebook has the Microsoft Windows operating system preinstalled on its hard drive. Charge times will vary. The first time you turn on when operating on battery ... to enter the Product ID code, locate the code on the bottom of the keyboard. Check the modem country or region settings. Hint If your notebook does not turn on your notebook, the Windows Setup program runs automatically so you to fully charge the battery. Getting Started with Your...

Reference Guide
Page 25
... briefly press the power button. -or- OFF-Power status light will turn off the display and other methods to start and stop the notebook-depending on the notebook. To enter this guide. 16 Reference Guide Select Start > Turn Off Computer > Stand By. -or- Allow the system to time ... in RAM. • Restarts quickly. • Restores network connections. • Saves maximum power. • Saves current session to turn off the notebook. If the system has stopped responding and Windows shutdown procedures cannot be used, press and hold the power button for at certain times you may...
... briefly press the power button. -or- OFF-Power status light will turn off the display and other methods to start and stop the notebook-depending on the notebook. To enter this guide. 16 Reference Guide Select Start > Turn Off Computer > Stand By. -or- Allow the system to time ... in RAM. • Restarts quickly. • Restores network connections. • Saves maximum power. • Saves current session to turn off the notebook. If the system has stopped responding and Windows shutdown procedures cannot be used, press and hold the power button for at certain times you may...
Reference Guide
Page 26
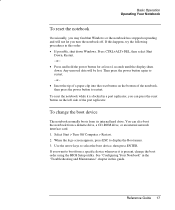
... order: • If possible, shut down . Select Start > Turn Off Computer > Restart. 2. Basic Operation Operating Your Notebook To reset the notebook Occasionally, you may find that Windows or the notebook has stopped responding and will be lost. Press CTRL+ALT+DEL, then select Shut Down, Restart. -or- • Press...want to select the boot device, then press ENTER. To change the boot order using the BIOS Setup utility. See "Configuring Your Notebook" in the "Troubleshooting and Maintenance" chapter in this guide. You can press the reset button on the bottom of the port replicator.
... order: • If possible, shut down . Select Start > Turn Off Computer > Restart. 2. Basic Operation Operating Your Notebook To reset the notebook Occasionally, you may find that Windows or the notebook has stopped responding and will be lost. Press CTRL+ALT+DEL, then select Shut Down, Restart. -or- • Press...want to select the boot device, then press ENTER. To change the boot order using the BIOS Setup utility. See "Configuring Your Notebook" in the "Troubleshooting and Maintenance" chapter in this guide. You can press the reset button on the bottom of the port replicator.
Reference Guide
Page 27
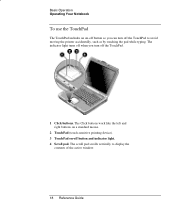
The indicator light turns off when you can turn off the TouchPad. 1 Click buttons. The Click buttons work like the left and right buttons on a standard mouse. 2 TouchPad (touch-sensitive pointing device). 3 TouchPad on -off button so you turn off the TouchPad to display the contents of the active window. 18 Reference Guide The scroll pad scrolls vertically to avoid moving the pointer accidentally, such as by touching the pad while typing. Basic Operation Operating Your Notebook To use the TouchPad The TouchPad includes an on -off button and indicator light. 4 Scroll pad.
The indicator light turns off when you can turn off the TouchPad. 1 Click buttons. The Click buttons work like the left and right buttons on a standard mouse. 2 TouchPad (touch-sensitive pointing device). 3 TouchPad on -off button so you turn off the TouchPad to display the contents of the active window. 18 Reference Guide The scroll pad scrolls vertically to avoid moving the pointer accidentally, such as by touching the pad while typing. Basic Operation Operating Your Notebook To use the TouchPad The TouchPad includes an on -off button and indicator light. 4 Scroll pad.


