
Reference Guide
Page 77
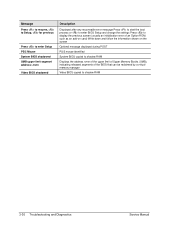
.../DVD RW combo drive, try using the Extended Desktop (dual displays), move the player window to one display. If a DVD movie doesn't fill the screen Each side of the keyboard to switch to the display selected as primary. Type C:\Program Files\Accessories in WordPad, but the screen is cold, allow it to open a .doc file in the error message box. Remove the disc from the drive, then select Start > Turn...
.../DVD RW combo drive, try using the Extended Desktop (dual displays), move the player window to one display. If a DVD movie doesn't fill the screen Each side of the keyboard to switch to the display selected as primary. Type C:\Program Files\Accessories in WordPad, but the screen is cold, allow it to open a .doc file in the error message box. Remove the disc from the drive, then select Start > Turn...
Reference Guide
Page 80
... System Devices menu is set to restore normal operation. • If an external mouse is connected, the built-in this setting with the BIOS Setup utility. If the pointer is rebooting or resuming from Standby mode. You can change this chapter. • Restart the notebook. If the TouchPad doesn't work • Press the TouchPad on the light. • Don't touch the TouchPad while the notebook is difficult to turn on -off button to turn off button to control Adjust...
... System Devices menu is set to restore normal operation. • If an external mouse is connected, the built-in this setting with the BIOS Setup utility. If the pointer is rebooting or resuming from Standby mode. You can change this chapter. • Restart the notebook. If the TouchPad doesn't work • Press the TouchPad on the light. • Don't touch the TouchPad while the notebook is difficult to turn on -off button to turn off button to control Adjust...
Reference Guide
Page 119
... BIOS password, 24 BIOS Setup utility Boot menu, 87 Exit menu, 87 external display settings, 86 Main menu, 85 Security menu, 86 using, 84 black list (modem), 37 blackout periods, modem, 37 Bluetooth business cards, 46 configuring, 45 sending files, 46 troubleshooting, 82 tuning on, 44 turning off, 45 wireless, 44 boot device order, 17, 87 Boot menu (BIOS), 87 brightness, adjusting, 19 business cards, 46 C Cable lock, 25 Caps Lock, 9 Cardbus cards, 48 cards, PCMCIA, 48 CD-ROM drive creating or copying CDs, 23 inserting CD, 20, 22 location, 2, 3 removing...
... BIOS password, 24 BIOS Setup utility Boot menu, 87 Exit menu, 87 external display settings, 86 Main menu, 85 Security menu, 86 using, 84 black list (modem), 37 blackout periods, modem, 37 Bluetooth business cards, 46 configuring, 45 sending files, 46 troubleshooting, 82 tuning on, 44 turning off, 45 wireless, 44 boot device order, 17, 87 Boot menu (BIOS), 87 brightness, adjusting, 19 business cards, 46 C Cable lock, 25 Caps Lock, 9 Cardbus cards, 48 cards, PCMCIA, 48 CD-ROM drive creating or copying CDs, 23 inserting CD, 20, 22 location, 2, 3 removing...

Maintenance and Service Guide
Page 3
... Operation...1-14 Specifications ...1-18 Internal Design...1-24 Removal and Replacement 2-1 Disassembly Flowchart ...2-3 Removing the Battery ...2-4 Removing an SDRAM Module...2-5 Removing the Wireless LAN Mini PCI Card 2-7 Removing the Hard Disk Drive...2-9 Recovering the Factory Software...2-11 Replacing Small Parts ...2-12 Removing the Keyboard Cover...2-13 Removing the Speaker Assembly ...2-15 Removing the Keyboard ...2-16 Removing the Switchboard PCA ...2-19 Removing the CD/DVD Drive...2-20 Removing the Display Assembly...2-23 Removing the Top Case ...2-26 Removing the Floppy Drive...
... Operation...1-14 Specifications ...1-18 Internal Design...1-24 Removal and Replacement 2-1 Disassembly Flowchart ...2-3 Removing the Battery ...2-4 Removing an SDRAM Module...2-5 Removing the Wireless LAN Mini PCI Card 2-7 Removing the Hard Disk Drive...2-9 Recovering the Factory Software...2-11 Replacing Small Parts ...2-12 Removing the Keyboard Cover...2-13 Removing the Speaker Assembly ...2-15 Removing the Keyboard ...2-16 Removing the Switchboard PCA ...2-19 Removing the CD/DVD Drive...2-20 Removing the Display Assembly...2-23 Removing the Top Case ...2-26 Removing the Floppy Drive...
Maintenance and Service Guide
Page 89
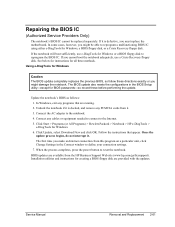
... needed to connect to the Internet. 5. The first time you cannot boot the notebook adequately, use e-DiagTools for Windows. 6. The BIOS update also resets the configurations in the Connect window to define your connection settings. 7. Follow the instructions that are provided with the updates. Installation utilities and instructions for creating a BIOS floppy disk are running. 2. If the notebook will boot sufficiently, use a Crisis Recovery floppy disk. Connect the AC adapter to reset the notebook. If it . Repairing the BIOS IC (Service Partners Only) The notebook's BIOS...
... needed to connect to the Internet. 5. The first time you cannot boot the notebook adequately, use e-DiagTools for Windows. 6. The BIOS update also resets the configurations in the Connect window to define your connection settings. 7. Follow the instructions that are provided with the updates. Installation utilities and instructions for creating a BIOS floppy disk are running. 2. If the notebook will boot sufficiently, use a Crisis Recovery floppy disk. Connect the AC adapter to reset the notebook. If it . Repairing the BIOS IC (Service Partners Only) The notebook's BIOS...
Maintenance and Service Guide
Page 100
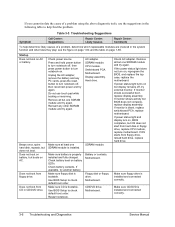
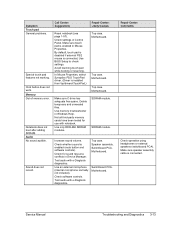
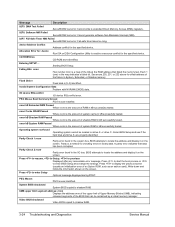
... problem. Reinsert any PC cards, press the reset button to turn on but BIOS does not complete, replace display assembly. CPU module Switchboard PCA Motherboard Display assembly Hard drive Beeps once, spins hard disk, repeats, but OS does not start from floppy drive, reload hard drive, replace hard drive. 3-8 Troubleshooting and Diagnostics Service Manual Remove all but one SDRAM module and try again. If monitor shows successful boot, replace display assembly. If monitor shows activity but display remains off , and reconnect power and try external monitor. If the power...
... problem. Reinsert any PC cards, press the reset button to turn on but BIOS does not complete, replace display assembly. CPU module Switchboard PCA Motherboard Display assembly Hard drive Beeps once, spins hard disk, repeats, but OS does not start from floppy drive, reload hard drive, replace hard drive. 3-8 Troubleshooting and Diagnostics Service Manual Remove all but one SDRAM module and try again. If monitor shows successful boot, replace display assembly. If monitor shows activity but display remains off , and reconnect power and try external monitor. If the power...
Maintenance and Service Guide
Page 103
... and checking hardware and network connections. Display cable connection SDRAM modules CPU module Display assembly Motherboard White display Adjust display brightness. Display assembly Switchboard PCA Repair Center: Comments Check cable connections. Service Manual Troubleshooting and Diagnostics 3-11 Notebook won't suspend if connection to Never. Also, make sure Hibernate timeouts (Power Schemes tab) for additional support. Try external monitor. Check display cable connections, replace display assembly. Symptom General problems Notebook resumes slowly from Standby mode Does...
... and checking hardware and network connections. Display cable connection SDRAM modules CPU module Display assembly Motherboard White display Adjust display brightness. Display assembly Switchboard PCA Repair Center: Comments Check cable connections. Service Manual Troubleshooting and Diagnostics 3-11 Notebook won't suspend if connection to Never. Also, make sure Hibernate timeouts (Power Schemes tab) for additional support. Try external monitor. Check display cable connections, replace display assembly. Symptom General problems Notebook resumes slowly from Standby mode Does...
Maintenance and Service Guide
Page 107
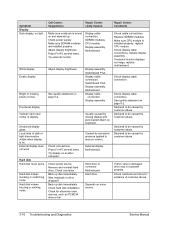
... in Windows Help. By default, touch pad is disabled if external PS/2 mouse is enabled (mute button and software controls). Avoid touching touch pad while booting or resuming. Delete temporary and unneeded files. Use memory troubleshooter in Device Manager. Check software controls. Test audio with notebook. Check for use with e-Diagtools diagnostics. Test audio with e-Diagtools diagnostics. Use only DDR-266 SDRAM modules. SDRAM module SDRAM module Increase sound volume. Top case Speaker assembly Switchboard PCA Motherboard Switchboard PCA Motherboard Repair Center...
... in Windows Help. By default, touch pad is disabled if external PS/2 mouse is enabled (mute button and software controls). Avoid touching touch pad while booting or resuming. Delete temporary and unneeded files. Use memory troubleshooter in Device Manager. Check software controls. Test audio with notebook. Check for use with e-Diagtools diagnostics. Test audio with e-Diagtools diagnostics. Use only DDR-266 SDRAM modules. SDRAM module SDRAM module Increase sound volume. Top case Speaker assembly Switchboard PCA Motherboard Switchboard PCA Motherboard Repair Center...
Maintenance and Service Guide
Page 115
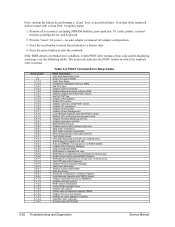
... Phoenix Dispatch Manager Warm start shut down Shadow system BIOS ROM Auto size cache Advanced configuration of chipset registers Load alternate registers with initial POST values Restore CPU control word during warm boot Initialize PCI Bus Mastering devices Initialize keyboard controller BIOS ROM checksum Initialize cache before memory Auto size 8254 timer initialization 8237 DMA controller initialization Reset Programmable Interrupt Controller Test DRAM refresh Test 8742 Keyboard Controller (on motherboard) Set ES...
... Phoenix Dispatch Manager Warm start shut down Shadow system BIOS ROM Auto size cache Advanced configuration of chipset registers Load alternate registers with initial POST values Restore CPU control word during warm boot Initialize PCI Bus Mastering devices Initialize keyboard controller BIOS ROM checksum Initialize cache before memory Auto size 8254 timer initialization 8237 DMA controller initialization Reset Programmable Interrupt Controller Test DRAM refresh Test 8742 Keyboard Controller (on motherboard) Set ES...
Maintenance and Service Guide
Page 122
... to start the boot process or to enter BIOS Setup and change the settings Press to display the previous screen (usually an initialization error of an Option ROM, such as an add-on card) Write down and follow the information shown on the screen Optional message displayed during POST PS/2 mouse identified System BIOS copied to shadow RAM Displays the address nnnn of the upper limit of Upper Memory Blocks (UMB), indicating...
... to start the boot process or to enter BIOS Setup and change the settings Press to display the previous screen (usually an initialization error of an Option ROM, such as an add-on card) Write down and follow the information shown on the screen Optional message displayed during POST PS/2 mouse identified System BIOS copied to shadow RAM Displays the address nnnn of the upper limit of Upper Memory Blocks (UMB), indicating...

Service Manual
Page 66
... 512 MB SDRAM using 512 MB modules. Up to 40-GB removable hard drive with model, usage, and power settings). Embedded numeric keypad. 12 function (Fn) keys. 5 user-programmable One-Touch buttons. Ethernet 10Base-T (10 Mbps) and 100Base-TX (100 Mbps) support. Hardware 3D acceleration, hardware DVD acceleration. Volume and mute buttons (certain models). MBA (Managed Boot Agent) support for PC2100 DDR-266 SDRAM modules. ATI Mobility Radeon graphics accelerator with integrated scroll pad, on-off...
... 512 MB SDRAM using 512 MB modules. Up to 40-GB removable hard drive with model, usage, and power settings). Embedded numeric keypad. 12 function (Fn) keys. 5 user-programmable One-Touch buttons. Ethernet 10Base-T (10 Mbps) and 100Base-TX (100 Mbps) support. Hardware 3D acceleration, hardware DVD acceleration. Volume and mute buttons (certain models). MBA (Managed Boot Agent) support for PC2100 DDR-266 SDRAM modules. ATI Mobility Radeon graphics accelerator with integrated scroll pad, on-off...
Service Manual
Page 132
... Support Web site (www.hp.com/go/bizsupport). In Windows, exit any cables or equipment needed to connect to the Internet. 5. Service Manual Removal and Replacement 2-61 Repairing the BIOS IC (Authorized Service Providers Only) The notebook's BIOS IC cannot be able to reprogram a malfunctioning BIOS IC using either e-DiagTools for Windows, a BIOS floppy disk, or a Crisis Recovery floppy disk. If the notebook will boot sufficiently, use a Crisis Recovery floppy disk. See below for instructions for Windows. 6. Update the notebook's BIOS as follows: 1. Installation utilities...
... Support Web site (www.hp.com/go/bizsupport). In Windows, exit any cables or equipment needed to connect to the Internet. 5. Service Manual Removal and Replacement 2-61 Repairing the BIOS IC (Authorized Service Providers Only) The notebook's BIOS IC cannot be able to reprogram a malfunctioning BIOS IC using either e-DiagTools for Windows, a BIOS floppy disk, or a Crisis Recovery floppy disk. If the notebook will boot sufficiently, use a Crisis Recovery floppy disk. See below for instructions for Windows. 6. Update the notebook's BIOS as follows: 1. Installation utilities...
Service Manual
Page 141
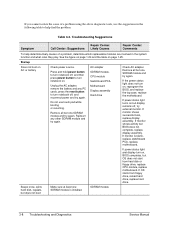
... adapter, remove the battery and any other SDRAM module and try again. Does not boot from floppy drive, reload hard drive, replace hard drive. Restart notebook. SDRAM module. Remove all but one SDRAM module and try again. Check power source. Reinsert any PC cards, press the reset button to turn on , BIOS completes, but one SDRAM module and try external monitor. Display assembly. If available, try again. Make sure CD is installed and connected correctly. 3-6 Troubleshooting and Diagnostics Service Manual Use BIOS Setup to check default boot order. Motherboard...
... adapter, remove the battery and any other SDRAM module and try again. Does not boot from floppy drive, reload hard drive, replace hard drive. Restart notebook. SDRAM module. Remove all but one SDRAM module and try again. Check power source. Reinsert any PC cards, press the reset button to turn on , BIOS completes, but one SDRAM module and try external monitor. Display assembly. If available, try again. Make sure CD is installed and connected correctly. 3-6 Troubleshooting and Diagnostics Service Manual Use BIOS Setup to check default boot order. Motherboard...
Service Manual
Page 145
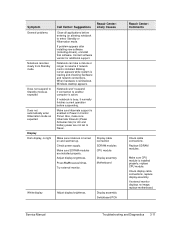
... installed properly, replace CPU module. Display cable connection. Bright or missing pixels or lines. Vertical crack near center of customer abuse. 3-10 Troubleshooting and Diagnostics Service Manual Scratched display glass. External display does not work. Check connector. Caused by customer abuse. Repair Center: Comments Check cable connections. If external monitor displays no light. Check display cable connection. Declared to area on keyboard. Make sure SDRAM modules are installed properly. SDRAM modules. Try display on page 5-2. Back up disk immediately...
... installed properly, replace CPU module. Display cable connection. Bright or missing pixels or lines. Vertical crack near center of customer abuse. 3-10 Troubleshooting and Diagnostics Service Manual Scratched display glass. External display does not work. Check connector. Caused by customer abuse. Repair Center: Comments Check cable connections. If external monitor displays no light. Check display cable connection. Declared to area on keyboard. Make sure SDRAM modules are installed properly. SDRAM modules. Try display on page 5-2. Back up disk immediately...
Service Manual
Page 148
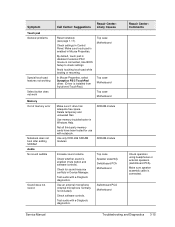
...1-57). Make sure touch pad is connected, Use BIOS Setup to check settings. Top case. Delete temporary and unneeded files. Use an external microphone (internal microphone normally not included). Motherboard. Click button does not work. Sound does not record. By default, touch pad is disabled if external PS/2 mouse is enabled in Device Manager. Not all third-party memory cards have been tested for sound resource conflicts in Mouse Properties. SDRAM module. Check whether sound is enabled (mute button and software controls). Motherboard. Increase sound volume. Service Manual...
...1-57). Make sure touch pad is connected, Use BIOS Setup to check settings. Top case. Delete temporary and unneeded files. Use an external microphone (internal microphone normally not included). Motherboard. Click button does not work. Sound does not record. By default, touch pad is disabled if external PS/2 mouse is enabled in Device Manager. Not all third-party memory cards have been tested for sound resource conflicts in Mouse Properties. SDRAM module. Check whether sound is enabled (mute button and software controls). Motherboard. Increase sound volume. Service Manual...
Service Manual
Page 154
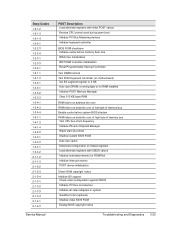
... for repair and/or follow-up actions. if an error occurs, the BIOS displays a message and/or issues a beep code. You should enable you to display the Support Ticket. 14. In Windows, click Start > All Programs (or Programs) > Hewlett-Packard > Notebook > HP e-Diagtools > e-Diagtools for Windows, use the e-Diagtools menu. The basic hardware test shows a recommended replacement part. Note that not all POST messages indicate a failure in BIOS Setup (the default setting), press...
... for repair and/or follow-up actions. if an error occurs, the BIOS displays a message and/or issues a beep code. You should enable you to display the Support Ticket. 14. In Windows, click Start > All Programs (or Programs) > Hewlett-Packard > Notebook > HP e-Diagtools > e-Diagtools for Windows, use the e-Diagtools menu. The basic hardware test shows a recommended replacement part. Note that not all POST messages indicate a failure in BIOS Setup (the default setting), press...
Service Manual
Page 155
..., including SDRAM modules, port replicator, PC cards, printer, external monitor, pointing device, and keyboard. 2. Shadow video BIOS ROM. 3-20 Troubleshooting and Diagnostics Service Manual Get CPU type. Set IN POST flag. Initialize CPU registers. Initialize local bus IDE. Load alternate registers with CMOS values. Restore CPU control word during warm boot. or wrong type or no auto adapter or unusual AC adapter configuration. 3. Shadow system BIOS ROM. Initialize extended memory for option ROMs. Verify Real Mode. Press the power button to 4 GB. BIOS ROM checksum...
..., including SDRAM modules, port replicator, PC cards, printer, external monitor, pointing device, and keyboard. 2. Shadow video BIOS ROM. 3-20 Troubleshooting and Diagnostics Service Manual Get CPU type. Set IN POST flag. Initialize CPU registers. Initialize local bus IDE. Load alternate registers with CMOS values. Restore CPU control word during warm boot. or wrong type or no auto adapter or unusual AC adapter configuration. 3. Shadow system BIOS ROM. Initialize extended memory for option ROMs. Verify Real Mode. Press the power button to 4 GB. BIOS ROM checksum...
Service Manual
Page 156
.... Set up System Management Mode (SMM) area. Initialize coprocessor if present. Re-initialize onboard I /O ports and IRQs. Configure Motherboard Configurable Devices (optional). Install CD-ROM for SMART Drive (optional). Check for boot. Shadow option ROMs. Set up Multi Processor table. Set time of ATA and SCSI drives. Enter SETUP. Prepare Boot. Initialize PnP Option ROMs. Service Manual Troubleshooting and Diagnostics 3-21 Enable USB devices. Enable external and CPU caches. Display error messages. Initialize Intelligent System Monitoring. Initialize PC...
.... Set up System Management Mode (SMM) area. Initialize coprocessor if present. Re-initialize onboard I /O ports and IRQs. Configure Motherboard Configurable Devices (optional). Install CD-ROM for SMART Drive (optional). Check for boot. Shadow option ROMs. Set up Multi Processor table. Set time of ATA and SCSI drives. Enter SETUP. Prepare Boot. Initialize PnP Option ROMs. Service Manual Troubleshooting and Diagnostics 3-21 Enable USB devices. Enable external and CPU caches. Display error messages. Initialize Intelligent System Monitoring. Initialize PC...
Service Manual
Page 159
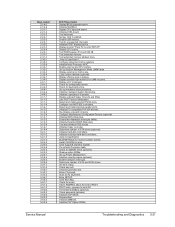
... binary data. Starting BIOS Setup. A parity error indicates that failed the memory test. BIOS attempts to resolve a resource conflict for offset address of the BIOS that can be located on the screen. Invalid System Configuration Data Problem with NVRAM (CMOS) data. PS/2 Mouse Boot Summary Screen: PS/2 mouse installed. Allocation Error for: device Run ISA or EISA Configuration Utility to locate the address and display it on drive A: or drive C:. Fixed Disk n Fixed disk n (0-3) identified. nnnn kB Shadow RAM Passed Where...
... binary data. Starting BIOS Setup. A parity error indicates that failed the memory test. BIOS attempts to resolve a resource conflict for offset address of the BIOS that can be located on the screen. Invalid System Configuration Data Problem with NVRAM (CMOS) data. PS/2 Mouse Boot Summary Screen: PS/2 mouse installed. Allocation Error for: device Run ISA or EISA Configuration Utility to locate the address and display it on drive A: or drive C:. Fixed Disk n Fixed disk n (0-3) identified. nnnn kB Shadow RAM Passed Where...
Installing Microsoft Windows XP Service Pack 2 on HP Compaq Business Notebooks
Page 4
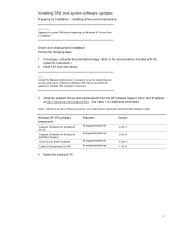
...Software for Bluetooth by hp Support Software for Bluetooth MultiPort Module Quick Launch Button Software System Enhancements for complete SP2 installation instructions. 3. If necessary, unbundle the preinstalled image. (Refer to the Microsoft website for SP2 4. See Table 1 for installation -- Install SP2 (See note below). Restart the notebook PC. Installing SP2 and system software updates Preparing for additional information. installing drivers and enhancements IMPORTANT Upgrade the system ROM before beginning the Windows XP Service Pack 2 installation. Install the updated...
...Software for Bluetooth by hp Support Software for Bluetooth MultiPort Module Quick Launch Button Software System Enhancements for complete SP2 installation instructions. 3. If necessary, unbundle the preinstalled image. (Refer to the Microsoft website for SP2 4. See Table 1 for installation -- Install SP2 (See note below). Restart the notebook PC. Installing SP2 and system software updates Preparing for additional information. installing drivers and enhancements IMPORTANT Upgrade the system ROM before beginning the Windows XP Service Pack 2 installation. Install the updated...


