

Reference Guide
Page 57
... all the way into the bottom of the PC Card slots vary by model series. To insert or remove a PC Card Note The location and number of the slot. Hold the PC Card label-side up with the casing of the notebook. Inserting a PC Card 1. Most cards are properly seated when the outer edge is available...
... all the way into the bottom of the PC Card slots vary by model series. To insert or remove a PC Card Note The location and number of the slot. Hold the PC Card label-side up with the casing of the notebook. Inserting a PC Card 1. Most cards are properly seated when the outer edge is available...
Reference Guide
Page 112
... Product Regulations 3000 Hanover Street Palo Alto, CA 94304 +1 (650) 857-1501 declares that the product(s) Trade name: Hewlett-Packard Company Product name: Pavilion ZE4... series Regulatory Model Number: CRVSA-02T1-75 Complies with Part 15 of the FCC Rules. and XT... Reference Guide 103
... Product Regulations 3000 Hanover Street Palo Alto, CA 94304 +1 (650) 857-1501 declares that the product(s) Trade name: Hewlett-Packard Company Product name: Pavilion ZE4... series Regulatory Model Number: CRVSA-02T1-75 Complies with Part 15 of the FCC Rules. and XT... Reference Guide 103
Maintenance and Service Guide
Page 6
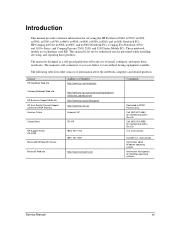
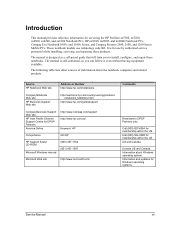
..., ze4600, ze4500, ze4400, ze4300, ze4200, and ze4100 Notebook PCs, HP Compaq nx9010, nx9008, nx9005, and nx9000 Notebook PCs, Compaq Evo Notebook 1050v and 1010v Series, and Compaq Presario 2500, 2100, and 1100 Series Mobile PCs. Source HP Notebook Web site Address or Number http://www.hp.com/notebooks Comments Compaq Notebook Web site HP Business Support Web site HP Asia Pacific Channel Support Centre for membership within...
..., ze4600, ze4500, ze4400, ze4300, ze4200, and ze4100 Notebook PCs, HP Compaq nx9010, nx9008, nx9005, and nx9000 Notebook PCs, Compaq Evo Notebook 1050v and 1010v Series, and Compaq Presario 2500, 2100, and 1100 Series Mobile PCs. Source HP Notebook Web site Address or Number http://www.hp.com/notebooks Comments Compaq Notebook Web site HP Business Support Web site HP Asia Pacific Channel Support Centre for membership within...
Maintenance and Service Guide
Page 40
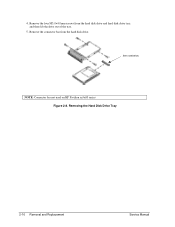
Removing the Hard Disk Drive Tray 2-10 Removal and Replacement Service Manual Remove the four M3.0×4.0mm screws from the hard disk drive. See note below NOTE: Connector bar not used on HP Pavilion ze5x00 series Figure 2-8. Remove the connector bar from the hard disk drive and hard disk drive tray, and then lift the drive out of the tray. 5. 4.
Removing the Hard Disk Drive Tray 2-10 Removal and Replacement Service Manual Remove the four M3.0×4.0mm screws from the hard disk drive. See note below NOTE: Connector bar not used on HP Pavilion ze5x00 series Figure 2-8. Remove the connector bar from the hard disk drive and hard disk drive tray, and then lift the drive out of the tray. 5. 4.
Maintenance and Service Guide
Page 45
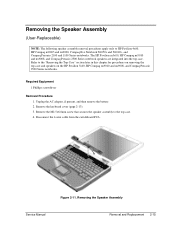
... the Speaker Assembly (User-Replaceable) NOTE: The following speaker assembly removal procedures apply only to HP Pavilion 4x00, HP Compaq nx9005 and nx9000, Compaq Evo Notebook N1050v and N1010v, and Compaq Presario 2100 and 1100 Series notebooks. Unplug the AC adapter, if present, and then remove the battery. 2. Required Equipment 1 Phillips screwdriver Removal Procedure 1. Removing the...
... the Speaker Assembly (User-Replaceable) NOTE: The following speaker assembly removal procedures apply only to HP Pavilion 4x00, HP Compaq nx9005 and nx9000, Compaq Evo Notebook N1050v and N1010v, and Compaq Presario 2100 and 1100 Series notebooks. Unplug the AC adapter, if present, and then remove the battery. 2. Required Equipment 1 Phillips screwdriver Removal Procedure 1. Removing the...
Maintenance and Service Guide
Page 53
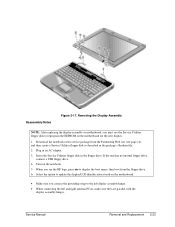
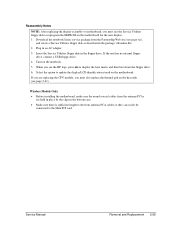
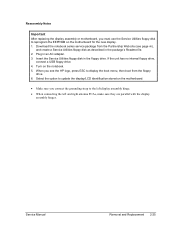
... to update the display/LCD identification stored on the motherboard. • Make sure you connect the grounding strap to reprogram the EEPROM on the notebook. 5. Service Manual Removal and Replacement 2-23 If the unit has no internal floppy drive, connect a USB floppy drive. 4. Plug in the... an AC adapter. 3. Reassembly Notes Figure 2-17. Turn on the motherboard for the new display. 1. Download the notebook series service package from the Partnership Web site (see the HP logo, press esc to display the boot menu, then boot from the floppy drive. 6. When you must use the...
... to update the display/LCD identification stored on the motherboard. • Make sure you connect the grounding strap to reprogram the EEPROM on the notebook. 5. Service Manual Removal and Replacement 2-23 If the unit has no internal floppy drive, connect a USB floppy drive. 4. Plug in the... an AC adapter. 3. Reassembly Notes Figure 2-17. Turn on the motherboard for the new display. 1. Download the notebook series service package from the Partnership Web site (see the HP logo, press esc to display the boot menu, then boot from the floppy drive. 6. When you must use the...
Maintenance and Service Guide
Page 85
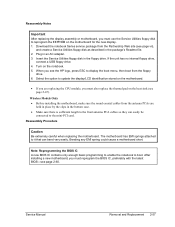
Download the notebook Series service package from the Partnership Web site (see page vii), and create a Service Utilities floppy disk as described in an AC adapter. 3. Plug in the package's Readme file. 2. Turn on the heat sink (see the HP logo, press esc to the Mini PCI card. Select... a USB floppy drive. 4. Reassembly Notes NOTE: After replacing the display assembly or motherboard, you must also replace the thermal pad on the notebook. 5. Insert the Service Utilities floppy disk in the bottom case. • Make sure there is sufficient length to the front antenna PCA cables...
Download the notebook Series service package from the Partnership Web site (see page vii), and create a Service Utilities floppy disk as described in an AC adapter. 3. Plug in the package's Readme file. 2. Turn on the heat sink (see the HP logo, press esc to the Mini PCI card. Select... a USB floppy drive. 4. Reassembly Notes NOTE: After replacing the display assembly or motherboard, you must also replace the thermal pad on the notebook. 5. Insert the Service Utilities floppy disk in the bottom case. • Make sure there is sufficient length to the front antenna PCA cables...

Maintenance and Service Guide
Page 114
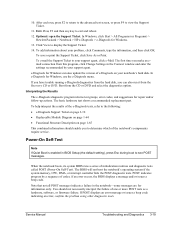
.... Press the reset button to return the notebook to start the notebook. Press the power button to a known state. 4. Beep Codes 1 1-2 1-1-1-3 1-1-1-4 1-1-2-1 1-1-2-3 1-1-2-4 1-1-3-1 1-1-3-2 1-1-3-3 1-1-3-4 1-1-4-1 1-1-4-3 1-1-4-4 1-2-1-1 Table 3-4. When the notebook boots, its system BIOS runs a series of one or more POST tests as described...notebook's operating system if the system memory, CPU, DMA, or interrupt controller fails the POST diagnostic tests. First, confirm the failure by a sequence of codes; Note that not all accessories, including SDRAM modules, port replicator, PC...
.... Press the reset button to return the notebook to start the notebook. Press the power button to a known state. 4. Beep Codes 1 1-2 1-1-1-3 1-1-1-4 1-1-2-1 1-1-2-3 1-1-2-4 1-1-3-1 1-1-3-2 1-1-3-3 1-1-3-4 1-1-4-1 1-1-4-3 1-1-4-4 1-2-1-1 Table 3-4. When the notebook boots, its system BIOS runs a series of one or more POST tests as described...notebook's operating system if the system memory, CPU, DMA, or interrupt controller fails the POST diagnostic tests. First, confirm the failure by a sequence of codes; Note that not all accessories, including SDRAM modules, port replicator, PC...
Service Manual
Page 6
... table lists other sources of information about Windows operating system. Call (800) 524-3388 for servicing the HP Pavilion ze5300, ze5200, ze4300, ze4200, and ze4100 Notebook PCs, HP nx9010, nx9005, and nx9000 Notebook PCs, Compaq Evo Notebook 1050v and 1010v Series, and Compaq Presario 2500, 2100, and 1100 Series Mobile PCs. It is self-contained, so you to DPSP Partners only.
... table lists other sources of information about Windows operating system. Call (800) 524-3388 for servicing the HP Pavilion ze5300, ze5200, ze4300, ze4200, and ze4100 Notebook PCs, HP nx9010, nx9005, and nx9000 Notebook PCs, Compaq Evo Notebook 1050v and 1010v Series, and Compaq Presario 2500, 2100, and 1100 Series Mobile PCs. It is self-contained, so you to DPSP Partners only.
Service Manual
Page 33
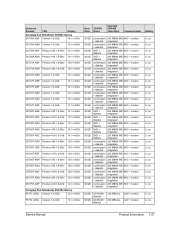
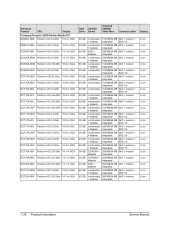
... Display Compaq Evo Notebook N1050v Series DC749A ABF Celeron 1.6-GHz 14.1-in XGA DC749A ABH Celeron 1.6-GHz 14.1-in XGA DC750A ABF Pentium 4-M 1.8-GHz 14.1-in XGA DC750A ABH Pentium 4-M 1.8-GHz ... XGA DC769T ABZ Pentium 4-M 1.8-GHz 15.0-in XGA DC770T ABD Pentium 4-M 1.8-GHz 14.1-in XGA DC770T ABF Pentium 4-M 1.8-GHz 14.1-in XGA Compaq Evo Notebook N1010v Series F5771 J/ABJ Celeron 1.6-GHz 14.1-in XGA F5772 J/ABJ Celeron 1.6-GHz 14.1-in XGA Hard CD/DVD Drive Drives Standard SDRAM/ Video Mem Communication 30...
... Display Compaq Evo Notebook N1050v Series DC749A ABF Celeron 1.6-GHz 14.1-in XGA DC749A ABH Celeron 1.6-GHz 14.1-in XGA DC750A ABF Pentium 4-M 1.8-GHz 14.1-in XGA DC750A ABH Pentium 4-M 1.8-GHz ... XGA DC769T ABZ Pentium 4-M 1.8-GHz 15.0-in XGA DC770T ABD Pentium 4-M 1.8-GHz 14.1-in XGA DC770T ABF Pentium 4-M 1.8-GHz 14.1-in XGA Compaq Evo Notebook N1010v Series F5771 J/ABJ Celeron 1.6-GHz 14.1-in XGA F5772 J/ABJ Celeron 1.6-GHz 14.1-in XGA Hard CD/DVD Drive Drives Standard SDRAM/ Video Mem Communication 30...
Service Manual
Page 34
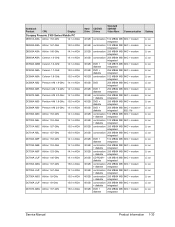
Notebook Product CPU Display Compaq Presario 2500 Series Mobile PC DB390A ABA Pentium 4-D 2.4-GHz 15.0-in XGA DB391A ABA Pentium 4-D 2.4-GHz 15.0-in XGA DC606A AB2 Pentium 4-D 2.4-GHz 14.1-in XGA DC607A ABM Pentium 4-D 2.0-GHz ...
Notebook Product CPU Display Compaq Presario 2500 Series Mobile PC DB390A ABA Pentium 4-D 2.4-GHz 15.0-in XGA DB391A ABA Pentium 4-D 2.4-GHz 15.0-in XGA DC606A AB2 Pentium 4-D 2.4-GHz 14.1-in XGA DC607A ABM Pentium 4-D 2.0-GHz ...
Service Manual
Page 39
Notebook Product CPU Display Compaq Presario 2100 Series Mobile PC DB381A ABA Athlon 1.53-GHz 14.1-in XGA DB382A ABA Athlon 1.67-GHz 15.0-in XGA DB383A ABA Athlon 1.46-GHz 14.1-in XGA DB954A ...
Notebook Product CPU Display Compaq Presario 2100 Series Mobile PC DB381A ABA Athlon 1.53-GHz 14.1-in XGA DB382A ABA Athlon 1.67-GHz 15.0-in XGA DB383A ABA Athlon 1.46-GHz 14.1-in XGA DB954A ...
Service Manual
Page 48
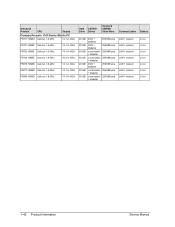
Notebook Product CPU Display Compaq Presario 1100 Series Mobile PC F5781 H/ABU Celeron 1.6-GHz 14.1-in XGA F5781 H/ABZ Celeron 1.6-GHz 14.1-in XGA F5782 H/ABZ Celeron 1.6-GHz 14.1-in XGA F5783 H/ABZ Celeron 1.8-GHz ...
Notebook Product CPU Display Compaq Presario 1100 Series Mobile PC F5781 H/ABU Celeron 1.6-GHz 14.1-in XGA F5781 H/ABZ Celeron 1.6-GHz 14.1-in XGA F5782 H/ABZ Celeron 1.6-GHz 14.1-in XGA F5783 H/ABZ Celeron 1.8-GHz ...
Service Manual
Page 86
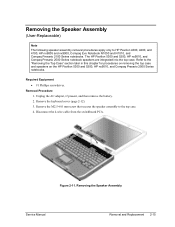
... Case" section later in this chapter for procedures on removing the top case and speakers on the HP Pavilion 5300 and 5200, HP nx9010, and Compaq Presario 2500 Series notebooks. Refer to the top case. 4. Figure 2-11. Unplug the AC adapter, if present, and...Speaker Assembly (User-Replaceable) Note The following speaker assembly removal procedures apply only to HP Pavilion 4300, 4200, and 4100, HP nx9005 and nx9000, Compaq Evo Notebook N1050 and N1010, and Compaq Presario 2100 Series notebooks. Required Equipment • #1 Phillips screwdriver. Disconnect the 4-wire cable from the ...
... Case" section later in this chapter for procedures on removing the top case and speakers on the HP Pavilion 5300 and 5200, HP nx9010, and Compaq Presario 2500 Series notebooks. Refer to the top case. 4. Figure 2-11. Unplug the AC adapter, if present, and...Speaker Assembly (User-Replaceable) Note The following speaker assembly removal procedures apply only to HP Pavilion 4300, 4200, and 4100, HP nx9005 and nx9000, Compaq Evo Notebook N1050 and N1010, and Compaq Presario 2100 Series notebooks. Required Equipment • #1 Phillips screwdriver. Disconnect the 4-wire cable from the ...
Service Manual
Page 96
Download the notebook series service package from the floppy drive. 6. If the unit has no internal floppy drive, connect a USB floppy drive. 4. Turn ...package's Readme file. 2. Select the option to update the display/LCD identification stored on the motherboard. • Make sure you see the HP logo, press ESC to display the boot menu, then boot from the Partnership Web site (see page vii), and create a Service Utilities ... the display assembly or motherboard, you must use the Service Utilities floppy disk to reprogram the EEPROM on the notebook. 5. Plug in an AC adapter. 3.
Download the notebook series service package from the floppy drive. 6. If the unit has no internal floppy drive, connect a USB floppy drive. 4. Turn ...package's Readme file. 2. Select the option to update the display/LCD identification stored on the motherboard. • Make sure you see the HP logo, press ESC to display the boot menu, then boot from the Partnership Web site (see page vii), and create a Service Utilities ... the display assembly or motherboard, you must use the Service Utilities floppy disk to reprogram the EEPROM on the notebook. 5. Plug in an AC adapter. 3.
Service Manual
Page 128
... disk to boot. Service Manual Removal and Replacement 2-57 Plug in the floppy drive. Bending any EMI spring could cause a motherboard short. Download the notebook Series service package from the Partnership Web site (see page vii), and create a Service Utilities floppy disk as described in the bottom case. • Make..., then boot from the antenna PCAs are replacing the CPU module, you must reprogram the BIOS IC, preferably with the latest BIOS-see the HP logo, press ESC to the front antenna PCA cables so they can bend very easily. Turn on the motherboard for the new display. 1. ...
... disk to boot. Service Manual Removal and Replacement 2-57 Plug in the floppy drive. Bending any EMI spring could cause a motherboard short. Download the notebook Series service package from the Partnership Web site (see page vii), and create a Service Utilities floppy disk as described in the bottom case. • Make..., then boot from the antenna PCAs are replacing the CPU module, you must reprogram the BIOS IC, preferably with the latest BIOS-see the HP logo, press ESC to the front antenna PCA cables so they can bend very easily. Turn on the motherboard for the new display. 1. ...
Service Manual
Page 154
...e-Diagtools diagnostic program returns test groups, error codes, and suggestions for Windows, use the e-Diagtools menu. When the notebook boots, its system BIOS runs a series of one or more POST tests as a hardware, software, or firmware failure. You should enable you can also ... 11. The basic hardware test shows a recommended replacement part. In Windows, click Start > All Programs (or Programs) > Hewlett-Packard > Notebook > HP e-Diagtools > e-Diagtools for information only. If POST displays an error message or issues a beep code indicating an error, confirm the problem using ...
...e-Diagtools diagnostic program returns test groups, error codes, and suggestions for Windows, use the e-Diagtools menu. When the notebook boots, its system BIOS runs a series of one or more POST tests as a hardware, software, or firmware failure. You should enable you can also ... 11. The basic hardware test shows a recommended replacement part. In Windows, click Start > All Programs (or Programs) > Hewlett-Packard > Notebook > HP e-Diagtools > e-Diagtools for information only. If POST displays an error message or issues a beep code indicating an error, confirm the problem using ...
Hard Drive White Paper
Page 3
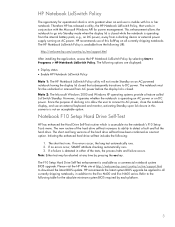
...is available from the following options are displayed: • Display status • Enable HP Notebook LidSwitch Policy Note 1: The HP Notebook LidSwitch Policy utility will not invoke Standby on all currently shipping notebooks, in either of the hard drive self-test increases its greatest when an end ...After installing the application, access the HP Notebook LidSwitch Policy by each platform. 3 However, it operates whether the notebook is operating on AC power or on AC power. If a failure is detected in addition to the Evo N400 and Evo N600 series. Note: Either test may be ...
...is available from the following options are displayed: • Display status • Enable HP Notebook LidSwitch Policy Note 1: The HP Notebook LidSwitch Policy utility will not invoke Standby on all currently shipping notebooks, in either of the hard drive self-test increases its greatest when an end ...After installing the application, access the HP Notebook LidSwitch Policy by each platform. 3 However, it operates whether the notebook is operating on AC power or on AC power. If a failure is detected in addition to the Evo N400 and Evo N600 series. Note: Either test may be ...
Hard Drive White Paper
Page 4
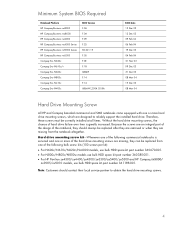
... should contact their local service partner to reliably support the installed hard drive. Minimum System BIOS Required Notebook Platform HP Compaq Business nc8000 HP Compaq Business nw8000 HP Compaq Business nc6000 HP Compaq Business nc4000 Series HP Compaq Business nx9000 Series HP Compaq Business nx5000 Compaq Evo N620c Compaq Evo N610c/v Compaq Evo N600c Compaq Evo N800c Compaq Evo N410c...
... should contact their local service partner to reliably support the installed hard drive. Minimum System BIOS Required Notebook Platform HP Compaq Business nc8000 HP Compaq Business nw8000 HP Compaq Business nc6000 HP Compaq Business nc4000 Series HP Compaq Business nx9000 Series HP Compaq Business nx5000 Compaq Evo N620c Compaq Evo N610c/v Compaq Evo N600c Compaq Evo N800c Compaq Evo N410c...
Lithium-ion battery technology: Getting the most from Smart Batteries
Page 2
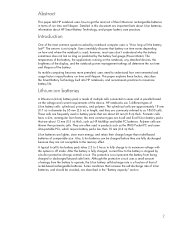
...cylindrical cells are approximately 18 mm (0.7 in) in diameter by notebook computer users is made of comparable size. the most users don't understand why the battery sometimes does not last as long as HP MultiBay and tablet PC batteries. Introduction One of the most out of Li-Ion ...batteries of multiple cells connected in series and in ) thick, such as predicted by a built-in terms of the device. The temperature of the battery, the applications running on the notebook, any attached devices, the brightness of the display, and the notebook power management settings all determine ...
...cylindrical cells are approximately 18 mm (0.7 in) in diameter by notebook computer users is made of comparable size. the most users don't understand why the battery sometimes does not last as long as HP MultiBay and tablet PC batteries. Introduction One of the most out of Li-Ion ...batteries of multiple cells connected in series and in ) thick, such as predicted by a built-in terms of the device. The temperature of the battery, the applications running on the notebook, any attached devices, the brightness of the display, and the notebook power management settings all determine ...


