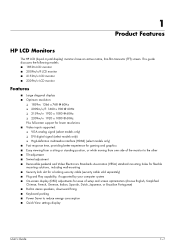
1859m,2009m,2009v, 2009f, 2159m,2159v,2309m,2309v, 2509m, 2709m LCD Monitor User Guide
Page 5
... HP LCD Monitors ...1-1 Features ...1-1 2 Safety and Maintenance Guidelines Important Safety Information ...2-1 Safety Precautions ...2-1 Maintenance Guidelines...2-2 Cleaning the Monitor ...2-2 3 Setting Up the Monitor Unpacking the Monitor...3-1 Installing the Monitor ...3-1 Preparing the monitor for desktop use 3-1 Preparing the monitor for wall-mounting...Cable Management...3-9 Adjusting the Tilt...3-9 Adjusting the Swivel...3-10 Keyboard Parking...3-10 4 Operating the Monitor CD Software and Utilities ...4-1 Installing Drivers...4-1 Downloading updated drivers from the Internet 4-1 Using ...
1859m,2009m,2009v, 2009f, 2159m,2159v,2309m,2309v, 2509m, 2709m LCD Monitor User Guide
Page 7
... standing position, or while moving from one side of the monitor to the other ■ Tilt adjustment ■ Swivel adjustment ■ Removable pedestal and Video Electronics Standards Association (VESA) standard mounting holes for flexible mounting solutions, including wall-mounting ■ Security lock slot for a locking security cable (... parking ■ Power Saver to reduce energy consumption ■ Quick View settings display User's Guide 1-1 1 Product Features HP LCD Monitors The HP LCD (liquid crystal display) monitors have an active matrix, thin-film transistor (TFT) screen.
1859m,2009m,2009v, 2009f, 2159m,2159v,2309m,2309v, 2509m, 2709m LCD Monitor User Guide
Page 11
... all contents are included. Connect the monitor cables after you have installed the monitor. Set the monitor screen face down while preparing it . Determine whether the monitor will be desktop mounted or wall-mounted. Grip the base near your computer. Prepare a flat area to the LCD screen; doing so can install the monitor on a flat, soft, protected surface. Unfold...
1859m,2009m,2009v, 2009f, 2159m,2159v,2309m,2309v, 2509m, 2709m LCD Monitor User Guide
Page 12
... cable and any other cables from the monitor. 2. Refer to the monitor. Location of supporting the monitor. 1. Monitor in upright position Preparing the monitor for wall-mounting WARNING: To reduce the risk of personal injury or of damage to the equipment, check that fasten monitor base to the instructions supplied with the wall-mounting fixture and check that it is...
1859m,2009m,2009v, 2009f, 2159m,2159v,2309m,2309v, 2509m, 2709m LCD Monitor User Guide
Page 14
Threaded holes for screws to attach the swing arm or other mounting fixture. 3-4 Features may vary by model. Follow the instructions included with the mounting fixture to the back of the panel are compliant with the VESA standard for mounting flat-panel monitors. 7. Attach a swing arm or other mounting fixture to ensure that are exposed. Setting Up the Monitor Four threaded holes are on the back of the monitor. These holes are for attaching wall mount 6. User's Guide The four threaded holes that the monitor is safely attached.
1859m,2009m,2009v, 2009f, 2159m,2159v,2309m,2309v, 2509m, 2709m LCD Monitor User Guide
Page 48
User's Guide Index T technical specifications B-1 - A-3 U unpacking 3-1 V video and audio cables and adapters 3-6 video input connectors selecting 4-7 W wall-mounting 3-2 Part number: 507981-001 D-2 Features may vary by model. B-6 tilt adjustment 3-9 troubleshooting A-1 -
HP 2210i/2310i/2510i LCD Monitors - User Guide
Page 8
● Removable base and Video Electronics Standards Association (VESA) standard mounting holes for flexible mounting solutions, including wall-mounting ● Security lock slot for a locking security cable (security cable sold separately) ● Plug and Play capability, if supported by your computer system ● On-...
HP 2210i/2310i/2510i LCD Monitors - User Guide
Page 13
...-slot screwdriver to assemble the monitor. You may need a Phillips screwdriver for preparing the monitor for installation. 5. Place the monitor in this chapter. 4. Unpacking the Monitor 7 Turn off the computer and other attached devices. 3. 3 Setting Up the Monitor Unpacking the Monitor 1. Determine whether the monitor will be desktop mounted or wall-mounted. See "Installing the Monitor" in a convenient, wellventilated location near...
HP 2210i/2310i/2510i LCD Monitors - User Guide
Page 15
... down on a flat, stable surface. Figure 3-4 Location of damage to the monitor. Refer to the instructions supplied with the wall-mounting fixture and check that fasten the monitor base to the equipment, check that the wall-mounting fixture is capable of the wall-mounting fixture. 3. Check the stability of supporting the monitor. 2. Figure 3-3 Monitor in upright position Preparing the monitor for wall-mounting 1.
HP 2210i/2310i/2510i LCD Monitors - User Guide
Page 17
...are located on the computer. Connecting Monitor Cables 11 Be sure the computer and monitor are exposed. Four threaded holes are turned off and unplugged. 1. To use DVI, you must have a DVI-compliant graphic card. These holes are for attaching wall mount 8. Follow the instructions included with ...select models) Connect one end of the VGA video cable to the back of the monitor and the other end to the back of the monitor. Attach a swing arm or other mounting fixture to the VGA video...
User's Guide 2309p, 2509p LCD Display
Page 5
... HP LCD Monitors ...1-1 Features ...1-1 2 Safety and Maintenance Guidelines Important Safety Information ...2-1 Safety Precautions ...2-1 Maintenance Guidelines...2-2 Cleaning the Monitor ...2-2 3 Setting Up the Monitor Unpacking the Monitor...3-1 Installing the Monitor ...3-1 Preparing the monitor for desktop use 3-1 Preparing the monitor for wall-mounting ......3-10 Adjusting the Tilt...3-11 Adjusting the Swivel...3-11 Adjusting the Monitor Height ...3-12 Keyboard Parking...3-12 4 Operating the Monitor CD Software and Utilities ...4-1 Installing Drivers...4-1 Downloading updated drivers from...
User's Guide 2309p, 2509p LCD Display
Page 7
...adjustment using tilt/slider mechanism ■ Removable pedestal and Video Electronics Standards Association (VESA) standard mounting holes for flexible mounting solutions, including wall-mounting ■ Security lock slot for a locking security cable (security cable sold separately) ■... Slider function between + and - 1 Product Features HP LCD Monitors The HP LCD (liquid crystal display) monitors have an active matrix, thin-film transistor (TFT) screen. This guide discusses the following model: ■ 2309P LCD monitor Features ■ Large diagonal display ■ Optimum resolution...
User's Guide 2309p, 2509p LCD Display
Page 11
... area to the LCD screen; You may need a flat, soft, protected area for installation. 5. Installing the Monitor You can cause damage. doing so can install the monitor on a flat, soft, protected surface. 3 Setting Up the Monitor Unpacking the Monitor 1. Make sure ...monitor will be desktop mounted or wall-mounted. You need a straight-slot screwdriver to secure some cables. Monitor with folded base User's Guide 3-1 Preparing the monitor for wall-mounting. Unfold the monitor by lifting it for placing the monitor screen down on a desktop or wall-mount it. Connect the monitor...
User's Guide 2309p, 2509p LCD Display
Page 13
... down on a flat, protected surface. 3. Disconnect the power cable and any other cables from the monitor User's Guide 3-3 Removing the base cover away from the monitor. 2. Setting Up the Monitor Preparing the monitor for wall-mounting WARNING: To reduce the risk of personal injury or of damage to the equipment, check that it is adequately installed...
User's Guide 2309p, 2509p LCD Display
Page 14
... or other mounting fixture. 3-4 Features may vary by model. Remove the two screws in the monitor base. The four threaded holes that the monitor is safely attached. These holes are exposed. Follow the instructions included with the VESA standard for attaching wall mount 6. Lift the monitor base off the monitor. Threaded holes for mounting flat-panel monitors. 7. User's Guide...
HP 2310mfa, 2310mfd LCD Monitors - User Guide
Page 3
...4 IMPORTANT SAFETY INSTRUCTIONS 5 PACKAGE CONTENTS...7 SETTING UP THE MFM ...8 ATTACHING THE BASE ...8 PREPARING THE MFM FOR WALL MOUNTING ...8 SELECTING A GOOD LOCATION...9 INSTALLING THE MONITOR DRIVER 10 INSTALLING THE DRIVER...10 DOWNLOADING UPDATED DRIVERS FROM THE INTERNET 10 LOCATING THE MFM CONNECTORS AND CONTROLS 11 ...MENUS...22 FOR ATV MODEL...22 • FEATURES MENU...24 • INSTALLATION ...26 • PICTURE MENU ...22 • SOUND MENU...23 FOR DTV MODEL ...28 • FEATURES MENU...31 • PARENTAL MENU...31 • PICTURE MENU ...28 • SOUND MENU...29 •...
HP 2310mfa, 2310mfd LCD Monitors - User Guide
Page 7
... not compromise these design standards by the manufacturer, or sold with minimum weight/load ( page 34-35). 20. For use only with a third party Listed Wall Mounting Bracket with the apparatus.When a cart is used as power-supply cord or plug is required when the apparatus has been damaged in the operating...
HP 2310mfa, 2310mfd LCD Monitors - User Guide
Page 10
...the MFM to the stand. 3. Loosen the screws holding your MFM using four screws, as indicated in the illustration. ATV Interface PREPARING THE MFM FOR WALL MOUNTING Place the MFM at least 2.36 inches (60 mm) from the MFM. 2. For your MFM on a soft and flat surface (blanket, foam,... pressure to prevent cable interference. Gently push the Base towards the MFM until the locking mechanism locks into place. Before mounting your safety, please use listed wall mount bracket with minimum weight of the MFM must be assembled prior to the MFM 2. Carefully align and insert the Base to...
HP w185,w1858, w2338h LCD Monitor - User Guide
Page 5
...HP LCD Monitors ...1-1 Features ...1-1 2 Safety and Maintenance Guidelines Important Safety Information ...2-1 Safety Precautions ...2-1 Maintenance Guidelines...2-2 Cleaning the Monitor ...2-2 3 Setting Up the Monitor Unpacking the Monitor...3-1 Installing the Monitor ...3-1 Assembling the cantilever base 3-1 Unfolding the double-hinged monitor 3-2 Preparing the cantilever-base monitor for wall-mounting 3-3 Wall-mounting the double-hinged monitor... Cable (Select Models Only 3-7 Connecting USB Devices to the Monitor (Select Models Only 3-8 Connecting the Power Cable ...3-8 Cable Management...
HP w185,w1858, w2338h LCD Monitor - User Guide
Page 9
...HP LCD Monitors The HP LCD (liquid crystal display) monitors have an active matrix, thin-film transistor (TFT) screen. This guide discusses the following models: ■ w1858 LCD monitor ■ w2228h LCD monitor ■ w2338h LCD monitor ■ w2348h LCD monitor ■ w2448h/hc LCD monitor ■ w2558hc LCD monitor Features ■ Large diagonal display ■ Optimum resolution: ❏ w1858: 1366 x 768 @ 60Hz ❏ w2228h: 1680 x 1050 @ 60Hz ❏ w2338h...Association (VESA) standard mounting holes for flexible mounting solutions, including wall-mounting ■ Security ...