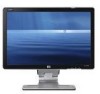
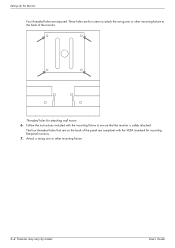
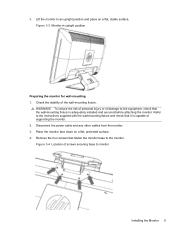
1859m,2009m,2009v, 2009f, 2159m,2159v,2309m,2309v, 2509m, 2709m LCD Monitor User Guide
Page 5
...HP LCD Monitors ...1-1 Features ...1-1 2 Safety and Maintenance Guidelines Important Safety Information ...2-1 Safety Precautions ...2-1 Maintenance Guidelines...2-2 Cleaning the Monitor ...2-2 3 Setting Up the Monitor Unpacking the Monitor...3-1 Installing the Monitor ...3-1 Preparing the monitor for desktop use 3-1 Preparing the monitor for wall-mounting...Cable Management...3-9 Adjusting the Tilt...3-9 Adjusting the Swivel...3-10 Keyboard Parking...3-10 4 Operating the Monitor CD Software and Utilities ...4-1 Installing Drivers...4-1 Downloading updated drivers from the Internet 4-1 Using ...
1859m,2009m,2009v, 2009f, 2159m,2159v,2309m,2309v, 2509m, 2709m LCD Monitor User Guide
Page 7
1 Product Features HP LCD Monitors The HP LCD (liquid crystal display) monitors have an active matrix, thin-film transistor (TFT) screen. This guide discusses the following models: ■ 1859m LCD monitor ■ 2009m/v/f LCD monitor ■ 2159m/v LCD monitor ■ 2309m/v LCD monitor Features ■ Large diagonal display ■ Optimum ... of the monitor to the other ■ Tilt adjustment ■ Swivel adjustment ■ Removable pedestal and Video Electronics Standards Association (VESA) standard mounting holes for flexible mounting solutions, including wall-mounting ■ ...
1859m,2009m,2009v, 2009f, 2159m,2159v,2309m,2309v, 2509m, 2709m LCD Monitor User Guide
Page 11
... attaches to secure some cables. Place the monitor in this chapter. 4. Unfolding the monitor 2. Store the packing box. 2. User's Guide 3-1 Determine whether the monitor will be desktop mounted or wall-mounted. Prepare a flat area to the LCD screen; Make sure all contents are included. 3 Setting Up the Monitor Unpacking the Monitor 1. Avoid touching or applying pressure to assemble...
1859m,2009m,2009v, 2009f, 2159m,2159v,2309m,2309v, 2509m, 2709m LCD Monitor User Guide
Page 12
... cable and any other cables from the monitor. 2. Monitor in upright position Preparing the monitor for wall-mounting WARNING: To reduce the risk of personal injury or of supporting the monitor. 1. Refer to the monitor. Place the monitor face down on a flat, stable surface. Remove the four screws that the wall-mounting fixture is capable of damage to...
1859m,2009m,2009v, 2009f, 2159m,2159v,2309m,2309v, 2509m, 2709m LCD Monitor User Guide
Page 14
Threaded holes for mounting flat-panel monitors. 7. Attach a swing arm or other mounting fixture to ensure that are on the back of the monitor. Follow the instructions included with the mounting fixture to the back of the panel are compliant with the VESA standard for attaching wall mount 6. The four threaded holes that the monitor is safely attached. Setting Up the Monitor Four threaded holes are for screws to attach the swing arm or other mounting fixture. 3-4 Features may vary by model. These holes are exposed. User's Guide
1859m,2009m,2009v, 2009f, 2159m,2159v,2309m,2309v, 2509m, 2709m LCD Monitor User Guide
Page 48
B-6 tilt adjustment 3-9 troubleshooting A-1 - User's Guide A-3 U unpacking 3-1 V video and audio cables and adapters 3-6 video input connectors selecting 4-7 W wall-mounting 3-2 Part number: 507981-001 D-2 Features may vary by model. Index T technical specifications B-1 -
HP 2210i/2310i/2510i LCD Monitors - User Guide
Page 8
● Removable base and Video Electronics Standards Association (VESA) standard mounting holes for flexible mounting solutions, including wall-mounting ● Security lock slot for a locking security cable (security cable sold separately) ● Plug and Play capability, if supported by your computer system ● On-...
HP 2210i/2310i/2510i LCD Monitors - User Guide
Page 13
... may cause disturbing reflections from surrounding light and bright surfaces. Unpacking the Monitor 7 Unpack the monitor. Prepare a flat area to secure some cables. Installing the Monitor You can install the monitor on a desktop or wall-mount it for placing the monitor screen-down while preparing it . NOTE: For displays with glossy bezels the user should consider...
HP 2210i/2310i/2510i LCD Monitors - User Guide
Page 15
... upright position Preparing the monitor for wall-mounting 1. WARNING! Disconnect the power cable and any other cables from the monitor. 3. Refer to monitor Installing the Monitor 9 Figure 3-4 Location of the wall-mounting fixture. Check the stability of screws securing base to the instructions supplied with the wall-mounting fixture and check that it is adequately installed and...
HP 2210i/2310i/2510i LCD Monitors - User Guide
Page 17
...the VGA video cable to the back of the monitor and the other end to your monitor to the VGA video connector on the back of the panel are compliant with the mounting fixture to the back of the monitor. Attach a swing arm or other mounting fixture to ensure that are on the computer. ...Connectors are for screws to attach the swing arm or other mounting fixture. 7. To use DVI, you must have a DVI-...
User's Guide 2309p, 2509p LCD Display
Page 5
... HP LCD Monitors ...1-1 Features ...1-1 2 Safety and Maintenance Guidelines Important Safety Information ...2-1 Safety Precautions ...2-1 Maintenance Guidelines...2-2 Cleaning the Monitor ...2-2 3 Setting Up the Monitor Unpacking the Monitor...3-1 Installing the Monitor ...3-1 Preparing the monitor for desktop use 3-1 Preparing the monitor for wall-mounting ... ...3-10 Adjusting the Tilt...3-11 Adjusting the Swivel...3-11 Adjusting the Monitor Height ...3-12 Keyboard Parking...3-12 4 Operating the Monitor CD Software and Utilities ...4-1 Installing Drivers...4-1 Downloading updated drivers from...
User's Guide 2309p, 2509p LCD Display
Page 7
...monitor to the other ■ Tilt adjustment: 90° pivot (select models only) ■ Swivel adjustment: 90° pivot (select models only) ■ Height adjustment using tilt/slider mechanism ■ Removable pedestal and Video Electronics Standards Association (VESA) standard mounting holes for flexible mounting solutions, including wall-mounting... energy consumption ■ Quick View settings display ■ Cable management User's Guide 1-1 1 Product Features HP LCD Monitors The HP LCD (liquid crystal display) monitors have an active matrix, thin-film transistor (TFT) screen.
User's Guide 2309p, 2509p LCD Display
Page 11
... to the LCD screen; You may need a Phillips screwdriver for preparing the monitor for desktop use CAUTION: The screen is fragile. 3 Setting Up the Monitor Unpacking the Monitor 1. Turn off the computer and other attached devices. 3. Installing the Monitor You can cause damage. Determine whether the monitor will be desktop mounted or wall-mounted. Connect the monitor cables after...
User's Guide 2309p, 2509p LCD Display
Page 13
... by inserting a screw driver into slots to the instructions supplied with the wall-mounting fixture and check that the wall-mounting fixture is capable of supporting the monitor. 1. Lift the cover off . Setting Up the Monitor Preparing the monitor for wall-mounting WARNING: To reduce the risk of personal injury or of damage to the equipment...
User's Guide 2309p, 2509p LCD Display
Page 14
... holes are for screws to attach the swing arm or other mounting fixture. 3-4 Features may vary by model. Lift the monitor base off the monitor. Follow the instructions included with the VESA standard for attaching wall mount 6. The four threaded holes that the monitor is safely attached. Removing the plate from the back of the...
HP 2310mfa, 2310mfd LCD Monitors - User Guide
Page 3
...IMPORTANT SAFETY INSTRUCTIONS 5 PACKAGE CONTENTS...7 SETTING UP THE MFM ...8 ATTACHING THE BASE ...8 PREPARING THE MFM FOR WALL MOUNTING ...8 SELECTING A GOOD LOCATION...9 INSTALLING THE MONITOR DRIVER 10 INSTALLING THE DRIVER...10 DOWNLOADING UPDATED DRIVERS FROM THE INTERNET 10 LOCATING THE MFM CONNECTORS AND CONTROLS 11 FRONT... MENUS...22 FOR ATV MODEL...22 • FEATURES MENU...24 • INSTALLATION ...26 • PICTURE MENU ...22 • SOUND MENU...23 FOR DTV MODEL ...28 • FEATURES MENU...31 • PARENTAL MENU...31 • PICTURE MENU ...28 • SOUND MENU...29 •...
HP 2310mfa, 2310mfd LCD Monitors - User Guide
Page 7
... apparatus has been exposed to rain or moisture, does not operate normally, or has been dropped. 16. For use only with a third party Listed Wall Mounting Bracket with the apparatus.When a cart is used as radiators, heat registers, stoves, or other . Read these instructions. 3. Do not defeat the safety purpose of...
HP 2310mfa, 2310mfd LCD Monitors - User Guide
Page 8
... system of the building, as close to provide some protection against voltage surges and built up static charges. The appliance should be mounted to dripping or splashing and no objects filled with respect to proper grounding of the mats and supporting structure grounding of the lead...for proper grounding and, in the operating instructions unless you are for use by the manufacturer. 22. Excessive sound pressure from power lines. 23. An outdoor antenna should be located away from earphones and headphones can cause hearing loss. Outdoor Antenna Grounding - Section 810 of the ...
HP 2310mfa, 2310mfd LCD Monitors - User Guide
Page 10
... the screen display area, which may compromise the integrity of your MFM using four screws, as indicated in the illustration. Secure the third party wall mount bracket to usage. 1. Place MFM unit face down on the wall, you need to prevent cable interference. For your safety, please use listed wall... prepare the MFM to the stand and remove the stand base from the wall to remove the base. ATV Interface PREPARING THE MFM FOR WALL MOUNTING Place the MFM at least 2.36 inches (60 mm) from the MFM. 2. Loosen the screws holding your MFM on a soft and flat surface (blanket, foam...
HP w185,w1858, w2338h LCD Monitor - User Guide
Page 5
...HP LCD Monitors ...1-1 Features ...1-1 2 Safety and Maintenance Guidelines Important Safety Information ...2-1 Safety Precautions ...2-1 Maintenance Guidelines...2-2 Cleaning the Monitor ...2-2 3 Setting Up the Monitor Unpacking the Monitor...3-1 Installing the Monitor ...3-1 Assembling the cantilever base 3-1 Unfolding the double-hinged monitor 3-2 Preparing the cantilever-base monitor for wall-mounting 3-3 Wall-mounting the double-hinged monitor... Cable (Select Models Only 3-7 Connecting USB Devices to the Monitor (Select Models Only 3-8 Connecting the Power Cable ...3-8 Cable Management...