Limited Warranty and Support Guide - Refurbished
Page 6
... be required to deliver your HP Hardware Product to an authorized service location for warranty repair. HP will incur all repair, logistics and insurance costs in this process. Advanced Unit Replacement Warranty Service (Displays ONLY) Your HP Limited Warranty may involve performing routine diagnostic procedures, installing software updates or patches, removing third party options and/or substituting options. Standard office hours are in place, accessible, and legible; (e) maintain an...
... be required to deliver your HP Hardware Product to an authorized service location for warranty repair. HP will incur all repair, logistics and insurance costs in this process. Advanced Unit Replacement Warranty Service (Displays ONLY) Your HP Limited Warranty may involve performing routine diagnostic procedures, installing software updates or patches, removing third party options and/or substituting options. Standard office hours are in place, accessible, and legible; (e) maintain an...
Safety and Regulatory Information Desktops, Thin Clients, and Personal Workstations
Page 17
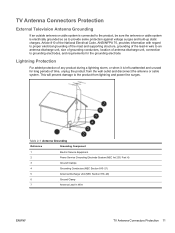
... or cable system. Article 810 of the National Electrical Code, ANSI/NFPA 70, provides information with regard to proper electrical grounding of the mast and supporting structure, grounding of time, unplug the product from lightning and power line surges. Table 2-1 Antenna Grounding Reference Grounding Component 1 Electric Service Equipment 2 Power Service Grounding Electrode System (NEC Art 250, Part H) 3 Ground...
... or cable system. Article 810 of the National Electrical Code, ANSI/NFPA 70, provides information with regard to proper electrical grounding of the mast and supporting structure, grounding of time, unplug the product from lightning and power line surges. Table 2-1 Antenna Grounding Reference Grounding Component 1 Electric Service Equipment 2 Power Service Grounding Electrode System (NEC Art 250, Part H) 3 Ground...
Advanced Setup Guide
Page 21
... Sharing Center window. 6 Click Connect to a network, and then follow onscreen instructions. Checking the wireless LAN device installation To set up your Web browser. The most common security levels are Wi-Fi Protected Access Personal (WPA-Personal) and Wired Equivalent Privacy (WEP). Set security on the taskbar. 2 Type Device Manager into the Start Search box, and then click Network and Sharing Center to open the Device Manager window. 3 Click Network adapters. Your WLAN device should be listed...
... Sharing Center window. 6 Click Connect to a network, and then follow onscreen instructions. Checking the wireless LAN device installation To set up your Web browser. The most common security levels are Wi-Fi Protected Access Personal (WPA-Personal) and Wired Equivalent Privacy (WEP). Set security on the taskbar. 2 Type Device Manager into the Start Search box, and then click Network and Sharing Center to open the Device Manager window. 3 Click Network adapters. Your WLAN device should be listed...
Limited Warranty and Support Guide
Page 14
... the HP Customer Care Center listed earlier in this a key differentiator for technical information or to get software updates. 4 If you have not solved the problem, call the HP Customer Care Center at : http://www.hp.com/apac/register 3 For help online, go through a comprehensive quality test to ensure the computer is working correctly before attempting to change without notice. Refer to the setup poster...
... the HP Customer Care Center listed earlier in this a key differentiator for technical information or to get software updates. 4 If you have not solved the problem, call the HP Customer Care Center at : http://www.hp.com/apac/register 3 For help online, go through a comprehensive quality test to ensure the computer is working correctly before attempting to change without notice. Refer to the setup poster...
Limited Warranty and Support Guide
Page 6
... source codes. • Installing of non-HP products. • System optimization and customization. • Network configuration. For blank tape removable media, refer to the following Web site: http://h20000.www2.hp.com/bizsupport/ TechSupport/Document.jsp?objectID=lpg50101 It is installed in an HP Hardware Product, HP may not apply to this will be purchased locally. Service Upgrades HP has a range of additional support and service coverage...
... source codes. • Installing of non-HP products. • System optimization and customization. • Network configuration. For blank tape removable media, refer to the following Web site: http://h20000.www2.hp.com/bizsupport/ TechSupport/Document.jsp?objectID=lpg50101 It is installed in an HP Hardware Product, HP may not apply to this will be purchased locally. Service Upgrades HP has a range of additional support and service coverage...

Getting Started
Page 25
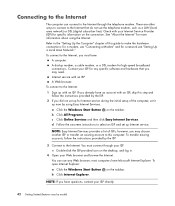
... open the Device Manager window. 3 Click Network adapters. Checking the wireless LAN device installation To set up a wireless network into the Search Help box. To connect the wireless LAN antenna: 1 Screw the wireless LAN antenna cable into the wireless LAN connector on the back of your wireless network, verify that the integrated WLAN device is not properly installed. 4 Click the Windows Start Button on the taskbar. 5 Type Network and Sharing Center into the Start Search box, and then click Network and Sharing Center to open the Network...
... open the Device Manager window. 3 Click Network adapters. Checking the wireless LAN device installation To set up a wireless network into the Search Help box. To connect the wireless LAN antenna: 1 Screw the wireless LAN antenna cable into the wireless LAN connector on the back of your wireless network, verify that the integrated WLAN device is not properly installed. 4 Click the Windows Start Button on the taskbar. 5 Type Network and Sharing Center into the Start Search box, and then click Network and Sharing Center to open the Network...
Getting Started
Page 58
... press Enter on the keyboard. 48 Getting Started (features vary by the ISP. 3 Connect to this step and follow the instructions provided by model) d Follow the onscreen instructions to the Safety & Comfort Guide for computer users. You must connect through your ISP. NOTE: If you begin using Easy Internet Services. Before you have Microsoft Internet Explorer. a Click the Windows Start Button on the desktop, and log in. 4 Open your...
... press Enter on the keyboard. 48 Getting Started (features vary by the ISP. 3 Connect to this step and follow the instructions provided by model) d Follow the onscreen instructions to the Safety & Comfort Guide for computer users. You must connect through your ISP. NOTE: If you begin using Easy Internet Services. Before you have Microsoft Internet Explorer. a Click the Windows Start Button on the desktop, and log in. 4 Open your...

Getting Started
Page 95
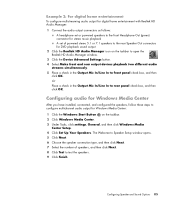
... number of powered stereo 5.1 or 7.1 speakers to the rear Speaker Out connectors for Windows Media Center: 1 Click the Windows Start Button on the taskbar to open the Realtek HD Audio Manager window. 3 Click the Device Advanced Settings button. 4 Select Make front and rear output devices playback two different audio streams simultaneously. 5 Place a check in the Output Mic In/Line In to rear panel check box, and then click OK. Configuring audio for Windows Media Center After you have installed, connected, and configured the speakers...
... number of powered stereo 5.1 or 7.1 speakers to the rear Speaker Out connectors for Windows Media Center: 1 Click the Windows Start Button on the taskbar to open the Realtek HD Audio Manager window. 3 Click the Device Advanced Settings button. 4 Select Make front and rear output devices playback two different audio streams simultaneously. 5 Place a check in the Output Mic In/Line In to rear panel check box, and then click OK. Configuring audio for Windows Media Center After you have installed, connected, and configured the speakers...
Getting Started
Page 201
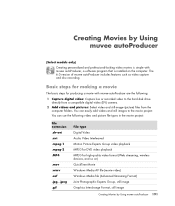
... easily add videos and still images to the hard disk drive directly from a compatible digital video (DV) camera. 2 Add videos and pictures: Select video and still-image (picture) files from the computer folders. Creating Movies by Using muvee autoProducer 191 Basic steps for making a movie The basic steps for high-quality video format (Web streaming, wireless devices, and so on) QuickTime Movie Windows Media AV file (movie video) Windows Media file...
... easily add videos and still images to the hard disk drive directly from a compatible digital video (DV) camera. 2 Add videos and pictures: Select video and still-image (picture) files from the computer folders. Creating Movies by Using muvee autoProducer 191 Basic steps for making a movie The basic steps for high-quality video format (Web streaming, wireless devices, and so on) QuickTime Movie Windows Media AV file (movie video) Windows Media file...

Getting Started Guide
Page 58
... Type http://www.hp.com/ergo into the Web browser address box, and then press Enter on the taskbar. a Click the Windows Start Button on the taskbar. NOTE: Easy Internet Services provides a list of serious injury, read the Safety & Comfort Guide. To transfer existing accounts, follow the instructions provided by the ISP. 2 If you did not set up for Internet service during the initial setup...
... Type http://www.hp.com/ergo into the Web browser address box, and then press Enter on the taskbar. a Click the Windows Start Button on the taskbar. NOTE: Easy Internet Services provides a list of serious injury, read the Safety & Comfort Guide. To transfer existing accounts, follow the instructions provided by the ISP. 2 If you did not set up for Internet service during the initial setup...
Getting Started Guide
Page 95
... Realtek HD Audio Manager: 1 Connect the audio output connectors as follows: A headphone set or powered speakers to the front Headphone Out (green) connector for stereo music playback A set of speakers, and then click Next. 8 Click Test to front panel check box, and then click OK. Configuring Speaker and Sound Options 85 Configuring audio for Windows Media Center After you have installed, connected, and configured the speakers, follow these steps to configure multichannel audio output for DVD playback sound output 2 Click...
... Realtek HD Audio Manager: 1 Connect the audio output connectors as follows: A headphone set or powered speakers to the front Headphone Out (green) connector for stereo music playback A set of speakers, and then click Next. 8 Click Test to front panel check box, and then click OK. Configuring Speaker and Sound Options 85 Configuring audio for Windows Media Center After you have installed, connected, and configured the speakers, follow these steps to configure multichannel audio output for DVD playback sound output 2 Click...
Getting Started Guide
Page 50
... Internet service during the initial setup of ISPs; See "About the Internet" for any specific software and hardware that do not use any Web browser; Refer to the "Setting Up the Computer" chapter of this step and follow the instructions provided by model) a Click the Windows Start Button on the connection. b Click Internet Explorer. Contact your ISP for more information about using Easy Internet Services. To open Internet Explorer: a Click the Windows Start Button...
... Internet service during the initial setup of ISPs; See "About the Internet" for any specific software and hardware that do not use any Web browser; Refer to the "Setting Up the Computer" chapter of this step and follow the instructions provided by model) a Click the Windows Start Button on the connection. b Click Internet Explorer. Contact your ISP for more information about using Easy Internet Services. To open Internet Explorer: a Click the Windows Start Button...
Getting Started Guide
Page 54
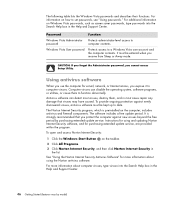
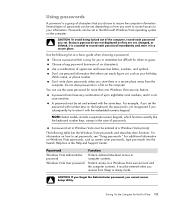
... to date. Instructions for purchasing extended update service, are provided within the program. It must be entered when you protect the computer against newly discovered viruses, antivirus software must be kept up to set passwords, see "Using passwords." Windows Vista User password Protects access to computer contents. The following table lists the Windows Vista passwords and describes their functions. For information on Windows Vista passwords, such as screen saver passwords, type passwords into the Search...
... to date. Instructions for purchasing extended update service, are provided within the program. It must be entered when you protect the computer against newly discovered viruses, antivirus software must be kept up to set passwords, see "Using passwords." Windows Vista User password Protects access to computer contents. The following table lists the Windows Vista passwords and describes their functions. For information on Windows Vista passwords, such as screen saver passwords, type passwords into the Search...
Getting Started Guide
Page 56
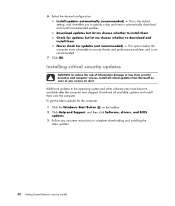
.... Download updates but let me choose whether to install them Never check for the computer: 1 Click the Windows Start Button on the taskbar. 2 Click Help and Support, and then click Software, drivers, and BIOS updates. 3 Follow any onscreen instructions to complete downloading and installing the latest updates. 48 Getting Started (features vary by model) Additional updates to download and install them Check for updates but let me choose whether to the operating...
.... Download updates but let me choose whether to install them Never check for the computer: 1 Click the Windows Start Button on the taskbar. 2 Click Help and Support, and then click Software, drivers, and BIOS updates. 3 Follow any onscreen instructions to complete downloading and installing the latest updates. 48 Getting Started (features vary by model) Additional updates to download and install them Check for updates but let me choose whether to the operating...
Upgrading and Servicing Guide
Page 12
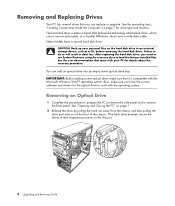
....) 8 Upgrading and Servicing Guide Removing and Replacing Drives Your PC has several drives that you need to run System Recovery using the recovery discs to load the factory-installed files. CAUTION: Back up your PC for details about the recovery procedure. IMPORTANT: Before adding a new optical drive, make sure you have a second hard disk drive. Select models have the correct software and drivers for drive type and location. See the user documentation that it is either a Serial ATA (advanced technology attachment) drive, which uses...
....) 8 Upgrading and Servicing Guide Removing and Replacing Drives Your PC has several drives that you need to run System Recovery using the recovery discs to load the factory-installed files. CAUTION: Back up your PC for details about the recovery procedure. IMPORTANT: Before adding a new optical drive, make sure you have a second hard disk drive. Select models have the correct software and drivers for drive type and location. See the user documentation that it is either a Serial ATA (advanced technology attachment) drive, which uses...
Upgrading and Servicing Guide
Page 28
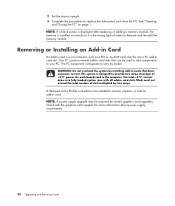
... add-in card slots that can be required for each board/card in card slot. NOTE: A power supply upgrade may be used to add components to remove, replace, or add an add-in card slots filled) must not exceed the total number of slots multiplied by model. See "Opening and Closing the PC" on page 1. NOTE: If a blank screen is displayed after replacing or adding a memory module, the memory is installed incorrectly or it is designed to replace the side panel...
... add-in card slots that can be required for each board/card in card slot. NOTE: A power supply upgrade may be used to add components to remove, replace, or add an add-in card slots filled) must not exceed the total number of slots multiplied by model. See "Opening and Closing the PC" on page 1. NOTE: If a blank screen is displayed after replacing or adding a memory module, the memory is installed incorrectly or it is designed to replace the side panel...
Upgrading and Servicing Guide
Page 30
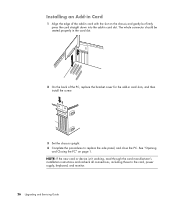
... then install the screw. 3 Set the chassis upright. 4 Complete the procedures to the card, power supply, keyboard, and monitor. 26 Upgrading and Servicing Guide NOTE: If the new card or device isn't working, read through the card manufacturer's installation instructions and recheck all connections, including those to replace the side panel, and close the PC. The whole connector should be seated properly in the card slot. 2 On the back of the add-in card slot. See "Opening...
... then install the screw. 3 Set the chassis upright. 4 Complete the procedures to the card, power supply, keyboard, and monitor. 26 Upgrading and Servicing Guide NOTE: If the new card or device isn't working, read through the card manufacturer's installation instructions and recheck all connections, including those to replace the side panel, and close the PC. The whole connector should be seated properly in the card slot. 2 On the back of the add-in card slot. See "Opening...
Upgrading and Servicing Guide
Page 31
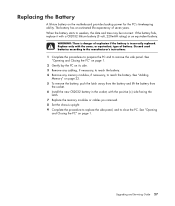
... Servicing Guide 27 When the battery starts to remove the side panel. See "Opening and Closing the PC" on page 1. 2 Gently lay the PC on page 22. 5 To remove the battery, push the latch away from the battery and lift the battery from the socket. 6 Install the new CR2032 battery in the socket, with the positive (+) side facing the latch. 7 Replace the memory modules or cables you removed. 8 Set...
... Servicing Guide 27 When the battery starts to remove the side panel. See "Opening and Closing the PC" on page 1. 2 Gently lay the PC on page 22. 5 To remove the battery, push the latch away from the battery and lift the battery from the socket. 6 Install the new CR2032 battery in the socket, with the positive (+) side facing the latch. 7 Replace the memory modules or cables you removed. 8 Set...
Getting Started Guide
Page 20
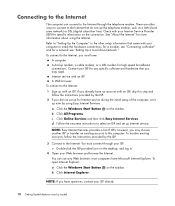
... other ways to connect to the Internet that do not use any specific software and hardware that came with your ISP for a network see "Connecting a Modem" and for any Web browser; A Web browser. a Click the Windows Start Button on the taskbar. To open Internet Explorer: a Click the Windows Start Button on the taskbar. NOTE: Easy Internet Services provides a list of the computer, set it up now by model) b Click Internet Explorer. most...
... other ways to connect to the Internet that do not use any specific software and hardware that came with your ISP for a network see "Connecting a Modem" and for any Web browser; A Web browser. a Click the Windows Start Button on the taskbar. To open Internet Explorer: a Click the Windows Start Button on the taskbar. NOTE: Easy Internet Services provides a list of the computer, set it up now by model) b Click Internet Explorer. most...
Getting Started Guide
Page 23
... exactly like the keyboard number keys, except in Windows Vista must be entered at a Windows Vista prompt. The following list as they are set . For additional information on how you want to control access to set in the case of passwords can use personal information that you subsequently try to secure the computer information. Protects access to guess. It must be entered when you cannot access Setup Utility. Turning On the Computer...
... exactly like the keyboard number keys, except in Windows Vista must be entered at a Windows Vista prompt. The following list as they are set . For additional information on how you want to control access to set in the case of passwords can use personal information that you subsequently try to secure the computer information. Protects access to guess. It must be entered when you cannot access Setup Utility. Turning On the Computer...


