HP Notebook Reference Guide - Windows 7
Page 17
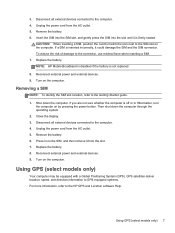
.... 5. Shut down the computer through the operating system. 2. If you are not sure whether the computer is inserted incorrectly, it is not replaced. 8. Turn on the computer. Reconnect external power and external devices. 9. Using GPS (select models only) 7 CAUTION: When inserting a SIM, position the card to match the icon next to the computer. 4. Disconnect all external devices connected to the Getting Started guide. 1. Close the...
.... 5. Shut down the computer through the operating system. 2. If you are not sure whether the computer is inserted incorrectly, it is not replaced. 8. Turn on the computer. Reconnect external power and external devices. 9. Using GPS (select models only) 7 CAUTION: When inserting a SIM, position the card to match the icon next to the computer. 4. Disconnect all external devices connected to the Getting Started guide. 1. Close the...
HP Notebook Reference Guide - Windows 7
Page 28
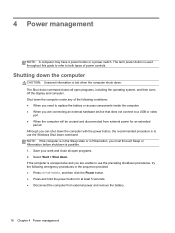
... work and close all open programs. 2. Select Start > Shut down the computer under any of power controls. 4 Power management NOTE: A computer may have a power button or a power switch. The term power button is used throughout this guide to refer to both types of the following conditions: ● When you need to replace the battery or access components inside the computer ● When you are connecting an external hardware device that does not connect to a USB or video port...
... work and close all open programs. 2. Select Start > Shut down the computer under any of power controls. 4 Power management NOTE: A computer may have a power button or a power switch. The term power button is used throughout this guide to refer to both types of the following conditions: ● When you need to replace the battery or access components inside the computer ● When you are connecting an external hardware device that does not connect to a USB or video port...
HP Notebook Reference Guide - Windows 7
Page 29
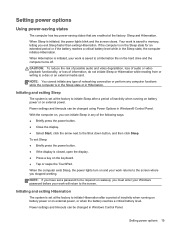
... the TouchPad. To exit Sleep: ● Briefly press the power button. ● If the display is initiated, the power lights blink and the screen clears. When Sleep is closed, open the display. ● Press a key on , you exit Sleep faster than exiting Hibernation. If the computer is set at the factory to a disc or an external media card. Power settings and timeouts can initiate Sleep in any computer functions while the computer is set a password to be changed using Power Options...
... the TouchPad. To exit Sleep: ● Briefly press the power button. ● If the display is initiated, the power lights blink and the screen clears. When Sleep is closed, open the display. ● Press a key on , you exit Sleep faster than exiting Hibernation. If the computer is set at the factory to a disc or an external media card. Power settings and timeouts can initiate Sleep in any computer functions while the computer is set a password to be changed using Power Options...

HP Notebook Reference Guide - Windows 7
Page 44
... a powered external device, turn off the device, and then disconnect it from the computer. A USB drive can be sure that additional ports and connectors can be connected to the powered USB port (select models only) on the cable to remove the eSATA device. To remove an eSATA device, save your options for storing and accessing information. Turn on -screen instructions. 3. CAUTION: To reduce the risk of loss of information or an unresponsive system, use...
... a powered external device, turn off the device, and then disconnect it from the computer. A USB drive can be sure that additional ports and connectors can be connected to the powered USB port (select models only) on the cable to remove the eSATA device. To remove an eSATA device, save your options for storing and accessing information. Turn on -screen instructions. 3. CAUTION: To reduce the risk of loss of information or an unresponsive system, use...
HP Notebook Reference Guide - Windows 7
Page 47
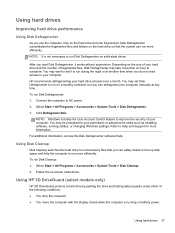
... running utilities, or changing Windows settings. HP recommends defragmenting your hard drive at another time when you do not need access to your computer manually at any time. To run more information. You may be prompted for tasks such as installing software, running on -screen instructions. Using hard drives Improving hard drive performance Using Disk Defragmenter As you use the computer, files on a monthly schedule, but you can safely delete to free up disk space...
... running utilities, or changing Windows settings. HP recommends defragmenting your hard drive at another time when you do not need access to your computer manually at any time. To run more information. You may be prompted for tasks such as installing software, running on -screen instructions. Using hard drives Improving hard drive performance Using Disk Defragmenter As you use the computer, files on a monthly schedule, but you can safely delete to free up disk space...
HP Notebook Reference Guide - Windows 7
Page 54
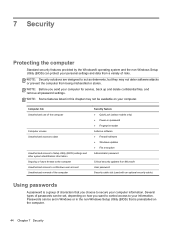
...to data Unauthorized access to Setup Utility (BIOS) settings and other system identification information Ongoing or future threats to the computer Unauthorized access to a Windows user account Unauthorized removal of the computer Security feature ● QuickLock (select models only) ● Power-on password ● Fingerprint reader Antivirus software ● Firewall software ● Windows updates ● File encryption Administrator password Critical security updates from Microsoft User password Security cable slot (used with an optional security cable) Using passwords A password is...
...to data Unauthorized access to Setup Utility (BIOS) settings and other system identification information Ongoing or future threats to the computer Unauthorized access to a Windows user account Unauthorized removal of the computer Security feature ● QuickLock (select models only) ● Power-on password ● Fingerprint reader Antivirus software ● Firewall software ● Windows updates ● File encryption Administrator password Critical security updates from Microsoft User password Security cable slot (used with an optional security cable) Using passwords A password is...
HP Notebook Reference Guide - Windows 7
Page 55
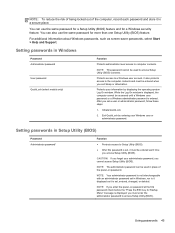
... with an administrator password set a user or administrator password, follow these steps: 1. NOTE: If you enter the power-on password. NOTE: This password cannot be entered each password and store it displayed as screen-saver passwords, select Start > Help and Support. It also protects access to a Windows user account. You can also use the same password for a Setup Utility (BIOS) feature and for Startup Menu" message is it in Windows, nor is displayed, you exit Sleep or Hibernation.
... with an administrator password set a user or administrator password, follow these steps: 1. NOTE: If you enter the power-on password. NOTE: This password cannot be entered each password and store it displayed as screen-saver passwords, select Start > Help and Support. It also protects access to a Windows user account. You can also use the same password for a Setup Utility (BIOS) feature and for Startup Menu" message is it in Windows, nor is displayed, you exit Sleep or Hibernation.
HP Notebook Reference Guide - Windows 7
Page 61
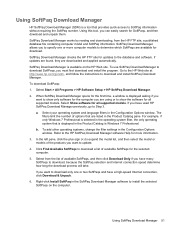
... for download. To use SoftPaq Download Manager to the database and software. To download SoftPaqs: 1. Using this tool, you to specify one or two SoftPaqs and have used HP SoftPaq Download Manager previously, go /sdm, and follow the instructions to Step 3. To add other operating systems, change the filter settings in the Configuration Options window. If you are using or to determine which SoftPaqs are downloaded and applied automatically. If updates...
... for download. To use SoftPaq Download Manager to the database and software. To download SoftPaqs: 1. Using this tool, you to specify one or two SoftPaqs and have used HP SoftPaq Download Manager previously, go /sdm, and follow the instructions to Step 3. To add other operating systems, change the filter settings in the Configuration Options window. If you are using or to determine which SoftPaqs are downloaded and applied automatically. If updates...
HP Notebook Reference Guide - Windows 7
Page 63
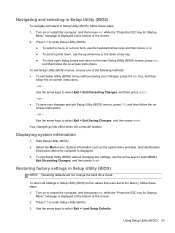
... Startup Menu" message is displayed at the bottom of the screen. 2. or - Start Setup Utility (BIOS). 2. Restoring factory settings in Setup Utility (BIOS), follow the on or restart the computer, and then press esc while the "Press the ESC key for Startup Menu" message is displayed. 3. Your changes go into effect when the computer restarts. Using Setup Utility (BIOS) 53 Use the arrow keys to select Exit > Load Setup Defaults. Select the Main menu. To return all settings in Setup Utility (BIOS...
... Startup Menu" message is displayed at the bottom of the screen. 2. or - Start Setup Utility (BIOS). 2. Restoring factory settings in Setup Utility (BIOS), follow the on or restart the computer, and then press esc while the "Press the ESC key for Startup Menu" message is displayed. 3. Your changes go into effect when the computer restarts. Using Setup Utility (BIOS) 53 Use the arrow keys to select Exit > Load Setup Defaults. Select the Main menu. To return all settings in Setup Utility (BIOS...
HP Notebook Reference Guide - Windows 7
Page 65
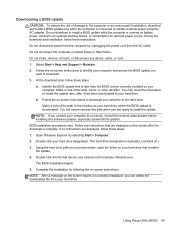
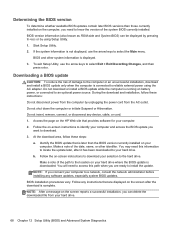
... when the computer is running on battery power, docked in an optional docking device, or connected to an optional power source. Do not download or install a BIOS update while the computer is connected to reliable external power using the AC adapter. Select Start > Help and Support > Maintain. 2. Complete the installation by selecting Start > Computer. 2. The hard drive designation is downloaded. Make a note of the date, name, or other identifier. Open Windows Explorer by following the on-screen instructions.
... when the computer is running on battery power, docked in an optional docking device, or connected to an optional power source. Do not download or install a BIOS update while the computer is connected to reliable external power using the AC adapter. Select Start > Help and Support > Maintain. 2. Complete the installation by selecting Start > Computer. 2. The hard drive designation is downloaded. Make a note of the date, name, or other identifier. Open Windows Explorer by following the on-screen instructions.
HP Notebook Reference Guide - Windows 7
Page 71
...displaying remaining charge 23 disposing 25 low battery levels 23 replacing 25 storing 24 Battery Check 22 battery information, finding 22 battery power 22 battery temperature 24 BIOS determining version 54 downloading an update 55 updating 54 Bluetooth device 2, 8 buttons media 13 power 18 volume 14 C cables 1394 32 eSATA 33 USB 31 checking audio functions 14 computer, traveling 24, 57 configuring audio for HDMI 17 configuring ExpressCards 28 connecting to a wired network 8 connecting to an existing wireless network 4 Connection Manager 3 conservation, power 24 creating a wireless connection...
...displaying remaining charge 23 disposing 25 low battery levels 23 replacing 25 storing 24 Battery Check 22 battery information, finding 22 battery power 22 battery temperature 24 BIOS determining version 54 downloading an update 55 updating 54 Bluetooth device 2, 8 buttons media 13 power 18 volume 14 C cables 1394 32 eSATA 33 USB 31 checking audio functions 14 computer, traveling 24, 57 configuring audio for HDMI 17 configuring ExpressCards 28 connecting to a wired network 8 connecting to an existing wireless network 4 Connection Manager 3 conservation, power 24 creating a wireless connection...
HP Notebook Reference Guide - Windows 7
Page 72
...9 connecting a modem cable adapter 9 selecting a location setting 10 N network cable, connecting 11 network icon 2 O operating system controls 4 optical disc inserting 39 removing 40 optical drive 34 optional external devices, using 34 P passwords set in Setup Utility (BIOS) 45 set in Windows 45 ports DisplayPort 15 expansion 34 external monitor 15 HDMI 16 Intel Wireless Display 17 VGA 15 power battery 22 conserving 24 options 19 power button 18 power meter 20 power plans customizing 21 selecting 20 viewing current 20 power switch 18 power-on password creating 47 entering 47 managing 47 power...
...9 connecting a modem cable adapter 9 selecting a location setting 10 N network cable, connecting 11 network icon 2 O operating system controls 4 optical disc inserting 39 removing 40 optical drive 34 optional external devices, using 34 P passwords set in Setup Utility (BIOS) 45 set in Windows 45 ports DisplayPort 15 expansion 34 external monitor 15 HDMI 16 Intel Wireless Display 17 VGA 15 power battery 22 conserving 24 options 19 power button 18 power meter 20 power plans customizing 21 selecting 20 viewing current 20 power switch 18 power-on password creating 47 entering 47 managing 47 power...
Getting Started HP Notebook - Windows 7
Page 27
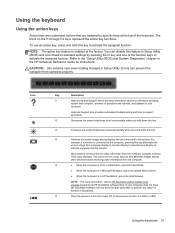
... in Setup Utility (BIOS) and revert back to standard settings by pressing the fn key and one of the function keys to activate the assigned function. NOTE: For more information, refer to HP QuickWeb (select models only) on page 14 and to support specialists. Using the keyboard 21 CAUTION: Use extreme care when making changes in QuickWeb. Icon Key Description f1 Opens Help and Support, which provides information about your Windows operating...
... in Setup Utility (BIOS) and revert back to standard settings by pressing the fn key and one of the function keys to activate the assigned function. NOTE: For more information, refer to HP QuickWeb (select models only) on page 14 and to support specialists. Using the keyboard 21 CAUTION: Use extreme care when making changes in QuickWeb. Icon Key Description f1 Opens Help and Support, which provides information about your Windows operating...

Getting Started HP Notebook - Windows 7
Page 28
... wireless feature on an external mouse. 22 Chapter 5 Keyboard and pointing devices To establish a wireless connection, a wireless network must also be set up. Using pointing devices NOTE: In addition to the pointing devices included with your computer, you want the pointer to customize settings for specific information about the TouchPad on your computer on page 4 for pointing devices, such as button configuration, click speed, and pointer options. To access Mouse Properties, select Start > Devices...
... wireless feature on an external mouse. 22 Chapter 5 Keyboard and pointing devices To establish a wireless connection, a wireless network must also be set up. Using pointing devices NOTE: In addition to the pointing devices included with your computer, you want the pointer to customize settings for specific information about the TouchPad on your computer on page 4 for pointing devices, such as button configuration, click speed, and pointer options. To access Mouse Properties, select Start > Devices...

Getting Started HP Notebook - Windows 7
Page 40
... remove a memory module while the computer is off or in Hibernation, turn the computer on , in the Sleep state, or in the primary memory module slot. If you , loosen the 2 memory module compartment cover screws (1). 5. Then shut down the computer through the operating system. 1. With the hard drive bay toward you are identical. Lift the memory module compartment cover (2) away from the computer. 34 Chapter 6 Maintenance Adding or replacing memory modules...
... remove a memory module while the computer is off or in Hibernation, turn the computer on , in the Sleep state, or in the primary memory module slot. If you , loosen the 2 memory module compartment cover screws (1). 5. Then shut down the computer through the operating system. 1. With the hard drive bay toward you are identical. Lift the memory module compartment cover (2) away from the computer. 34 Chapter 6 Maintenance Adding or replacing memory modules...
Getting Started HP Notebook - Windows 7
Page 45
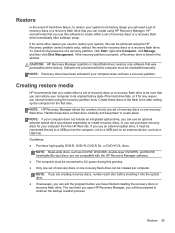
... computer must be achieved using the HP Recovery partition (select models only), without the need a set of recovery discs or a recovery flash drive that was preinstalled at the factory. If the recovery partition is present, a Recovery drive is listed in a safe place. Software not provided with the HP Recovery Manager software. ● The computer must be created per computer. Handle these discs or the flash drive after software setup. Guidelines: ● Purchase high-quality DVD-R, DVD+R, DVD-R DL, or DVD+R DL discs. Restore 39 If for...
... computer must be achieved using the HP Recovery partition (select models only), without the need a set of recovery discs or a recovery flash drive that was preinstalled at the factory. If the recovery partition is present, a Recovery drive is listed in a safe place. Software not provided with the HP Recovery Manager software. ● The computer must be created per computer. Handle these discs or the flash drive after software setup. Guidelines: ● Purchase high-quality DVD-R, DVD+R, DVD-R DL, or DVD+R DL discs. Restore 39 If for...

Getting Started HP Notebook - Windows 7
Page 56
... HP Recovery Manager 40 I input power 48 integrated webcam light, identifying 12 internal microphone, identifying 12 Internet connection setup 18 ISP, using 17 J jacks audio-in (microphone) 10 audio-out (headphone) 10 network 10 RJ-45 (network) 10 K keys action 8 esc 8 fn 8 QuickWeb 8, 15 Windows applications 8 Windows logo 8 L labels Bluetooth 46 Microsoft Certificate of Authenticity 46 regulatory 46 serial number 46 wireless certification 46 WLAN 46 latch, battery release 13 lights AC adapter 9 caps lock 6 hard drive 10 optical drive 9 power 6, 11 webcam 12 wireless 6 M memory module...
... HP Recovery Manager 40 I input power 48 integrated webcam light, identifying 12 internal microphone, identifying 12 Internet connection setup 18 ISP, using 17 J jacks audio-in (microphone) 10 audio-out (headphone) 10 network 10 RJ-45 (network) 10 K keys action 8 esc 8 fn 8 QuickWeb 8, 15 Windows applications 8 Windows logo 8 L labels Bluetooth 46 Microsoft Certificate of Authenticity 46 regulatory 46 serial number 46 wireless certification 46 WLAN 46 latch, battery release 13 lights AC adapter 9 caps lock 6 hard drive 10 optical drive 9 power 6, 11 webcam 12 wireless 6 M memory module...
HP Notebook User Guide
Page 78
... your hard drive where the BIOS update is complete. You will need to the location on the HP Web site that is later than those currently installed on battery power, or connected to select Exit > Exit Discarding Changes, and then press enter. To exit Setup Utility, use the arrow keys to locate the update later, after the download is downloaded. b. Make a note of the system BIOS currently installed. During the download and installation, follow these instructions: Do...
... your hard drive where the BIOS update is complete. You will need to the location on the HP Web site that is later than those currently installed on battery power, or connected to select Exit > Exit Discarding Changes, and then press enter. To exit Setup Utility, use the arrow keys to locate the update later, after the download is downloaded. b. Make a note of the system BIOS currently installed. During the download and installation, follow these instructions: Do...
HP Notebook User Guide
Page 86
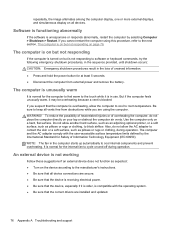
... among the computer display, one or more external displays, and simultaneous display on all device connections are installed and updated. 76 Appendix A Troubleshooting and support If you are using this procedure, refer to the next section, The computer is unresponsive or responds abnormally, restart the computer by the International Standard for the internal fan to cool internal components and prevent overheating. Software is functioning abnormally If the...
... among the computer display, one or more external displays, and simultaneous display on all device connections are installed and updated. 76 Appendix A Troubleshooting and support If you are using this procedure, refer to the next section, The computer is unresponsive or responds abnormally, restart the computer by the International Standard for the internal fan to cool internal components and prevent overheating. Software is functioning abnormally If the...

HP Notebook User Guide
Page 97
... action 8 operating system applications 8 operating system logo key 8 volume 29 L labels Bluetooth 79 regulatory 79 serial number 79 wireless certification 79 WLAN 79 latches, battery release 14 lights AC adapter 10 caps lock 6 hard drive 11 optical drive 10 power 6, 12 webcam 13 wireless 6 local area network (LAN) cable required 20 connecting cable 20 logical drive designations 72 low battery level 38 M managing a power-on password 59 managing an administrator password 59 memory module identifying 14 inserting 55 removing 54 microphone (audio-in) jack, identifying 11 mouse, external setting...
... action 8 operating system applications 8 operating system logo key 8 volume 29 L labels Bluetooth 79 regulatory 79 serial number 79 wireless certification 79 WLAN 79 latches, battery release 14 lights AC adapter 10 caps lock 6 hard drive 11 optical drive 10 power 6, 12 webcam 13 wireless 6 local area network (LAN) cable required 20 connecting cable 20 logical drive designations 72 low battery level 38 M managing a power-on password 59 managing an administrator password 59 memory module identifying 14 inserting 55 removing 54 microphone (audio-in) jack, identifying 11 mouse, external setting...


