
Maintenance and Service Guide
Page 8
... Utility ...127 Changing the language of Setup Utility 127 Navigating and selecting in Setup Utility 127 Displaying system information 128 Restoring factory default settings in Setup Utility 128 viii Using Setup Utility (BIOS) and HP PC Hardware Diagnostics (UEFI 124 Starting Setup Utility (BIOS) ...124 Updating the BIOS ...124 Determining the BIOS version 124 Downloading a BIOS update 125 Using HP PC Hardware Diagnostics (UEFI 126 Downloading HP PC Hardware Diagnostics (UEFI) to a USB device 126 8 Ubuntu Linux - 5 Removal and replacement procedures for Customer Self-Repair parts...
... Utility ...127 Changing the language of Setup Utility 127 Navigating and selecting in Setup Utility 127 Displaying system information 128 Restoring factory default settings in Setup Utility 128 viii Using Setup Utility (BIOS) and HP PC Hardware Diagnostics (UEFI 124 Starting Setup Utility (BIOS) ...124 Updating the BIOS ...124 Determining the BIOS version 124 Downloading a BIOS update 125 Using HP PC Hardware Diagnostics (UEFI 126 Downloading HP PC Hardware Diagnostics (UEFI) to a USB device 126 8 Ubuntu Linux - 5 Removal and replacement procedures for Customer Self-Repair parts...
Maintenance and Service Guide
Page 9
... backup 142 What you need to know 142 Creating a backup using Windows Backup and Restore 142 Restore and recovery ...143 Restoring to a previous system restore point 143 Restoring specific files ...143 Restoring specific files using Windows Backup and Restore 143 ix Exiting Setup Utility ...128 Updating the BIOS ...129 Determining the BIOS version 129 Downloading a BIOS update 129 Using Advanced System Diagnostics 130 9 Specifications ...131 Computer specifications ...131 Display Specifications (17.3) ...132 Display Specifications (15.6-in) ...133 Hard drive specifications ...134 DVD...
... backup 142 What you need to know 142 Creating a backup using Windows Backup and Restore 142 Restore and recovery ...143 Restoring to a previous system restore point 143 Restoring specific files ...143 Restoring specific files using Windows Backup and Restore 143 ix Exiting Setup Utility ...128 Updating the BIOS ...129 Determining the BIOS version 129 Downloading a BIOS update 129 Using Advanced System Diagnostics 130 9 Specifications ...131 Computer specifications ...131 Display Specifications (17.3) ...132 Display Specifications (15.6-in) ...133 Hard drive specifications ...134 DVD...
Maintenance and Service Guide
Page 21
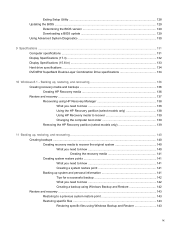
...an optional video or audio device, such as a keyboard, mouse, external drive, printer, scanner or USB hub. To remove a card: Press in on the network. Connects a network cable. ● White: The network is connected. ● Amber: Activity is normal for the internal fan to cool internal components and prevent overheating. Left side NOTE: Refer to cool internal components. Component (1) (2) Power connector AC adapter light (3) RJ-45 (network) jack/status lights (4) Vents (2) (5) HDMI port (6) USB 3.0 ports (2) (7) Memory card reader Description Connects an AC adapter...
...an optional video or audio device, such as a keyboard, mouse, external drive, printer, scanner or USB hub. To remove a card: Press in on the network. Connects a network cable. ● White: The network is connected. ● Amber: Activity is normal for the internal fan to cool internal components and prevent overheating. Left side NOTE: Refer to cool internal components. Component (1) (2) Power connector AC adapter light (3) RJ-45 (network) jack/status lights (4) Vents (2) (5) HDMI port (6) USB 3.0 ports (2) (7) Memory card reader Description Connects an AC adapter...

Maintenance and Service Guide
Page 22
... Enable airflow to the computer. Attaches an optional security cable to cool internal components. Connects an optional video or audio device, such as a keyboard, mouse, external drive, printer, scanner or USB hub. NOTE: The security cable is using battery power. Component (1) (2) Power connector AC adapter light (3) Security cable slot (4) RJ-45 (network) jack/status lights (5) Vents (2) (6) HDMI port (7) USB 3.0 ports (2) (8) Memory card reader Description Connects an AC adapter. ● Amber: The battery is charging. ● White: The AC adapter is connected...
... Enable airflow to the computer. Attaches an optional security cable to cool internal components. Connects an optional video or audio device, such as a keyboard, mouse, external drive, printer, scanner or USB hub. NOTE: The security cable is using battery power. Component (1) (2) Power connector AC adapter light (3) Security cable slot (4) RJ-45 (network) jack/status lights (5) Vents (2) (6) HDMI port (7) USB 3.0 ports (2) (8) Memory card reader Description Connects an AC adapter. ● Amber: The battery is charging. ● White: The AC adapter is connected...
Maintenance and Service Guide
Page 80
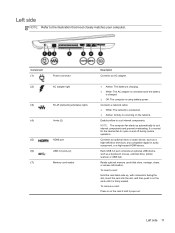
... screws) away from the work area to complete the removal and replacement procedures: ● Flat-bladed screwdriver ● Magnetic screwdriver ● Phillips P0 and P1 screwdrivers Service considerations The following tools to prevent damage. Plastic parts CAUTION: Using excessive force during disassembly and assembly procedures. Use care when handling the plastic 70 Chapter 4 Removal and replacement procedures preliminary requirements NOTE...
... screws) away from the work area to complete the removal and replacement procedures: ● Flat-bladed screwdriver ● Magnetic screwdriver ● Phillips P0 and P1 screwdrivers Service considerations The following tools to prevent damage. Plastic parts CAUTION: Using excessive force during disassembly and assembly procedures. Use care when handling the plastic 70 Chapter 4 Removal and replacement procedures preliminary requirements NOTE...
Maintenance and Service Guide
Page 89
... each screw size and location during removal and replacement. 6 Removal and replacement procedures for details. Component replacement procedures NOTE: Details about your computer, including model, serial number, product key, and length of warranty, are as many as 83 screws that must be accessed by an authorized service provider. There are on supported parts for Authorized Service Provider only parts. See Bottom on -screen instructions. Make special note of your...
... each screw size and location during removal and replacement. 6 Removal and replacement procedures for details. Component replacement procedures NOTE: Details about your computer, including model, serial number, product key, and length of warranty, are as many as 83 screws that must be accessed by an authorized service provider. There are on supported parts for Authorized Service Provider only parts. See Bottom on -screen instructions. Make special note of your...
Maintenance and Service Guide
Page 106
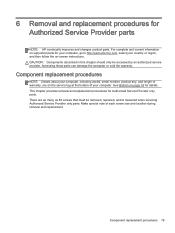
.... Remove the wireless antenna from the retaining channels (2), and lift the antenna (3) Reverse this procedure to restore device functionality, and then contact technical support. If you replace the module and then receive a warning message, remove the module to install the display panel. WLAN module Description Spare part number Realtek RT8188EE 802.11 bgn 1x1 Wi-Fi adapter, for use only on computer models equipped with Intel processors for HP Pavilion 17 and...
.... Remove the wireless antenna from the retaining channels (2), and lift the antenna (3) Reverse this procedure to restore device functionality, and then contact technical support. If you replace the module and then receive a warning message, remove the module to install the display panel. WLAN module Description Spare part number Realtek RT8188EE 802.11 bgn 1x1 Wi-Fi adapter, for use only on computer models equipped with Intel processors for HP Pavilion 17 and...
Maintenance and Service Guide
Page 123
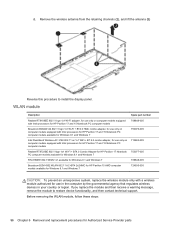
... done so: ● Power connector board cable (1) ● Display cables (2), and (3) ● Speaker cable (4) 2. Remove the subwoofer (see WLAN module on page 102). 8. Remove the system board: 1. Remove the top cover from the base enclosure (see Battery on page 80). 7. Remove the following cables if you have not already done so: ● Subwoofer cable (1) ● Optical drive cable (2) ● Hard drive cable (3) ● USB connector cable (4) Component replacement procedures 113 4. Remove the battery (see Base enclosure...
... done so: ● Power connector board cable (1) ● Display cables (2), and (3) ● Speaker cable (4) 2. Remove the subwoofer (see WLAN module on page 102). 8. Remove the system board: 1. Remove the top cover from the base enclosure (see Battery on page 80). 7. Remove the following cables if you have not already done so: ● Subwoofer cable (1) ● Optical drive cable (2) ● Hard drive cable (3) ● USB connector cable (4) Component replacement procedures 113 4. Remove the battery (see Base enclosure...
Maintenance and Service Guide
Page 135
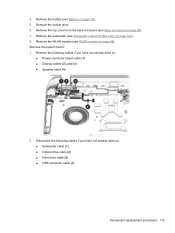
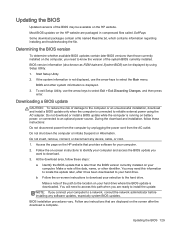
..., open Windows Explorer by selecting Start > Computer. 2. From the Start screen, type file, and then select File Explorer. During the download and installation, follow these instructions: Do not disconnect power from the computer by following the on -screen instructions. 4. Identify the most recent BIOS update and compare it has been downloaded to the location on battery power, docked in an optional docking device, or connected to reliable external power using the AC adapter. If the update...
..., open Windows Explorer by selecting Start > Computer. 2. From the Start screen, type file, and then select File Explorer. During the download and installation, follow these instructions: Do not disconnect power from the computer by following the on -screen instructions. 4. Identify the most recent BIOS update and compare it has been downloaded to the location on battery power, docked in an optional docking device, or connected to reliable external power using the AC adapter. If the update...
Maintenance and Service Guide
Page 136
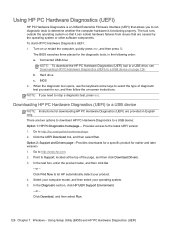
... computer model, and then select your product. 4. In the Diagnostic section, click HP UEFI Support Environment. - Using Setup Utility (BIOS) and HP PC Hardware Diagnostics (UEFI) Turn on page 126. Option 2: Support and Drivers page-Provides downloads for a specific product for downloading HP PC Hardware Diagnostics (UEFI) are caused by the operating system or other software components. Using HP PC Hardware Diagnostics (UEFI) HP PC Hardware Diagnostics is functioning properly. BIOS 2. When the diagnostic tool opens, use the keyboard arrow keys...
... computer model, and then select your product. 4. In the Diagnostic section, click HP UEFI Support Environment. - Using Setup Utility (BIOS) and HP PC Hardware Diagnostics (UEFI) Turn on page 126. Option 2: Support and Drivers page-Provides downloads for a specific product for downloading HP PC Hardware Diagnostics (UEFI) are caused by the operating system or other software components. Using HP PC Hardware Diagnostics (UEFI) HP PC Hardware Diagnostics is functioning properly. BIOS 2. When the diagnostic tool opens, use the keyboard arrow keys...
Maintenance and Service Guide
Page 139
... Setup Utility, use the arrow keys to the hard drive. During the download and installation, follow these instructions: Do not disconnect power from the computer by using the AC adapter. Do not insert, remove, connect, or disconnect any software updates, especially system BIOS updates. You may be displayed by unplugging the power cord from the AC outlet. You will need to access this information to select Exit > Exit Discarding Changes, and then press enter. BIOS installation...
... Setup Utility, use the arrow keys to the hard drive. During the download and installation, follow these instructions: Do not disconnect power from the computer by using the AC adapter. Do not insert, remove, connect, or disconnect any software updates, especially system BIOS updates. You may be displayed by unplugging the power cord from the AC outlet. You will need to access this information to select Exit > Exit Discarding Changes, and then press enter. BIOS installation...

Maintenance and Service Guide
Page 147
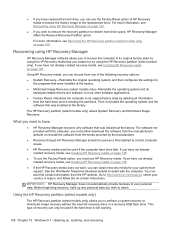
... Reinstall option of HP Recovery Manager to reinstall the individual application or driver. You can obtain recovery discs for restoring from the HP Recovery partition (select models only) or use the HP Recovery media that you need to a USB port on page 138. Select Recovery Media Creation, and then follow the on page 138. From the Start screen, type help, and then select Help and Support. ● If you have created. Minimized Image Recovery installs only drivers and hardware-enabling applications...
... Reinstall option of HP Recovery Manager to reinstall the individual application or driver. You can obtain recovery discs for restoring from the HP Recovery partition (select models only) or use the HP Recovery media that you need to a USB port on page 138. Select Recovery Media Creation, and then follow the on page 138. From the Start screen, type help, and then select Help and Support. ● If you have created. Minimized Image Recovery installs only drivers and hardware-enabling applications...
Maintenance and Service Guide
Page 148
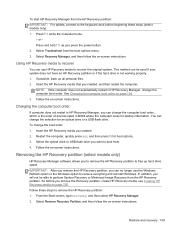
... the HP Recovery media does not work, you wish to retain. IMPORTANT: HP Recovery Manager does not automatically provide backups of HP Recovery media to restore the factory image to know ● HP Recovery Manager recovers only software that was installed at the factory. Using the HP Recovery partition (select models only) The HP Recovery partition (select models only) allows you to perform a system recovery or minimized image recovery without the need to the replacement drive. Go to reclaim hard drive space, HP Recovery Manager offers the Remove Recovery Partition option...
... the HP Recovery media does not work, you wish to retain. IMPORTANT: HP Recovery Manager does not automatically provide backups of HP Recovery media to restore the factory image to know ● HP Recovery Manager recovers only software that was installed at the factory. Using the HP Recovery partition (select models only) The HP Recovery partition (select models only) allows you to perform a system recovery or minimized image recovery without the need to the replacement drive. Go to reclaim hard drive space, HP Recovery Manager offers the Remove Recovery Partition option...
Maintenance and Service Guide
Page 149
...not working properly. 1. To change the computer boot order. Follow the on -screen instructions. IMPORTANT: After you remove the HP Recovery partition, you can use the Windows Refresh option or the Windows option to remove everything and reinstall Windows. Insert the HP Recovery media that you created. 2. You can no longer use HP Recovery media to free up all personal files. 2. If possible, back up hard drive space. Removing the HP Recovery partition (select models only) HP Recovery Manager software allows you press the power button. 2. see Creating HP Recovery media on...
...not working properly. 1. To change the computer boot order. Follow the on -screen instructions. IMPORTANT: After you remove the HP Recovery partition, you can use the Windows Refresh option or the Windows option to remove everything and reinstall Windows. Insert the HP Recovery media that you created. 2. You can no longer use HP Recovery media to free up all personal files. 2. If possible, back up hard drive space. Removing the HP Recovery partition (select models only) HP Recovery Manager software allows you press the power button. 2. see Creating HP Recovery media on...

Maintenance and Service Guide
Page 152
... back up , restoring, and recovering Select Start > Control Panel > System and Security > Backup and Restore. 2. You may take more information. 142 Chapter 11 Backing up : 1. See Help and Support for more than an hour. ● Verify the amount of free space on your information to an optional external hard drive, a flash drive, a network drive, or discs. ● Connect the computer to replace, such as installing software, running utilities, or changing Windows settings. Display the screen you want to...
... back up , restoring, and recovering Select Start > Control Panel > System and Security > Backup and Restore. 2. You may take more information. 142 Chapter 11 Backing up : 1. See Help and Support for more than an hour. ● Verify the amount of free space on your information to an optional external hard drive, a flash drive, a network drive, or discs. ● Connect the computer to replace, such as installing software, running utilities, or changing Windows settings. Display the screen you want to...

Maintenance and Service Guide
Page 154
... HP Recovery Manager, change the computer boot order. Press esc while the computer is displayed at system bootup. 4. Recovering using the recovery media 1. If the recovery partition is present, a Recovery drive is listed in the HP Recovery Manager window. 3. or - ● Turn on your system without the need for advanced users only. Follow the on the screen. 2. This type of the screen. Click System Recovery in the window. If possible, back up , restoring, and recovering Restart the computer. 2. Select Internal CD/DVD ROM Drive...
... HP Recovery Manager, change the computer boot order. Press esc while the computer is displayed at system bootup. 4. Recovering using the recovery media 1. If the recovery partition is present, a Recovery drive is listed in the HP Recovery Manager window. 3. or - ● Turn on your system without the need for advanced users only. Follow the on the screen. 2. This type of the screen. Click System Recovery in the window. If possible, back up , restoring, and recovering Restart the computer. 2. Select Internal CD/DVD ROM Drive...

Maintenance and Service Guide
Page 156
... recent backup. Backing up your USB device into the USB port on the storage device. You can create an image restore DVD using blank, writable DVDs (DVDR or DVD+R). CAUTION: Using Restore completely erases hard drive contents and reformats the hard drive. Creating the restore DVDs The restore creation software creates a set of free space on the computer before you will need at least 8 GB of system restore discs using an optional external DVD±RW optical drive. Click the System menu icon at the factory...
... recent backup. Backing up your USB device into the USB port on the storage device. You can create an image restore DVD using blank, writable DVDs (DVDR or DVD+R). CAUTION: Using Restore completely erases hard drive contents and reformats the hard drive. Creating the restore DVDs The restore creation software creates a set of free space on the computer before you will need at least 8 GB of system restore discs using an optional external DVD±RW optical drive. Click the System menu icon at the factory...
Maintenance and Service Guide
Page 163
... update 125 downloading an update for Ubuntu Linux computer models 129 updating 124 updating for Ubuntu Linux computer models 129 Bluetooth label 19 boot order changing 144 changing HP Recovery Manager 139 bottom 19 buttons left TouchPad 14 power 16 right TouchPad 14 C caps lock light, identifying 15 chipset, product description 1 components bottom 18 display 13 left side 11 right side 8 top 14 computer major components 20 computer specifications 131 connector, power 11, 12 D default settings, restoring...
... update 125 downloading an update for Ubuntu Linux computer models 129 updating 124 updating for Ubuntu Linux computer models 129 Bluetooth label 19 boot order changing 144 changing HP Recovery Manager 139 bottom 19 buttons left TouchPad 14 power 16 right TouchPad 14 C caps lock light, identifying 15 chipset, product description 1 components bottom 18 display 13 left side 11 right side 8 top 14 computer major components 20 computer specifications 131 connector, power 11, 12 D default settings, restoring...

Maintenance and Service Guide
Page 164
... spare part numbers 66 HDMI port identifying 11, 12 HDMI to VGA adapter, spare part number 45 heat sink removal 120 spare part numbers 47, 48, 120 heat sink assembly spare part numbers 37, 56, 63 HP PC Hardware Diagnostics (UEFI) downloading 126 using 126 HP Recovery Manager 143 correcting boot problems 139 starting 139 HP Recovery media creating 136 recovery 139 HP Recovery partition recovery 138 removing 139 I integrated numeric keypad, identifying 17 internal display switch, identifying 13 internal microphones, identifying 13 J jacks audio-out (headphone)/audio-in (microphone) 8, 9 network...
... spare part numbers 66 HDMI port identifying 11, 12 HDMI to VGA adapter, spare part number 45 heat sink removal 120 spare part numbers 47, 48, 120 heat sink assembly spare part numbers 37, 56, 63 HP PC Hardware Diagnostics (UEFI) downloading 126 using 126 HP Recovery Manager 143 correcting boot problems 139 starting 139 HP Recovery media creating 136 recovery 139 HP Recovery partition recovery 138 removing 139 I integrated numeric keypad, identifying 17 internal display switch, identifying 13 internal microphones, identifying 13 J jacks audio-out (headphone)/audio-in (microphone) 8, 9 network...
Maintenance and Service Guide
Page 165
... audio 4 chipset 1 display panel 2 Ethernet 4 external media cards 5 graphics 2 hard drive 3 keyboard 5 memory module 3 microphone 4 operating system 6 optical drive 4 pointing device 5 ports 5 power requirements 5 processors 1 product name 1 security 5 serviceability 6 video 4 wireless 4 product name 1 product name and number, computer 19 R recovering from the recovery discs 144 recovering the original system 143 recovery 143 discs 136, 139 HP Recovery Manager 138, 143 media 139 options 137 starting 139 supported discs 136 system 138 USB flash drive 139 using HP Recovery media 137 recovery...
... audio 4 chipset 1 display panel 2 Ethernet 4 external media cards 5 graphics 2 hard drive 3 keyboard 5 memory module 3 microphone 4 operating system 6 optical drive 4 pointing device 5 ports 5 power requirements 5 processors 1 product name 1 security 5 serviceability 6 video 4 wireless 4 product name 1 product name and number, computer 19 R recovering from the recovery discs 144 recovering the original system 143 recovery 143 discs 136, 139 HP Recovery Manager 138, 143 media 139 options 137 starting 139 supported discs 136 system 138 USB flash drive 139 using HP Recovery media 137 recovery...


