
Maintenance and Service Guide
Page 8
... replacement procedures 79 Base enclosure ...80 Display panel ...88 WLAN module ...96 TouchPad button board ...99 Battery Board (select models only 100 Optical drive connector ...101 Subwoofer (select models only 102 USB board ...104 Hard drive ...105 System board ...106 Speakers ...115 Memory modules ...116 RTC battery ...117 Power connector ...118 Fan ...119 Heat sink ...120 Power button board ...123 7 Windows - Using Setup Utility (BIOS) and HP PC Hardware Diagnostics (UEFI 124 Starting Setup Utility (BIOS) ...124 Updating the BIOS ...124 Determining the BIOS version 124 Downloading...
... replacement procedures 79 Base enclosure ...80 Display panel ...88 WLAN module ...96 TouchPad button board ...99 Battery Board (select models only 100 Optical drive connector ...101 Subwoofer (select models only 102 USB board ...104 Hard drive ...105 System board ...106 Speakers ...115 Memory modules ...116 RTC battery ...117 Power connector ...118 Fan ...119 Heat sink ...120 Power button board ...123 7 Windows - Using Setup Utility (BIOS) and HP PC Hardware Diagnostics (UEFI 124 Starting Setup Utility (BIOS) ...124 Updating the BIOS ...124 Determining the BIOS version 124 Downloading...
Maintenance and Service Guide
Page 9
... Display Specifications (17.3) ...132 Display Specifications (15.6-in) ...133 Hard drive specifications ...134 DVD±RW SuperMulti Double-Layer Combination Drive specifications 134 10 Windows 8.1 - Backing up, restoring, and recovering 136 Creating recovery media and backups 136 Creating HP Recovery media 136 Restore and recovery ...137 Recovering using HP Recovery Manager 138 What you need to know 138 Using the HP Recovery partition (select models only 138 Using HP Recovery media to recover 139 Changing the computer boot order 139 Removing the HP Recovery partition (select models...
... Display Specifications (17.3) ...132 Display Specifications (15.6-in) ...133 Hard drive specifications ...134 DVD±RW SuperMulti Double-Layer Combination Drive specifications 134 10 Windows 8.1 - Backing up, restoring, and recovering 136 Creating recovery media and backups 136 Creating HP Recovery media 136 Restore and recovery ...137 Recovering using HP Recovery Manager 138 What you need to know 138 Using the HP Recovery partition (select models only 138 Using HP Recovery media to recover 139 Changing the computer boot order 139 Removing the HP Recovery partition (select models...
Maintenance and Service Guide
Page 15
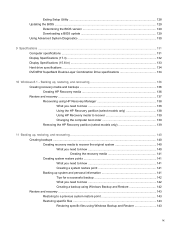
... Wireless-AC 3160 802.11 ac 1x1 WiFi + BT 4.0 combo adapter (with dual antennas) External media HP Multi-Format Memory Card Reader slot with push-push technology, √ √ cards supporting the following digital card formats: Supports memory cards such as Secure Digital SD/SDHC/SDXC Ports ● AC Smart Pin adapter plug (4.5 mm barrel) ● Combination audio-out (stereo headphone)/audio-in (mono microphone) ● RJ-45 (Ethernet) ● USB 3.0 (2 ports), USB 2.0 (1 port) √ √ ● HDMI...
... Wireless-AC 3160 802.11 ac 1x1 WiFi + BT 4.0 combo adapter (with dual antennas) External media HP Multi-Format Memory Card Reader slot with push-push technology, √ √ cards supporting the following digital card formats: Supports memory cards such as Secure Digital SD/SDHC/SDXC Ports ● AC Smart Pin adapter plug (4.5 mm barrel) ● Combination audio-out (stereo headphone)/audio-in (mono microphone) ● RJ-45 (Ethernet) ● USB 3.0 (2 ports), USB 2.0 (1 port) √ √ ● HDMI...
Maintenance and Service Guide
Page 21
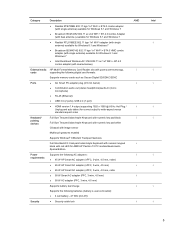
... internal components. Reads optional memory cards that most closely matches your computer. NOTE: The computer fan starts up , with connectors facing the slot, insert the card into the slot, and then push in on and off during routine operation. Enable airflow to cool internal components and prevent overheating. Component (1) (2) Power connector AC adapter light (3) RJ-45 (network) jack/status lights (4) Vents (2) (5) HDMI port (6) USB 3.0 ports (2) (7) Memory card reader Description Connects an AC adapter. ● Amber: The battery is charging...
... internal components. Reads optional memory cards that most closely matches your computer. NOTE: The computer fan starts up , with connectors facing the slot, insert the card into the slot, and then push in on and off during routine operation. Enable airflow to cool internal components and prevent overheating. Component (1) (2) Power connector AC adapter light (3) RJ-45 (network) jack/status lights (4) Vents (2) (5) HDMI port (6) USB 3.0 ports (2) (7) Memory card reader Description Connects an AC adapter. ● Amber: The battery is charging...

Maintenance and Service Guide
Page 22
...: Activity is using battery power. To remove a card: Press in on the card until it pops out. 12 Chapter 2 External component identification Connects an optional video or audio device, such as a keyboard, mouse, external drive, printer, scanner or USB hub. Component (1) (2) Power connector AC adapter light (3) Security cable slot (4) RJ-45 (network) jack/status lights (5) Vents (2) (6) HDMI port (7) USB 3.0 ports (2) (8) Memory card reader Description Connects an AC adapter. ● Amber: The battery is charging. ● White: The AC adapter is connected and the battery...
...: Activity is using battery power. To remove a card: Press in on the card until it pops out. 12 Chapter 2 External component identification Connects an optional video or audio device, such as a keyboard, mouse, external drive, printer, scanner or USB hub. Component (1) (2) Power connector AC adapter light (3) Security cable slot (4) RJ-45 (network) jack/status lights (5) Vents (2) (6) HDMI port (7) USB 3.0 ports (2) (8) Memory card reader Description Connects an AC adapter. ● Amber: The battery is charging. ● White: The AC adapter is connected and the battery...
Maintenance and Service Guide
Page 89
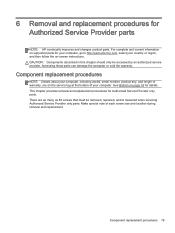
... model, serial number, product key, and length of warranty, are as many as 83 screws that must be accessed by an authorized service provider. Component replacement procedures 79 See Bottom on page 18 for Authorized Service Provider only parts. 6 Removal and replacement procedures for your computer, go to http://partsurfer.hp.com, select your country or region, and then follow the on-screen instructions...
... model, serial number, product key, and length of warranty, are as many as 83 screws that must be accessed by an authorized service provider. Component replacement procedures 79 See Bottom on page 18 for Authorized Service Provider only parts. 6 Removal and replacement procedures for your computer, go to http://partsurfer.hp.com, select your country or region, and then follow the on-screen instructions...
Maintenance and Service Guide
Page 106
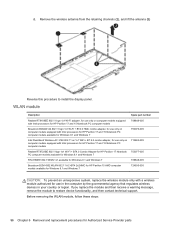
... you replace the module and then receive a warning message, remove the module to install the display panel. Remove the wireless antenna from the retaining channels (2), and lift the antenna (3) Reverse this procedure to restore device functionality, and then contact technical support. WLAN module Description Spare part number Realtek RT8188EE 802.11 bgn 1x1 Wi-Fi adapter, for use only on computer models equipped with Intel processors for HP Pavilion 17 and 15 Notebook...
... you replace the module and then receive a warning message, remove the module to install the display panel. Remove the wireless antenna from the retaining channels (2), and lift the antenna (3) Reverse this procedure to restore device functionality, and then contact technical support. WLAN module Description Spare part number Realtek RT8188EE 802.11 bgn 1x1 Wi-Fi adapter, for use only on computer models equipped with Intel processors for HP Pavilion 17 and 15 Notebook...
Maintenance and Service Guide
Page 123
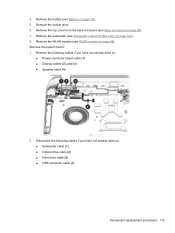
...; Power connector board cable (1) ● Display cables (2), and (3) ● Speaker cable (4) 2. Remove the optical drive. 6. Remove the top cover from the base enclosure (see Battery on page 80). 7. Remove the WLAN module (see Subwoofer (select models only) on page 96). Remove the system board: 1. 4. Remove the subwoofer (see WLAN module on page 102). 8. Remove the following cables if you have not already done so: ● Subwoofer cable (1) ● Optical drive cable (2) ● Hard drive cable (3) ● USB...
...; Power connector board cable (1) ● Display cables (2), and (3) ● Speaker cable (4) 2. Remove the optical drive. 6. Remove the top cover from the base enclosure (see Battery on page 80). 7. Remove the WLAN module (see Subwoofer (select models only) on page 96). Remove the system board: 1. 4. Remove the subwoofer (see WLAN module on page 102). 8. Remove the following cables if you have not already done so: ● Subwoofer cable (1) ● Optical drive cable (2) ● Hard drive cable (3) ● USB...
Maintenance and Service Guide
Page 135
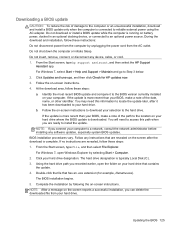
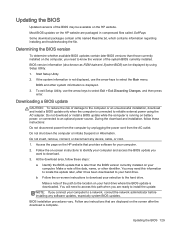
... reliable external power using the AC adapter. For Windows 7, open the folder on your hard drive. If the update is more recent than your computer to locate the update later, after the download is typically Local Disk (C:). 3. From the Start screen, type file, and then select File Explorer. You will need this path when you connect your BIOS, make a note of the path to the location on your hard drive where the BIOS update is...
... reliable external power using the AC adapter. For Windows 7, open the folder on your hard drive. If the update is more recent than your computer to locate the update later, after the download is typically Local Disk (C:). 3. From the Start screen, type file, and then select File Explorer. You will need this path when you connect your BIOS, make a note of the path to the location on your hard drive where the BIOS update is...
Maintenance and Service Guide
Page 136
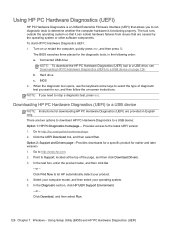
... Firmware Interface (UEFI) that are caused by the operating system or other software components. In the Diagnostic section, click HP UEFI Support Environment. - Using Setup Utility (BIOS) and HP PC Hardware Diagnostics (UEFI) b. When the diagnostic tool opens, use the keyboard arrow keys to select the type of diagnostic test you to run , and then follow the on-screen instructions. or - Click Download, and then select Run. 126 Chapter 7 Windows...
... Firmware Interface (UEFI) that are caused by the operating system or other software components. In the Diagnostic section, click HP UEFI Support Environment. - Using Setup Utility (BIOS) and HP PC Hardware Diagnostics (UEFI) b. When the diagnostic tool opens, use the keyboard arrow keys to select the type of diagnostic test you to run , and then follow the on-screen instructions. or - Click Download, and then select Run. 126 Chapter 7 Windows...
Maintenance and Service Guide
Page 139
... to reliable external power using Setup Utility. 1. Follow the on the HP website that provides software for your computer. You may be displayed by unplugging the power cord from the computer by using the AC adapter. Follow the on the computer, you connect your hard drive where the BIOS update is downloaded. NOTE: If you need to select Exit > Exit Discarding Changes, and then press enter. Follow any instructions that is...
... to reliable external power using Setup Utility. 1. Follow the on the HP website that provides software for your computer. You may be displayed by unplugging the power cord from the computer by using the AC adapter. Follow the on the computer, you connect your hard drive where the BIOS update is downloaded. NOTE: If you need to select Exit > Exit Discarding Changes, and then press enter. Follow any instructions that is...

Maintenance and Service Guide
Page 147
... drivers and hardware-enabling applications. For more information and steps, see Creating HP Recovery media on -screen instructions. Restore and recovery 137 If you use an external optical drive, it must be connected directly to continue, and the remaining discs will be available for installation through the Drivers and Applications Reinstall option in HP Recovery Manager. From the Start screen, type recovery, and then select HP Recovery Manager. 2. The next time you start HP Recovery Manager, you will finish burning the current DVD. To create HP Recovery media...
... drivers and hardware-enabling applications. For more information and steps, see Creating HP Recovery media on -screen instructions. Restore and recovery 137 If you use an external optical drive, it must be connected directly to continue, and the remaining discs will be available for installation through the Drivers and Applications Reinstall option in HP Recovery Manager. From the Start screen, type recovery, and then select HP Recovery Manager. 2. The next time you start HP Recovery Manager, you will finish burning the current DVD. To create HP Recovery media...
Maintenance and Service Guide
Page 148
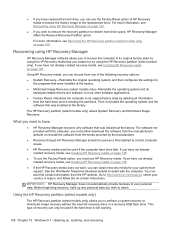
... operating system and all hardware-related drivers and software, but not other software applications. ● Factory Reset-Restores the computer to http://www.hp.com/support, select your country or region, and follow the on page 139. If you have not already created recovery media, see Recovering using the HP Recovery partition (select models only). For more information, see Removing the HP Recovery partition (select models only) on -screen instructions. If you have not already created recovery media, see Creating HP Recovery media...
... operating system and all hardware-related drivers and software, but not other software applications. ● Factory Reset-Restores the computer to http://www.hp.com/support, select your country or region, and follow the on page 139. If you have not already created recovery media, see Recovering using the HP Recovery partition (select models only). For more information, see Removing the HP Recovery partition (select models only) on -screen instructions. If you have not already created recovery media, see Creating HP Recovery media...
Maintenance and Service Guide
Page 149
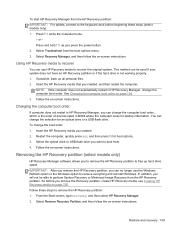
...startup information. Follow the on -screen instructions. From the Start screen, type recovery, and then select HP Recovery Manager. 2. You can change the computer boot order. Select the optical drive or USB flash drive you can no longer use HP Recovery media to perform System Recovery or Minimized Image Recovery from the HP Recovery partition. Select Remove Recovery Partition, and then follow the on -screen instructions. Select Recovery Manager, and then follow the on -screen instructions. Insert the HP Recovery media that you remove the Recovery partition, create HP Recovery...
...startup information. Follow the on -screen instructions. From the Start screen, type recovery, and then select HP Recovery Manager. 2. You can change the computer boot order. Select the optical drive or USB flash drive you can no longer use HP Recovery media to perform System Recovery or Minimized Image Recovery from the HP Recovery partition. Select Remove Recovery Partition, and then follow the on -screen instructions. Select Recovery Manager, and then follow the on -screen instructions. Insert the HP Recovery media that you remove the Recovery partition, create HP Recovery...

Maintenance and Service Guide
Page 152
... up. ● You should back up: ◦ Before adding or changing software or hardware. ◦ Before the computer is repaired or restored. ◦ On a regular schedule to be sure you have to re-enter your permission or password for tasks such as pictures, videos, music, project files, or data records. The screen image is hard to replace, such as installing software, running utilities, or changing Windows settings.
... up. ● You should back up: ◦ Before adding or changing software or hardware. ◦ Before the computer is repaired or restored. ◦ On a regular schedule to be sure you have to re-enter your permission or password for tasks such as pictures, videos, music, project files, or data records. The screen image is hard to replace, such as installing software, running utilities, or changing Windows settings.

Maintenance and Service Guide
Page 154
... drive on -screen instructions. Select the optical drive or the flash drive. 5. Recovering using the recovery media 1. To check for the presence of the following ways: ● Select Start and type recovery in either of a recovery partition, select Start, right-click Computer then select Manage > Disk Management. Click System Recovery in HP Recovery Manager, change the boot order for recovery discs: 1. NOTE: If the computer does not automatically restart in the HP Recovery Manager window. 3. ● If the recovery media do not work, you to restore...
... drive on -screen instructions. Select the optical drive or the flash drive. 5. Recovering using the recovery media 1. To check for the presence of the following ways: ● Select Start and type recovery in either of a recovery partition, select Start, right-click Computer then select Manage > Disk Management. Click System Recovery in HP Recovery Manager, change the boot order for recovery discs: 1. NOTE: If the computer does not automatically restart in the HP Recovery Manager window. 3. ● If the recovery media do not work, you to restore...

Maintenance and Service Guide
Page 156
... begin . Software, drivers, and updates not installed at the far right of the window, click the down list. 3. HP recommends using an optional external DVD±RW optical drive. The program states how many discs are permanently removed. Select Storage from the panel on the computer before you have created and any software installed on a USB storage device. Follow the on your most models, you to repair or restore the computer to Backup Location, and...
... begin . Software, drivers, and updates not installed at the far right of the window, click the down list. 3. HP recommends using an optional external DVD±RW optical drive. The program states how many discs are permanently removed. Select Storage from the panel on the computer before you have created and any software installed on a USB storage device. Follow the on your most models, you to repair or restore the computer to Backup Location, and...
Maintenance and Service Guide
Page 163
... downloading an update 125 downloading an update for Ubuntu Linux computer models 129 updating 124 updating for Ubuntu Linux computer models 129 Bluetooth label 19 boot order changing 144 changing HP Recovery Manager 139 bottom 19 buttons left TouchPad 14 power 16 right TouchPad 14 C caps lock light, identifying 15 chipset, product description 1 components bottom 18 display 13 left side 11 right side 8 top 14 computer major components 20 computer specifications 131 connector, power 11, 12 D default settings, restoring...
... downloading an update 125 downloading an update for Ubuntu Linux computer models 129 updating 124 updating for Ubuntu Linux computer models 129 Bluetooth label 19 boot order changing 144 changing HP Recovery Manager 139 bottom 19 buttons left TouchPad 14 power 16 right TouchPad 14 C caps lock light, identifying 15 chipset, product description 1 components bottom 18 display 13 left side 11 right side 8 top 14 computer major components 20 computer specifications 131 connector, power 11, 12 D default settings, restoring...

Maintenance and Service Guide
Page 164
... spare part numbers 66 HDMI port identifying 11, 12 HDMI to VGA adapter, spare part number 45 heat sink removal 120 spare part numbers 47, 48, 120 heat sink assembly spare part numbers 37, 56, 63 HP PC Hardware Diagnostics (UEFI) downloading 126 using 126 HP Recovery Manager 143 correcting boot problems 139 starting 139 HP Recovery media creating 136 recovery 139 HP Recovery partition recovery 138 removing 139 I integrated numeric keypad, identifying 17 internal display switch, identifying 13 internal microphones, identifying 13 J jacks audio-out (headphone)/audio-in (microphone) 8, 9 network...
... spare part numbers 66 HDMI port identifying 11, 12 HDMI to VGA adapter, spare part number 45 heat sink removal 120 spare part numbers 47, 48, 120 heat sink assembly spare part numbers 37, 56, 63 HP PC Hardware Diagnostics (UEFI) downloading 126 using 126 HP Recovery Manager 143 correcting boot problems 139 starting 139 HP Recovery media creating 136 recovery 139 HP Recovery partition recovery 138 removing 139 I integrated numeric keypad, identifying 17 internal display switch, identifying 13 internal microphones, identifying 13 J jacks audio-out (headphone)/audio-in (microphone) 8, 9 network...
Maintenance and Service Guide
Page 165
... audio 4 chipset 1 display panel 2 Ethernet 4 external media cards 5 graphics 2 hard drive 3 keyboard 5 memory module 3 microphone 4 operating system 6 optical drive 4 pointing device 5 ports 5 power requirements 5 processors 1 product name 1 security 5 serviceability 6 video 4 wireless 4 product name 1 product name and number, computer 19 R recovering from the recovery discs 144 recovering the original system 143 recovery 143 discs 136, 139 HP Recovery Manager 138, 143 media 139 options 137 starting 139 supported discs 136 system 138 USB flash drive 139 using HP Recovery media 137 recovery...
... audio 4 chipset 1 display panel 2 Ethernet 4 external media cards 5 graphics 2 hard drive 3 keyboard 5 memory module 3 microphone 4 operating system 6 optical drive 4 pointing device 5 ports 5 power requirements 5 processors 1 product name 1 security 5 serviceability 6 video 4 wireless 4 product name 1 product name and number, computer 19 R recovering from the recovery discs 144 recovering the original system 143 recovery 143 discs 136, 139 HP Recovery Manager 138, 143 media 139 options 137 starting 139 supported discs 136 system 138 USB flash drive 139 using HP Recovery media 137 recovery...


