
HP Mini 5102 - Maintenance and Service Guide
Page 11
... headphone) RJ-45 (Ethernet, includes link and activity lights) USB (2) USB+ (powered) (1) VGA (D-sub 15) supporting 1920 × 1440 external monitor (hot plug/unplug with auto-detect) 3-pin AC power 92%, spill-resistant keyboard Dura-Keys TouchPad, with Windows XP Pro images Windows 7 Home Premium Windows 7 Starter Windows XP Home SP3 for NetBooks FreeDOS SUSE Linux (SLED 11) Customer Self-Replacement (CSR): ● AC adapter ● Battery (system) ● Keyboard ● Memory module ● Hard drive 3
... headphone) RJ-45 (Ethernet, includes link and activity lights) USB (2) USB+ (powered) (1) VGA (D-sub 15) supporting 1920 × 1440 external monitor (hot plug/unplug with auto-detect) 3-pin AC power 92%, spill-resistant keyboard Dura-Keys TouchPad, with Windows XP Pro images Windows 7 Home Premium Windows 7 Starter Windows XP Home SP3 for NetBooks FreeDOS SUSE Linux (SLED 11) Customer Self-Replacement (CSR): ● AC adapter ● Battery (system) ● Keyboard ● Memory module ● Hard drive 3
HP Mini 5102 - Maintenance and Service Guide
Page 13
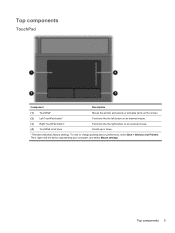
To view or change pointing device preferences, select Start > Devices and Printers. Then, right-click the device representing your computer, and select Mouse settings. Top components 5 Top components TouchPad Component Description (1) TouchPad* Moves the pointer and selects or activates items on the screen. (2) Left TouchPad button* Functions like the left button on an external mouse. (3) Right TouchPad button* Functions like the right button on an external mouse. (4) TouchPad scroll zone Scrolls up or down. *This table describes factory settings.
To view or change pointing device preferences, select Start > Devices and Printers. Then, right-click the device representing your computer, and select Mouse settings. Top components 5 Top components TouchPad Component Description (1) TouchPad* Moves the pointer and selects or activates items on the screen. (2) Left TouchPad button* Functions like the left button on an external mouse. (3) Right TouchPad button* Functions like the right button on an external mouse. (4) TouchPad scroll zone Scrolls up or down. *This table describes factory settings.
HP Mini 5102 - Maintenance and Service Guide
Page 47
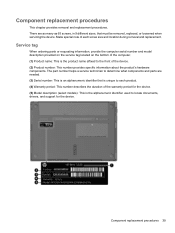
... the computer serial number and model description provided on the service tag located on the bottom of the device. (2) Product number: This number provides specific information about the product's hardware components. The part number helps a service technician to determine what components and parts are as many as 65 screws, in 9 different sizes, that is the alphanumeric identifier used to locate documents, drivers, and support for the device. Make special note...
... the computer serial number and model description provided on the service tag located on the bottom of the device. (2) Product number: This number provides specific information about the product's hardware components. The part number helps a service technician to determine what components and parts are as many as 65 screws, in 9 different sizes, that is the alphanumeric identifier used to locate documents, drivers, and support for the device. Make special note...
HP Mini 5102 - Maintenance and Service Guide
Page 83
... device uses an electric fan for ventilation. Disconnect all external devices connected to turn the device on, and then shut it down . Hard drive (see SIM on page 42). 6. Component replacement procedures 75 Disconnect the power from the device by high external temperatures, system power consumption, power management/battery conservation configurations, battery fast charging, and software requirements. If your device has WWAN capability, remove the SIM (see Mass storage devices on page 48) c. Display assembly (see Keyboard...
... device uses an electric fan for ventilation. Disconnect all external devices connected to turn the device on, and then shut it down . Hard drive (see SIM on page 42). 6. Component replacement procedures 75 Disconnect the power from the device by high external temperatures, system power consumption, power management/battery conservation configurations, battery fast charging, and software requirements. If your device has WWAN capability, remove the SIM (see Mass storage devices on page 48) c. Display assembly (see Keyboard...
HP Mini 5102 - Maintenance and Service Guide
Page 87
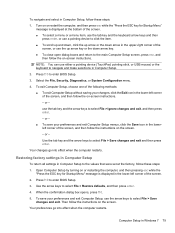
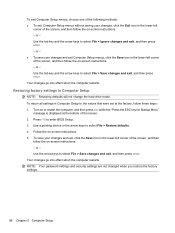
... displayed in Windows 7 79 When the confirmation dialog box opens, press f10. 5. Your preferences go into effect when the computer restarts. Restoring factory settings in Computer Setup To return all settings in Computer Setup to the values that were set at the bottom of the screen. ● To select a menu or a menu item, use the tab key and the keyboard arrow keys and then press enter, or use a pointing device...
... displayed in Windows 7 79 When the confirmation dialog box opens, press f10. 5. Your preferences go into effect when the computer restarts. Restoring factory settings in Computer Setup To return all settings in Computer Setup to the values that were set at the bottom of the screen. ● To select a menu or a menu item, use the tab key and the keyboard arrow keys and then press enter, or use a pointing device...
HP Mini 5102 - Maintenance and Service Guide
Page 89
... hard drive. Security menu NOTE: Some of BIOS users. Enter a user-defined computer asset tracking number and ownership tag. User Management (requires a BIOS administrator password) Create New BIOS User Account password ● ● Select from a list. ● Last Pass: Displays Disk Sanitizer Completion Report System IDs CAUTION: If you to destroy all existing data on the primary hard drive is a set of ProtectTools users. Select To do this section may not be supported by your password...
... hard drive. Security menu NOTE: Some of BIOS users. Enter a user-defined computer asset tracking number and ownership tag. User Management (requires a BIOS administrator password) Create New BIOS User Account password ● ● Select from a list. ● Last Pass: Displays Disk Sanitizer Completion Report System IDs CAUTION: If you to destroy all existing data on the primary hard drive is a set of ProtectTools users. Select To do this section may not be supported by your password...

HP Mini 5102 - Maintenance and Service Guide
Page 91
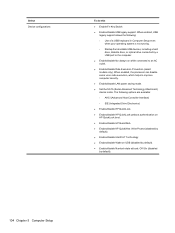
.... ● Enable/disable HP QuickWeb: Write Protect (disabled by default). ● Enable/disable Intel® HT Technology. ● Enable/disable Wake on USB (disabled by default). ● Enable/disable Numlock state at boot: Off /On (disabled by a USB port to the computer. ● Enable/disable fan always on while connected to improve computer security. ● Enable/disable LAN power saving mode. ● Set the SATA (Serial Advanced Technology Attachment) device mode. Select Device configurations To do this ● Enable Fn Key Switch ● Enable/disable USB legacy support.
.... ● Enable/disable HP QuickWeb: Write Protect (disabled by default). ● Enable/disable Intel® HT Technology. ● Enable/disable Wake on USB (disabled by default). ● Enable/disable Numlock state at boot: Off /On (disabled by a USB port to the computer. ● Enable/disable fan always on while connected to improve computer security. ● Enable/disable LAN power saving mode. ● Set the SATA (Serial Advanced Technology Attachment) device mode. Select Device configurations To do this ● Enable Fn Key Switch ● Enable/disable USB legacy support.
HP Mini 5102 - Maintenance and Service Guide
Page 93
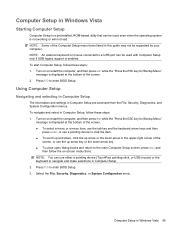
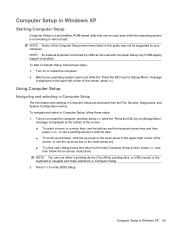
... use either a pointing device (TouchPad, pointing stick, or USB mouse) or the keyboard to enter BIOS Setup. Using Computer Setup Navigating and selecting in Computer Setup The information and settings in Windows Vista 85 To navigate and select in Computer Setup, follow these steps: 1. Computer Setup in Windows Vista Starting Computer Setup Computer Setup is a preinstalled, ROM-based utility that can be supported by your computer. Press f10 to enter BIOS Setup. 3. NOTE: Some of the screen. 2. To start Computer Setup...
... use either a pointing device (TouchPad, pointing stick, or USB mouse) or the keyboard to enter BIOS Setup. Using Computer Setup Navigating and selecting in Computer Setup The information and settings in Windows Vista 85 To navigate and select in Computer Setup, follow these steps: 1. Computer Setup in Windows Vista Starting Computer Setup Computer Setup is a preinstalled, ROM-based utility that can be supported by your computer. Press f10 to enter BIOS Setup. 3. NOTE: Some of the screen. 2. To start Computer Setup...
HP Mini 5102 - Maintenance and Service Guide
Page 94
... saving your changes, click the Exit icon in the lower-left corner of the screen, and then follow these steps: 1. Use the arrow keys to enter BIOS Setup. 3. To return all settings in Computer Setup NOTE: Restoring defaults will not change the hard drive mode. Use a pointing device or the arrow keys to the values that were set at the bottom of the screen. 2. Restoring factory settings in Computer Setup to select File > Restore defaults. 4. or...
... saving your changes, click the Exit icon in the lower-left corner of the screen, and then follow these steps: 1. Use the arrow keys to enter BIOS Setup. 3. To return all settings in Computer Setup NOTE: Restoring defaults will not change the hard drive mode. Use a pointing device or the arrow keys to the values that were set at the bottom of the screen. 2. Restoring factory settings in Computer Setup to select File > Restore defaults. 4. or...

HP Mini 5102 - Maintenance and Service Guide
Page 97
... (disabled by default). ● Enable/disable SD Card boot (enabled by default). ● Enable/disable floppy boot (enabled by default). ● Enable/disable PXE Internal NIC boot (enabled by default). ● Enable/Disable Unified Extensible Firmware Interface (UEFI) Boot Mode (disabled by default). ● Set the Legacy Boot Order. ● Enable/disable USB legacy support (enabled by default). ● SATA (Serial Advanced Technology Attachment) device mode. Select Language Boot Options Device Configurations To do this Change the Computer Setup language. ● Set a Startup Menu...
... (disabled by default). ● Enable/disable SD Card boot (enabled by default). ● Enable/disable floppy boot (enabled by default). ● Enable/disable PXE Internal NIC boot (enabled by default). ● Enable/Disable Unified Extensible Firmware Interface (UEFI) Boot Mode (disabled by default). ● Set the Legacy Boot Order. ● Enable/disable USB legacy support (enabled by default). ● SATA (Serial Advanced Technology Attachment) device mode. Select Language Boot Options Device Configurations To do this Change the Computer Setup language. ● Set a Startup Menu...
HP Mini 5102 - Maintenance and Service Guide
Page 101
... screen, or use a pointing device to navigate and make selections in Computer Setup, follow these steps: 1. Before your computer. Computer Setup in Windows XP Starting Computer Setup Computer Setup is a preinstalled, ROM-based utility that can use either a pointing device (TouchPad, pointing stick, or USB mouse) or the keyboard to click the item. ● To scroll up and down, click the up arrow key or the down arrow in this guide...
... screen, or use a pointing device to navigate and make selections in Computer Setup, follow these steps: 1. Before your computer. Computer Setup in Windows XP Starting Computer Setup Computer Setup is a preinstalled, ROM-based utility that can use either a pointing device (TouchPad, pointing stick, or USB mouse) or the keyboard to click the item. ● To scroll up and down, click the up arrow key or the down arrow in this guide...

HP Mini 5102 - Maintenance and Service Guide
Page 106
...; Enable/disable Wake on USB (disabled by default). ● Enable/disable Numlock state at boot: Off /On (disabled by a USB port to the computer. ● Enable/disable fan always on while connected to improve computer security. ● Enable/disable LAN power saving mode. ● Set the SATA (Serial Advanced Technology Attachment) device mode. The following : ◦ Use of a USB keyboard in Computer Setup even when your operating system is not running. ◦ Startup from bootable USB devices, including a hard drive, diskette drive, or optical drive connected by default...
...; Enable/disable Wake on USB (disabled by default). ● Enable/disable Numlock state at boot: Off /On (disabled by a USB port to the computer. ● Enable/disable fan always on while connected to improve computer security. ● Enable/disable LAN power saving mode. ● Set the SATA (Serial Advanced Technology Attachment) device mode. The following : ◦ Use of a USB keyboard in Computer Setup even when your operating system is not running. ◦ Startup from bootable USB devices, including a hard drive, diskette drive, or optical drive connected by default...
HP Mini 5102 - Maintenance and Service Guide
Page 112
...◦ Use of a USB keyboard in Computer Setup even when your operating system is not running. ◦ Startup from bootable USB devices, including a hard drive, diskette drive, or optical drive connected by default). 104 Chapter 5 Computer Setup When enabled, USB legacy support allows the following options are available: ◦ AHCI (Advanced Host Controller Interface) ◦ IDE (Integrated Drive Electronics) ● Enable/disable HP QuickLook. ● Enable/disable HP QuickLook preboot authentication on HP QuickLook boot. ● Enable/disable HP QuickWeb. ● Enable/disable HP...
...◦ Use of a USB keyboard in Computer Setup even when your operating system is not running. ◦ Startup from bootable USB devices, including a hard drive, diskette drive, or optical drive connected by default). 104 Chapter 5 Computer Setup When enabled, USB legacy support allows the following options are available: ◦ AHCI (Advanced Host Controller Interface) ◦ IDE (Integrated Drive Electronics) ● Enable/disable HP QuickLook. ● Enable/disable HP QuickLook preboot authentication on HP QuickLook boot. ● Enable/disable HP QuickWeb. ● Enable/disable HP...

HP Mini 5102 - Maintenance and Service Guide
Page 118
...accessible capacity is less. Contact technical support for details. 110 Chapter 6 Specifications Hard drive specifications 320 GB* 250 GB* 160 GB* Dimensions Height 9.5 mm (0.37 in) 9.5 mm (0.37 in) 9.5 mm (0.37 in) Width 70 mm (2.75 in) 70 mm (2.76 in) 70 mm (2.76 in) Weight 115 g (4.06 oz) 115 g (4.06 oz) 115 g (4.06 oz) Interface type... setting) Single track 1.5 ms 1.5 ms 1.5 ms Average 11.0 ms 11.0 ms 11.0 ms Maximum 22.0 ms 22.0 ms 22.0 ms Logical blocks 625,142,448 488,397,168 312,581,808 Disc rotational speed 7200 rpm 7200 rpm 7200 rpm Operating ...
...accessible capacity is less. Contact technical support for details. 110 Chapter 6 Specifications Hard drive specifications 320 GB* 250 GB* 160 GB* Dimensions Height 9.5 mm (0.37 in) 9.5 mm (0.37 in) 9.5 mm (0.37 in) Width 70 mm (2.75 in) 70 mm (2.76 in) 70 mm (2.76 in) Weight 115 g (4.06 oz) 115 g (4.06 oz) 115 g (4.06 oz) Interface type... setting) Single track 1.5 ms 1.5 ms 1.5 ms Average 11.0 ms 11.0 ms 11.0 ms Maximum 22.0 ms 22.0 ms 22.0 ms Logical blocks 625,142,448 488,397,168 312,581,808 Disc rotational speed 7200 rpm 7200 rpm 7200 rpm Operating ...

HP Mini 5102 - Maintenance and Service Guide
Page 120
... create a device conflict, you can access from Device Manager are direct memory access (DMA) channels, input/output (I/O) ports, interrupt request (IRQ) lines, and memory addresses. CAUTION: Improperly changing resource settings can disable your hardware and cause your computer to get a graphical view of the following : ● Resources by type ● Resources by connection To view resource settings in Windows 7 and Windows Vista: 1. System resources you can manually change resource settings. System resource specifications...
... create a device conflict, you can access from Device Manager are direct memory access (DMA) channels, input/output (I/O) ports, interrupt request (IRQ) lines, and memory addresses. CAUTION: Improperly changing resource settings can disable your hardware and cause your computer to get a graphical view of the following : ● Resources by type ● Resources by connection To view resource settings in Windows 7 and Windows Vista: 1. System resources you can manually change resource settings. System resource specifications...

HP Mini 5102 - Maintenance and Service Guide
Page 122
... the active window, press alt+fn+prt sc. The discs you use will depend on the type of optical drive installed in a window, toolbar, or menu bar by taking a screen shot of your backup, create a system image (select models only), or create a system repair disc (select models only). NOTE: The backup process may be a time-saver if you start up to discs, use Windows Startup Repair to fix problems that might prevent Windows from starting correctly. ● f11 recovery...
... the active window, press alt+fn+prt sc. The discs you use will depend on the type of optical drive installed in a window, toolbar, or menu bar by taking a screen shot of your backup, create a system image (select models only), or create a system repair disc (select models only). NOTE: The backup process may be a time-saver if you start up to discs, use Windows Startup Repair to fix problems that might prevent Windows from starting correctly. ● f11 recovery...

HP Mini 5102 - Maintenance and Service Guide
Page 125
...; When backing up to AC power before inserting it into the optional external optical drive. The discs you use. The screen image is connected to discs, use any of the following types of discs (purchased separately): CD-R, CD-RW, DVD+R, DVD+R DL, DVD-R, DVD-R DL, or DVD±RW. NOTE: Windows includes the User Account Control feature to the document. 4. Windows Vista backup and recovery 117 Click Start > All Programs > Maintenance > Backup and Restore Center. 2. You may take...
...; When backing up to AC power before inserting it into the optional external optical drive. The discs you use. The screen image is connected to discs, use any of the following types of discs (purchased separately): CD-R, CD-RW, DVD+R, DVD+R DL, DVD-R, DVD-R DL, or DVD±RW. NOTE: Windows includes the User Account Control feature to the document. 4. Windows Vista backup and recovery 117 Click Start > All Programs > Maintenance > Backup and Restore Center. 2. You may take...
HP Mini 5102 - Maintenance and Service Guide
Page 143
... 13 battery, identifying 16 BIOS administrator password 88 Bluetooth module removal 62 spare part number 23, 62 boot options 82, 89, 97, 103 boot order 82, 89, 97, 103 built-in device audio devices 91 Bluetooth device radio 91 fingerprint reader 91 internal speakers 91 LAN/WLAN switching 91 microphone 91 modem 91 Network Interface Controller (LAN) 91 Notebook Upgrade Bay 91 Power Monitor Circuit 91 Wake on LAN 91 wireless button 91 WLAN device radio 91 built-in device options 91 buttons power 7 QuickLook 7 QuickWeb 7 TouchPad 5 C cables, service considerations...
... 13 battery, identifying 16 BIOS administrator password 88 Bluetooth module removal 62 spare part number 23, 62 boot options 82, 89, 97, 103 boot order 82, 89, 97, 103 built-in device audio devices 91 Bluetooth device radio 91 fingerprint reader 91 internal speakers 91 LAN/WLAN switching 91 microphone 91 modem 91 Network Interface Controller (LAN) 91 Notebook Upgrade Bay 91 Power Monitor Circuit 91 Wake on LAN 91 wireless button 91 WLAN device radio 91 built-in device options 91 buttons power 7 QuickLook 7 QuickWeb 7 TouchPad 5 C cables, service considerations...
HP Mini 5102 - Maintenance and Service Guide
Page 144
... (network) 10 K keyboard product description 3 removal 45 spare part number 19, 45 keys esc 8 fn 8 function 8 keypad 8 Windows applications 8 Windows logo 8 L labels service tag 13 LAN Power Save 91 language, changing in Computer Setup 89 latches, battery release 13 legacy support, USB 78, 83, 85, 89, 93, 98, 100, 104 lights battery 11 caps lock 6 drive 9 power 6 QuickLook 6 QuickWeb 6 webcam 12 wireless 9 M mass storage device product description 1 spare part number 20 memory module product description 1 removal 43 spare part number 23, 43 memory module...
... (network) 10 K keyboard product description 3 removal 45 spare part number 19, 45 keys esc 8 fn 8 function 8 keypad 8 Windows applications 8 Windows logo 8 L labels service tag 13 LAN Power Save 91 language, changing in Computer Setup 89 latches, battery release 13 legacy support, USB 78, 83, 85, 89, 93, 98, 100, 104 lights battery 11 caps lock 6 drive 9 power 6 QuickLook 6 QuickWeb 6 webcam 12 wireless 9 M mass storage device product description 1 spare part number 20 memory module product description 1 removal 43 spare part number 23, 43 memory module...
HP Mini 5102 - Maintenance and Service Guide
Page 145
serial port 92 Smart Card slot 92 USB port 92 ports external monitor 11 product description 3 USB 10, 11 power button board spare part number 63 power button, identifying 7 power connector, identifying 11 power cord set requirements 127 spare part number 26 power cord, identifying 16 power light, identifying 6 power requirements, product description 3 processor, product description 1 product description audio 2 chipset 1 diskette drive 2 Ethernet 2 external media cards 2 graphics 1 hard drive 1 keyboard 3 mass storage device 1 memory module 1 modem 2 operating system 3 optical drive 2 panels 1...
serial port 92 Smart Card slot 92 USB port 92 ports external monitor 11 product description 3 USB 10, 11 power button board spare part number 63 power button, identifying 7 power connector, identifying 11 power cord set requirements 127 spare part number 26 power cord, identifying 16 power light, identifying 6 power requirements, product description 3 processor, product description 1 product description audio 2 chipset 1 diskette drive 2 Ethernet 2 external media cards 2 graphics 1 hard drive 1 keyboard 3 mass storage device 1 memory module 1 modem 2 operating system 3 optical drive 2 panels 1...


