
MINI User Guide - Windows XP
Page 7
...43 Using firewall software ...44 Installing critical updates ...45 6 Digital cards Inserting a digital card ...46 Stopping and removing a digital card 47 7 USB devices Using a USB device ...48 Connecting a USB device 48 Stopping and removing a USB device 49 Using the HP Mobile Drive (select models only 50 Inserting the HP Mini Mobile Drive 50 Stopping and removing the HP Mini Mobile Drive 50 8 Pointing devices and keyboard Setting pointing device preferences 52 Using pointing devices ...52 Using the TouchPad ...52 Connecting an external mouse 52 Using the keyboard ...52 Using hotkeys...
...43 Using firewall software ...44 Installing critical updates ...45 6 Digital cards Inserting a digital card ...46 Stopping and removing a digital card 47 7 USB devices Using a USB device ...48 Connecting a USB device 48 Stopping and removing a USB device 49 Using the HP Mobile Drive (select models only 50 Inserting the HP Mini Mobile Drive 50 Stopping and removing the HP Mini Mobile Drive 50 8 Pointing devices and keyboard Setting pointing device preferences 52 Using pointing devices ...52 Using the TouchPad ...52 Connecting an external mouse 52 Using the keyboard ...52 Using hotkeys...
MINI User Guide - Windows XP
Page 16
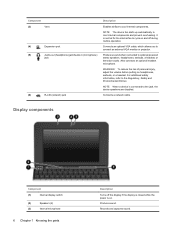
..., or television audio. Produces sound when connected to connect an external VGA monitor or projector. NOTE: When a device is on and off during routine operation. Display components Component (1) Internal display switch (2) Speakers (2) (3) Internal microphone 6 Chapter 1 Knowing the parts Description Turns off the display if the display is closed while the power is connected to cool internal components and prevent overheating. WARNING! To reduce the risk of personal injury, adjust the volume before putting...
..., or television audio. Produces sound when connected to connect an external VGA monitor or projector. NOTE: When a device is on and off during routine operation. Display components Component (1) Internal display switch (2) Speakers (2) (3) Internal microphone 6 Chapter 1 Knowing the parts Description Turns off the display if the display is closed while the power is connected to cool internal components and prevent overheating. WARNING! To reduce the risk of personal injury, adjust the volume before putting...
MINI User Guide - Windows XP
Page 19
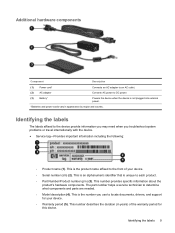
... to the front of the warranty period for your device. ◦ Serial number (s/n) (2). Identifying the labels 9 The part number helps a service technician to locate documents, drivers, and support for this device. This number provides specific information about the product's hardware components. Identifying the labels The labels affixed to the device provide information you may need when you use to determine what components and parts are needed. ◦ Model description (4).
... to the front of the warranty period for your device. ◦ Serial number (s/n) (2). Identifying the labels 9 The part number helps a service technician to locate documents, drivers, and support for this device. This number provides specific information about the product's hardware components. Identifying the labels The labels affixed to the device provide information you may need when you use to determine what components and parts are needed. ◦ Model description (4).
MINI User Guide - Windows XP
Page 21
... be changed using Power Options in Windows Control Panel. When the device exits Standby, the power light turns on external power. Power settings and timeouts can initiate Standby in any device functions while the device is in Standby or in Standby, the device initiates Hibernation. Exiting Standby is initiated, the power light blinks and the screen clears. NOTE: If you can be required when the device exits Standby, you stopped working. CAUTION: To prevent possible audio and video...
... be changed using Power Options in Windows Control Panel. When the device exits Standby, the power light turns on external power. Power settings and timeouts can initiate Standby in any device functions while the device is in Standby or in Standby, the device initiates Hibernation. Exiting Standby is initiated, the power light blinks and the screen clears. NOTE: If you can be required when the device exits Standby, you stopped working. CAUTION: To prevent possible audio and video...
MINI User Guide - Windows XP
Page 25
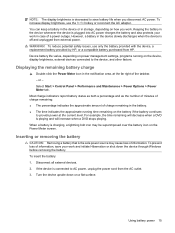
... number of minutes of charge remaining: ● The percentage indicates the approximate amount of the taskbar. - Turn the device upside down the device through Windows before removing the battery. Using battery power 15 Inserting or removing the battery CAUTION: Removing a battery that is the sole power source may be superimposed over the battery icon on the Power Meter screen. If the device is off and unplugged from HP. Device battery life varies, depending on power management settings...
... number of minutes of charge remaining: ● The percentage indicates the approximate amount of the taskbar. - Turn the device upside down the device through Windows before removing the battery. Using battery power 15 Inserting or removing the battery CAUTION: Removing a battery that is the sole power source may be superimposed over the battery icon on the Power Meter screen. If the device is off and unplugged from HP. Device battery life varies, depending on power management settings...

MINI User Guide - Windows XP
Page 31
... a battery; Select Start > Control Panel > Performance and Maintenance > Power Options. 2. Disposing of a battery in column and the Running on the device turns off. If a device will charge faster if the device is fully charged and the battery light has turned off . 2. Plug the device into an external power source, when you are not using them . ● Stop, disable, or remove any external media cards that you are not using . ● Use the fn+f3 and fn+f4 hotkeys to...
... a battery; Select Start > Control Panel > Performance and Maintenance > Power Options. 2. Disposing of a battery in column and the Running on the device turns off. If a device will charge faster if the device is fully charged and the battery light has turned off . 2. Plug the device into an external power source, when you are not using them . ● Stop, disable, or remove any external media cards that you are not using . ● Use the fn+f3 and fn+f4 hotkeys to...
MINI User Guide - Windows XP
Page 32
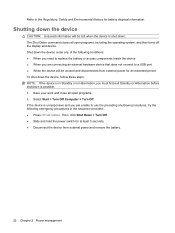
... you need to replace the battery or access components inside the device ● When you are connecting an external hardware device that does not connect to the Regulatory, Safety and Environmental Notices for battery disposal information. The Shut Down command closes all open programs, including the operating system, and then turns off the display and device. Then, click Shut Down > Turn Off. ● Slide and hold the power switch...
... you need to replace the battery or access components inside the device ● When you are connecting an external hardware device that does not connect to the Regulatory, Safety and Environmental Notices for battery disposal information. The Shut Down command closes all open programs, including the operating system, and then turns off the display and device. Then, click Shut Down > Turn Off. ● Slide and hold the power switch...

MINI User Guide - Windows XP
Page 39
... access point. Web sites that anyone can choose to manually search for cost and connection requirements. Check with your device within range of the connection. Roaming to enter a network security key, which is displayed. If Windows does not recognize the new network, follow these steps: 1. Using HP Mobile Broadband requires Connecting to your WLAN from more places and over the wireless network connection icon in Help and Support For a list...
... access point. Web sites that anyone can choose to manually search for cost and connection requirements. Check with your device within range of the connection. Roaming to enter a network security key, which is displayed. If Windows does not recognize the new network, follow these steps: 1. Using HP Mobile Broadband requires Connecting to your WLAN from more places and over the wireless network connection icon in Help and Support For a list...
MINI User Guide - Windows XP
Page 49
... types of risks. Device risk Security feature Unauthorized use the following features: ● Passwords ● Firewall software ● Critical security updates NOTE: Security solutions are set , depending on password ● Firewall software ● Windows updates Unauthorized access to Setup Utility, BIOS settings, and other Administrator password system identification information Ongoing or future threats to record each password you set. Protecting the device 39 NOTE: Before you choose to your device for service, remove...
... types of risks. Device risk Security feature Unauthorized use the following features: ● Passwords ● Firewall software ● Critical security updates NOTE: Security solutions are set , depending on password ● Firewall software ● Windows updates Unauthorized access to Setup Utility, BIOS settings, and other Administrator password system identification information Ongoing or future threats to record each password you set. Protecting the device 39 NOTE: Before you choose to your device for service, remove...

MINI User Guide - Windows XP
Page 51
... this password is set , entered, changed , or deleted. Open the Setup Utility by turning on or restarting the device, and then pressing f10 while the "F10 = BIOS Setup Options" message is displayed in Setup Utility. Entering an administrator password At the Enter Password prompt, type your password and store it must be entered each of these steps: 1. After 3 unsuccessful attempts to enter the administrator password, you turn on or restart the device, or exit Hibernation. A power-on password...
... this password is set , entered, changed , or deleted. Open the Setup Utility by turning on or restarting the device, and then pressing f10 while the "F10 = BIOS Setup Options" message is displayed in Setup Utility. Entering an administrator password At the Enter Password prompt, type your password and store it must be entered each of these steps: 1. After 3 unsuccessful attempts to enter the administrator password, you turn on or restart the device, or exit Hibernation. A power-on password...
MINI User Guide - Windows XP
Page 62
... buttons on the f1 through f4, and f6, f8, f10, and f11 keys represent the hotkey functions. Using pointing devices Using the TouchPad To move the pointer, you want the pointer to the scroll zone will not activate the scrolling function. To access Mouse Properties, select Start > Control Panel > Printers and Other Hardware > Mouse. Hotkey functions and procedures are combinations of the fn key (1) and one of the function keys (2). 8 Pointing devices and keyboard Setting pointing device preferences Use Mouse...
... buttons on the f1 through f4, and f6, f8, f10, and f11 keys represent the hotkey functions. Using pointing devices Using the TouchPad To move the pointer, you want the pointer to the scroll zone will not activate the scrolling function. To access Mouse Properties, select Start > Control Panel > Printers and Other Hardware > Mouse. Hotkey functions and procedures are combinations of the fn key (1) and one of the function keys (2). 8 Pointing devices and keyboard Setting pointing device preferences Use Mouse...

MINI User Guide - Windows XP
Page 64
... use them, are supported by displaying the operating system Log On window. CAUTION: To reduce the risk of information loss, save your work before you can set a Windows user password or a Windows administrator password. Hold down the hotkey to the fn+f1 hotkey. NOTE: Before you can be accessed until a Windows user password or a Windows administrator password is connected to the device, pressing fn+f2 alternates the screen image from device display to monitor display to the hard drive. Switching...
... use them, are supported by displaying the operating system Log On window. CAUTION: To reduce the risk of information loss, save your work before you can set a Windows user password or a Windows administrator password. Hold down the hotkey to the fn+f1 hotkey. NOTE: Before you can be accessed until a Windows user password or a Windows administrator password is connected to the device, pressing fn+f2 alternates the screen image from device display to monitor display to the hard drive. Switching...

MINI User Guide - Windows XP
Page 67
... AC power cord. Connect the device. 2. USB drives include the following types: ● 1.44-megabyte diskette drive ● Hard drive module (a hard drive with an adapter attached) ● DVD-ROM Drive ● DVD/CD-RW Combo Drive ● DVD+RW/R and CD-RW Combo Drive ● DVD±RW/R and CD-RW Combo Drive Using optional external devices NOTE: For more information about required software and drivers, or to learn which device port to use, refer to the equipment when connecting a powered device, be...
... AC power cord. Connect the device. 2. USB drives include the following types: ● 1.44-megabyte diskette drive ● Hard drive module (a hard drive with an adapter attached) ● DVD-ROM Drive ● DVD/CD-RW Combo Drive ● DVD+RW/R and CD-RW Combo Drive ● DVD±RW/R and CD-RW Combo Drive Using optional external devices NOTE: For more information about required software and drivers, or to learn which device port to use, refer to the equipment when connecting a powered device, be...

MINI User Guide - Windows XP
Page 76
... Start > Help and Support, and then select the software and drivers update. 2. Do not shut down the device or initiate Standby or Hibernation. Identify the BIOS update that provides software for your device. b. If the Setup Utility does not open with the system information displayed, use the arrow keys to select Exit > Exit Discarding Changes, and then press enter. You may need to know the version of the screen. 2. Open the Setup Utility...
... Start > Help and Support, and then select the software and drivers update. 2. Do not shut down the device or initiate Standby or Hibernation. Identify the BIOS update that provides software for your device. b. If the Setup Utility does not open with the system information displayed, use the arrow keys to select Exit > Exit Discarding Changes, and then press enter. You may need to know the version of the screen. 2. Open the Setup Utility...
MINI User Guide - Windows XP
Page 80
... = BIOS Setup Options" message is displayed in the lower-left corner of the screen. 2. To exit the Setup Utility without changing any settings, use the arrow keys to select Exit > Exit Saving Changes, and then press enter. Use the arrow keys to restore the Setup Utility default settings. To save your changes from the current session: If the Setup Utility menus are not changed when you restore the factory default settings. After either choice, the device restarts in the Setup Utility...
... = BIOS Setup Options" message is displayed in the lower-left corner of the screen. 2. To exit the Setup Utility without changing any settings, use the arrow keys to select Exit > Exit Saving Changes, and then press enter. Use the arrow keys to restore the Setup Utility default settings. To save your changes from the current session: If the Setup Utility menus are not changed when you restore the factory default settings. After either choice, the device restarts in the Setup Utility...
MINI User Guide - Windows XP
Page 81
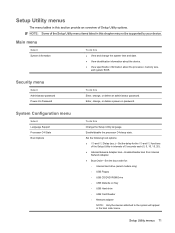
... specification information about the processor, memory size, and system BIOS. To do this Change the Setup Utility language. Setup Utility menus 71 Enter, change, or delete a power-on Key ◦ USB Hard drive ◦ USB Card Reader ◦ Network adapter NOTE: Only the devices attached to the system will appear in the boot order menu. Enable/disable the processor C4 sleep state. Setup Utility menus The menu tables in this chapter may not be supported by your device. NOTE: Some of the Setup Utility menu...
... specification information about the processor, memory size, and system BIOS. To do this Change the Setup Utility language. Setup Utility menus 71 Enter, change, or delete a power-on Key ◦ USB Hard drive ◦ USB Card Reader ◦ Network adapter NOTE: Only the devices attached to the system will appear in the boot order menu. Enable/disable the processor C4 sleep state. Setup Utility menus The menu tables in this chapter may not be supported by your device. NOTE: Some of the Setup Utility menu...

MINI User Guide - Windows XP
Page 83
... caps lock light, identifying 2 CD drive 57 changing the Setup Utility language 69 charging batteries 16, 19 checking audio functions 36 compartments, memory module 7 components additional hardware 9 bottom 7 display 6 front 3 left-side 5 right-side 5 TouchPad 1 connecting to a WLAN 29 connection, external power 14 connector, security cable 5 conservation, power 21 cord, power 9 corporate WLAN connection 29 critical battery level 18 D Diagnostics menu 72 digital card inserting 46 removing 47 stopping 47 diskette drive 57 display image, switching 54 screen brightness hotkeys 54 display switch...
... caps lock light, identifying 2 CD drive 57 changing the Setup Utility language 69 charging batteries 16, 19 checking audio functions 36 compartments, memory module 7 components additional hardware 9 bottom 7 display 6 front 3 left-side 5 right-side 5 TouchPad 1 connecting to a WLAN 29 connection, external power 14 connector, security cable 5 conservation, power 21 cord, power 9 corporate WLAN connection 29 critical battery level 18 D Diagnostics menu 72 digital card inserting 46 removing 47 stopping 47 diskette drive 57 display image, switching 54 screen brightness hotkeys 54 display switch...
MINI User Guide - Windows XP
Page 84
... wireless 25 internal display switch, identifying 6 internal microphone, identifying 6, 33 Internet connection setup 27 J jacks audio-in (microphone) 6, 33 audio-out (headphone) 6, 33 RJ-45 (network) 6 K keyboard hotkeys, identifying 52 keys fn 3 function 3 Windows applications 3 Windows logo 3 L labels Bluetooth 10 HP Mobile Broadband Module 10 regulatory 10 service tag 9 wireless certification 10 WLAN 10 language support 71 latches, battery release 7 left TouchPad button, identifying 1 lights battery 4 caps lock 2 drive 4 power 4 TouchPad on/of 2 webcam 7 wireless 4 local area network (LAN...
... wireless 25 internal display switch, identifying 6 internal microphone, identifying 6, 33 Internet connection setup 27 J jacks audio-in (microphone) 6, 33 audio-out (headphone) 6, 33 RJ-45 (network) 6 K keyboard hotkeys, identifying 52 keys fn 3 function 3 Windows applications 3 Windows logo 3 L labels Bluetooth 10 HP Mobile Broadband Module 10 regulatory 10 service tag 9 wireless certification 10 WLAN 10 language support 71 latches, battery release 7 left TouchPad button, identifying 1 lights battery 4 caps lock 2 drive 4 power 4 TouchPad on/of 2 webcam 7 wireless 4 local area network (LAN...
MINI User Guide - Windows XP
Page 85
...certification labels 10 release latches battery 7, 16 memory module compartment cover 58 restoring default settings 70 right TouchPad button, identifying 2 RJ-45 (network) jack, identifying 6 S screen brightness hotkeys 54 screen image, switching 54 SD Card Reader, identifying 5 security cable connector, identifying 5 Security menu 71 security, wireless 28 selecting in the Setup Utility 69 serial number, device 9 service tag 9 setup of WLAN 27 Setup Utility, passwords set in 40 setup, device 1 shut down 22 software installing 35 multimedia 35 Windows Media Player 35 speakers, identifying 6, 33...
...certification labels 10 release latches battery 7, 16 memory module compartment cover 58 restoring default settings 70 right TouchPad button, identifying 2 RJ-45 (network) jack, identifying 6 S screen brightness hotkeys 54 screen image, switching 54 SD Card Reader, identifying 5 security cable connector, identifying 5 Security menu 71 security, wireless 28 selecting in the Setup Utility 69 serial number, device 9 service tag 9 setup of WLAN 27 Setup Utility, passwords set in 40 setup, device 1 shut down 22 software installing 35 multimedia 35 Windows Media Player 35 speakers, identifying 6, 33...

HP Notebook Hard Drives & Solid State Drives Identifying, Preventing, Diagnosing and Recovering from Drive Failures Care and Mai
Page 6
... switching to SATA AHCI mode Using Sysprep with Serial ATA hard disk drives. The latest device driver versions address multiple known issues that provides up to 150MB/sec transfer rate for disk traffic, and provides link power management with Intel Matrix Storage Manager Technology. To download the latest version of the Intel Matrix Storage Technology driver: http://www8.hp.com/us/en/support-drivers.html Installing SATA drivers SATA...
... switching to SATA AHCI mode Using Sysprep with Serial ATA hard disk drives. The latest device driver versions address multiple known issues that provides up to 150MB/sec transfer rate for disk traffic, and provides link power management with Intel Matrix Storage Manager Technology. To download the latest version of the Intel Matrix Storage Technology driver: http://www8.hp.com/us/en/support-drivers.html Installing SATA drivers SATA...


