

LE42B1380 Manual
Page 4
.... Safety Instructions FCC STATEMENT Haier is committed to provide reasonable protection against harmful interference in a residential installation. Please check fora local recycling location in particular installation. However there is subject to the following measures: *Reorient or relocate the receiving antenna. *Increase the separation between the equipment and receiver. *Connect the equipment into an outlet on , the user is helping the environment...
.... Safety Instructions FCC STATEMENT Haier is committed to provide reasonable protection against harmful interference in a residential installation. Please check fora local recycling location in particular installation. However there is subject to the following measures: *Reorient or relocate the receiving antenna. *Increase the separation between the equipment and receiver. *Connect the equipment into an outlet on , the user is helping the environment...

LE42B1380 Manual
Page 6
Time menu 4. Lock menu 6. Instruction for Wall Mount 4. Base Stand Assembly Instructions 5. Setup menu 5. Channel menu 7. USB mode Simple Troubleshooting Warranty 1 2-3 5 5 6-10 6 7 8 9 9-10 11-13 14 15-22 15 16 17 18 19 20-21 22 23 24 Rear View 3. Picture menu 2. Contents Contents Warning Safety Instructions Unit and Accessories Product Features Introduction 1. Front View 2. Remote Control Connection Basic Operation OSD Menu 1. Audio menu 3.
Time menu 4. Lock menu 6. Instruction for Wall Mount 4. Base Stand Assembly Instructions 5. Setup menu 5. Channel menu 7. USB mode Simple Troubleshooting Warranty 1 2-3 5 5 6-10 6 7 8 9 9-10 11-13 14 15-22 15 16 17 18 19 20-21 22 23 24 Rear View 3. Picture menu 2. Contents Contents Warning Safety Instructions Unit and Accessories Product Features Introduction 1. Front View 2. Remote Control Connection Basic Operation OSD Menu 1. Audio menu 3.
LE42B1380 Manual
Page 8
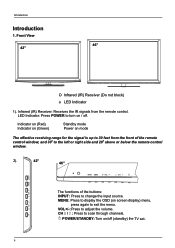
... (Red) Indicator on (Green) Standby mode Power on screen display) menu, press again to change the input source. POWER/STANDBY: Turn on / off (standby) the TV set. 6 Front View 46" 42" O Infrared (IR) Receiver (Do not block) o LED Indicator 1). Infrared (IR) Receiver: Receives the IR signals from the front of the remote control window, and 300 to the left or right side and 200 above or below the remote control window. 2). 42" 46" INPUT MENU VOL CH INPUT MENU VOL...
... (Red) Indicator on (Green) Standby mode Power on screen display) menu, press again to change the input source. POWER/STANDBY: Turn on / off (standby) the TV set. 6 Front View 46" 42" O Infrared (IR) Receiver (Do not block) o LED Indicator 1). Infrared (IR) Receiver: Receives the IR signals from the front of the remote control window, and 300 to the left or right side and 200 above or below the remote control window. 2). 42" 46" INPUT MENU VOL CH INPUT MENU VOL...
LE42B1380 Manual
Page 9
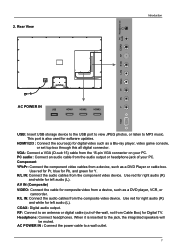
.... Component YPbPr: Connect the component video cables from Cable Box) for software updates. Headphone: Connect headphones. When it is also used for Digital TV. COAX: Digital audio output. 2. Use red for Pr, blue for Pb, and green for left audio (L). R/L IN: Connect the audio cables from the audio output or headphone jack of -the-wall, not from a device, such as a Blu-ray player, video game console, or set top box through this all digital connector. PC audio : Connect an audio cable from the composite video device. Use red...
.... Component YPbPr: Connect the component video cables from Cable Box) for software updates. Headphone: Connect headphones. When it is also used for Digital TV. COAX: Digital audio output. 2. Use red for Pr, blue for Pb, and green for left audio (L). R/L IN: Connect the audio cables from the audio output or headphone jack of -the-wall, not from a device, such as a Blu-ray player, video game console, or set top box through this all digital connector. PC audio : Connect an audio cable from the composite video device. Use red...
LE42B1380 Manual
Page 10
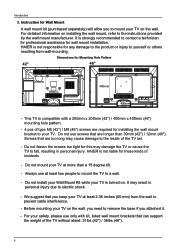
Instruction for Wall Mount A wall mount kit (purchased separately) will allow you attached it. - It is turned on installing the wall mount, refer to your TV at least 2.36 inches (60 mm) from wall-mounting. HAIER is not responsible for installing the wall mount bracket to the instructions provided by the wall mount manufacturer. Do not use screws that are too long may cause damage to prevent cable interference. - Screws that are required for any...
Instruction for Wall Mount A wall mount kit (purchased separately) will allow you attached it. - It is turned on installing the wall mount, refer to your TV at least 2.36 inches (60 mm) from wall-mounting. HAIER is not responsible for installing the wall mount bracket to the instructions provided by the wall mount manufacturer. Do not use screws that are too long may cause damage to prevent cable interference. - Screws that are required for any...

LE42B1380 Manual
Page 11
... different types or used batteries with the supplied screws (4 x B4 x 22F). 42" Screws:4xB4X22F 5. Close the cover. Put the rear board on the TV set 2. Put the neck on a soft and flat surface (blanket, foam, cloth, etc.) to prevent any damage to the left and right of the IR receiver at the front of properly. Introduction 4. Base Stand Assembly Instructions Note: the pictures below are...
... different types or used batteries with the supplied screws (4 x B4 x 22F). 42" Screws:4xB4X22F 5. Close the cover. Put the rear board on the TV set 2. Put the neck on a soft and flat surface (blanket, foam, cloth, etc.) to prevent any damage to the left and right of the IR receiver at the front of properly. Introduction 4. Base Stand Assembly Instructions Note: the pictures below are...
LE42B1380 Manual
Page 12
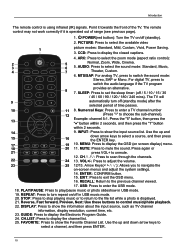
... a TV channel number 12 within 2 seconds. 9. Introduction The remote control is operated out of range (see previous page). 1 PICTURE AUDIO 2 3 ARC CCD MTS/SAP SLEEP 4 1 2 3 4 5 6 7 8 9 9 INPUT 0 MENU 10 MUTE CH+ 13 VOL ENTER VOL+ 14 CH EXIT RECALL 15 USB PLAY/PAUSE STOP REPEAT 17 18 REV FWD PREV NEXT 21 DISPLAY GUIDE FAVORITE CH.LIST 22 23 1. AUDIO: Press to enter the USB mode. 18. ENTER : CONFIRM button. 15. USB: Press...
... a TV channel number 12 within 2 seconds. 9. Introduction The remote control is operated out of range (see previous page). 1 PICTURE AUDIO 2 3 ARC CCD MTS/SAP SLEEP 4 1 2 3 4 5 6 7 8 9 9 INPUT 0 MENU 10 MUTE CH+ 13 VOL ENTER VOL+ 14 CH EXIT RECALL 15 USB PLAY/PAUSE STOP REPEAT 17 18 REV FWD PREV NEXT 21 DISPLAY GUIDE FAVORITE CH.LIST 22 23 1. AUDIO: Press to enter the USB mode. 18. ENTER : CONFIRM button. 15. USB: Press...
LE42B1380 Manual
Page 13
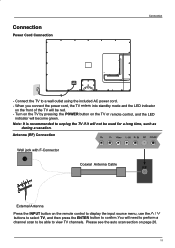
... AC power cord. - Antenna (RF) Connection IN IN COAX Wall jack with F-Connector Coaxial Antenna Cable RF External Antenna Press the INPUT button on page 20. 11 Turn on the TV by pressing the POWER button on the front of the TV will need to perform a channel scan to be able to view TV channels. Connection Power Cord Connection Connection - When you connect the power cord, the TV enters into standby mode and the LED indicator on the TV or remote control...
... AC power cord. - Antenna (RF) Connection IN IN COAX Wall jack with F-Connector Coaxial Antenna Cable RF External Antenna Press the INPUT button on page 20. 11 Turn on the TV by pressing the POWER button on the front of the TV will need to perform a channel scan to be able to view TV channels. Connection Power Cord Connection Connection - When you connect the power cord, the TV enters into standby mode and the LED indicator on the TV or remote control...
LE42B1380 Manual
Page 14
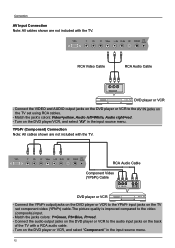
... colors: Y=Green, Pb=Blue, Pr=red. - Turn on the DVD player/VCR, and select "AV" in the input source menu. 12 Turn on the DVD player or VCR, and select "Component " in the input source menu. YPbPr (Component) Connection Note: All cables shown are not included with the TV. Connect the YPbPr output jacks on the DVD player or VCR to the YPbPr input jacks on the TV set using RCA cables. - IN IN COAX RCA Video Cable RCA Audio Cable DVD player...
... colors: Y=Green, Pb=Blue, Pr=red. - Turn on the DVD player/VCR, and select "AV" in the input source menu. 12 Turn on the DVD player or VCR, and select "Component " in the input source menu. YPbPr (Component) Connection Note: All cables shown are not included with the TV. Connect the YPbPr output jacks on the DVD player or VCR to the YPbPr input jacks on the TV set using RCA cables. - IN IN COAX RCA Video Cable RCA Audio Cable DVD player...
LE42B1380 Manual
Page 15
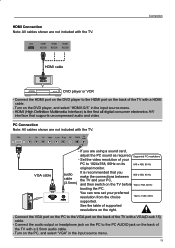
... supported resolutions on the PC, and select "VGA" in the input source menu. Turn on the right. - HDMI Connection Note: All cables shown are not included with the TV. Set the video resolution of the TV with a VGA(D-sub 15) cable. - You can now set your PC to the PC AUDIO jack on the TV before booting the PC. Turn on its original monitor. Connect the HDMI port on the DVD player...
... supported resolutions on the PC, and select "VGA" in the input source menu. Turn on the right. - HDMI Connection Note: All cables shown are not included with the TV. Set the video resolution of the TV with a VGA(D-sub 15) cable. - You can now set your PC to the PC AUDIO jack on the TV before booting the PC. Turn on its original monitor. Connect the HDMI port on the DVD player...
LE42B1380 Manual
Page 16
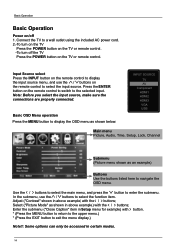
... EXIT button to a wall outlet using the included AC power cord. 2.-To turn on the TV Press the POWER button on the remote control to display the input source menu, and use the / buttons to display the OSD menu as shown below: INPUT SOURCE TV AV Component HDMI1 HDMI2 HDMI3 VGA USB Main menu Picture, Audio, Time, Setup, Lock, Channel Submenu (Picture menu shown as shown in certain modes. 14 Connect the TV to exit the menu display.) Note1: Some options can only be accessed in...
... EXIT button to a wall outlet using the included AC power cord. 2.-To turn on the TV Press the POWER button on the remote control to display the input source menu, and use the / buttons to display the OSD menu as shown below: INPUT SOURCE TV AV Component HDMI1 HDMI2 HDMI3 VGA USB Main menu Picture, Audio, Time, Setup, Lock, Channel Submenu (Picture menu shown as shown in certain modes. 14 Connect the TV to exit the menu display.) Note1: Some options can only be accessed in...
LE42B1380 Manual
Page 17
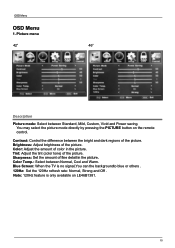
...: Adjust brightness of color in the picture. Color: Adjust the amount of the picture. Blue Screen: When the TV is only available on the remote control. Note: 120Hz feature is no signal,You can the backgroundto blue or others . 120Hz: Set the 120Hz refresh rate: Normal, Strong and Off . Picture menu 42" 46" Description Picture mode: Select between the bright and dark regions of the picture...
...: Adjust brightness of color in the picture. Color: Adjust the amount of the picture. Blue Screen: When the TV is only available on the remote control. Note: 120Hz feature is no signal,You can the backgroundto blue or others . 120Hz: Set the 120Hz refresh rate: Normal, Strong and Off . Picture menu 42" 46" Description Picture mode: Select between the bright and dark regions of the picture...
LE42B1380 Manual
Page 19
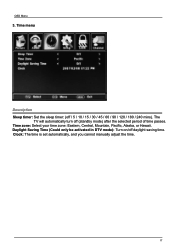
Daylight Saving Time (Could only be activated in DTV mode): Turn on/off (standby mode) after the selected period of time passes. Time zone: Select your time zone: Eastern, Central, Mountain, Pacific, Alaska, or Hawaii. The TV will automatically turn off daylight saving time. OSD Menu 3. Clock: The time is set automatically, and you cannot manually adjust the time. 17 Time menu Description Sleep timer: Set the sleep timer: (off / 5 / 10 / 15 / 30 / 45 / 60 / 90 / 120 / 180 / 240 mins).
Daylight Saving Time (Could only be activated in DTV mode): Turn on/off (standby mode) after the selected period of time passes. Time zone: Select your time zone: Eastern, Central, Mountain, Pacific, Alaska, or Hawaii. The TV will automatically turn off daylight saving time. OSD Menu 3. Clock: The time is set automatically, and you cannot manually adjust the time. 17 Time menu Description Sleep timer: Set the sleep timer: (off / 5 / 10 / 15 / 30 / 45 / 60 / 90 / 120 / 180 / 240 mins).
LE42B1380 Manual
Page 20
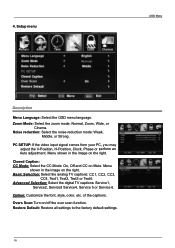
..., CC3, CC4, Text1, Text2, Text3 or Text4. Setup menu OSD Menu Description Menu Language: Select the OSD menu language. Menu shown in the image on the right. Noise reduction: Select the noise reduction mode: Weak, Middle, or Strong. Advanced Selection: Select the digital TV captions: Service1, Service2, Service3 Service4, Service 5 or Service 6. Overs Scan:Turn on Mute. Restore Default: Restore all settings to the factory default settings. 18
..., CC3, CC4, Text1, Text2, Text3 or Text4. Setup menu OSD Menu Description Menu Language: Select the OSD menu language. Menu shown in the image on the right. Noise reduction: Select the noise reduction mode: Weak, Middle, or Strong. Advanced Selection: Select the digital TV captions: Service1, Service2, Service3 Service4, Service 5 or Service 6. Overs Scan:Turn on Mute. Restore Default: Restore all settings to the factory default settings. 18
LE42B1380 Manual
Page 21
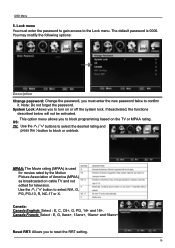
...0000. This option menu allows you to turn on or off the system lock. Canada French: Select : E, G, 8ans+, 13ans+, 16ans+ and 18ans+. OSD Menu 5. You may modify the following options: Description Change password: it. If ...Use the Ĥ 0 ĥ buttons to block or unblock. Reset RRT: Allows you to block programming based on cable TV and not edited for television. Canada:! Use the Ĥ 0 ĥ button to reset the RRT setting. 19 Lock menu You must enter the password to gain access to the Lock menu. The default password is used for movies rated by the Motion Picture...
...0000. This option menu allows you to turn on or off the system lock. Canada French: Select : E, G, 8ans+, 13ans+, 16ans+ and 18ans+. OSD Menu 5. You may modify the following options: Description Change password: it. If ...Use the Ĥ 0 ĥ buttons to block or unblock. Reset RRT: Allows you to block programming based on cable TV and not edited for television. Canada:! Use the Ĥ 0 ĥ button to reset the RRT setting. 19 Lock menu You must enter the password to gain access to the Lock menu. The default password is used for movies rated by the Motion Picture...

LE42B1380 Manual
Page 22
... /from the favorite channels list. If you selet "Cable", the following items(Favorite, Show/Hide, Channel NO, Channel Label and DTV Signal) will be stored automatically. The receivable channels will be stored automatically. Favorite: Add/remove channels to auto scan in "Air" mode, please wait patiently. button to start auto scan. Auto Scan: Enter the Auto Scan menu to search the channels automatically The receivable channels will be unavailable. Use the ĥ button to highlight "Start...
... /from the favorite channels list. If you selet "Cable", the following items(Favorite, Show/Hide, Channel NO, Channel Label and DTV Signal) will be stored automatically. The receivable channels will be stored automatically. Favorite: Add/remove channels to auto scan in "Air" mode, please wait patiently. button to start auto scan. Auto Scan: Enter the Auto Scan menu to search the channels automatically The receivable channels will be unavailable. Use the ĥ button to highlight "Start...

LE42B1380 Manual
Page 23
Channel No.: Show and select the channel. DTV Signal: Shows the quality of a channel. Channel Label: Change the label (name) of the digital signal: Good, Normal, Bad. 21 Press the =!0!?!button to select the position , and press the Ĥ 0 ĥ button to show or hide the channels. OSD Menu Show/Hide: Allow you to show or hide the highlighted channel. Use the Ĥ 0 ĥ button to highlight the desired item, then press the ENTER button to select the letter.
Channel No.: Show and select the channel. DTV Signal: Shows the quality of a channel. Channel Label: Change the label (name) of the digital signal: Good, Normal, Bad. 21 Press the =!0!?!button to select the position , and press the Ĥ 0 ĥ button to show or hide the channels. OSD Menu Show/Hide: Allow you to show or hide the highlighted channel. Use the Ĥ 0 ĥ button to highlight the desired item, then press the ENTER button to select the letter.

LE42B1380 Manual
Page 24
... the input source menu. Press the < > buttons to change the programing mode. 22 Operation buttons : Play or pause. : Stop. : Reverse : Fast forword : Previous chapter : Next chapter REPEAT: Press to select Photo files or Music files. 2. Press the ġ Ģ buttons to select a file or folder, and press the ENTER button to play the file or open the folder. USB mode 1). OSD Menu 7. Press the USB button on the remote control...
... the input source menu. Press the < > buttons to change the programing mode. 22 Operation buttons : Play or pause. : Stop. : Reverse : Fast forword : Previous chapter : Next chapter REPEAT: Press to select Photo files or Music files. 2. Press the ġ Ģ buttons to select a file or folder, and press the ENTER button to play the file or open the folder. USB mode 1). OSD Menu 7. Press the USB button on the remote control...
LE42B1380 Manual
Page 25
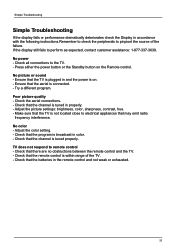
... the following instructions.Remember to check the peripherals to pinpiont the source of the TV. - Try a different program. No power - Ensure that the remote control is tuned properly. Check that the batteries in properly. - Adjust the color setting. - Check the aerial connections. - Check that may emit radio frequency interference. No picture or sound - Make sure that the TV is not located close to perform...
... the following instructions.Remember to check the peripherals to pinpiont the source of the TV. - Try a different program. No power - Ensure that the remote control is tuned properly. Check that the batteries in properly. - Adjust the color setting. - Check the aerial connections. - Check that may emit radio frequency interference. No picture or sound - Make sure that the TV is not located close to perform...
LE42B1380 Manual
Page 26
...change to the purchaser, for parts or labor for incidental or consequential economic or property damage. YOU MAY ALSO HAVE OTHER RIGHTS WHICH VARY FROM STATE TO STATE. It does not apply to the additional excluded items set forth below : The warranty commences on contract, negligence, strict duality or otherwise. THIS WARRANTY GIVES YOU SPECIFIC...year parts and labor. Where to obtain service: For the location of purchase. 24 What to do not allow limitations on behalf of Haier. Warranty This Haier brand product, when shipped in its option, either repair the defect or replace ...
...change to the purchaser, for parts or labor for incidental or consequential economic or property damage. YOU MAY ALSO HAVE OTHER RIGHTS WHICH VARY FROM STATE TO STATE. It does not apply to the additional excluded items set forth below : The warranty commences on contract, negligence, strict duality or otherwise. THIS WARRANTY GIVES YOU SPECIFIC...year parts and labor. Where to obtain service: For the location of purchase. 24 What to do not allow limitations on behalf of Haier. Warranty This Haier brand product, when shipped in its option, either repair the defect or replace ...


