
L55B2181 Manual
Page 4
...installed and used when connecting this equipment does cause harmful interference to radio or television reception, which the receiver is connected. *Consult the dealer or an experienced radio/TV technician for a Class B digital device, pursuant to the following measures: *Reorient or relocate the receiving antenna... used in particular installation. Operation is no guarantee that may cause harmful interference to radio communications. Safety Instructions FCC STATEMENT This equipment has been tested and found to comply with the limits for help. These limits are designed to video ...
...installed and used when connecting this equipment does cause harmful interference to radio or television reception, which the receiver is connected. *Consult the dealer or an experienced radio/TV technician for a Class B digital device, pursuant to the following measures: *Reorient or relocate the receiving antenna... used in particular installation. Operation is no guarantee that may cause harmful interference to radio communications. Safety Instructions FCC STATEMENT This equipment has been tested and found to comply with the limits for help. These limits are designed to video ...

L55B2181 Manual
Page 6
Lock menu 6. Picture menu 2. Instruction for Wall Mount 4. Audio menu 3. Channel menu 7. Base Stand Assembly Instructions 5. Remote Control Connection Basic Operation OSD Menu 1. USB mode Simple Troubleshooting Warranty 1 2-3 5 5 6-10 6 7 8 9 9 10 11-13 14 15-22 15 16 17 18 19 20-21 22 23 24 Time menu 4. Setup menu 5. Remote Control Installing Batteries 6. Contents Contents Warning Safety Instructions Unit and Accessories Product Features Introduction 1. Front View 2. Rear View 3.
Lock menu 6. Picture menu 2. Instruction for Wall Mount 4. Audio menu 3. Channel menu 7. Base Stand Assembly Instructions 5. Remote Control Connection Basic Operation OSD Menu 1. USB mode Simple Troubleshooting Warranty 1 2-3 5 5 6-10 6 7 8 9 9 10 11-13 14 15-22 15 16 17 18 19 20-21 22 23 24 Time menu 4. Setup menu 5. Remote Control Installing Batteries 6. Contents Contents Warning Safety Instructions Unit and Accessories Product Features Introduction 1. Front View 2. Rear View 3.
L55B2181 Manual
Page 8
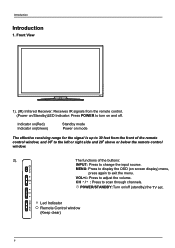
... View 1). (IR) Infrared Receiver: Receives IR signals from the front of the buttons: INPUT: Press to scan through channels. CH / : Press to change the input source. POWER/STANDBY: Turn on screen display) menu, press again to display the OSD (on /off . MENU: Press to exit the menu. Introduction Introduction 1. Indicator on(Red) Indicator on(Green) Standby mode Power on mode The effective receiving range for the signal is up to 30 feet from the remote control. (Power on/Standby)LED Indicator: Press POWER to adjust...
... View 1). (IR) Infrared Receiver: Receives IR signals from the front of the buttons: INPUT: Press to scan through channels. CH / : Press to change the input source. POWER/STANDBY: Turn on screen display) menu, press again to display the OSD (on /off . MENU: Press to exit the menu. Introduction Introduction 1. Indicator on(Red) Indicator on(Green) Standby mode Power on mode The effective receiving range for the signal is up to 30 feet from the remote control. (Power on/Standby)LED Indicator: Press POWER to adjust...
L55B2181 Manual
Page 9
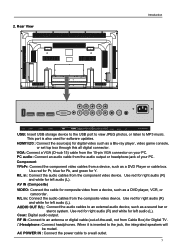
..., and green for Digital TV. AUDIO OUT R/L: Connect the audio cables to the jack, the integrated speakers will be muted. 2. VGA: Connect a VGA (D-sub 15) cable from a device, such as a sound bar or sterco system. Component YPbPr: Connect the component video cables from the 15-pin VGA connector on your PC. Use red for right audio (R) and white for software updates. This port is inserted to an external audio device, such as a DVD Player or cable box. When...
..., and green for Digital TV. AUDIO OUT R/L: Connect the audio cables to the jack, the integrated speakers will be muted. 2. VGA: Connect a VGA (D-sub 15) cable from a device, such as a sound bar or sterco system. Component YPbPr: Connect the component video cables from the 15-pin VGA connector on your PC. Use red for right audio (R) and white for software updates. This port is inserted to an external audio device, such as a DVD Player or cable box. When...
L55B2181 Manual
Page 10
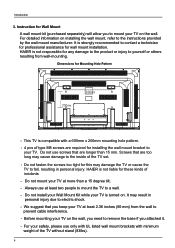
... the wall, you need to remove the base if you keep your TV at least two people to mount the TV to mount your TV on the wall. Instruction for Wall Mount A wall mount kit (purchased separately) will allow you to a wall. - Do not use screws that are longer than a 15 degree tilt. - Always use only with UL listed wall mount brackets with a 600mm x 200mm mounting hole pattern. - 4 pcs of the TV set. - Screws...
... the wall, you need to remove the base if you keep your TV at least two people to mount the TV to mount your TV on the wall. Instruction for Wall Mount A wall mount kit (purchased separately) will allow you to a wall. - Do not use screws that are longer than a 15 degree tilt. - Always use only with UL listed wall mount brackets with a 600mm x 200mm mounting hole pattern. - 4 pcs of the TV set. - Screws...
L55B2181 Manual
Page 11
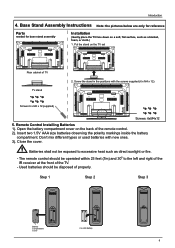
...) and 300 to excessive heat such as a blanket, foam, or cloth.) 1. Screw the stand in the positions with new ones. 3). Introduction 4. Put the stand on a soft, flat surface, such as direct sunlight or fire. - Base Stand Assembly Instructions Note: the pictures below are only for reference Parts needed for base stand assembly Installation (Gently place the TV face down on the TV set Rear cabinet of the remote control. 2).
...) and 300 to excessive heat such as a blanket, foam, or cloth.) 1. Screw the stand in the positions with new ones. 3). Introduction 4. Put the stand on a soft, flat surface, such as direct sunlight or fire. - Base Stand Assembly Instructions Note: the pictures below are only for reference Parts needed for base stand assembly Installation (Gently place the TV face down on the TV set Rear cabinet of the remote control. 2).
L55B2181 Manual
Page 12
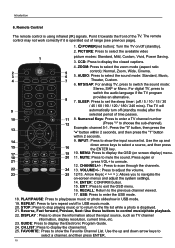
.... 6 5. POWER(red button): Turn the TV on screen display) menu. 18 REV FWD PREV NEXT 20 11. MTS/SAP: For analog TV, press to set the sleep timer: (off (standby mode) after the selected period of time passes. 11 8. SLEEP: Press to switch the sound mode: Stereo, SAP or Mono. MUTE: Press to display the channel list. 25. DISPLAY GUIDE FAVORITE CH.LIST 22 12. CH.LIST: Press to mute the sound. INPUT : Press to show the input source list...
.... 6 5. POWER(red button): Turn the TV on screen display) menu. 18 REV FWD PREV NEXT 20 11. MTS/SAP: For analog TV, press to set the sleep timer: (off (standby mode) after the selected period of time passes. 11 8. SLEEP: Press to switch the sound mode: Stereo, SAP or Mono. MUTE: Press to display the channel list. 25. DISPLAY GUIDE FAVORITE CH.LIST 22 12. CH.LIST: Press to mute the sound. INPUT : Press to show the input source list...

L55B2181 Manual
Page 13
... will need to perform a channel scan to a wall outlet using the included AC power cord. - Note: It is red. - Antenna (RF) Connection Wall jack with F-Connector VIDEO AV IN AUDIO OUT COAX RF IN Coaxial Antenna Cable RF External Antenna Press the INPUT button on the TV or remote control, and the LED indicator will not be used for a long time, such as during a vacation. When you connect the power cord, the TV enters into standby mode and the LED...
... will need to perform a channel scan to a wall outlet using the included AC power cord. - Note: It is red. - Antenna (RF) Connection Wall jack with F-Connector VIDEO AV IN AUDIO OUT COAX RF IN Coaxial Antenna Cable RF External Antenna Press the INPUT button on the TV or remote control, and the LED indicator will not be used for a long time, such as during a vacation. When you connect the power cord, the TV enters into standby mode and the LED...
L55B2181 Manual
Page 14
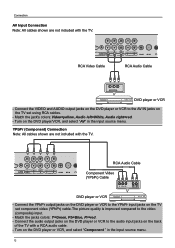
... set using RCA cables. - Connect the audio output jacks on the DVD player or VCR to the audio input jacks on the DVD player or VCR to the video (composite) input. - Match the jack's colors:Video=yellow, Audio left=White, Audio right=red. - Turn on the DVD player or VCR, and select "Component " in the input source menu. VIDEO AV IN AUDIO OUT COAX RF IN RCA Video Cable RCA Audio Cable DVD player or VCR - Connection AV Input Connection Note: All cables shown are not included with a RCA audio cable...
... set using RCA cables. - Connect the audio output jacks on the DVD player or VCR to the audio input jacks on the DVD player or VCR to the video (composite) input. - Match the jack's colors:Video=yellow, Audio left=White, Audio right=red. - Turn on the DVD player or VCR, and select "Component " in the input source menu. VIDEO AV IN AUDIO OUT COAX RF IN RCA Video Cable RCA Audio Cable DVD player or VCR - Connection AV Input Connection Note: All cables shown are not included with a RCA audio cable...
L55B2181 Manual
Page 15
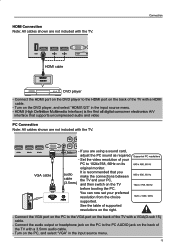
Turn on the right. - HDMI1 HDMI2 HDMI3 VGA cable VGA - You can now set your PC to the VG A port on the PC, and select "VGA" in the input source menu. See the table of supported resolutions on the DVD player, and select "HDMI1/2/3" in the input source menu. 13 HDMI Connection Note: All cables shown are using a sound card, VIDEO AV adjust the PC sound as required. - audio cable (3.5mm) It is recommended that supports uncompressed...
Turn on the right. - HDMI1 HDMI2 HDMI3 VGA cable VGA - You can now set your PC to the VG A port on the PC, and select "VGA" in the input source menu. See the table of supported resolutions on the DVD player, and select "HDMI1/2/3" in the input source menu. 13 HDMI Connection Note: All cables shown are using a sound card, VIDEO AV adjust the PC sound as required. - audio cable (3.5mm) It is recommended that supports uncompressed...
L55B2181 Manual
Page 16
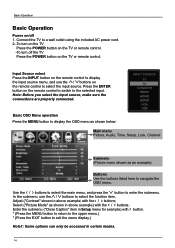
... connected. Use the =!/ ? buttons to select the main menu, and press the ĥ!button to a wall outlet using the included AC power cord. 2.-To turn on the TV Press the POWER button on the TV or remote control. -To turn off 1. Basic OSD Menu operation Press the MENU button to display the OSD menu as shown below: INPUT SOURCE TV AV Component HDMI1 HDMI2 HDMI3 VGA USB Main menu Picture, Audio, Time, Setup, Lock, Channel Submenu (Picture menu shown as shown in certain modes. 14 buttons...
... connected. Use the =!/ ? buttons to select the main menu, and press the ĥ!button to a wall outlet using the included AC power cord. 2.-To turn on the TV Press the POWER button on the TV or remote control. -To turn off 1. Basic OSD Menu operation Press the MENU button to display the OSD menu as shown below: INPUT SOURCE TV AV Component HDMI1 HDMI2 HDMI3 VGA USB Main menu Picture, Audio, Time, Setup, Lock, Channel Submenu (Picture menu shown as shown in certain modes. 14 buttons...
L55B2181 Manual
Page 17
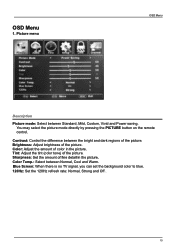
... picture mode directly by pressing the PICTURE button on the remote control. Sharpness: Color Temp.: Select between the bright and dark regions of the picture. Contrast: Control the difference between Normal, Cool and Warm. Color: Adjust the amount of the picture. Picture menu OSD Menu Description Picture mode: Select between Standard, Mild, Custom, Vivid and Power saving. Brightness: Adjust brightness of color in the picture. Tint: Adjust the tint (color tone) of the picture...
... picture mode directly by pressing the PICTURE button on the remote control. Sharpness: Color Temp.: Select between the bright and dark regions of the picture. Contrast: Control the difference between Normal, Cool and Warm. Color: Adjust the amount of the picture. Picture menu OSD Menu Description Picture mode: Select between Standard, Mild, Custom, Vivid and Power saving. Brightness: Adjust brightness of color in the picture. Tint: Adjust the tint (color tone) of the picture...
L55B2181 Manual
Page 19
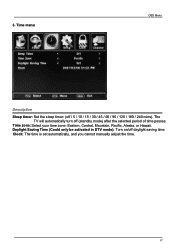
Time zone: Select your time zone: Eastern, Central, Mountain, Pacific, Alaska, or Hawaii. The TV will automatically turn off / 5 / 10 / 15 / 30 / 45 / 60 / 90 / 120 / 180 / 240 mins). Clock: The time is set automatically, and you cannot manually adjust the time. 17 Time menu OSD Menu Description Sleep timer: Set the sleep timer: (off (standby mode) after the selected period of time passes. Daylight Saving Time (Could only be activated in DTV mode): Turn on/off daylight saving time. 3.
Time zone: Select your time zone: Eastern, Central, Mountain, Pacific, Alaska, or Hawaii. The TV will automatically turn off / 5 / 10 / 15 / 30 / 45 / 60 / 90 / 120 / 180 / 240 mins). Clock: The time is set automatically, and you cannot manually adjust the time. 17 Time menu OSD Menu Description Sleep timer: Set the sleep timer: (off (standby mode) after the selected period of time passes. Daylight Saving Time (Could only be activated in DTV mode): Turn on/off daylight saving time. 3.
L55B2181 Manual
Page 20
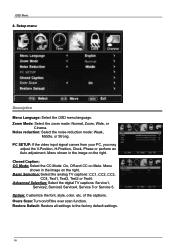
... Service 6. PC SETUP: If the video input signal comes from your PC, you may adjust the V-Position, H-Position, Clock, Phase or perform an Auto adjustment. Menu shown in the image on the right. Menu shown in the image on the right. Option: Customize the font, style, color, etc. of the captions. OSD Menu 4. Noise reduction: Select the noise reduction mode: Weak, Middle, or Strong. Closed Caption...
... Service 6. PC SETUP: If the video input signal comes from your PC, you may adjust the V-Position, H-Position, Clock, Phase or perform an Auto adjustment. Menu shown in the image on the right. Menu shown in the image on the right. Option: Customize the font, style, color, etc. of the captions. OSD Menu 4. Noise reduction: Select the noise reduction mode: Weak, Middle, or Strong. Closed Caption...
L55B2181 Manual
Page 21
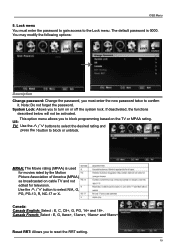
This option menu allows you to reset the RRT setting. 19 Use the Ĥ 0 ĥ button to the Lock menu. Canada English: Select : E, C, C8+, G, PG, 14+ and 18+. Reset RRT: Allows you to turn on cable TV and not edited for television. Lock menu You must enter the password to gain access to select N/A, G, PG, PG-13, R, NC-17 or X. Note: Do not forget the password. button to...
This option menu allows you to reset the RRT setting. 19 Use the Ĥ 0 ĥ button to the Lock menu. Canada English: Select : E, C, C8+, G, PG, 14+ and 18+. Reset RRT: Allows you to turn on cable TV and not edited for television. Lock menu You must enter the password to gain access to select N/A, G, PG, PG-13, R, NC-17 or X. Note: Do not forget the password. button to...

L55B2181 Manual
Page 22
... Channel menu Description Air/Cable: Select Air or Cable. button to auto scan in "Air" mode, please wait patiently. NOTE: It may take a while to search the channels automatically The receivable channels will be stored automatically. Favorite: Add/remove channels to add or remove the highlighted channel as the input signal you selet "Cable", the following items(Favorite, Show/Hide, Channel NO, Channel Label and DTV Signal) will be unavailable. The receivable channels...
... Channel menu Description Air/Cable: Select Air or Cable. button to auto scan in "Air" mode, please wait patiently. NOTE: It may take a while to search the channels automatically The receivable channels will be stored automatically. Favorite: Add/remove channels to add or remove the highlighted channel as the input signal you selet "Cable", the following items(Favorite, Show/Hide, Channel NO, Channel Label and DTV Signal) will be unavailable. The receivable channels...

L55B2181 Manual
Page 23
Channel Label: Change the label (name) of the digital signal: Good, Normal, Bad. 21 Use the Ĥ 0 ĥ button to highlight the desired item, then press the ENTER button to show or hide the highlighted channel. Show/Hide: Allow you to show or hide the channels. Press the =!0!?!button to select the position , and press the Ĥ 0 ĥ button to select the letter. OSD Menu Channel No.: Show and select the channel. DTV Signal: Shows the quality of a channel.
Channel Label: Change the label (name) of the digital signal: Good, Normal, Bad. 21 Use the Ĥ 0 ĥ button to highlight the desired item, then press the ENTER button to show or hide the highlighted channel. Show/Hide: Allow you to show or hide the channels. Press the =!0!?!button to select the position , and press the Ĥ 0 ĥ button to select the letter. OSD Menu Channel No.: Show and select the channel. DTV Signal: Shows the quality of a channel.

L55B2181 Manual
Page 24
... USB source in the input source menu. Press the ġ Ģ buttons to select a file or folder, and press the ENTER button to change the programing mode. 22 Operation buttons : Play or pause. : Stop. : Reverse : Fast forword : Previous chapter : Next chapter REPEAT: Press to play the file or open the folder. OSD Menu 7. Press the USB button on the remote control, theTV will search for the device automatically, and display...
... USB source in the input source menu. Press the ġ Ģ buttons to select a file or folder, and press the ENTER button to change the programing mode. 22 Operation buttons : Play or pause. : Stop. : Reverse : Fast forword : Previous chapter : Next chapter REPEAT: Press to play the file or open the folder. OSD Menu 7. Press the USB button on the remote control, theTV will search for the device automatically, and display...
L55B2181 Manual
Page 25
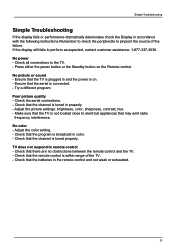
... the failure. Try a different program. Adjust the picture settings: brightness, color, sharpness, contrast, hue. - TV does not respond to the TV. - Check that the remote control is broadcast in color. - No power - Check all connections to remote control - Check the aerial connections. - Adjust the color setting. - Ensure that the channel is connected. - Check that the aerial is tuned in properly. - Simple Troubleshooting Simple Troubleshooting If the display fails or performance dramatically...
... the failure. Try a different program. Adjust the picture settings: brightness, color, sharpness, contrast, hue. - TV does not respond to the TV. - Check that the remote control is broadcast in color. - No power - Check all connections to remote control - Check the aerial connections. - Adjust the color setting. - Ensure that the channel is connected. - Check that the aerial is tuned in properly. - Simple Troubleshooting Simple Troubleshooting If the display fails or performance dramatically...
L55B2181 Manual
Page 26
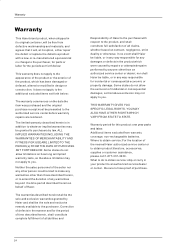
... authorized service center before warranty repairs are rendered. Correction of defects in the manner and for this product: one year parts and labor. Warranty period for the period of time described herein, shall constitute complete fulfillment of all claims, whether based on behalf of Haier. Warranty Warranty This Haier brand product, when shipped in its option, either repair the defect or replace the...
... authorized service center before warranty repairs are rendered. Correction of defects in the manner and for this product: one year parts and labor. Warranty period for the period of time described herein, shall constitute complete fulfillment of all claims, whether based on behalf of Haier. Warranty Warranty This Haier brand product, when shipped in its option, either repair the defect or replace the...


