
User Manual
Page 1
R TFT-LCD TV/DVD Combo OWNER'S MANUAL Please READ this manual carefully before operating your TV, and retain it for future reference. MODELS: HLC32R1 HLC26R1
R TFT-LCD TV/DVD Combo OWNER'S MANUAL Please READ this manual carefully before operating your TV, and retain it for future reference. MODELS: HLC32R1 HLC26R1
User Manual
Page 2
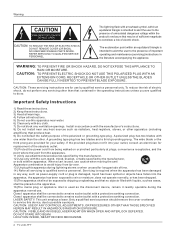
... the apparatus. 16)The mains plug or appliance inlet is intended to alert the user to possible eye injury. LOCATION: INSIDE, NEAR THE DECK MECHANISM. 2 TV LCD-TFT The lightning flash with the apparatus. DO NOT STARE INTO BEAM. A grounding type plug has two blades and a third grounding prong. Servicing is damaged...
... the apparatus. 16)The mains plug or appliance inlet is intended to alert the user to possible eye injury. LOCATION: INSIDE, NEAR THE DECK MECHANISM. 2 TV LCD-TFT The lightning flash with the apparatus. DO NOT STARE INTO BEAM. A grounding type plug has two blades and a third grounding prong. Servicing is damaged...
User Manual
Page 3
... different from that may cause undesired operation. ENERGY STAR is connected. *Consult the dealer or an experienced radio/TV technician for a Class B digital device, pursuant to Part 15 of the following two conditions: (1) This device...found to comply with Part 15 of the FCC Rules. However there is no guarantee that your Haier model is encourage to try to correct the interference by using less energy while saving you are... with the instructions, may be not cause harmful interference. (2) this LCD display to other peripheral device. Environmental Protection Agency and the U.S.
... different from that may cause undesired operation. ENERGY STAR is connected. *Consult the dealer or an experienced radio/TV technician for a Class B digital device, pursuant to Part 15 of the following two conditions: (1) This device...found to comply with Part 15 of the FCC Rules. However there is no guarantee that your Haier model is encourage to try to correct the interference by using less energy while saving you are... with the instructions, may be not cause harmful interference. (2) this LCD display to other peripheral device. Environmental Protection Agency and the U.S.

User Manual
Page 4
Remember to obtain warranty service. 4 TV LCD-TFT Model number serial number Date of purchase Staple your receipt to -use of the unit. You will guide you for purchasing the Haier product. This easy-to your product. They are on label in getting the best use manual will need it to record the model and serial number. Safety Instructions SAVE THESE INSTRUCTIONS Thank you in back of your manual.
Remember to obtain warranty service. 4 TV LCD-TFT Model number serial number Date of purchase Staple your receipt to -use of the unit. You will guide you for purchasing the Haier product. This easy-to your product. They are on label in getting the best use manual will need it to record the model and serial number. Safety Instructions SAVE THESE INSTRUCTIONS Thank you in back of your manual.
User Manual
Page 5
... s 9 Antenna Connection 9 Co nn ec ti ng a V CR 10 External A/V Source Setup 11 Co nn ec ti ng a D VD p la ye r 11 Connecting a DTV(digital TV 12 Connecting digital audio output 12 Co nn ec ti ng a c om pu te r 13 Monitor Out Setup 14 HD MI a nd D VI i np ut... 14 Cable sample 15 Connecting Headphones 16 Power source 16 Removing the table stand and installing a wall mount bracket 17 Operation Switching On/Off the TV set 18 Choose the Menu Language 18 Choose the input source 18 Channel Menu Channel Scan 19 Ch an ne l Sk ip 19 Se le...
... s 9 Antenna Connection 9 Co nn ec ti ng a V CR 10 External A/V Source Setup 11 Co nn ec ti ng a D VD p la ye r 11 Connecting a DTV(digital TV 12 Connecting digital audio output 12 Co nn ec ti ng a c om pu te r 13 Monitor Out Setup 14 HD MI a nd D VI i np ut... 14 Cable sample 15 Connecting Headphones 16 Power source 16 Removing the table stand and installing a wall mount bracket 17 Operation Switching On/Off the TV set 18 Choose the Menu Language 18 Choose the input source 18 Channel Menu Channel Scan 19 Ch an ne l Sk ip 19 Se le...

User Manual
Page 6
... the audio L/R cables from the video signal source to these jacks. 8.AV2 VIDEO IN: Connects the composite video cable from the remote control. Introduction TV Side panel controls and connections USB L - In the MENU screen, the INPUT button serves as left/right buttons. 4.CH +/- : Press to receive...Press to stop the DVD disc. Press repeatedly to change the source to the one you .) STOP Press to play the next program. 6 TV LCD-TFT To scan quickly through channels. DVD panel controls DVD slot load Insert DVD with label towards back(Silver "shiny" side facing towards you...
... the audio L/R cables from the video signal source to these jacks. 8.AV2 VIDEO IN: Connects the composite video cable from the remote control. Introduction TV Side panel controls and connections USB L - In the MENU screen, the INPUT button serves as left/right buttons. 4.CH +/- : Press to receive...Press to stop the DVD disc. Press repeatedly to change the source to the one you .) STOP Press to play the next program. 6 TV LCD-TFT To scan quickly through channels. DVD panel controls DVD slot load Insert DVD with label towards back(Silver "shiny" side facing towards you...

User Manual
Page 7
... jacks. 11. Digital Audio Output: Connect various types of digital audio equipment. AUDIO In: Connect the audio L/R cables from the video signal source to the TV, either directly or through your audio equipment. Owner s Manual 7 Antenna Input: Connect cable or antenna signals to these jacks. 12. HDMI In: Connect a HDMI device...
... jacks. 11. Digital Audio Output: Connect various types of digital audio equipment. AUDIO In: Connect the audio L/R cables from the video signal source to the TV, either directly or through your audio equipment. Owner s Manual 7 Antenna Input: Connect cable or antenna signals to these jacks. 12. HDMI In: Connect a HDMI device...
User Manual
Page 8
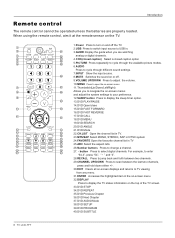
... STOP 34.DVD REPEAT 35.DVD Previous Chapter 36.DVD Next Chapter 37.DVD AUDIO Mode 38.DVD SETUP 39.DVD PROGRAM 40.DVD SUBTITLE 8 TV LCD-TFT For example, to enter "54-3", press "54", " " and "3". 28.RECALL Press to jump back and forth between two channels. 29.CHANNEL UP/DOWN Press... AUDIO ARC FAVORITE 23 5 24 6 25 26 INPUT 7 MUTE 8 27 RECALL 28 9 VOL CH 29 MENU 10 EXIT 30 11 31 ENTER SLEEP DISPLAY 12 32 13 OPEN/CLOSE PLAY/PAUSE STOP REPEAT 33 14 34 15 REV PREV NEXT 35 16 36 17 D.MENU D.CALL D.AUDIO SETUP 37 18 38...
... STOP 34.DVD REPEAT 35.DVD Previous Chapter 36.DVD Next Chapter 37.DVD AUDIO Mode 38.DVD SETUP 39.DVD PROGRAM 40.DVD SUBTITLE 8 TV LCD-TFT For example, to enter "54-3", press "54", " " and "3". 28.RECALL Press to jump back and forth between two channels. 29.CHANNEL UP/DOWN Press... AUDIO ARC FAVORITE 23 5 24 6 25 26 INPUT 7 MUTE 8 27 RECALL 28 9 VOL CH 29 MENU 10 EXIT 30 11 31 ENTER SLEEP DISPLAY 12 32 13 OPEN/CLOSE PLAY/PAUSE STOP REPEAT 33 14 34 15 REV PREV NEXT 35 16 36 17 D.MENU D.CALL D.AUDIO SETUP 37 18 38...
User Manual
Page 9
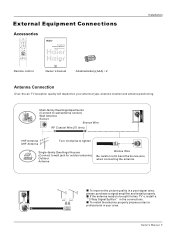
External Equipment Connections Accessories TV DVD STB CABLE VCR AUD PICTURE AUDIO PC HDMI INPUT MUTE RECALL VOL MENU CH EXIT ENTER SLEEP DISPLAY USB PLAY/PAUSE STOP REC REV PREV NEXT REPEAT MTS/SAP FREEZE CH.LIST GUIDE CCD ARC FAVORITE R TFT-LCD TV OWNER'S MANUAL Please READ this manual... carefully before operating your TV, and retain it for outdoor antenna) Outdoor Antenna Bronze Wire Be careful not to bend the bronze wire ...
External Equipment Connections Accessories TV DVD STB CABLE VCR AUD PICTURE AUDIO PC HDMI INPUT MUTE RECALL VOL MENU CH EXIT ENTER SLEEP DISPLAY USB PLAY/PAUSE STOP REC REV PREV NEXT REPEAT MTS/SAP FREEZE CH.LIST GUIDE CCD ARC FAVORITE R TFT-LCD TV OWNER'S MANUAL Please READ this manual... carefully before operating your TV, and retain it for outdoor antenna) Outdoor Antenna Bronze Wire Be careful not to bend the bronze wire ...
User Manual
Page 10
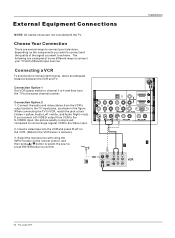
... input, the picture quality is improved; The following are examples of the signal you connect a S-VIDEO output from the VCR's output jacks to the TV input jacks, as shown in the figure. Insert a video tape into the VCR and press PLAY on the VCR. (Refer to VCR, match the... R VGA AUDIO VGA VIDEO L AUDIO R S-VIDEO L AUDIO R L AUDIO R HDMI IN AUDIO OUT VGA IN 10 TV LCD-TFT External Equipment Connections Installation ANT IN NOTE: All cables shown are several ways to connect your TV with using the INPUT button on the remote control, and then press / button to select the source...
... input, the picture quality is improved; The following are examples of the signal you connect a S-VIDEO output from the VCR's output jacks to the TV input jacks, as shown in the figure. Insert a video tape into the VCR and press PLAY on the VCR. (Refer to VCR, match the... R VGA AUDIO VGA VIDEO L AUDIO R S-VIDEO L AUDIO R L AUDIO R HDMI IN AUDIO OUT VGA IN 10 TV LCD-TFT External Equipment Connections Installation ANT IN NOTE: All cables shown are several ways to connect your TV with using the INPUT button on the remote control, and then press / button to select the source...
User Manual
Page 11
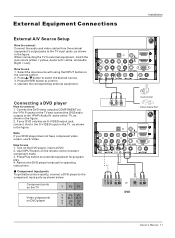
... VIDEO L AUDIO R S-VIDEO L AUDIO R L AUDIO R Owner s Manual 11 Refer to the DVD player's manual for program play. 4. Component ports on the TV Y Pb Pr Video output ports on the remote control to select component mode. 3. Press / button to connect 1. External Equipment Connections Installation ANT IN HDMI IN... External A/V Source Setup How to connect Connect the audio and video cables from the external equipment's output jacks to the TV input jacks, as shown in the figure. 2. How to the component input ports as shown in the figure. Component Input ports ...
... VIDEO L AUDIO R S-VIDEO L AUDIO R L AUDIO R Owner s Manual 11 Refer to the DVD player's manual for program play. 4. Component ports on the TV Y Pb Pr Video output ports on the remote control to select component mode. 3. Press / button to connect 1. External Equipment Connections Installation ANT IN HDMI IN... External A/V Source Setup How to connect Connect the audio and video cables from the external equipment's output jacks to the TV input jacks, as shown in the figure. 2. How to the component input ports as shown in the figure. Component Input ports ...
User Manual
Page 12
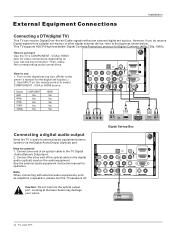
...Set-top Box 2 L 2 DVI AUDIO 1 R 1 Y 1 Pb Pr L AUDIO R VGA AUDIO VGA VIDEO L AUDIO R S-VIDEO L AUDIO R L AUDIO R AUDIO OUT VGA IN 12 TV LCD-TFT However, if you do receive Digital signals from a digital set -top box connector. Use INPUT on the digital set-top box. (Refer to the... figure as amplifers or speakers, please turn the TV speakers off. How to connect 1. How to use 1. Caution: Do not look into the optical output ! Then, make the corresponding audio connections....
...Set-top Box 2 L 2 DVI AUDIO 1 R 1 Y 1 Pb Pr L AUDIO R VGA AUDIO VGA VIDEO L AUDIO R S-VIDEO L AUDIO R L AUDIO R AUDIO OUT VGA IN 12 TV LCD-TFT However, if you do receive Digital signals from a digital set -top box connector. Use INPUT on the digital set-top box. (Refer to the... figure as amplifers or speakers, please turn the TV speakers off. How to connect 1. How to use 1. Caution: Do not look into the optical output ! Then, make the corresponding audio connections....
User Manual
Page 13
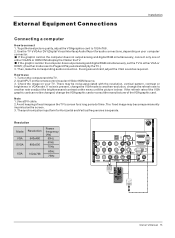
... clear. UseINPUT onthe remotecontrol toselect VGAor HDMIsource. 3. There may becomepermanently imprinted onthe screen. 3. If the graphic card on your TV. To get the best picture quality, adjust the VGAgraphics card to either VGAIN or HDMI IN todisplay the VGAon theTV. Then,...make thecorresponding audioconnection. External Equipment Connections Installation Connecting a computer How toconnect 1. Use the TV`sVGA or DVI (Digital VisualInterface)Audio IN port for audio connections, depending on the computer does not output analog and digital RGB...
... clear. UseINPUT onthe remotecontrol toselect VGAor HDMIsource. 3. There may becomepermanently imprinted onthe screen. 3. If the graphic card on your TV. To get the best picture quality, adjust the VGAgraphics card to either VGAIN or HDMI IN todisplay the VGAon theTV. Then,...make thecorresponding audioconnection. External Equipment Connections Installation Connecting a computer How toconnect 1. Use the TV`sVGA or DVI (Digital VisualInterface)Audio IN port for audio connections, depending on the computer does not output analog and digital RGB...

User Manual
Page 14
...). 2. A separated audio connection is necessary. To get the best picture quality, adjust the output resolution of the source device to HDMI port of this TV with this TV with an HDMI cable(not supplied with a HDMI-to 1280x720p. If the source device has an analog audio output connector, connect the source device... quality, adjust the output resolution of the source device to DVI Audio In port located on the left side of Select Main source menu. 14 TV LCD-TFT
...). 2. A separated audio connection is necessary. To get the best picture quality, adjust the output resolution of the source device to HDMI port of this TV with this TV with an HDMI cable(not supplied with a HDMI-to 1280x720p. If the source device has an analog audio output connector, connect the source device... quality, adjust the output resolution of the source device to DVI Audio In port located on the left side of Select Main source menu. 14 TV LCD-TFT
User Manual
Page 16
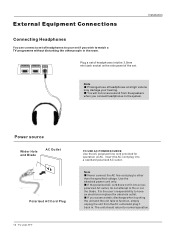
Power source Wider Hole and Blade AC Outlet Polarized AC Cord Plug 16 TV LCD-TFT TO USE AC POWER SOURCE Use the AC polarized line cord provided for operation on the side panel of the set. Insert the AC ... AC outlet, do not attempt to normal operation. Note Prolonged use of headphones at a high volume may damage your set if you wish to watch a TV programme without disturbing the other than the specified voltage. You will not receive sound from the speakers when you cause a static discharge when touching the...
Power source Wider Hole and Blade AC Outlet Polarized AC Cord Plug 16 TV LCD-TFT TO USE AC POWER SOURCE Use the AC polarized line cord provided for operation on the side panel of the set. Insert the AC ... AC outlet, do not attempt to normal operation. Note Prolonged use of headphones at a high volume may damage your set if you wish to watch a TV programme without disturbing the other than the specified voltage. You will not receive sound from the speakers when you cause a static discharge when touching the...
User Manual
Page 17
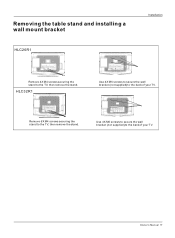
Owner s Manual 17 Use 4X M6 screws to secure the wall bracket (not supplied) to the back of your TV. Remove 6X M4 screws securing the stand to the TV, then remove the stand. Removing the table stand and installing a wall mount bracket HLC26R1 Installation Remove 4X M4 screws securing the stand to the TV, then remove the stand. HLC32R1 Use 4X M6 screws to secure the wall bracket (not supplied) to the back of your TV.
Owner s Manual 17 Use 4X M6 screws to secure the wall bracket (not supplied) to the back of your TV. Remove 6X M4 screws securing the stand to the TV, then remove the stand. Removing the table stand and installing a wall mount bracket HLC26R1 Installation Remove 4X M4 screws securing the stand to the TV, then remove the stand. HLC32R1 Use 4X M6 screws to secure the wall bracket (not supplied) to the back of your TV.

User Manual
Page 18
...are several options you intend to work properly. The TV reverts to select Language. 4. Choose TV Input and then press MENU button. 2. Press or ENTER button and then use / button to confirm . 18 TV LCD-TFT Select Source TV Video1 Video2 S-Video Component1 Component2 VGA HDMI1 HDMI2 HDMI3... HDMI4 Press ENTER button to select the desired items (TV, Video1, Video2, S-Video,Component1, Component2, VGA, HDMI1,HDMI2,HDMI3,HDMI4). 2....
...are several options you intend to work properly. The TV reverts to select Language. 4. Choose TV Input and then press MENU button. 2. Press or ENTER button and then use / button to confirm . 18 TV LCD-TFT Select Source TV Video1 Video2 S-Video Component1 Component2 VGA HDMI1 HDMI2 HDMI3... HDMI4 Press ENTER button to select the desired items (TV, Video1, Video2, S-Video,Component1, Component2, VGA, HDMI1,HDMI2,HDMI3,HDMI4). 2....
User Manual
Page 19
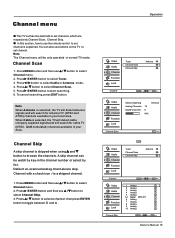
... 5 Analog 5-1 Digital KPIX-DT 6 Analog 7 Analog 8 Analog 9 Analog 10 Analog Channel Skip ENTER Set / Select EXIT Back Owner s Manual 19 Channel menu This TV set has two methods to set channel is explained. Press /ENTER button to select Channel Scan. 5. A skip channel can also use buttons on the...using and button to set channels, which are skip. Note When Antenna is a skipped channel. 1. Channel with a check icon is selected, the TV will detect antenna signals and will be watch by key-in your Area. Press MENU button and then use the remote control to browse the...
... 5 Analog 5-1 Digital KPIX-DT 6 Analog 7 Analog 8 Analog 9 Analog 10 Analog Channel Skip ENTER Set / Select EXIT Back Owner s Manual 19 Channel menu This TV set has two methods to set channel is explained. Press /ENTER button to select Channel Scan. 5. A skip channel can also use buttons on the...using and button to set channels, which are skip. Note When Antenna is a skipped channel. 1. Channel with a check icon is selected, the TV will detect antenna signals and will be watch by key-in your Area. Press MENU button and then use the remote control to browse the...
User Manual
Page 20
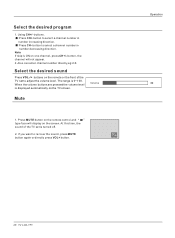
.... Select the desired sound Press VOL-/+ buttons on the remote or the front of the TV set to select a channel number in number increasing direction. Operation 20 TV LCD-TFT Using CH+/- button, the channel will display on the remote control and type face will not appear. 2. If you want to select a channel...
.... Select the desired sound Press VOL-/+ buttons on the remote or the front of the TV set to select a channel number in number increasing direction. Operation 20 TV LCD-TFT Using CH+/- button, the channel will display on the remote control and type face will not appear. 2. If you want to select a channel...
User Manual
Page 21
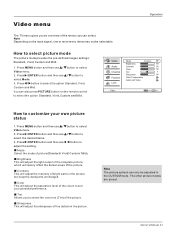
... dark parts unchanged. Owner s Manual 21 Sharpness This will adjust the saturation level of the colors to suit your own picture status 1. Video menu The TV menu gives you an overview of the menus you to select the color mix (Tint) of the picture. Video Audio Channel Function Lock Mode Custom...
... dark parts unchanged. Owner s Manual 21 Sharpness This will adjust the saturation level of the colors to suit your own picture status 1. Video menu The TV menu gives you an overview of the menus you to select the color mix (Tint) of the picture. Video Audio Channel Function Lock Mode Custom...


