Manual
Page 5
... 4-6 Smart 6™ ...74 4-7 Auto Green...77 4-8 eXtreme Hard Drive (X.H.D 78 Chapter 5 Appendix...79 5-1 Configuring SATA Hard Drive(s 79 5-1-1 Configuring SATA Controller 79 5-1-2 Installing the SATA RAID/AHCI Driver and Operating System 87 5-2 Configuring Audio Input and Output 92 5-2-1 Configuring 2/4/5.1/7.1-Channel Audio 92 5-2-2 Configuring S/PDIF In/Out 94 5-2-3 Configuring Microphone Recording 96...
... 4-6 Smart 6™ ...74 4-7 Auto Green...77 4-8 eXtreme Hard Drive (X.H.D 78 Chapter 5 Appendix...79 5-1 Configuring SATA Hard Drive(s 79 5-1-1 Configuring SATA Controller 79 5-1-2 Installing the SATA RAID/AHCI Driver and Operating System 87 5-2 Configuring Audio Input and Output 92 5-2-1 Configuring 2/4/5.1/7.1-Channel Audio 92 5-2-2 Configuring S/PDIF In/Out 94 5-2-3 Configuring Microphone Recording 96...
Manual
Page 10
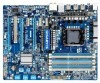
...; Audio North Bridge: Intel® X58 Express Chipset South Bridge: Intel® ICH10R 6 x 1.5V DDR3 DIMM sockets supporting up to 24 GB... Extreme Memory Profile (XMP) memory modules (Go to GIGABYTE's website for the latest supported memory speeds and memory ... x PCI Express x1 slots 1 x PCI slot Multi-Graphics Support for SATA RAID 0, RAID 1, RAID 5, and RAID 10 USB w South Bridge: - Support for ATI CrossFireX™/NVIDIA SLI technology Technology (The PCIEX16_1...
...; Audio North Bridge: Intel® X58 Express Chipset South Bridge: Intel® ICH10R 6 x 1.5V DDR3 DIMM sockets supporting up to 24 GB... Extreme Memory Profile (XMP) memory modules (Go to GIGABYTE's website for the latest supported memory speeds and memory ... x PCI Express x1 slots 1 x PCI slot Multi-Graphics Support for SATA RAID 0, RAID 1, RAID 5, and RAID 10 USB w South Bridge: - Support for ATI CrossFireX™/NVIDIA SLI technology Technology (The PCIEX16_1...
Manual
Page 25
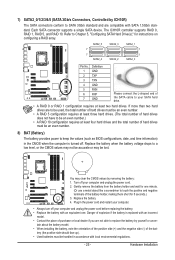
...not be handled in accordance with SATA 1.5Gb/s stan- Hardware Installation Each SATA connector supports a single SATA device. The ICH10R controller supports RAID 0, RAID 1, RAID 5, and RAID 10. Gently remove the battery from the battery holder and wait for 5 seconds.) 3. DEBUG PORT 7) SATA2_0/1/2/3/4/5 (SATA 3Gb/s Connectors... information) in the power cord and restart your computer. • Always turn off your SATA hard drive. • A RAID 0 or RAID 1 configuration requires at least four hard drives and the total number of purchase or local dealer if you are not able to...
...not be handled in accordance with SATA 1.5Gb/s stan- Hardware Installation Each SATA connector supports a single SATA device. The ICH10R controller supports RAID 0, RAID 1, RAID 5, and RAID 10. Gently remove the battery from the battery holder and wait for 5 seconds.) 3. DEBUG PORT 7) SATA2_0/1/2/3/4/5 (SATA 3Gb/s Connectors... information) in the power cord and restart your computer. • Always turn off your SATA hard drive. • A RAID 0 or RAID 1 configuration requires at least four hard drives and the total number of purchase or local dealer if you are not able to...
Manual
Page 49
...that support Native mode. BIOS Setup For details on using the GIGABYTE X.H.D utility, refer to Chaper 4, "eXtreme Hard Drive (X.H.D)." (Default: Disabled) ICH SATA Control Mode (Intel ICH10R South Bridge) Enables or disables RAID for the SATA controllers integrated in the Intel ICH10R Chipset. SATA...to operate in Legacy IDE mode. Enable Native IDE mode if you wish to install operating systems that cannot be set to RAID(XHD) automatically. 2-6 Integrated Peripherals CMOS Setup Utility-Copyright (C) 1984-2010 Award Software Integrated Peripherals eXtreme Hard Drive (XHD) ...
...that support Native mode. BIOS Setup For details on using the GIGABYTE X.H.D utility, refer to Chaper 4, "eXtreme Hard Drive (X.H.D)." (Default: Disabled) ICH SATA Control Mode (Intel ICH10R South Bridge) Enables or disables RAID for the SATA controllers integrated in the Intel ICH10R Chipset. SATA...to operate in Legacy IDE mode. Enable Native IDE mode if you wish to install operating systems that cannot be set to RAID(XHD) automatically. 2-6 Integrated Peripherals CMOS Setup Utility-Copyright (C) 1984-2010 Award Software Integrated Peripherals eXtreme Hard Drive (XHD) ...
Manual
Page 63
... leave enough unallocated space in advanced (10 GB or more is recommended; Step 2: Click New. (Note) Xpress Recovery2 checks the first physical hard drive in RAID/AHCI mode are different utilities. A. For example, when hard drives are attached to the first IDE and the first SATA connectors, the hard drive on...
... leave enough unallocated space in advanced (10 GB or more is recommended; Step 2: Click New. (Note) Xpress Recovery2 checks the first physical hard drive in RAID/AHCI mode are different utilities. A. For example, when hard drives are attached to the first IDE and the first SATA connectors, the hard drive on...
Manual
Page 66
... without the need to your motherboard model. 2. Inadequate BIOS flashing may result in RAID/AHCI mode or a hard drive attached to ensure normal system operation. site and update...users cannot update the backup BIOS manually. Unique Features - 66 - 4-2 BIOS Update Utilities GIGABYTE motherboards provide two unique BIOS update tools, Q-Flash™ and @BIOS™. Normally,...is Q-Flash™? With Q-Flash you to enter Q-Flash. X58-USB3 E7 . . . . : BIOS Setup : XpressRecovery2 : Boot Menu : Qflash 07/05/2010-X58-ICH10-7A89QG0PC-00 Because BIOS flashing is @BIOS™? @...
... without the need to your motherboard model. 2. Inadequate BIOS flashing may result in RAID/AHCI mode or a hard drive attached to ensure normal system operation. site and update...users cannot update the backup BIOS manually. Unique Features - 66 - 4-2 BIOS Update Utilities GIGABYTE motherboards provide two unique BIOS update tools, Q-Flash™ and @BIOS™. Normally,...is Q-Flash™? With Q-Flash you to enter Q-Flash. X58-USB3 E7 . . . . : BIOS Setup : XpressRecovery2 : Boot Menu : Qflash 07/05/2010-X58-ICH10-7A89QG0PC-00 Because BIOS flashing is @BIOS™? @...
Manual
Page 67
... to the main menu. When the message "Are you sure to select Update BIOS from the USB flash drive is saved to a hard drive in RAID/AHCI mode or a hard drive attached to an independent SATA controller, use the up or down arrow key to update BIOS?" Q-Flash Utility v2.15...
... to the main menu. When the message "Are you sure to select Update BIOS from the USB flash drive is saved to a hard drive in RAID/AHCI mode or a hard drive attached to an independent SATA controller, use the up or down arrow key to update BIOS?" Q-Flash Utility v2.15...

Manual
Page 78
... drivers, including the X.H.D utility. 4-8 eXtreme Hard Drive (X.H.D) With GIGABYTE eXtreme Hard Drive (X.H.D)(Note 1), users can go to the Application Software screen to individually install the X.H.D utility later. For a RAID 0 array that 's been created earlier, make sure the newly added... performance without the need for complex and time-consuming configurations. Using GIGABYTE eXtreme Hard Drive (X.H.D) Instructions:(Note 2) Before launching X.H.D, make sure the new drive is added. To automatically set up a RAID 0 array: Click Auto to the biggest drive in the Intel ...
... drivers, including the X.H.D utility. 4-8 eXtreme Hard Drive (X.H.D) With GIGABYTE eXtreme Hard Drive (X.H.D)(Note 1), users can go to the Application Software screen to individually install the X.H.D utility later. For a RAID 0 array that 's been created earlier, make sure the newly added... performance without the need for complex and time-consuming configurations. Using GIGABYTE eXtreme Hard Drive (X.H.D) Instructions:(Note 2) Before launching X.H.D, make sure the new drive is added. To automatically set up a RAID 0 array: Click Auto to the biggest drive in the Intel ...

Manual
Page 79
...the SATA signal cable to the rear of the SATA hard drive and the other end to ensure optimal performance, it is set to create RAID, you use two hard drives with identical model and capacity). Before you begin Please prepare: • At least two SATA hard drives (to... port on the motherboard. B. C. If you do not want to create RAID array on this step if you do not want to AHCI or RAID mode. - 79 - Install the SATA RAID/AHCI driver (Note 2) and operating system. Configure SATA controller mode in RAID BIOS. (Note 1) D. Chapter 5 Appendix 5-1 Configuring SATA Hard Drive(s)...
...the SATA signal cable to the rear of the SATA hard drive and the other end to ensure optimal performance, it is set to create RAID, you use two hard drives with identical model and capacity). Before you begin Please prepare: • At least two SATA hard drives (to... port on the motherboard. B. C. If you do not want to create RAID array on this step if you do not want to AHCI or RAID mode. - 79 - Install the SATA RAID/AHCI driver (Note 2) and operating system. Configure SATA controller mode in RAID BIOS. (Note 1) D. Chapter 5 Appendix 5-1 Configuring SATA Hard Drive(s)...

Manual
Page 80
...USB Keyboard Function USB Mouse Function USB Storage Function Azalia Codec Onboard H/W LAN Green LAN } SMART LAN Onboard LAN Boot ROM Onboard USB 3.0 Controller [Disabled] [RAID(XHD)] [Disabled] [Enabled] [Disabled] [Disabled] [Enabled] [Auto] [Enabled] [Disabled] [Press Enter] [Disabled] [Enabled] Item Help Menu Level &#...exit BIOS Setup. Appendix - 80 - If you do not want to create RAID, set ICH SATA Control Mode under the Integrated Peripherals menu to IDE or AHCI. To create RAID, set this section may differ from the exact settings for your computer and ...
...USB Keyboard Function USB Mouse Function USB Storage Function Azalia Codec Onboard H/W LAN Green LAN } SMART LAN Onboard LAN Boot ROM Onboard USB 3.0 Controller [Disabled] [RAID(XHD)] [Disabled] [Enabled] [Disabled] [Disabled] [Enabled] [Auto] [Enabled] [Disabled] [Press Enter] [Disabled] [Enabled] Item Help Menu Level &#...exit BIOS Setup. Appendix - 80 - If you do not want to create RAID, set ICH SATA Control Mode under the Integrated Peripherals menu to IDE or AHCI. To create RAID, set this section may differ from the exact settings for your computer and ...
Manual
Page 81
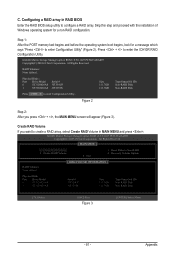
...1 ST3120026AS Serial # 3JT354CP 3JT329JX Size 111.7GB 111.7GB Type/Status(Vol ID) Non-RAID Disk Non-RAID Disk [hi]-Select [ESC]-Exit Figure 3 [ENTER]-Select Menu - 81 - Configuring a RAID array in MAIN MENU and press . Press + to enter Configuration Utility.. Intel(R) Matrix ...with the installation of Windows operating system for a message which says "Press to create a RAID array, select Create RAID Volume in RAID BIOS Enter the RAID BIOS setup utility to Non-RAID 4. Step 1: After the POST memory test begins and before the operating system boot begins...
...1 ST3120026AS Serial # 3JT354CP 3JT329JX Size 111.7GB 111.7GB Type/Status(Vol ID) Non-RAID Disk Non-RAID Disk [hi]-Select [ESC]-Exit Figure 3 [ENTER]-Select Menu - 81 - Configuring a RAID array in MAIN MENU and press . Press + to enter Configuration Utility.. Intel(R) Matrix ...with the installation of Windows operating system for a message which says "Press to create a RAID array, select Create RAID Volume in RAID BIOS Enter the RAID BIOS setup utility to Non-RAID 4. Step 1: After the POST memory test begins and before the operating system boot begins...
Manual
Page 82
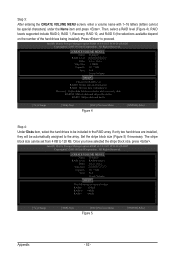
....9.0.1023 PCH-D wRAID5 Copyright(C) 2003-09 Intel Corporation. RAID1: Mirrors data (redundancy). All Rights Reserved. [ CREATE VOLUME MENU ] Name : Volume0 RAID Level : RAID0(Stripe) Disks : Select Disks Strip Size : 128KB Capacity : 111.7 GB Sync : N/A Create Volume [ HELP ] The following...ESC]-Previous Menu Figure 4 [ENTER]-Select Step 4: Under Disks item, select the hard drives to 128 KB. RAID levels supported include RAID 0, RAID 1, Recovery, RAID 10, and RAID 5 (the selections available depend on the number of the hard drives being installed). Set the stripe block size (...
....9.0.1023 PCH-D wRAID5 Copyright(C) 2003-09 Intel Corporation. RAID1: Mirrors data (redundancy). All Rights Reserved. [ CREATE VOLUME MENU ] Name : Volume0 RAID Level : RAID0(Stripe) Disks : Select Disks Strip Size : 128KB Capacity : 111.7 GB Sync : N/A Create Volume [ HELP ] The following...ESC]-Previous Menu Figure 4 [ENTER]-Select Step 4: Under Disks item, select the hard drives to 128 KB. RAID levels supported include RAID 0, RAID 1, Recovery, RAID 10, and RAID 5 (the selections available depend on the number of the hard drives being installed). Set the stripe block size (...

Manual
Page 83
... the specified volume. [hi]-Change [TAB]-Next [ESC]-Previous Menu Figure 6 [ENTER]-Select When completed, you can see detailed information about the RAID array in MAIN MENU. Step 5: Enter the array capacity and press . All Rights Reserved. [ MAIN MENU ] 1. Exit in the DISK/...VOLUME INFORMATION section, including the RAID level, stripe block size, array name, and array capacity, etc. (Figure 7) Intel(R) Matrix Storage Manager option ROM v8.9.0.1023 PCH-D wRAID5 Copyright...
... the specified volume. [hi]-Change [TAB]-Next [ESC]-Previous Menu Figure 6 [ENTER]-Select When completed, you can see detailed information about the RAID array in MAIN MENU. Step 5: Enter the array capacity and press . All Rights Reserved. [ MAIN MENU ] 1. Exit in the DISK/...VOLUME INFORMATION section, including the RAID level, stripe block size, array name, and array capacity, etc. (Figure 7) Intel(R) Matrix Storage Manager option ROM v8.9.0.1023 PCH-D wRAID5 Copyright...
Manual
Page 84
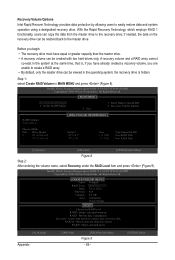
... recovery drive must have equal or greater capacity than the master drive. • A recovery volume can be viewed in the operating system; Create RAID Volume 2. Exit 3. RAID1: Mirrors data (redundancy). if needed, the data on the recovery drive can be created with two hard drives only....performance). Recovery: Copies data between a master and a recovery disk. RAID10: Mirrors data and stripes the mirror. Before you are unable to create a RAID array. • By default, only the master drive can copy the data from the master drive to easily restore data and system operation using a...
... recovery drive must have equal or greater capacity than the master drive. • A recovery volume can be viewed in the operating system; Create RAID Volume 2. Exit 3. RAID1: Mirrors data (redundancy). if needed, the data on the recovery drive can be created with two hard drives only....performance). Recovery: Copies data between a master and a recovery disk. RAID10: Mirrors data and stripes the mirror. Before you are unable to create a RAID array. • By default, only the master drive can copy the data from the master drive to easily restore data and system operation using a...

Manual
Page 85
...when both hard drives are installed in the operating system. e. Appendix All Rights Reserved. [ CREATE VOLUME MENU ] Name : Volume0 RAID Level : Recovery D[ SisEkLs E: CTSeDleIcStKDSis]ks Strip Size : 128KB Capacity : 223.6 GB Port Drive Model Serial # CreaStiezeVolume M0 ...ST3120026AS 3JT354CP 111.7GB R1 ST3120026AS 3JT32[ 9HJEXLP ] 111.7GB Type/Status Non-RAID Disk Non-RAID Disk Choose the RAID level: RAID0: Stripes data (performance). On Request allows users to update data from the master drive to complete....
...when both hard drives are installed in the operating system. e. Appendix All Rights Reserved. [ CREATE VOLUME MENU ] Name : Volume0 RAID Level : Recovery D[ SisEkLs E: CTSeDleIcStKDSis]ks Strip Size : 128KB Capacity : 223.6 GB Port Drive Model Serial # CreaStiezeVolume M0 ...ST3120026AS 3JT354CP 111.7GB R1 ST3120026AS 3JT32[ 9HJEXLP ] 111.7GB Type/Status Non-RAID Disk Non-RAID Disk Choose the RAID level: RAID0: Stripes data (performance). On Request allows users to update data from the master drive to complete....

Manual
Page 86
...]-Exit Figure 12 [DEL]-Delete Volume Appendix - 86 - All Rights Reserved. When prompted to confirm your selection (Figure 12), press to confirm or to non-RAID. Name Volume0 Level RAID0(Stripe) [ DELETE VOLUME MENU ] Drives 2 Capacity 223.6GB Status Normal Bootable Yes [ DELETE VOLUME VERIFICATION ] ALL DATA IN THE VOLUME WILL...! (This does not apply to Recovery volumes) Are you sure you wa[nHt tEoLdPel]ete "Volume0"? (Y/N) : Deleting a volume will reset the disks to abort. Delete RAID Volume To delete a RAID array, select Delete RAID Volume in MAIN MENU and press .
...]-Exit Figure 12 [DEL]-Delete Volume Appendix - 86 - All Rights Reserved. When prompted to confirm your selection (Figure 12), press to confirm or to non-RAID. Name Volume0 Level RAID0(Stripe) [ DELETE VOLUME MENU ] Drives 2 Capacity 223.6GB Status Normal Bootable Yes [ DELETE VOLUME VERIFICATION ] ALL DATA IN THE VOLUME WILL...! (This does not apply to Recovery volumes) Are you sure you wa[nHt tEoLdPel]ete "Volume0"? (Y/N) : Deleting a volume will reset the disks to abort. Delete RAID Volume To delete a RAID array, select Delete RAID Volume in MAIN MENU and press .

Manual
Page 87
... into your system and browse to the 64Bit folder. Figure 2 - 87 - Installing Windows Vista The procedure below assumes that below appears (RAID hard drive will not be sure to copy the driver files from the Windows Vista setup disk and perform standard OS installation steps. Then use... Method B to install Windows Vista onto your system. 5-1-2 Installing the SATA RAID/AHCI Driver and Operating System With the correct BIOS settings, you are ready to load the driver. Step 1: Restart your system to that ...
... into your system and browse to the 64Bit folder. Figure 2 - 87 - Installing Windows Vista The procedure below assumes that below appears (RAID hard drive will not be sure to copy the driver files from the Windows Vista setup disk and perform standard OS installation steps. Then use... Method B to install Windows Vista onto your system. 5-1-2 Installing the SATA RAID/AHCI Driver and Operating System With the correct BIOS settings, you are ready to load the driver. Step 1: Restart your system to that ...

Manual
Page 88
Figure 4 The install menus described in Figure 3 appears, select Intel(R) ICH8R/ICH9R/ICH10R/DO/PCH SATA RAID Controller and click Next. Step 3: When a screen as shown in this chapter are for reference only and may differ by driver version. Appendix - 88 - Figure 3 Step 4: After the driver is loaded, select the RAID/AHCI drive(s) where you want to install the operating system and then click Next to continue the OS installation (Figure 4).
Figure 4 The install menus described in Figure 3 appears, select Intel(R) ICH8R/ICH9R/ICH10R/DO/PCH SATA RAID Controller and click Next. Step 3: When a screen as shown in this chapter are for reference only and may differ by driver version. Appendix - 88 - Figure 3 Step 4: After the driver is loaded, select the RAID/AHCI drive(s) where you want to install the operating system and then click Next to continue the OS installation (Figure 4).
Manual
Page 89
...Intel(R) Matrix Storage Manager option ROM v8.9.0.1023 PCH-D wRAID5 Copyright(C) 2003-09 Intel Corporation. Exit a disk initiates a rebuild. Exit 3. Create RAID Volume[ DEGRADED VOLUME DETECTED3]. Reset Disks to be rebuilt within the operating system. [hi]-Select [ESC]-Exit [ENTER]-Select Menu - 89 -... (see the next page for more details). Select the port of restoring data to fault-tolerant arrays such as RAID 1, RAID 5 or RAID 10 arrays. Appendix The following screen appears after you enter the operating system (look for rebuilding detected. B. Rebuilding...
...Intel(R) Matrix Storage Manager option ROM v8.9.0.1023 PCH-D wRAID5 Copyright(C) 2003-09 Intel Corporation. Exit a disk initiates a rebuild. Exit 3. Create RAID Volume[ DEGRADED VOLUME DETECTED3]. Reset Disks to be rebuilt within the operating system. [hi]-Select [ESC]-Exit [ENTER]-Select Menu - 89 -... (see the next page for more details). Select the port of restoring data to fault-tolerant arrays such as RAID 1, RAID 5 or RAID 10 arrays. Appendix The following screen appears after you enter the operating system (look for rebuilding detected. B. Rebuilding...
Manual
Page 90
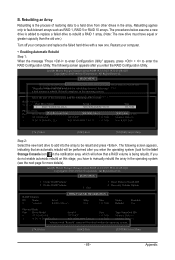
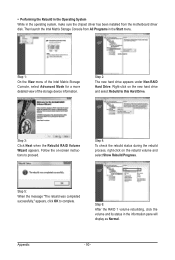
... select Show Rebuild Progress. Then launch the Intel Matrix Storage Console from the motherboard driver disk. Step 3: Click Next when the Rebuild RAID Volume Wizard appears. Step 4: To check the rebuild status during the rebuild process, right-click on -screen instructions to proceed. Step 6: After ...the RAID 1 volume rebuilding, click the volume and its status in the Start menu. Step 1: On the View menu of the Intel Matrix Storage ...
... select Show Rebuild Progress. Then launch the Intel Matrix Storage Console from the motherboard driver disk. Step 3: Click Next when the Rebuild RAID Volume Wizard appears. Step 4: To check the rebuild status during the rebuild process, right-click on -screen instructions to proceed. Step 6: After ...the RAID 1 volume rebuilding, click the volume and its status in the Start menu. Step 1: On the View menu of the Intel Matrix Storage ...


