Manual
Page 3
... manual may be reproduced, copied, translated, transmitted, or published in this manual may be made by GIGABYTE without GIGABYTE's prior written permission. No part of the product, read the Quick Installation Guide included with the product.... For detailed product information, carefully read or download the information on/from the Support&Downloads\Motherboard\Technology Guide page on your motherboard revision before updating motherboard BIOS, drivers...
... manual may be reproduced, copied, translated, transmitted, or published in this manual may be made by GIGABYTE without GIGABYTE's prior written permission. No part of the product, read the Quick Installation Guide included with the product.... For detailed product information, carefully read or download the information on/from the Support&Downloads\Motherboard\Technology Guide page on your motherboard revision before updating motherboard BIOS, drivers...
Manual
Page 5
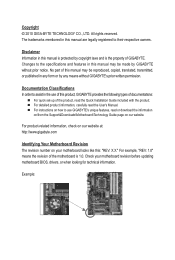
... 59 3-1 Installing Chipset Drivers 59 3-2 Application Software 60 3-3 Technical Manuals 60 3-4 Contact...61 3-5 System...61 3-6 Download Center 62 3-7 New Utilities...62 Chapter 4 Unique Features 63 ...Green...77 4-8 eXtreme Hard Drive (X.H.D 78 Chapter 5 Appendix...79 5-1 Configuring SATA Hard Drive(s 79 5-1-1 Configuring SATA Controller 79 5-1-2 Installing the SATA RAID/AHCI Driver and Operating System 87 5-2 Configuring Audio Input and Output 92 5-2-1 Configuring 2/4/5.1/7.1-Channel Audio 92 5-2-2 Configuring S/PDIF In/Out 94 5-2-3 Configuring Microphone Recording 96 5-2-4 Using...
... 59 3-1 Installing Chipset Drivers 59 3-2 Application Software 60 3-3 Technical Manuals 60 3-4 Contact...61 3-5 System...61 3-6 Download Center 62 3-7 New Utilities...62 Chapter 4 Unique Features 63 ...Green...77 4-8 eXtreme Hard Drive (X.H.D 78 Chapter 5 Appendix...79 5-1 Configuring SATA Hard Drive(s 79 5-1-1 Configuring SATA Controller 79 5-1-2 Installing the SATA RAID/AHCI Driver and Operating System 87 5-2 Configuring Audio Input and Output 92 5-2-1 Configuring 2/4/5.1/7.1-Channel Audio 92 5-2-2 Configuring S/PDIF In/Out 94 5-2-3 Configuring Microphone Recording 96 5-2-4 Using...
Manual
Page 6
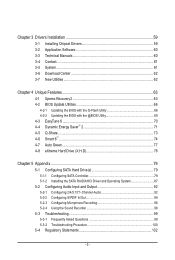
The box contents are for reference only. Optional Items 2-port USB 2.0 bracket (Part No. 12CR1-1UB030-5*R) 2-port SATA power cable (Part No. 12CF1-2SERPW-0*R) S/PDIF In cable (Part No. 12CR1-1SPDIN-0*R) - 6 - Box Contents GA-X58-USB3 motherboard Motherboard driver disk User's Manual Quick Installation Guide Four SATA cables I/O Shield 2-Way SLI bridge connector • The box contents above are subject to change without notice. • The motherboard image is for reference only and the actual items shall depend on the product package you obtain.
The box contents are for reference only. Optional Items 2-port USB 2.0 bracket (Part No. 12CR1-1UB030-5*R) 2-port SATA power cable (Part No. 12CF1-2SERPW-0*R) S/PDIF In cable (Part No. 12CR1-1SPDIN-0*R) - 6 - Box Contents GA-X58-USB3 motherboard Motherboard driver disk User's Manual Quick Installation Guide Four SATA cables I/O Shield 2-Way SLI bridge connector • The box contents above are subject to change without notice. • The motherboard image is for reference only and the actual items shall depend on the product package you obtain.
Manual
Page 18
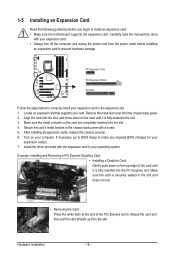
... the expansion card in the slot. 3. Remove the metal slot cover from the slot. After installing all expansion cards, replace the chassis cover(s). 6. Install the driver provided with a screw. 5. PCI Express x1 Slot PCI Express x16 Slot PCI Slot Follow the steps below to release the card and then pull the...
... the expansion card in the slot. 3. Remove the metal slot cover from the slot. After installing all expansion cards, replace the chassis cover(s). 6. Install the driver provided with a screw. 5. PCI Express x1 Slot PCI Express x16 Slot PCI Slot Follow the steps below to release the card and then pull the...
Manual
Page 19
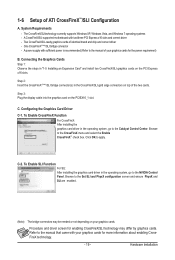
...)/SLI bridge connector(s) in the operating system, go to the manual that came with two/three PCI Express x16 slots and correct driver - A CrossFireX/SLI-supported motherboard with your graphics cards. C. Browse to apply. Refer to the Catalyst Control Center. Connecting the... CrossFireX menu and select the Enable CrossFireX™ check box. To Enable CrossFireX Function For CrossFireX: After installing the graphics card driver in "1-5 Installing an Expansion Card" and install two CrossFireX/SLI graphics cards on your graphics cards for more information about enabling ...
...)/SLI bridge connector(s) in the operating system, go to the manual that came with two/three PCI Express x16 slots and correct driver - A CrossFireX/SLI-supported motherboard with your graphics cards. C. Browse to apply. Refer to the Catalyst Control Center. Connecting the... CrossFireX menu and select the Enable CrossFireX™ check box. To Enable CrossFireX Function For CrossFireX: After installing the graphics card driver in "1-5 Installing an Expansion Card" and install two CrossFireX/SLI graphics cards on your graphics cards for more information about enabling ...
Manual
Page 32
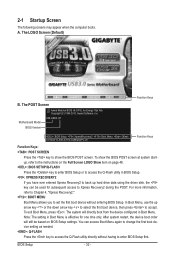
...driver disk, the key can access Boot Menu again to change the first boot device setting as needed. : Q-FLASH Press the key to back up arrow key or the down arrow key to select the first boot device, then press to enter BIOS Setup first. Motherboard Model BIOS Version X58-USB3... E7 . . . . : BIOS Setup : XpressRecovery2 : Boot Menu : Qflash 07/05/2010-X58-ICH10-7A89QG0PC-00 Function Keys Function Keys: : POST SCREEN Press the key to show the BIOS POST screen...
...driver disk, the key can access Boot Menu again to change the first boot device setting as needed. : Q-FLASH Press the key to back up arrow key or the down arrow key to select the first boot device, then press to enter BIOS Setup first. Motherboard Model BIOS Version X58-USB3... E7 . . . . : BIOS Setup : XpressRecovery2 : Boot Menu : Qflash 07/05/2010-X58-ICH10-7A89QG0PC-00 Function Keys Function Keys: : POST SCREEN Press the key to show the BIOS POST screen...
Manual
Page 49
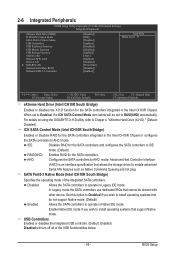
... X.H.D function for the SATA controllers integrated in Legacy IDE mode. For details on using the GIGABYTE X.H.D utility, refer to AHCI mode. Enable Native IDE mode if you wish to install operating systems that allows the storage driver to IDE mode. (Default) RAID(XHD) Enables RAID for the SATA controllers and configures the...
... X.H.D function for the SATA controllers integrated in Legacy IDE mode. For details on using the GIGABYTE X.H.D utility, refer to AHCI mode. Enable Native IDE mode if you wish to install operating systems that allows the storage driver to IDE mode. (Default) RAID(XHD) Enables RAID for the SATA controllers and configures the...
Manual
Page 59
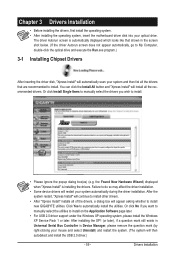
... Computer, double-click the optical drive and execute the Run.exe program.) 3-1 Installing Chipset Drivers After inserting the driver disk, "Xpress Install" will appear asking whether to automatically install the utilities. Click Yes to install new GIGABYTE utilities. Drivers Installation the Found New Hardware Wizard) displayed when "Xpress Install" is automatically displayed which looks...
... Computer, double-click the optical drive and execute the Run.exe program.) 3-1 Installing Chipset Drivers After inserting the driver disk, "Xpress Install" will appear asking whether to automatically install the utilities. Click Yes to install new GIGABYTE utilities. Drivers Installation the Found New Hardware Wizard) displayed when "Xpress Install" is automatically displayed which looks...

Manual
Page 60
Drivers Installation - 60 - 3-2 Application Software This page displays all the utilities and applications that GIGABYTE develops and some free software. You can click the Install button on the right of an item to install it. 3-3 Technical Manuals This page provides GIGABYTE's application guides, content descriptions for this driver disk, and the motherboard manuals.
Drivers Installation - 60 - 3-2 Application Software This page displays all the utilities and applications that GIGABYTE develops and some free software. You can click the Install button on the right of an item to install it. 3-3 Technical Manuals This page provides GIGABYTE's application guides, content descriptions for this driver disk, and the motherboard manuals.
Manual
Page 61
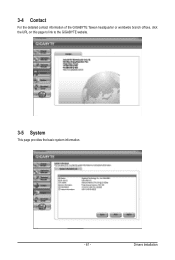
3-4 Contact For the detailed contact information of the GIGABYTE Taiwan headquarter or worldwide branch offices, click the URL on this page to link to the GIGABYTE website. 3-5 System This page provides the basic system information. - 61 - Drivers Installation
3-4 Contact For the detailed contact information of the GIGABYTE Taiwan headquarter or worldwide branch offices, click the URL on this page to link to the GIGABYTE website. 3-5 System This page provides the basic system information. - 61 - Drivers Installation
Manual
Page 62
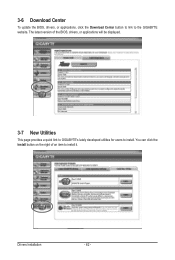
You can click the Install button on the right of the BIOS, drivers, or applications will be displayed. 3-7 New Utilities This page provides a quick link to GIGABYTE's lately developed utilities for users to install. The latest version of an item to the GIGABYTE website. Drivers Installation - 62 - 3-6 Download Center To update the BIOS, drivers, or applications, click the Download Center button to link to install it.
You can click the Install button on the right of the BIOS, drivers, or applications will be displayed. 3-7 New Utilities This page provides a quick link to GIGABYTE's lately developed utilities for users to install. The latest version of an item to the GIGABYTE website. Drivers Installation - 62 - 3-6 Download Center To update the BIOS, drivers, or applications, click the Download Center button to link to install it.
Manual
Page 63
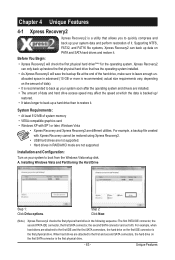
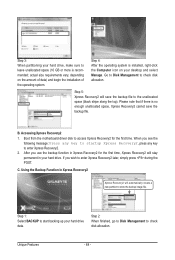
... the first physical hard drive(Note) for the operating system. Xpress Recovery2 can back up data on your system soon after the operating system and drivers are different utilities. Unique Features For example, a backup file created with SP1 or later, Windows Vista • Xpress Recovery and Xpress Recovery2 are installed. •...
... the first physical hard drive(Note) for the operating system. Xpress Recovery2 can back up data on your system soon after the operating system and drivers are different utilities. Unique Features For example, a backup file created with SP1 or later, Windows Vista • Xpress Recovery and Xpress Recovery2 are installed. •...
Manual
Page 64
Boot from the motherboard driver disk to check disk allocation. Go to Disk Management to access Xpress Recovery2 for the first time, Xpress Recovery2 will stay permanent in your hard ...
Boot from the motherboard driver disk to check disk allocation. Go to Disk Management to access Xpress Recovery2 for the first time, Xpress Recovery2 will stay permanent in your hard ...

Manual
Page 73
... only when data sharing is an easy and convenient data sharing tool. Directions for using Q-Share After installing Q-Share from the motherboard driver disk, go to Start>All Programs>GIGABYTE>Q-Share.exe to share your taskbar and right-click on the same network, making full use of Internet resources. Find the Q-Share...
... only when data sharing is an easy and convenient data sharing tool. Directions for using Q-Share After installing Q-Share from the motherboard driver disk, go to Start>All Programs>GIGABYTE>Q-Share.exe to share your taskbar and right-click on the same network, making full use of Internet resources. Find the Q-Share...

Manual
Page 78
...78 - Using GIGABYTE eXtreme Hard Drive (X.H.D) Instructions:(Note 2) Before launching X.H.D, make sure the newly added harddrive has equal or greater capacity than the RAID-ready system drive. (To add a new hard drive into the array to expand its capacity. Without the driver, the hard ...System Step 1: Configure the system BIOS Enter the system BIOS Setup program, set up a RAID 0 array. 2. 4-8 eXtreme Hard Drive (X.H.D) With GIGABYTE eXtreme Hard Drive (X.H.D)(Note 1), users can quickly configure a RAIDready system for RAID 0 when a new SATA drive is recommended that before you run ...
...78 - Using GIGABYTE eXtreme Hard Drive (X.H.D) Instructions:(Note 2) Before launching X.H.D, make sure the newly added harddrive has equal or greater capacity than the RAID-ready system drive. (To add a new hard drive into the array to expand its capacity. Without the driver, the hard ...System Step 1: Configure the system BIOS Enter the system BIOS Setup program, set up a RAID 0 array. 2. 4-8 eXtreme Hard Drive (X.H.D) With GIGABYTE eXtreme Hard Drive (X.H.D)(Note 1), users can quickly configure a RAIDready system for RAID 0 when a new SATA drive is recommended that before you run ...

Manual
Page 79
... below: A. B. Configure SATA controller mode in RAID BIOS. (Note 1) D. If there is more than one hard drive. • Windows Vista/XP setup disk. • Motherboard driver disk. 5-1-1 Configuring SATA Controller A. Install SATA hard drive(s) in your computer Attach one end of the SATA signal cable to the rear of the SATA.... (Note 2) Required when the SATA controller is recommended that you do not want to available SATA port on the motherboard. Install the SATA RAID/AHCI driver (Note 2) and operating system. C. Before you do not want to AHCI or RAID mode. - 79 -
... below: A. B. Configure SATA controller mode in RAID BIOS. (Note 1) D. If there is more than one hard drive. • Windows Vista/XP setup disk. • Motherboard driver disk. 5-1-1 Configuring SATA Controller A. Install SATA hard drive(s) in your computer Attach one end of the SATA signal cable to the rear of the SATA.... (Note 2) Required when the SATA controller is recommended that you do not want to available SATA port on the motherboard. Install the SATA RAID/AHCI driver (Note 2) and operating system. C. Before you do not want to AHCI or RAID mode. - 79 -

Manual
Page 83
... : 111.7 GB Sync : N/A Create Volume WARNING : ALL DATA ON SELECTED DISKS WILL BE LOST. [ HELP ] Are you sure you can install the SATA RAID/AHCI driver and operating system. - 83 - Appendix Intel(R) Matrix Storage Manager option ROM v8.9.0.1023 PCH-D wRAID5 Copyright(C) 2003-09 Intel Corporation. Step 5: Enter the array capacity...
... : 111.7 GB Sync : N/A Create Volume WARNING : ALL DATA ON SELECTED DISKS WILL BE LOST. [ HELP ] Are you sure you can install the SATA RAID/AHCI driver and operating system. - 83 - Appendix Intel(R) Matrix Storage Manager option ROM v8.9.0.1023 PCH-D wRAID5 Copyright(C) 2003-09 Intel Corporation. Step 5: Enter the array capacity...

Manual
Page 87
...Vista installation. Method B: Insert the USB flash drive containing the driver files and browse to load the driver. When a screen similar to that only one RAID array exists in your system to boot from the motherboard driver disk to a USB flash drive before installing Windows Vista (... \iMSM\64Bit (for Windows Vista 64-bit). A. Appendix Note: For users using a SATA optical drive, be detected at this stage), select Load Driver (Figure 1). Step 1: Restart your system. The following directory: \BootDrv\iMSM\32Bit For Windows Vista 64-bit, browse to the USB flash drive). ...
...Vista installation. Method B: Insert the USB flash drive containing the driver files and browse to load the driver. When a screen similar to that only one RAID array exists in your system to boot from the motherboard driver disk to a USB flash drive before installing Windows Vista (... \iMSM\64Bit (for Windows Vista 64-bit). A. Appendix Note: For users using a SATA optical drive, be detected at this stage), select Load Driver (Figure 1). Step 1: Restart your system. The following directory: \BootDrv\iMSM\32Bit For Windows Vista 64-bit, browse to the USB flash drive). ...

Manual
Page 88
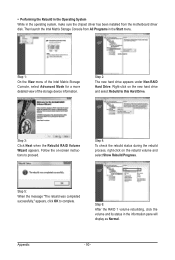
Figure 3 Step 4: After the driver is loaded, select the RAID/AHCI drive(s) where you want to install the operating system and then click Next to continue the OS installation (Figure 4). Figure 4 The install menus described in Figure 3 appears, select Intel(R) ICH8R/ICH9R/ICH10R/DO/PCH SATA RAID Controller and click Next. Step 3: When a screen as shown in this chapter are for reference only and may differ by driver version. Appendix - 88 -
Figure 3 Step 4: After the driver is loaded, select the RAID/AHCI drive(s) where you want to install the operating system and then click Next to continue the OS installation (Figure 4). Figure 4 The install menus described in Figure 3 appears, select Intel(R) ICH8R/ICH9R/ICH10R/DO/PCH SATA RAID Controller and click Next. Step 3: When a screen as shown in this chapter are for reference only and may differ by driver version. Appendix - 88 -
Manual
Page 90
... volume and its status in the Start menu. • Performing the Rebuild in the Operating System While in the operating system, make sure the chipset driver has been installed from All Programs in the information pane will display as Normal. Then launch the Intel Matrix Storage Console from the motherboard...
... volume and its status in the Start menu. • Performing the Rebuild in the Operating System While in the operating system, make sure the chipset driver has been installed from All Programs in the information pane will display as Normal. Then launch the Intel Matrix Storage Console from the motherboard...


