User Manual
Page 10
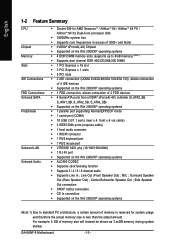
... ; GA-K8NF-9 Motherboard - 10 - English 1-2 Feature Summary CPU Chipset Memory Slots IDE Connections FDD Connections Onboard SATA Peripherals Onboard LAN Onboard Audio Š Socket 939 for system usage and therefore the actual memory size is less than the stated amount. MIC ; For example, 4 GB of 3000+ and faster Š nVIDIA® nForce4(-4X) Chipset Š Supported on the Win 2000/XP operating systems Š ALC850 CODEC Š Supports Jack Sensing function Š Supports 2 / 4 / 6 / 8 channel audio Š Supports...
... ; GA-K8NF-9 Motherboard - 10 - English 1-2 Feature Summary CPU Chipset Memory Slots IDE Connections FDD Connections Onboard SATA Peripherals Onboard LAN Onboard Audio Š Socket 939 for system usage and therefore the actual memory size is less than the stated amount. MIC ; For example, 4 GB of 3000+ and faster Š nVIDIA® nForce4(-4X) Chipset Š Supported on the Win 2000/XP operating systems Š ALC850 CODEC Š Supports Jack Sensing function Š Supports 2 / 4 / 6 / 8 channel audio Š Supports...

User Manual
Page 11
... voltage detection CPU temperature detection CPU / System fan speed detection CPU warning temperature CPU / System fan failure warning CPU smart fan control Onboard nForce4(-4X) chipset (S_ATA0_SB, S_ATA1_SB, S_ATA2_SB, S_ATA3_SB) - supports data transfer rate of licensed AWARD BIOS Supports Q-Flash Supports @BIOS Supports EasyTune (Note 2) Over Voltage via BIOS (CPU/ DDR/ HT-Link/ Core Power) ATX form factor; 30.5cm x 24.4cm (Note 2) EasyTune functions may vary depending on the Win 2000/XP operating systems Use of up to 150 MB/s - supports data striping (RAID...
... voltage detection CPU temperature detection CPU / System fan speed detection CPU warning temperature CPU / System fan failure warning CPU smart fan control Onboard nForce4(-4X) chipset (S_ATA0_SB, S_ATA1_SB, S_ATA2_SB, S_ATA3_SB) - supports data transfer rate of licensed AWARD BIOS Supports Q-Flash Supports @BIOS Supports EasyTune (Note 2) Over Voltage via BIOS (CPU/ DDR/ HT-Link/ Core Power) ATX form factor; 30.5cm x 24.4cm (Note 2) EasyTune functions may vary depending on the Win 2000/XP operating systems Use of up to 150 MB/s - supports data striping (RAID...
User Manual
Page 21
... types of the cable connects to the FDD drive. English 5) FDD (FDD Connector) The FDD connector is used to connect the FDD cable while the other as Slave (for information on settings, please refer to the instructions located on one IDE cable, and the single IDE cable can then connect to two IDE devices (hard drive or optical drive). Hardware Installation If you wish to the computer via an IDE connector. Please connect the red power connector wire to...
... types of the cable connects to the FDD drive. English 5) FDD (FDD Connector) The FDD connector is used to connect the FDD cable while the other as Slave (for information on settings, please refer to the instructions located on one IDE cable, and the single IDE cable can then connect to two IDE devices (hard drive or optical drive). Hardware Installation If you wish to the computer via an IDE connector. Please connect the red power connector wire to...
User Manual
Page 22
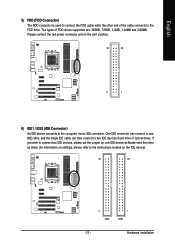
Definition 1 MPD+ 2 MPD- 1 3 MPD- GA-K8NF-9 Motherboard - 22 - Please refer to the BIOS setting for the Serial ATA and install the proper driver in order to 150MB/s transfer rate. It will blink when the system enters suspend mode. English 7) S_ATA0/1/2/3_SB (Serial ATA Connectors, Controlled by nForce4(-4X)) Serial ATA can provide up to work properly. Definition 1 GND 7 1 2 TXP 3 TXN 4 GND 5 RXN 6 RXP 7 GND 8) PWR_LED PWR_LED is connect with the system power indicator to indicate whether the system is on/off. Pin No. Pin No.
Definition 1 MPD+ 2 MPD- 1 3 MPD- GA-K8NF-9 Motherboard - 22 - Please refer to the BIOS setting for the Serial ATA and install the proper driver in order to 150MB/s transfer rate. It will blink when the system enters suspend mode. English 7) S_ATA0/1/2/3_SB (Serial ATA Connectors, Controlled by nForce4(-4X)) Serial ATA can provide up to work properly. Definition 1 GND 7 1 2 TXP 3 TXN 4 GND 5 RXN 6 RXP 7 GND 8) PWR_LED PWR_LED is connect with the system power indicator to indicate whether the system is on/off. Pin No. Pin No.
User Manual
Page 30
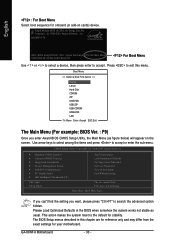
GA-K8NF-9 Motherboard - 30 - This action makes the system reset to accept or enter the sub-menu. Boot Menu == Select a Boot First device == Floppy LS120 Hard Disk CDROM ZIP USB-FDD USB-ZIP USB-CDROM USB-HDD LAN KL:Move Enter :Accept ESC:Exit The Main Menu (For example: BIOS Ver. : F9) Once you want, please press "Ctrl+F1" to search the advanced option hidden. If you can't find the setting you enter Award BIOS CMOS Setup Utility, the Main Menu (as usual. Use arrow...
GA-K8NF-9 Motherboard - 30 - This action makes the system reset to accept or enter the sub-menu. Boot Menu == Select a Boot First device == Floppy LS120 Hard Disk CDROM ZIP USB-FDD USB-ZIP USB-CDROM USB-HDD LAN KL:Move Enter :Accept ESC:Exit The Main Menu (For example: BIOS Ver. : F9) Once you want, please press "Ctrl+F1" to search the advanced option hidden. If you can't find the setting you enter Award BIOS CMOS Setup Utility, the Main Menu (as usual. Use arrow...

User Manual
Page 32
... correct settings. GA-K8NF-9 Motherboard - 32 - to select this if no IDE devices are used and the system will skip the automatic detection step and allow for automatic device detection. time clock. User can use one of the two methods: • Auto Allows BIOS to automatically detect IDE devices during POST(default) • None Select this option for faster system start up . Access Mode Use this option for the hard drive. IDE Channel 1 Master/Slave IDE devices setup. Drive A Drive B Halt On Floppy 3 Mode...
... correct settings. GA-K8NF-9 Motherboard - 32 - to select this if no IDE devices are used and the system will skip the automatic detection step and allow for automatic device detection. time clock. User can use one of the two methods: • Auto Allows BIOS to automatically detect IDE devices during POST(default) • None Select this option for faster system start up . Access Mode Use this option for the hard drive. IDE Channel 1 Master/Slave IDE devices setup. Drive A Drive B Halt On Floppy 3 Mode...
User Manual
Page 34
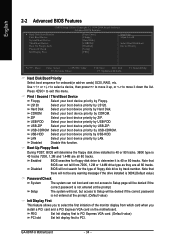
... correct password is not entered at the prompt. (Default value) Init Display First This feature allows you install a PCI card and a PCI Express VGA card on cards) SCSI, RAID, etc. GA-K8NF-9 Motherboard - 34 - USB-FDD Select your boot device priority by USB-HDD. LAN Select your boot device priority by USB-CDROM. Enabled BIOS searches for floppy disk drive to determine it down the list. PEG Set Init display first to PCI Express VGA card. (Default value) PCI slot Set Init display first to Setup will not search for the type of the monitor display...
... correct password is not entered at the prompt. (Default value) Init Display First This feature allows you install a PCI card and a PCI Express VGA card on cards) SCSI, RAID, etc. GA-K8NF-9 Motherboard - 34 - USB-FDD Select your boot device priority by USB-HDD. LAN Select your boot device priority by USB-CDROM. Enabled BIOS searches for floppy disk drive to determine it down the list. PEG Set Init display first to PCI Express VGA card. (Default value) PCI slot Set Init display first to Setup will not search for the type of the monitor display...

User Manual
Page 36
... (Default value) NV Serial-ATA 1 Enabled Enable Serial ATA 1 supported. (Default value) Disabled Disable Serial ATA 1 supported. NV SATA 1 Primary RAID Enabled Enable 1st SATA primary RAID function. GA-K8NF-9 Motherboard - 36 - Disable this function. (Default value) IDE Primary Slave RAID Enabled Disabled Enable 1st slave channel IDE RAID function. NV SATA 1 class code (Note) 0101 Set NV SATA 1 class code to 0101. (Default value) 0104 Set NV SATA 1 class code to invoke the boot ROM of the onboard LAN chip. NV IDE/SATA RAID function Enabled Disabled Enable IDE/SATA RAID...
... (Default value) NV Serial-ATA 1 Enabled Enable Serial ATA 1 supported. (Default value) Disabled Disable Serial ATA 1 supported. NV SATA 1 Primary RAID Enabled Enable 1st SATA primary RAID function. GA-K8NF-9 Motherboard - 36 - Disable this function. (Default value) IDE Primary Slave RAID Enabled Disabled Enable 1st slave channel IDE RAID function. NV SATA 1 class code (Note) 0101 Set NV SATA 1 class code to 0101. (Default value) 0104 Set NV SATA 1 class code to invoke the boot ROM of the onboard LAN chip. NV IDE/SATA RAID function Enabled Disabled Enable IDE/SATA RAID...

User Manual
Page 43
...CPU Spread Spectrum Disabled Center Spread Disable CPU Spread Spectrum. Auto Set Robust Graphics Booster to Auto. (Default value) Fast Turbo Set Robust Graphics Booster to Turbo. Set Robust Graphics Booster to Fast. English 2-7 MB Intelligent Tweaker(M.I.T.) CMOS Setup Utility-Copyright (C) 1984-2004 Award Software MB Intelligent Tweaker(M.I.T.) HT Frequency ratio CPU Frequency K8 CPU Clock Ratio Current DDR speed CPU Spread Spectrum PCIE Clock Robust Graphics Booster CPU Voltage Control Normal CPU Vcore Chipset core PCI-E voltage HT-Link voltage control DDR voltage control [Auto...
...CPU Spread Spectrum Disabled Center Spread Disable CPU Spread Spectrum. Auto Set Robust Graphics Booster to Auto. (Default value) Fast Turbo Set Robust Graphics Booster to Turbo. Set Robust Graphics Booster to Fast. English 2-7 MB Intelligent Tweaker(M.I.T.) CMOS Setup Utility-Copyright (C) 1984-2004 Award Software MB Intelligent Tweaker(M.I.T.) HT Frequency ratio CPU Frequency K8 CPU Clock Ratio Current DDR speed CPU Spread Spectrum PCIE Clock Robust Graphics Booster CPU Voltage Control Normal CPU Vcore Chipset core PCI-E voltage HT-Link voltage control DDR voltage control [Auto...
User Manual
Page 44
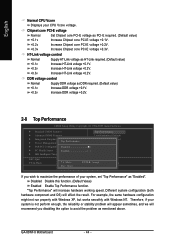
.... 2-8 Top Performance CMOS Setup Utility-Copyright (C) 1984-2005 Award Software ` Standard CMOS Features Top Performance ` Advanced BIOS Features Load Optimized Defaults ` Integrated Peripherals ` Power Management SetuTpop Performance Set Supervisor Password Set User Password ` PnP/PCI ConfigurationsDisabled Save & Exit Setup ` PC Health Status Enabled Exit Without Saving ` MB Intelligent Tweaker(M.I.T.) ESC: Quit F8: Q-Flash KLJI: Select Item KL: Move ENTER: AcFc1e0p:t Save & Exit Setup ESC: Abort Load Optimized Defaults If you disabling the option to maximize...
.... 2-8 Top Performance CMOS Setup Utility-Copyright (C) 1984-2005 Award Software ` Standard CMOS Features Top Performance ` Advanced BIOS Features Load Optimized Defaults ` Integrated Peripherals ` Power Management SetuTpop Performance Set Supervisor Password Set User Password ` PnP/PCI ConfigurationsDisabled Save & Exit Setup ` PC Health Status Enabled Exit Without Saving ` MB Intelligent Tweaker(M.I.T.) ESC: Quit F8: Q-Flash KLJI: Select Item KL: Move ENTER: AcFc1e0p:t Save & Exit Setup ESC: Abort Load Optimized Defaults If you disabling the option to maximize...
User Manual
Page 45
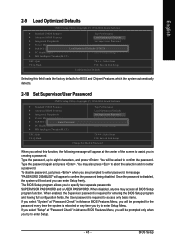
... Set Supervisor/User Password CMOS Setup Utility-Copyright (C) 1984-2004 Award Software ` Standard CMOS Features ` Advanced BIOS Features ` Integrated Peripherals ` Power Management Setup ` PnP/PCI ConfiguratioEnns ter Password: ` PC Health Status ` MB Intelligent Tweaker(M.I .T.) ESC: Quit F8: Q-Flash KLJI: Select Item F10: Save & Exit Setup Load Optimized Defaults Selecting this field loads the factory defaults for the password every time the system is disabled, the system will boot and you can enter Setup freely. Type the password...
... Set Supervisor/User Password CMOS Setup Utility-Copyright (C) 1984-2004 Award Software ` Standard CMOS Features ` Advanced BIOS Features ` Integrated Peripherals ` Power Management Setup ` PnP/PCI ConfiguratioEnns ter Password: ` PC Health Status ` MB Intelligent Tweaker(M.I .T.) ESC: Quit F8: Q-Flash KLJI: Select Item F10: Save & Exit Setup Load Optimized Defaults Selecting this field loads the factory defaults for the password every time the system is disabled, the system will boot and you can enter Setup freely. Type the password...
User Manual
Page 46
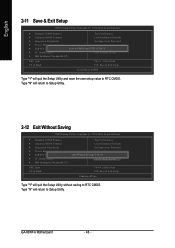
...: Select Item F10: Save & Exit Setup Save Data to CMOS Type "Y" will quit the Setup Utility and save the user setup value to RTC CMOS. Type "N" will return to Setup Utility. English 2-11 Save & Exit Setup CMOS Setup Utility-Copyright (C) 1984-2004 Award Software ` Standard CMOS Features Top Performance ` Advanced BIOS Features Load Optimized Defaults ` Integrated Peripherals Set Supervisor Password ` Power Management Setup Set User Password ` PnP/PCI Configurations Save to CMOS and EXITSa(Yve/N&)?EYxit Setup ` PC Health Status Exit Without...
...: Select Item F10: Save & Exit Setup Save Data to CMOS Type "Y" will quit the Setup Utility and save the user setup value to RTC CMOS. Type "N" will return to Setup Utility. English 2-11 Save & Exit Setup CMOS Setup Utility-Copyright (C) 1984-2004 Award Software ` Standard CMOS Features Top Performance ` Advanced BIOS Features Load Optimized Defaults ` Integrated Peripherals Set Supervisor Password ` Power Management Setup Set User Password ` PnP/PCI Configurations Save to CMOS and EXITSa(Yve/N&)?EYxit Setup ` PC Health Status Exit Without...

User Manual
Page 52
... use the Xpress Recovery2 Initial access by booting from CD-ROM and subsequent access by pressing the key in the bottom left corner of hard disk data. System requirements: 1. VESA-supported VGA cards How to enter Xpress Recovery2 without the CD-ROM. Save the settings and exit the BIOS Setup. Press any key to boot from CD-ROM. If you can simply press F9 during system power-on PATA and SATA IDE controllers...
... use the Xpress Recovery2 Initial access by booting from CD-ROM and subsequent access by pressing the key in the bottom left corner of hard disk data. System requirements: 1. VESA-supported VGA cards How to enter Xpress Recovery2 without the CD-ROM. Save the settings and exit the BIOS Setup. Press any key to boot from CD-ROM. If you can simply press F9 during system power-on PATA and SATA IDE controllers...
User Manual
Page 55
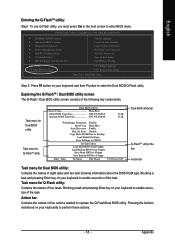
...Q-FlashTM utility: Step1: To use Q-Flash utility, you must press Del in the boot screen to operate the Q-Flash/Dual BIOS utility. CMOS Setup Utility-Copyright (C) 1984-2004 Award Software Standard CMOS Features Advanced BIOS Features Integrated Peripherals Power Management Setup PnP/PCI Configurations PC Health Status MB Intelligent Tweaker(M.I.T.) ESC: Quit F8: Dual BIOS/Q-Flash Select Language Load Fail-Safe Defaults Load Optimized Defaults Set Supervisor Password Set User Password Save & Exit Setup Exit Without Saving F3: Change Language F10: Save & Exit Setup Time, Date, Hard Disk Type...
...Q-FlashTM utility: Step1: To use Q-Flash utility, you must press Del in the boot screen to operate the Q-Flash/Dual BIOS utility. CMOS Setup Utility-Copyright (C) 1984-2004 Award Software Standard CMOS Features Advanced BIOS Features Integrated Peripherals Power Management Setup PnP/PCI Configurations PC Health Status MB Intelligent Tweaker(M.I.T.) ESC: Quit F8: Dual BIOS/Q-Flash Select Language Load Fail-Safe Defaults Load Optimized Defaults Set Supervisor Password Set User Password Save & Exit Setup Exit Without Saving F3: Change Language F10: Save & Exit Setup Time, Date, Hard Disk Type...
User Manual
Page 57
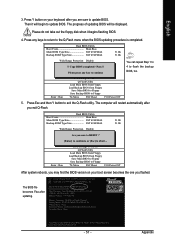
... Q-Flash menu when the BIOS updating procedure is completed. Appendix Press Y button on your keyboard after you flashed. Please do not take out the floppy disk when it will begin to Floppy Enter : Run :Move ESC:Reset F10:Power Off After system reboots, you may find the BIOS version on your boot screen becomes the one you exit Q-Flash. The computer will be displayed. English 3. Load Default Settings Save Settings to CMOS Q-Flash Utility Load Main BIOS from Floppy Load Backup BIOS...
... Q-Flash menu when the BIOS updating procedure is completed. Appendix Press Y button on your keyboard after you flashed. Please do not take out the floppy disk when it will begin to Floppy Enter : Run :Move ESC:Reset F10:Power Off After system reboots, you may find the BIOS version on your boot screen becomes the one you exit Q-Flash. The computer will be displayed. English 3. Load Default Settings Save Settings to CMOS Q-Flash Utility Load Main BIOS from Floppy Load Backup BIOS...
User Manual
Page 58
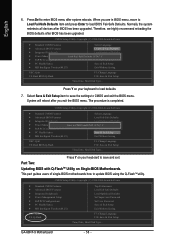
..., Date, Hard Disk Type... This part guides users of single-BIOS motherboards how to CMOS and exit the BIOS menu. Press Y on your keyboard to save the settings to update BIOS using the Q-FlashTM utility. GA-K8NF-9 Motherboard - 58 - Press Del to load defaults. 7. CMOS Setup Utility-Copyright (C) 1984-2004 Award Software Standard CMOS Features Select Language Advanced BIOS Features Load Fail-Safe Defaults Integrated Peripherals Load Optimized Defaults Power Management Setup Load Fail-Safe Defaults (YS/eNt )S?uYpervisor Password PnP/PCI Configurations Set User...
..., Date, Hard Disk Type... This part guides users of single-BIOS motherboards how to CMOS and exit the BIOS menu. Press Y on your keyboard to save the settings to update BIOS using the Q-FlashTM utility. GA-K8NF-9 Motherboard - 58 - Press Del to load defaults. 7. CMOS Setup Utility-Copyright (C) 1984-2004 Award Software Standard CMOS Features Select Language Advanced BIOS Features Load Fail-Safe Defaults Integrated Peripherals Load Optimized Defaults Power Management Setup Load Fail-Safe Defaults (YS/eNt )S?uYpervisor Password PnP/PCI Configurations Set User...
User Manual
Page 61
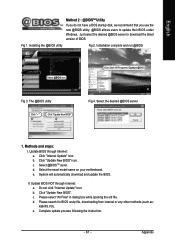
... @BIOS server 1. d. II. Click "Update New BIOS". System will automatically download and update the BIOS. English Method 2 : @BIOSTM Utility If you do not have a DOS startup disk, we recommend that you use the new @BIOS utility. @BIOS allows users to download the latest version of BIOS. Click Start/ All Programs/ Gigabyte/@BIOS Fig 3. Methods and steps: I. Update BIOS through Internet: a. Click "Update New BIOS" icon. Complete update process following the instruction. - 61 - Click "Internet Update" icon. Update BIOS...
... @BIOS server 1. d. II. Click "Update New BIOS". System will automatically download and update the BIOS. English Method 2 : @BIOSTM Utility If you do not have a DOS startup disk, we recommend that you use the new @BIOS utility. @BIOS allows users to download the latest version of BIOS. Click Start/ All Programs/ Gigabyte/@BIOS Fig 3. Methods and steps: I. Update BIOS through Internet: a. Click "Update New BIOS" icon. Complete update process following the instruction. - 61 - Click "Internet Update" icon. Update BIOS...

User Manual
Page 64
... or download the information you need.) Configuring the NVIDIA RAID BIOS The NVRAID BIOS setup lets you choose the RAID array type and which hard drives you to enter RAID setup utility ... RAID Mode: Mirroring NVIDIA RAID Utility Nov 5 2004 - The NVIDIA RAID Utility - Define a New Array - After rebooting your computer, wait until you see the RAID software prompting you want to make and storage capacity. 2) Please attach the hard drive connectors to select NVIDIA RAID; Define...
... or download the information you need.) Configuring the NVIDIA RAID BIOS The NVRAID BIOS setup lets you choose the RAID array type and which hard drives you to enter RAID setup utility ... RAID Mode: Mirroring NVIDIA RAID Utility Nov 5 2004 - The NVIDIA RAID Utility - Define a New Array - After rebooting your computer, wait until you see the RAID software prompting you want to make and storage capacity. 2) Please attach the hard drive connectors to select NVIDIA RAID; Define...
User Manual
Page 68
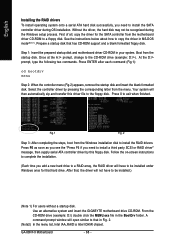
... CD-ROM support and a blank formatted floppy disk. See the instructions below about how to copy the driver in the BootDrv folder. Boot from the motherboard driver CD-ROM to be installed under Windows once for the SATA controller from the startup disk. Select the controller driver by this driver file to the floppy disk. From the CD-ROM drive (example: D:\) double click the MENU.exe file in MS-DOS mode(Note 1). English Installing the RAID drivers To install operating...
... CD-ROM support and a blank formatted floppy disk. See the instructions below about how to copy the driver in the BootDrv folder. Boot from the motherboard driver CD-ROM to be installed under Windows once for the SATA controller from the startup disk. Select the controller driver by this driver file to the floppy disk. From the CD-ROM drive (example: D:\) double click the MENU.exe file in MS-DOS mode(Note 1). English Installing the RAID drivers To install operating...
User Manual
Page 75
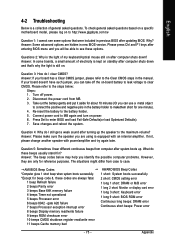
...beeps Display memory read/write failure 9 beeps ROM checksum error 10 beeps CMOS shutdown register read/write error 11 beeps Cache memory bad AWARD BIOS Beep Codes 1 short: System boots successfully 2 short: CMOS setting error 1 long 1 short: DRAM or M/B error 1 long 2 short: Monitor or display card error 1 long 3 short: Keyboard error 1 long 9 short: BIOS ROM error Continuous long beeps: DRAM error Continuous short beeps: Power error - 75 - If your board has a Clear CMOS jumper, please refer to the maximum volume? Connect power cord to MB again and turn on -board battery to leak voltage...
...beeps Display memory read/write failure 9 beeps ROM checksum error 10 beeps CMOS shutdown register read/write error 11 beeps Cache memory bad AWARD BIOS Beep Codes 1 short: System boots successfully 2 short: CMOS setting error 1 long 1 short: DRAM or M/B error 1 long 2 short: Monitor or display card error 1 long 3 short: Keyboard error 1 long 9 short: BIOS ROM error Continuous long beeps: DRAM error Continuous short beeps: Power error - 75 - If your board has a Clear CMOS jumper, please refer to the maximum volume? Connect power cord to MB again and turn on -board battery to leak voltage...


