
User Manual
Page 5
Chapter 3 Drivers Installation 47 3-1 Install Chipset Drivers 47 3-2 SoftwareApplication 48 3-3 Software Information 48 3-4 Hardware Information 49 3-5 Contact Us ...49 Chapter 4 Appendix 51 4-1 Unique Software Utilities 51 4-1-1 EasyTune 5 Introduction 51 4-1-2 Xpress Recovery2 Introduction 52 4-1-3 Flash BIOS Method Introduction 54 4-1-4 Serial ATA BIOS Setting Utility Introduction 63 4-1-5 2- / 4- / 6- / 8- Channel Audio Function Introduction 69 4-2 Troubleshooting 75 - 5 -
Chapter 3 Drivers Installation 47 3-1 Install Chipset Drivers 47 3-2 SoftwareApplication 48 3-3 Software Information 48 3-4 Hardware Information 49 3-5 Contact Us ...49 Chapter 4 Appendix 51 4-1 Unique Software Utilities 51 4-1-1 EasyTune 5 Introduction 51 4-1-2 Xpress Recovery2 Introduction 52 4-1-3 Flash BIOS Method Introduction 54 4-1-4 Serial ATA BIOS Setting Utility Introduction 63 4-1-5 2- / 4- / 6- / 8- Channel Audio Function Introduction 69 4-2 Troubleshooting 75 - 5 -

User Manual
Page 16
Install related driver from the computer. 3. GA-K8NF-9 Motherboard - 16 - Press the expansion card firmly into the computer. 2. Replace the screw to install/uninstall the VGA card. Be sure the metal contacts on ...
Install related driver from the computer. 3. GA-K8NF-9 Motherboard - 16 - Press the expansion card firmly into the computer. 2. Replace the screw to install/uninstall the VGA card. Be sure the metal contacts on ...

User Manual
Page 17
... you connect your device(s) into USB connector(s), please make sure your OS does not support USB controller, please contact OS vendor for possible patch or driver upgrade. If your OS supports USB controller. Line Out (Front Speaker Out) Connect the stereo speakers, earphone or front surround speakers to MIC In jack...
... you connect your device(s) into USB connector(s), please make sure your OS does not support USB controller, please contact OS vendor for possible patch or driver upgrade. If your OS supports USB controller. Line Out (Front Speaker Out) Connect the stereo speakers, earphone or front surround speakers to MIC In jack...
User Manual
Page 22
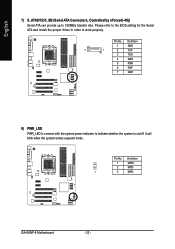
Please refer to the BIOS setting for the Serial ATA and install the proper driver in order to indicate whether the system is connect with the system power indicator to work properly. GA-K8NF-9 Motherboard - 22 - Definition 1 GND 7 1 2 TXP 3 TXN 4 GND 5 RXN 6 RXP 7 GND 8) PWR_LED PWR_LED is on/off. Pin No. It will blink when the system enters suspend mode. English 7) S_ATA0/1/2/3_SB (Serial ATA Connectors, Controlled by nForce4(-4X)) Serial ATA can provide up to 150MB/s transfer rate. Pin No. Definition 1 MPD+ 2 MPD- 1 3 MPD-
Please refer to the BIOS setting for the Serial ATA and install the proper driver in order to indicate whether the system is connect with the system power indicator to work properly. GA-K8NF-9 Motherboard - 22 - Definition 1 GND 7 1 2 TXP 3 TXN 4 GND 5 RXN 6 RXP 7 GND 8) PWR_LED PWR_LED is on/off. Pin No. It will blink when the system enters suspend mode. English 7) S_ATA0/1/2/3_SB (Serial ATA Connectors, Controlled by nForce4(-4X)) Serial ATA can provide up to 150MB/s transfer rate. Pin No. Definition 1 MPD+ 2 MPD- 1 3 MPD-

User Manual
Page 37
...). And manually set "NV SATA2 class code" to 0104. - 37 - Disable onboard IrDA port . If your SATA hard drive is 3BC/IRQ7. (Note) When using driver version 1.2, please enable "NV IDE/SATA RAID function" if you wish to 0104. English NV SATA 2 Primary RAID Enabled Enable 2nd SATA primary RAID function...
...). And manually set "NV SATA2 class code" to 0104. - 37 - Disable onboard IrDA port . If your SATA hard drive is 3BC/IRQ7. (Note) When using driver version 1.2, please enable "NV IDE/SATA RAID function" if you wish to 0104. English NV SATA 2 Primary RAID Enabled Enable 2nd SATA primary RAID function...

User Manual
Page 47
...will auto start and show a question mark "?" System will auto-detect the right USB2.0 driver). - 47 - in "My computer", and execute the Setup.exe. 3-1 Install Chipset Drivers After insert the driver CD, "Xpress Install" will show the installation guide. The "Xpress Install" uses the... Please remove the question mark and restart the system (System will reboot automatically after install the drivers, afterward you can install others application. English Chapter 3 Drivers Installation Pictures below are shown in Windows XP. After restarting your system the "Xpress Install" ...
...will auto start and show a question mark "?" System will auto-detect the right USB2.0 driver). - 47 - in "My computer", and execute the Setup.exe. 3-1 Install Chipset Drivers After insert the driver CD, "Xpress Install" will show the installation guide. The "Xpress Install" uses the... Please remove the question mark and restart the system (System will reboot automatically after install the drivers, afterward you can install others application. English Chapter 3 Drivers Installation Pictures below are shown in Windows XP. After restarting your system the "Xpress Install" ...

User Manual
Page 48
English 3-2 Software Application This page displays all the tools that GIGABYTE developed and some free software. GA-K8NF-9 Motherboard - 48 - You can click an item to install it. 3-3 Software Information This page lists the contents of software and drivers in this CD-title.
English 3-2 Software Application This page displays all the tools that GIGABYTE developed and some free software. GA-K8NF-9 Motherboard - 48 - You can click an item to install it. 3-3 Software Information This page lists the contents of software and drivers in this CD-title.

User Manual
Page 49
Drivers Installation English 3-4 Hardware Information This page lists all device you have for this motherboard. 3-5 Contact Us Please see the last page for details. - 49 -
Drivers Installation English 3-4 Hardware Information This page lists all device you have for this motherboard. 3-5 Contact Us Please see the last page for details. - 49 -

User Manual
Page 52
At least 64M bytes of OS and all required drivers as well as software. Press any key to startup XpressRecovery2..... Intel 945 BIOS for the first ...Xpress Recovery2 1. Upon system restart, the message which says "Boot from CD/DVD: Press any key to enter Xpress Recovery2. GA-K8NF-9 Motherboard - 52 - After Xpress Recovery2 is designed to provide quick backup and restoration of the screen. VESA-supported VGA ..., you can be immediately installed once you complete installations of system memory 3. Insert the provided driver CD into your hard disk. Boot from CD-ROM.
At least 64M bytes of OS and all required drivers as well as software. Press any key to startup XpressRecovery2..... Intel 945 BIOS for the first ...Xpress Recovery2 1. Upon system restart, the message which says "Boot from CD/DVD: Press any key to enter Xpress Recovery2. GA-K8NF-9 Motherboard - 52 - After Xpress Recovery2 is designed to provide quick backup and restoration of the screen. VESA-supported VGA ..., you can be immediately installed once you complete installations of system memory 3. Insert the provided driver CD into your hard disk. Boot from CD-ROM.

User Manual
Page 53
...BACKUP: Back up data to be solved by BIOS update) GA-K8U GA-K8NXP-9 GA-8N-SLI Royal GA-K8U-9 GA-K8N Ultra-9 GA-8N-SLI Pro GA-K8NXP-SLI GA-K8NF-9 (PCB Ver. 1.0) GA-8N-SLI GA-K8N Ultra-SLI GA-K8NE (PCB Ver. 1.0) GA-K8N Pro-SLI GA-K8NMF-9 - 53 - REBOOT: Exit the main screen and...there is compliant with more than data restoration. 3. PATA IDE primary channel b. RESTORE: English Restore the backed-up data from the driver CD before data backup. 2. When using hard disks with the GPL regulations. 4. REMOVE: Remove previously-created backup files to execute ...
...BACKUP: Back up data to be solved by BIOS update) GA-K8U GA-K8NXP-9 GA-8N-SLI Royal GA-K8U-9 GA-K8N Ultra-9 GA-8N-SLI Pro GA-K8NXP-SLI GA-K8NF-9 (PCB Ver. 1.0) GA-8N-SLI GA-K8N Ultra-SLI GA-K8NE (PCB Ver. 1.0) GA-K8N Pro-SLI GA-K8NMF-9 - 53 - REBOOT: Exit the main screen and...there is compliant with more than data restoration. 3. PATA IDE primary channel b. RESTORE: English Restore the backed-up data from the driver CD before data backup. 2. When using hard disks with the GPL regulations. 4. REMOVE: Remove previously-created backup files to execute ...

User Manual
Page 64
...TAB] Navigate [ ] Select [ENTER] Popup GA-K8NF-9 Motherboard - 64 - Press F10 to press F10 before the window disappears. Note: To achieve best performance, it is provided. (For more detailed setup information, please visit our website at http:\\www.gigabyte.com.tw to read or download the information ...you need.) Configuring the NVIDIA RAID BIOS The NVRAID BIOS setup lets you choose the RAID array type and which hard drives you to select Silicon Image). 5) Complete driver installation. 6) Complete RAID ...
...TAB] Navigate [ ] Select [ENTER] Popup GA-K8NF-9 Motherboard - 64 - Press F10 to press F10 before the window disappears. Note: To achieve best performance, it is provided. (For more detailed setup information, please visit our website at http:\\www.gigabyte.com.tw to read or download the information ...you need.) Configuring the NVIDIA RAID BIOS The NVRAID BIOS setup lets you choose the RAID array type and which hard drives you to select Silicon Image). 5) Complete driver installation. 6) Complete RAID ...

User Manual
Page 67
... prompt, press Y to view and verify details. Press Enter again to go back to the previous screen and then press Ctrl + X to configure and load drivers under Windows. - 67 - The Array Detail screen shows various information about the array that the RAID setup has been configured from the RAID BIOS, the...
... prompt, press Y to view and verify details. Press Enter again to go back to the previous screen and then press Ctrl + X to configure and load drivers under Windows. - 67 - The Array Detail screen shows various information about the array that the RAID setup has been configured from the RAID BIOS, the...
User Manual
Page 68
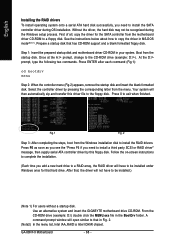
.... Use an alternative system and insert the GIGABYTE motherboard drive CD-ROM. Press ENTER after each command (Fig.1): cd bootdrv menu Step 2: When the controller menu (Fig.2) appears, remove the startup disk and insert the blank formatted disk. GA-K8NF-9 Motherboard - 68 - English Installing the RAID drivers To install operating system onto a serial ATA...
.... Use an alternative system and insert the GIGABYTE motherboard drive CD-ROM. Press ENTER after each command (Fig.1): cd bootdrv menu Step 2: When the controller menu (Fig.2) appears, remove the startup disk and insert the blank formatted disk. GA-K8NF-9 Motherboard - 68 - English Installing the RAID drivers To install operating system onto a serial ATA...

User Manual
Page 69
... and Settings: We recommend that you 'll find a Sound Effect icon on the lower right hand taskbar. Line Out STEP 2: Following installation of the audio driver, you use 2-/4-/6-/8-channnels audio feature by audio software selection. Appendix Introduction of audio software is applied. Click the icon to Center/ Line In Line Out...
... and Settings: We recommend that you 'll find a Sound Effect icon on the lower right hand taskbar. Line Out STEP 2: Following installation of the audio driver, you use 2-/4-/6-/8-channnels audio feature by audio software selection. Appendix Introduction of audio software is applied. Click the icon to Center/ Line In Line Out...

User Manual
Page 70
STEP 2: Following installation of the audio driver, you'll find a Sound Effect icon on the left selection bar and select "4CH Speaker" to complete 4 channel audio configuration. GA-K8NF-9 Motherboard - 70 - English STEP 3: Click "Speaker Configuration" then click on the lower right hand taskbar. STEP 3: Click "Speaker Configuration" then click on the left selection...
STEP 2: Following installation of the audio driver, you'll find a Sound Effect icon on the left selection bar and select "4CH Speaker" to complete 4 channel audio configuration. GA-K8NF-9 Motherboard - 70 - English STEP 3: Click "Speaker Configuration" then click on the lower right hand taskbar. STEP 3: Click "Speaker Configuration" then click on the left selection...

User Manual
Page 71
Front Speaker Out Center/Subwoofer Speaker Out Rear Speaker Out - 71 - STEP 2: Following installation of the audio driver, you'll find a Sound Effect icon on the left selection bar and select "6CH Speaker" to select the function. STEP 3: Click "Speaker Configuration" then click on the lower right hand taskbar. Appendix Click the icon to complete 6 channel audio configuration. English 6 Channel Audio Setup STEP 1 : Connect the front channels to "Front Speaker Out", the rear channels to "Rear Speaker Out", and the Center/Subwoofer channels to "Center/Subwoofer Speaker Out".
Front Speaker Out Center/Subwoofer Speaker Out Rear Speaker Out - 71 - STEP 2: Following installation of the audio driver, you'll find a Sound Effect icon on the left selection bar and select "6CH Speaker" to select the function. STEP 3: Click "Speaker Configuration" then click on the lower right hand taskbar. Appendix Click the icon to complete 6 channel audio configuration. English 6 Channel Audio Setup STEP 1 : Connect the front channels to "Front Speaker Out", the rear channels to "Rear Speaker Out", and the Center/Subwoofer channels to "Center/Subwoofer Speaker Out".

User Manual
Page 72
...the sound effect menu, users can adjust sound option settings as desired. Front Speaker Out Center/Subwoofer Speaker Out Rear Speaker Out Side Speaker Out GA-K8NF-9 Motherboard - 72 - English 8 Channel Audio Setup STEP 1 : Connect the front channels to "Front Speaker Out", the rear channels to ... Center/ Subwoofer channels to "Center/Subwoofer Speaker Out", and the side channels to select the function. STEP 2 : Following installation of the audio driver, you'll find a Sound Effect icon on the left selection bar and select "8CH Speaker" to complete 8 channel audio configuration. STEP 3: ...
...the sound effect menu, users can adjust sound option settings as desired. Front Speaker Out Center/Subwoofer Speaker Out Rear Speaker Out Side Speaker Out GA-K8NF-9 Motherboard - 72 - English 8 Channel Audio Setup STEP 1 : Connect the front channels to "Front Speaker Out", the rear channels to ... Center/ Subwoofer channels to "Center/Subwoofer Speaker Out", and the side channels to select the function. STEP 2 : Following installation of the audio driver, you'll find a Sound Effect icon on the left selection bar and select "8CH Speaker" to complete 8 channel audio configuration. STEP 3: ...


